How to Install and Manage Apache web server on Ubuntu 24.04/22.04
Apache is free and open-source web server software for hosting websites. It is one of the most popular web server software on the internet. In this tutorial, we’ll walk you through the step-by-step installing, configuring, and managing Apache on the Ubuntu 24.04 server.
For FreeBSD users, check out our guide Apache: A Guide to Install and Configure on FreeBSD 14.
Prerequisites
To complete this tutorial, you must have the following:
- A Linux server running Ubuntu 24.04 Server.
See more: How to install Ubuntu 24.04 server (step-by-step) - A non-root user with sudo/root privileges.
- A domain name pointed to a server IP address. Or you can use a local domain for testing.
- A UFW is up and running.
See also: 17 practical guides to UFW (Uncomplicated Firewall)
Installing Apache on Ubuntu
Apache is a web server solution to host your websites. According to the w3tech.com report (as of October 2023), the Apache web server is used by 30.9% of websites on the internet.
Apache is available on most Linux distributions. On Ubuntu, Apache can be installed with ease via APT.
1. To start, run the following command to update the Ubuntu package index and retrieve the latest version of package information.
sudo apt update
2. Next, install Apache using the apt install command below.
sudo apt install apache2Input Y and press ENTER to proceed with the installation.
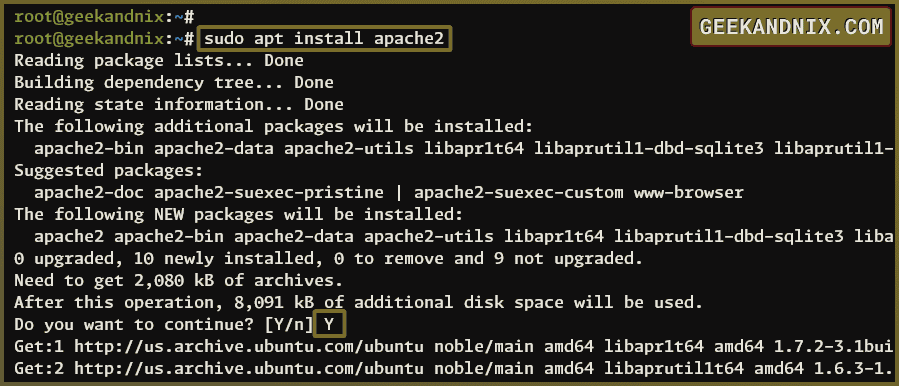
3. Once Apache is installed, it will start automatically and be enabled. Run the command below to ensure that Apache is running.
sudo systemctl is-enabled apache2
sudo systemctl status apache2
If Apache is running and enabled, the output you receive should be similar to:

Opening HTTP and HTTP Ports via UFW
By default, the Apache web server includes the UFW application profile that you can apply to your system. Here, you will enable the Apache application profile on UFW to open both HTTP and HTTPS ports.
1. Run the following command to list UFW application profiles.
sudo ufw app listYou should expect to see three different application profiles, such as Apache, Apache Full, and Apache Secure.
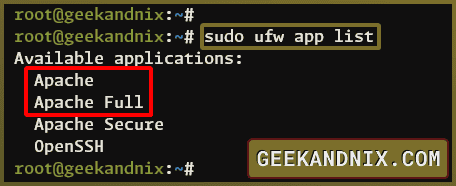
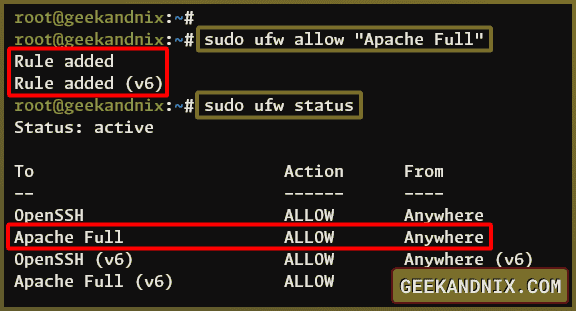
2. Enter this command to enable Apache Full profile. This will open HTTP and HTTPS ports on your system – Port 80 and 443.
sudo ufw allow "Apache Full"3. After that, run the command below to check enabled rules and application profiles on UFW.
sudo ufw statusYou should expect to see the Apache Full profile on the UFW-enabled rules.
4. Lastly, open your preferred web browser and navigate to your server IP address (e.g. http://192.168.5.65/). If everything goes well, you should see the default index.html page of the Apache web server.
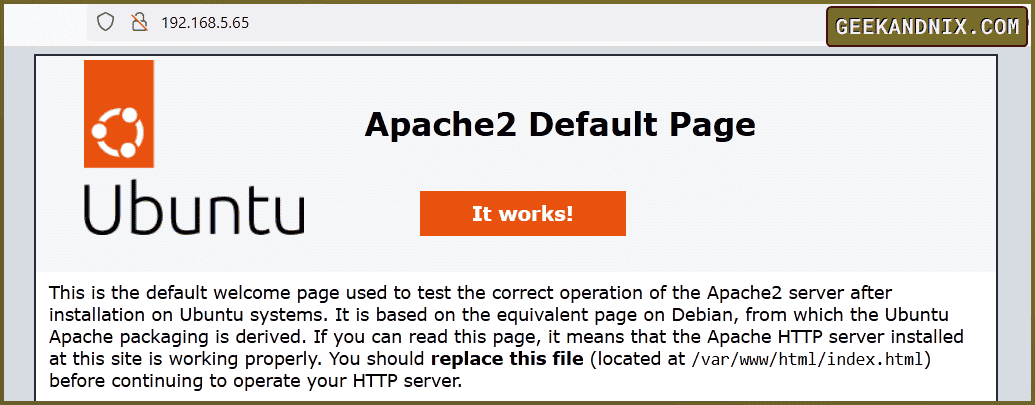
Pro tip: If you don’t know your server IP address, run the ip a command to find your Apache server IP address.
Managing Apache Service on Ubuntu
Before diving deeper into Apache configuration, it’s essential to know how to manage Apache service. This includes how to start, stop, restart, enable, and check the status of Apache service.
1. To start Apache, run the systemctl start command below.
sudo systemctl start apache22. If you want to restart Apache, enter the following command.
sudo systemctl restart apache23. Then, to ensure Apache is running, input this command. If running, the output should be active (running), and if stopped, the output should be inactive (dead).
sudo systemctl status apache24. In case you’d like to stop Apache, run the systemctl stop command below.
sudo systemctl stop apache25. Now, to enable Apache on system startup, enter the command below. This will create a symlink of the Apache service file and reload the system manager to apply immediate changes.
sudo systemctl enable apache26. Lastly, to ensure if Apache is enabled or not, run the following command. If enabled, the output should be enabled, and if disabled, you should see the output disabled.
sudo systemctl is-enabled apache2Exploring Apache Configuration Files and Directories
Another key factor before configuring Apache is to understand Apache configuration files and directories.
On Ubuntu, the default Apache configuration files are stored in the /etc/apache2 directory. Within that directory, you will find many configuration files and directories. Below are some important files and directories you should be familiar with:
Main Apache Configuration
- apache2.conf: The main Apache configuration file.
- ports.conf: This file determines the Apache port. By default, Apache will be running on port 80 for HTTP and port 443 for HTTPS.
Apache Global Configuration Directory
- conf-available: The global Apache configurations and snippets are stored in this directory. If you want to add a custom global Apache configuration, you can create a new .conf file in this directory.
- conf-enabled: To apply Apache global configurations and snippets, you must create a symlink of the file from the
conf-availabledirectory to theconf-enableddirectory. You can easily manage Apache global configurations witha2encofanda2disconfutilities.
Modules Directory
- mods-available: The default Apache module configurations and files are stored in this directory.
- mods-enabled: When Apache modules are enabled, the symlink file of Apache modules will be created in the
mods-enableddirectory. Use thea2enmodanda2dismodto manage Apache modules.
Virtual Host Directory
- sites-available: This directory is used to store Apache virtual host configurations.
- sites-enabled: When activating the virtual host via the
a2ensiteutility, the symlink file of the target virtual host will be created in this directory.
Log Files and Document Root
- /var/log/apache2: This directory is used to store Apache log files. The log files
access.loganderror.logare used by the default virtual host. For any virtual host without access and error logs defined, the logs will be stored in the fileother_vhosts_access.logandother_vhosts_error.log. - /var/www/html: The default web root or document root directory for Apache. The index.html file of Apache is stored in this directory.
At this point, you must have a solid understanding of Apache configuration files and directories and how to manage Apache service. With that, you’re ready to set up virtual hosts.
Setting up Apache Virtual Hosts on Ubuntu
If you ever wonder how to host multiple websites or domain names with Apache on a single server, the answer is virtual hosts. This section covers how to set up an Apache virtual host on Ubuntu.
Before configuring a virtual host, you must establish the following requirements:
- Domain Name: The domain name of your virtual host.
- Document root directory: Your application source code must be stored in the document root directory.
- Log files: Enable both access and error logs to later troubleshoot when errors occur.
In this scenario, you will create an Apache virtual host with the following configuration:
- Domain:
mydomain.devel. - Document Root directory:
/var/www/mydomain. - Log files: The access log will be stored in
mydomain-access.log, and the error log ismydomain-error.log.
Now let’s get started.
1. First, run the following command to create a new document root directory /var/www/mydomain and create a custom index.html file using vim.
sudo mkdir -p /var/www/mydomain
vim /var/www/mydomain/index.html
Insert the following HTML script as your default index.html file.
<!doctype html>

<html lang="en">

<head>
  <meta charset="utf-8">
  <title>Welcome to Apache2 Virtual Host</title>
</head>

<body>
  <h2>Hello from mydomain.devel - Powered by Apache2</h2>
</body>

</html>
Save the file and exit the editor.
2. Secondly, change the ownership of the document root directory /var/www/mydomain to the user and group www-data. Doing this allows Apache to access and read your applications.
sudo chown -R www-data:www-data /var/www/mydomain3. Next, create a new virtual host configuration mydomain.conf within the directory /etc/apache2/sites-available/ using vim.
sudo vim /etc/apache2/sites-available/mydomain.confInsert the following virtual host configuration.
<VirtualHost *:80>

        ServerName mydomain.devel
        ServerAdmin [email protected]

        DocumentRoot /var/www/mydomain

        #LogLevel info ssl:warn
        ErrorLog ${APACHE_LOG_DIR}/mydomain-error.log
        CustomLog ${APACHE_LOG_DIR}/mydomain-access.log combined

</VirtualHost>
Save the changes and close the editor.
4. After that, enter the following command to activate the virtual host mydomain.conf. This will create a symlink of the file mydomain.conf to the directory /etc/apache2/sites-enabled/.
sudo a2ensite mydomain.conf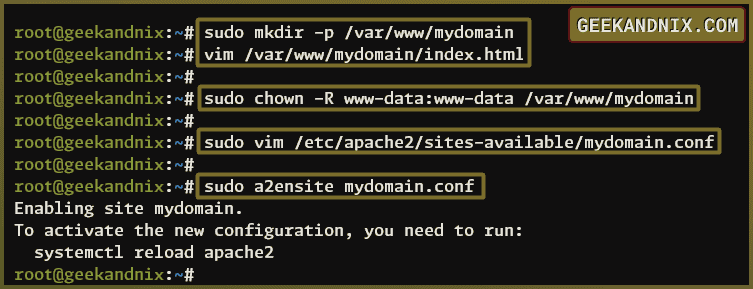
5. Next, run the command below to verify Apache configuration, if successful, you should expect an output Syntax OK. Then, restart the Apache service to apply the changes.
sudo apachectl configtest
sudo systemctl restart apache2
6. Lastly, launch your web browser and visit the domain name of your virtual host (e.g. http://mydomain.devel/). If everything goes smoothly, you will be shown the custom index.html page like this:

Pro tip: If you’re using a fake domain name, you can modify the hosts file on your local machine. For Linux users, edit the file /etc/hosts, and for Windows users, edit the file C:\Windows\System32\drivers\etc\hosts. Define your server IP address and domain name like “192.168.5.65 mydomain.devel“.
6 Essential Utilities for Managing Apache
By default, Apache comes with some utilities that simplify web server management. Below are 6 most important Apache utilities to add to your arsenal:
Managing Global Configurations and Snippets
Use the following commands for managing Apache global configuration within the /etc/apache2/conf-available directory.
a2enconf: This is used to enable Apache global configurations and snippets on theconf-availabledirectory.a2disconf: To disable custom global configurations for Apache, you can use this command. This will remove the symlink of custom configuration from theconf-enableddirectory.
Examples:
# enable configuration filename.conf
a2enconf filename.conf

# disable configuration filename.conf
a2disconf filename.conf
Managing Apache Virtual Hosts on Ubuntu
On Ubuntu system, you can manage Apache virtual host by using the following commands:
a2ensite: This command is used to enable Apache virtual host configuration on thesites-availabledirectory.a2dissite: This can be used to disable or deactivate a virtual host. Thea2dissitecommand works by removing the symlink of the virtual host file from thesites-enableddirectory.
Example:
# enable virtual host vhost.conf
a2ensite vhost.conf

# disable virtual host vhost.conf
a2dissite vhost.conf
Managing Apache Modules on Ubuntu
Furthermore, use the following command to enable or disable Apache modules.
a2enmod: This command is used to enable Apache modules.a2dismod: This is used to disable Apache modules by removing the symlink file from themods-enableddirectory.
Example:
# enable Apache module
a2enmod module_name

# disable Apache module
a2dismod module_name
Apache Control Manager Interface
Another essential utility that you should know is apachectl or Apache control manager interface. Below are some helpful apachectl parameters that make web server management easy:
1. Run the apachectl command below to check the Apache version:
# checking basic Apache version
sudo apachectl -v

# checking detailed Apache version
sudo apachectl -V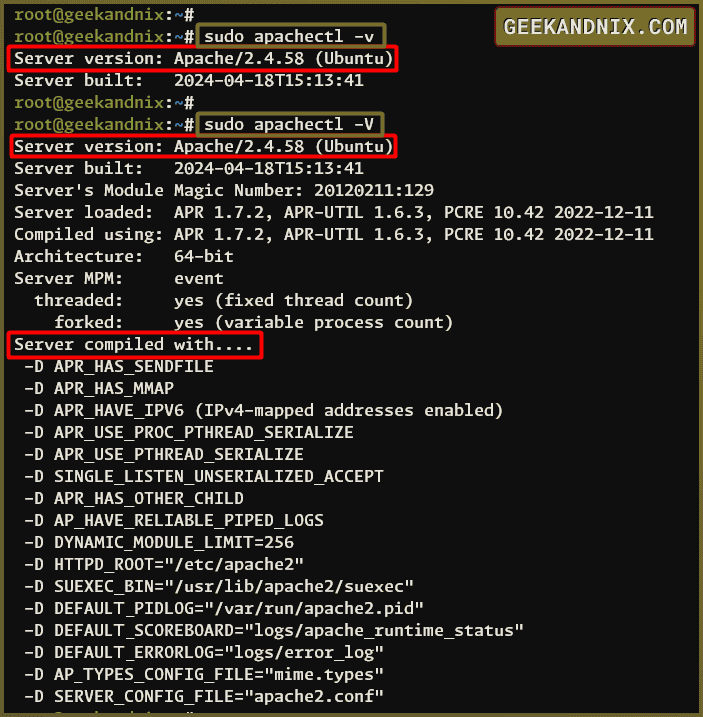
2. Run the syntax check for Apache configuration files. The expected output should be Syntax OK or an error message when you have the wrong syntax.
sudo apachectl -t
3. Checking the list of enabled Apache virtual hosts. This will show you the port number and domain names of your virtual hosts.
sudo apachectl -S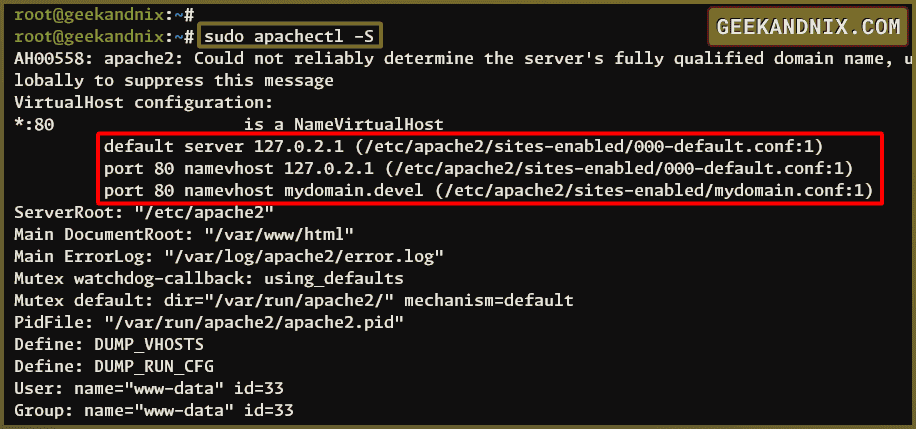
4. Lastly, you can also verify the list-enabled modules on Apache using the command below.
sudo apachectl -M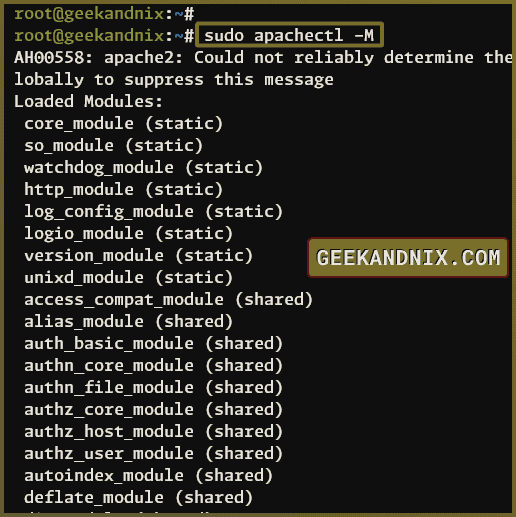
Debugging Apache Web Server
When configuring Apache or adding a virtual host, you may get some errors in your journey. So, knowing how to debug the Apache web server is a critical aspect that you must understand.
1. Always run the following command whenever you make changes to Apache configuration files to ensure that you have proper syntax.
sudo apachectl configtest2. If you can’t access Apache from outside the network, run the following command to ensure that the Apache is running.
sudo systemctl status apache23. And if Apache is running, but you still can’t access your web server, check the firewall status.
sudo ufw status4. Lastly, if your websites get an error such as 503 Forbidden and 500 Internal Server Error, go check the log files of your Apache virtual host using the tail command like this:
sudo tail -f /var/log/apache2/{access,error}.logUninstalling Apache2 on Ubuntu
1. If you decide to Uninstall Apache from your Ubuntu server, run the following apt command.
sudo apt remove apache2 -y && sudo apt autoremove -y2. In addition, you can also remove the Apache configuration directory /etc/apache2 using the command below.
sudo rm -rf /etc/apache2Conclusion
Mission accomplished! You’ve followed all the steps and installed the Apache web server on the Ubuntu 24.04 system. Furthermore, you also have a solid understanding of how to manage Apache service, understanding of Apache configuration files and directories, and also learned six essential Apache utilities for ease of web server management.
You’re now ready to host more websites on your server. Moreover, take a look at some guides for integrating Apache with PHP or PHP-FPM, MySQL/MariaDB database server, and also implement basic security with fail2ban. These are great resources for hosting PHP web applications such as WordPress.


