How to Install VNC on Ubuntu 22.04 (GNOME and TigerVNC)
If you’re looking for a flexible and easy to setup Remote Desktop that can be used across operating systems like Mac, Windows, and Linux, including Ubuntu, VNC is your choice. The VNC or Virtual Network Computing allows desktop-sharing over RFB (Remote Frame Buffer) protocol.
For FreeBSD users, check the latest tutorial on How to Install VNC Server on FreeBSD 14.
In this tutorial, we’ll show you how to install the VNC Server with TigerVNC and Gnome Desktop on the Ubuntu 22.04 server step-by-step, so you can create your remote desktops.
Prerequisites
You will need the following to proceed:
- An Ubuntu 22.04 server.
See also: 15 Steps to Install Ubuntu Server 22.04 LTS - A non-root user with sudo privileges.
- A client machine – In this case, we’ll use Linux as the client machine.
Installing TigerVNC and GNOME Desktop on Ubuntu
In this guide, you will install TigerVNC Server to create your VNC Server. As for the Desktop Environments (DE), you will be using GNOME, which can be automatically installed via tasksel.
1. First, update and refresh the Ubuntu repository and install the tasksel package using the command below. The tasksel package is a utility for installing basic system packages, including Desktop Environments, such as GNOME, KDE, and XFCE.
sudo apt update
sudo apt install tasksel -y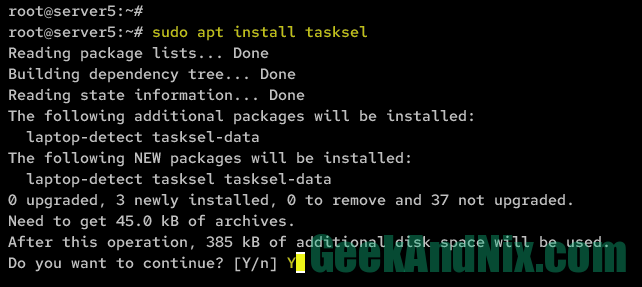
2. Run the tasksel command to start the installation of the Desktop Environment.
sudo taskselSelect GNOME to install it, then OK to confirm.
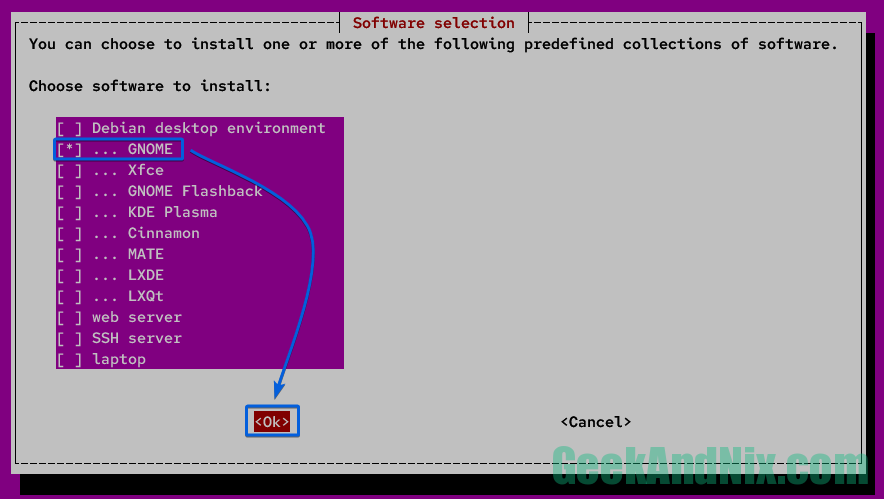
The Gnome Desktop installation should begin.
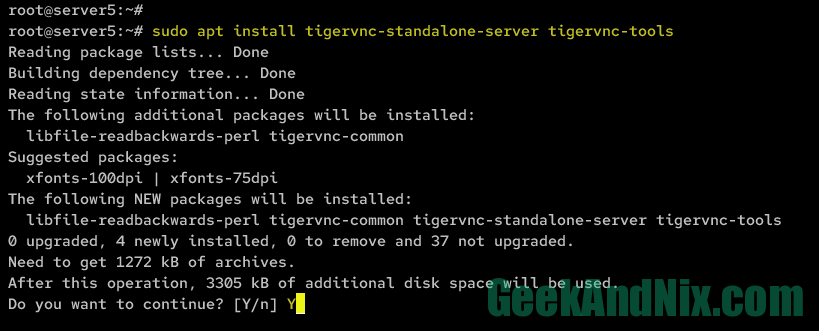
3. Next, run the following command to install the TigerVNC Server packages and some additional tools for font rendering.
sudo apt install tigervnc-standalone-server tigervnc-tools xfonts-100dpi xfonts-75dpiType y to confirm and proceed with the installation.
Configuring TigerVNC on Ubuntu Server
The VNC server allows you to create multiple remote desktops and for each users that available on your server. In this section, you will configure your VNC Server with TigerVNC and set up Gnome as the default Desktop Environment.
1. Log in to your user by executing the following command.
su - username2. Once logged in, execute the vncserver command below to configure your VNC Server installation.
vncserverDuring the process, you will be asked with the following:
- Type the new password for the VNC Server and repeat.
- Type n to disable the view-only password for your VNC Server.
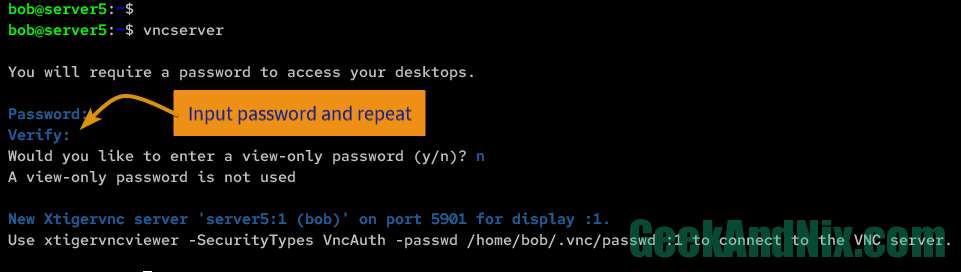
Also, the VNC Server should be running with the default desktop number :1, such as hostname:1.
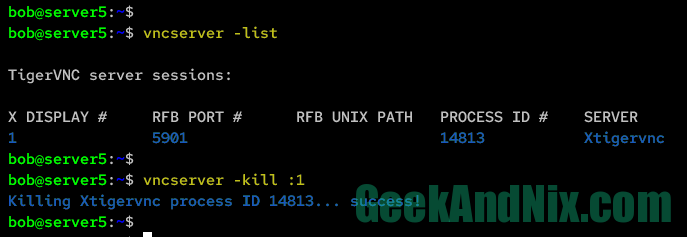
3. Check the list of remote desktops that running on your system. Then, terminate the remote desktop using the vncserver -kill command. You must terminate the remote desktop before configuring the Desktop Environment.
vncserver -list
vncserver -kill :1
In this case, the remote desktop number :1 is terminated.
4. Next, use the vim command below to open the default VNC Server configuration ~/.vnc/config.
vim ~/.vnc/configInsert the following configuration into the file.
# define the default screen size
geometry=1280x720

# set up the default desktop environment
# check the /usr/share/xsessions to get the list of
# Desktop Environments
session=ubuntu

# run this remote desktop on localhost only
localhost

# allow one desktop to be used by two people
# at the same time
alwaysshared
When finished, save and exit the file.
5. Now type exit to log out from your user and back to the root user.
6. After that, open the TigerVNC Server configuration /etc/tigervnc/vncserver.users using vim. Be sure to input your password when prompted.
sudo vim /etc/tigervnc/vncserver.usersAdd your remote desktop number and user. In this case, the remote desktop :1 will be used for user bob.
:1=bobSave and exit the file when you’re done.
7. Next, run the following systemctl command to start and enable the VNC Server display :1. If you’ve multiple VNC Server displays, then the number goes onwards :2, :3, etc.
sudo systemctl start tigervncserver@:1.service
sudo systemctl enable tigervncserver@:1.service
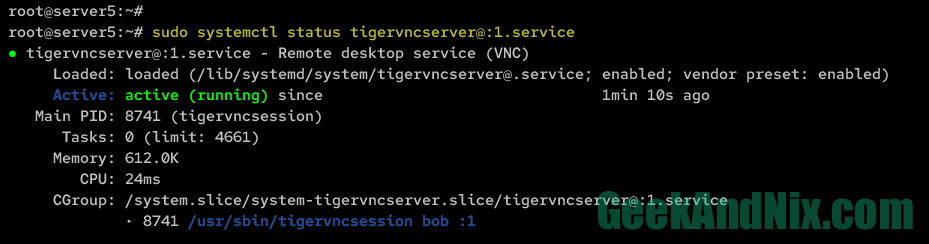
8. Lastly, execute the command below to ensure the VNC Server for display :1 is running.
sudo systemctl status tigervncserver@:1.serviceThe output should display the VNC Server display :1 is running with Gnome Desktop Environment.
Installing VNC Viewer to Your Client Machine
To access VNC Server, you must install the VNC client software on your local computer. There are multiple VNC Client software that you can use, select, and install the best VNC client for your client machine.
- TigerVNC Client: Available for Linux.
- RealVNC Viewer: Available for Linux, Windows, and macOS.
- Remmina: Available on Linux.
- UltraVNC: Available for Windows, macOS, and Linux.
Securing VNC Server Connection with SSH Tunneling
At this point, you’ve finished the VNC Server installation on your Ubuntu server and installed the VNC Viewer/Client on your local machine. Now you’ll learn how to access VNC Server securely via SSH tunneling.
1. First, open the terminal on your Linux client machine and create the SSH tunneling using the command below. Ensure to change the following server IP address and username, and input your password when asked.
ssh -L 59001:localhost:5901 -C -N -l bob 192.168.5.65
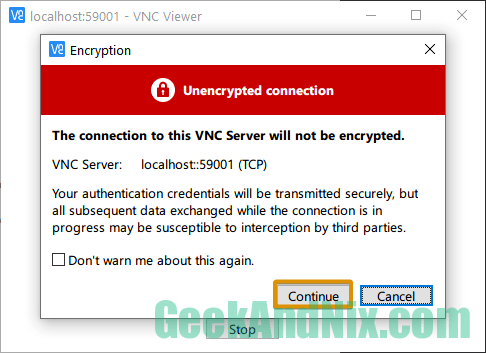
2. Open the VNC Client software and connect the VNC Server via localhost on port 59001. The following example uses realvnc viewer.

Click Continue to confirm when asked about the insecure connection. Your connection to the VNC Server is secured via SSH tunneling.
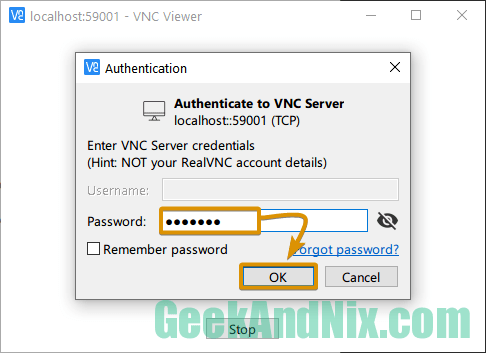
3. Input your VNC Server password when asked.
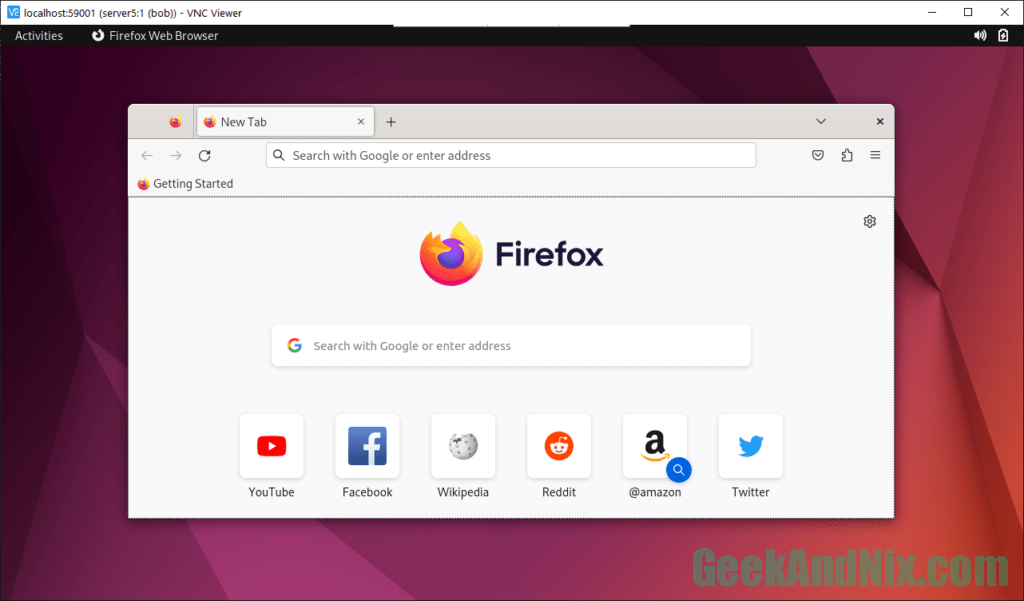
4. If everything goes well, you should see the Gnome Desktop screen like this:

Running Multiple VNC Desktops on a Single Ubuntu Server
To run multiple VNC Servers on a single server, repeat the step on Configuring VNC Server, adjust the display number for a new user, and then start the TigerVNC Server for that user.
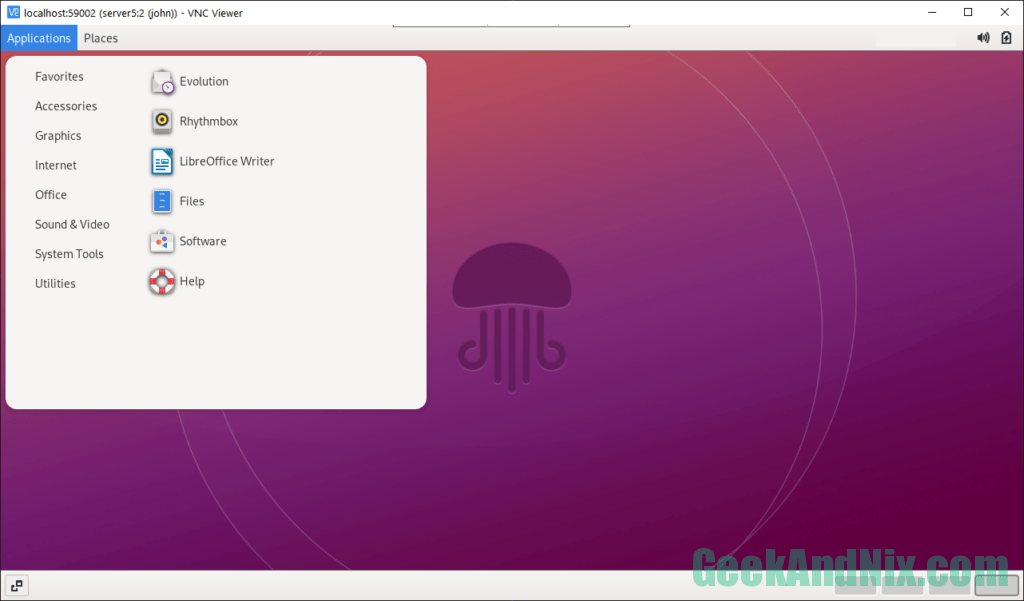
1. First, log in to your user and complete the step Configuring TigerVNC on Ubuntu Server. In this case, we’ll create second VNC desktop for user john.
su - username22. Once the you’ve finished VNC Server initialization, open the file /etc/tigervnc/vncserver.users using your preferred editor and insert your new user into it. In this example, we’ll allocate the desktop number :2 for user john.
:2=john3. Now start and enable the TIgerVNC Server for the display :2 using the following command. Now the VNC Server display :2 will be running on the same machine but with a different port.
sudo systemctl start tigervncserver@:2.service
sudo systemctl enable tigervncserver@:2.service
4. Then, verify the TigerVNC Server for display :2 to ensure it is running.
sudo systemctl status tigervncserver@:2.service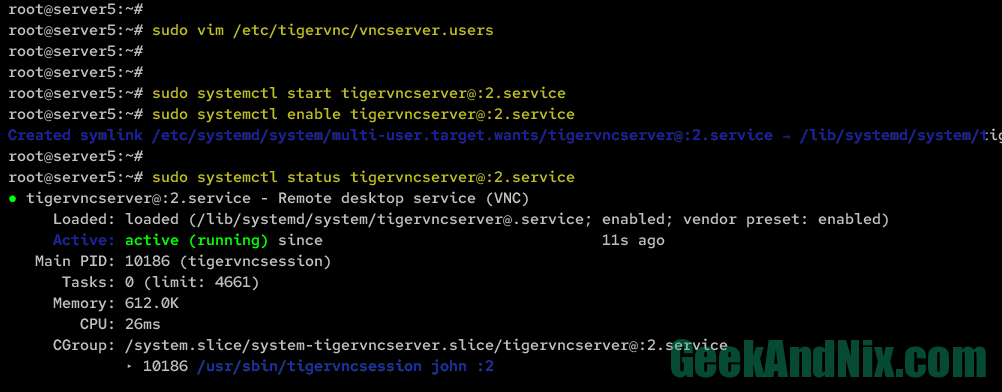
5. Next, check the open port on your system using the ss command below. The VNC Server display number :2 is running on port 5902, while the display :1 is running on port 5901.
ss -tulpn | grep vnc
6. Now, if you want to connect to the VNC Server display :2 via SSH tunneling, create the SSH tunneling with the command like this:
ssh -L 59002:localhost:5902 -C -N -l john 192.168.5.657. Lastly, open the VNC client application and connect to your second VNC desktop securely with SSH tunneling to localhost:5902.
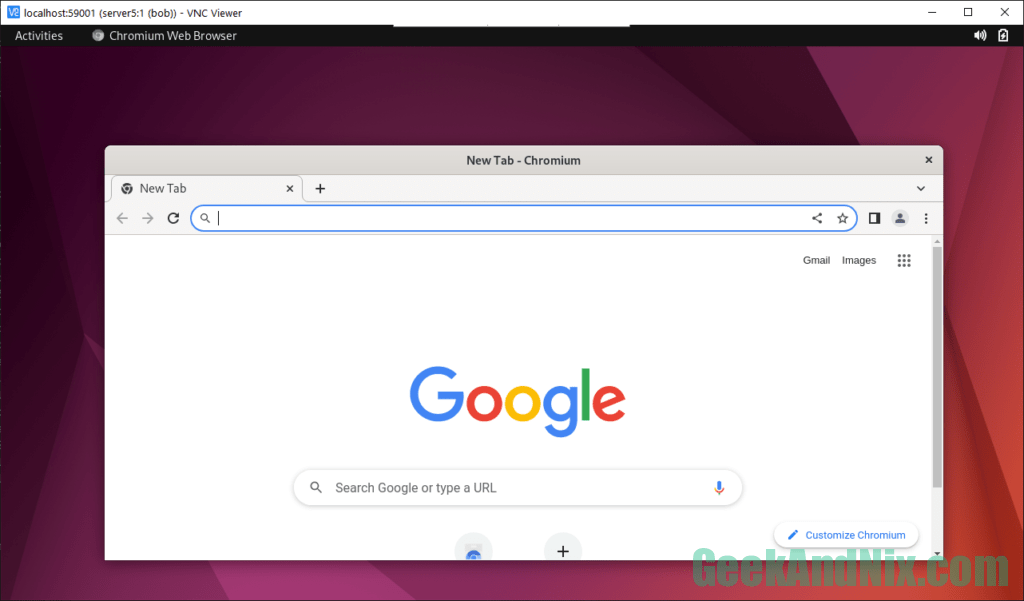
Installing Desktop applications to the VNC Server Environment
If you want to install applications such as Firefox and Chromium on an Ubuntu server via VNC, and you get an error message like the following:
“/user.slice/user-1000.slice/session-5.scope is not a snap cgroup”
This error we get after installing Firefox, and according to the Bugzilla Mozilla Firefox, it is caused by Snap.
To resolve this, you need to remove Snap completely from the Ubuntu server. Then, install Firefox and Chromium from the PPA repository, and be sure to disable Firefox or Chromium packages from the Ubuntu repository by adding the priority to -1.
Conclusion
By following this step-by-step tutorial, you’ve accomplished the installation of the VNC Server with TigerVNC and Gnome Desktop on the Ubuntu system. You’ve also installed VNC Client software, learned how to connect to VNC Server via SSH Tunneling, and how to run multiple VNC Server on a single Ubuntu machine.
From now on, enjoy your free remote desktop VNC Server to increase your productivity. Furthermore, you can install an application to your VNC Server or implement secure connection via VPN.
System administrator and devops enthusiast, leveraging over 10+ years of Linux expertise to optimize operations. Proficient in FreeBSD, VMWare, KVM, Proxmox, PfSense, Ansible, Docker, and Kubernetes.


