How to Install VNC Server on FreeBSD 14 (TigerVNC and XFCE)
In this guide, I will show you how to install a VNC server on FreeBSD 14 using TigerVNC Server and XFCE Desktop, step-by-step.
The TigerVNC Server offers free remote desktop solutions on FreeBSD. Combined with XFCE as the default Desktop Environment, allows you to create a lightweight and user-friendly remote desktop that you can access from anywhere.
Without further delay, let’s begin.
Prerequisites
Before you begin, confirm that you have the following:
- A FreeBSD 14 server.
Read more: FreeBSD 14: Step-by-Step Installation (With Screenshot) - A root user or non-root user with sudo privileges.
Step 1 – Install Xorg and XFCE Desktop on FreeBSD
Before installing the VNC server, you must decide which Desktop Environment or DE that will be used for your VNC server installation. In this example, I will be using XFCE as the default DE for the VNC server.
To install XFCE on FreeBSD, execute the following steps:
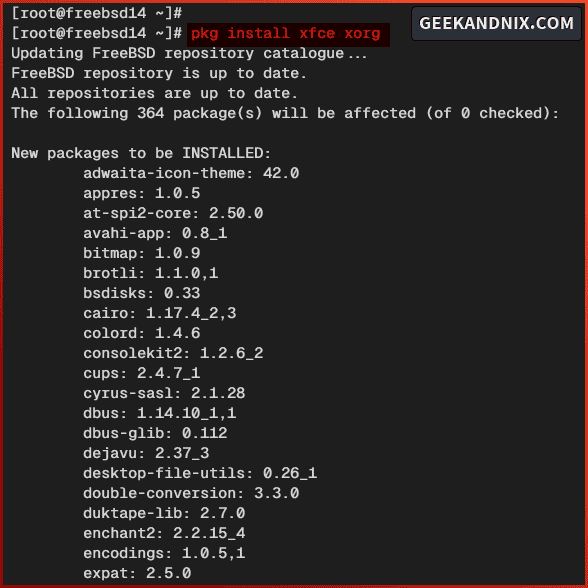
1. First, run the command below to update your FreeBSD repository and install the main desktop packages xorg and xfce packages.
# update package index
pkg update

# installing xorg and xfce
pkg install xorg xfce
To confirm, type y and press ENTER.
2. After installation is complete, run vim to open the /etc/fstab file.
vim /etc/fstabAdd the following setting to the bottom of the line.
# Device                Mountpoint      FStype  Options         Dump    Pass#
proc                    /proc           procfs  rw              0       0
Save and close the file when you’re done.
3. Now run the command below to enable dbus on your FreeBSD server.
sysrc dbus_enable="YES"
sysrc -a | grep dbus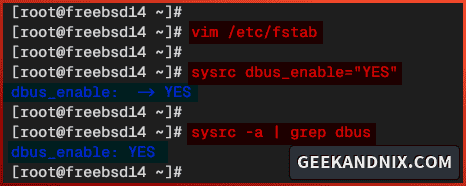
Step 2 – Installing TigerVNC Server on FreeBSD
Now that you have installed XFCE, let’s move on to the VNC server installation via TigerVNC Server.
In this section, you will set up a VNC server via TigerVNC and XFCE with these three steps:
- Installing TigerVNC Server packages.
- Initializing VNC Server configuration.
- Setting up XFCE as the default DE for the VNC server.
Let’s get started.
Installing TigerVNC Server
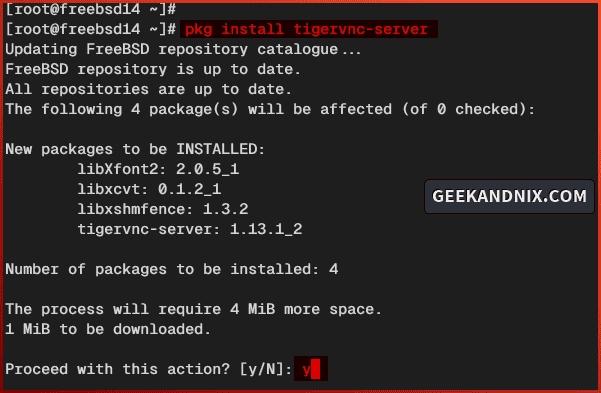
First things first, run the pkg command below to install tigervnc-server on FreeBSD.
pkg install tigervnc-serverInput y to confirm with the installation.
Initialize VNC Server Configuration
After you’ve installed tigervnc-server, let’s initialize the VNC server configuration with these steps:
1. Log in to your user with the following command.
su - david2. Initialize the VNC server configuration by executing the vncserver command below.
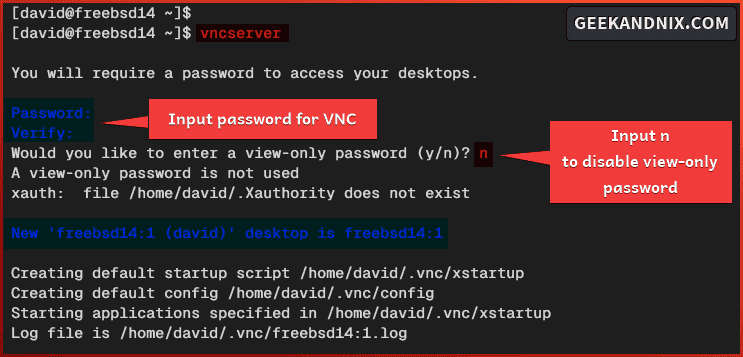
vncserverAs you proceed, you will be prompted with the VNC server configuration below:
- Input your VNC server password and repeat.
- Type
nto disable the view-only password.
Once finished, you will see the VNC server is running on hostname:1, which means VNC is running on the display :1. Also, the VNC server configuration directory ~/.vnc is generated.
3. Now run the command below to verify the list running the VNC server and terminate the display 1. This action is needed to set up your VNC server installation.
vncserver -list
vncserver -kill :1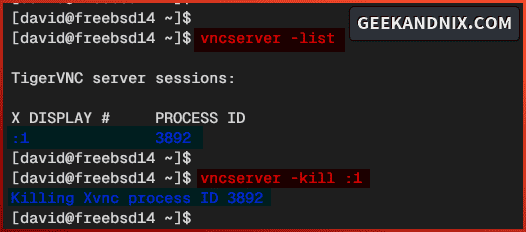
Configuring TigerVNC Server
After initializing the VNC server configuration, follow these actions to configure the VNC server and set up the default desktop.
1. First, run vim to open the VNC server config file ~/.vnc/config.
vim ~/.vnc/configChange the default configuration with the following:
# Setup authentication method
securitytypes=vncauth,tlsvnc

# define the default screen size
# adjust this with your current screen size
geometry=1280x800

# allow one desktop to be used by two people
# at the same time
alwaysshared
When finished, save the file and exit the editor.
2. Now create a new file ~/.vnc/xstartup using the vim editor.
vim ~/.vnc/xstartupAdd the following script to make XFCE the default desktop for your VNC server.
#!/bin/bash
xrdb $HOME/.Xresources
startxfce4 &
Save the file and exit the editor.
3. Lastly, run the chmod command below to make the ~/.vnc/xstartup file executable.
chmod +x ~/.vnc/xstartupStep 3 – Adding Init Service for TigerVNC Server on FreeBSD
So far, you have configured TigerVNC with Desktop Environment XFCE. Moving on, you will create a new service file for running the VNC server via TigerVNC.
Complete these actions to set up the init service file for the VNC server:
1. Create a new init service file /usr/local/etc/rc.d/vncserver using vim.
vim /usr/local/etc/rc.d/vncserverCopy and paste the following vncserver init script to your file.
#!/bin/sh

# Download this file
# cd /usr/local/etc/rc.d && fetch --no-verify-peer https://gist.githubusercontent.com/PieterScheffers/1ecd70a1bfe640afb98f3cac9630814b/raw/326033ce1c243fd7ecd018684e748234668cf9ff/vncserver
#
# Make the file executable with:
# /usr/local/etc/rc.d/vncserver (chmod +x)
#
# add to /etc/rc.conf
#
# vncserver_enable="YES"
# vncserver_user="vncserver"
# vncserver_display="1"


# PROVIDE: vncserver
# REQUIRE: NETWORKING SERVERS DAEMON ldconfig resolv
#

. /etc/rc.subr

name=vncserver
rcvar=vncserver_enable

VNCSERVER=/usr/local/bin/vncserver

load_rc_config $name

start_cmd="vncserver_start"
stop_cmd="vncserver_stop"
restart_cmd="vncserver_restart"

: ${vncserver_user="vncserver"}
: ${vncserver_enable="NO"}
: ${vncserver_display="1"}
: ${vncserver_depth="24"}
: ${vncserver_geometry="1280x800"}
#: ${vncserver_localhost="no"}
: ${vncserver_localhost="yes"}

vncserver_start()
{
        CMD="$VNCSERVER :${vncserver_display} -depth ${vncserver_depth} -geometry ${vncserver_geometry} -localhost ${vncserver_localhost}"
        su -l ${vncserver_user} -c "${CMD}"
}

vncserver_stop()
{
        CMD="$VNCSERVER -kill :${vncserver_display}"
        su -l ${vncserver_user} -c "${CMD}"
}

vncserver_restart()
{
        host=$(hostname -s)
        [ -f "/home/${vncserver_user}/.vnc/${host}:${vncserver_display}.pid" ] && run_rc_command stop
        run_rc_command start
}

run_rc_command "$1"
Save and exit the file when you’re done.
2. Now run the chmod command below to make the init script /usr/local/etc/rc.d/vncserver executable.
chmod +x /usr/local/etc/rc.d/vncserver3. Next, run the following command to enable the vncserver service.
sysrc vncserver_enable="YES"4. Then set up the user and display number for the VNC server using the following. In this example, I’ve initialized and configured the VNC server for user david with the display 1.
# setup user for VNC server
sysrc vncserver_user="david"

# setup display number for VNC server
sysrc vncserver_display="1"
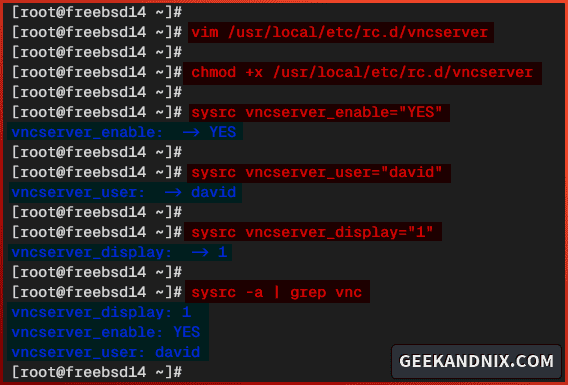
5. Lastly, verify the vncserver service using the command below.
sysrc -a | grep vncAs seen in the following, the vncserver service is enabled with the default user david that will be running on display 1.
Step 4 – Managing TigerVNC Server Service on FreeBSD
After you’ve created the vncserver service, you can proceed to manage the vncserver service on FreeBSD. This will start the TigerVNC process with XFCE as the default Desktop Environment.
Complete these actions to manage the vncserver service on FreeBSD:
1. To start the VNC server, run the command below.
service vncserver start
2. To verify your VNC server, run the sockstat command below.
sockstat -4 | grep vncIf the VNC server running, you will see the default VNC server port 5901 is used by the Xvnc program.

3. When you need to stop the VNC server, execute the command below.
service vncserver stop4. Lastly, run the command below whenever needed to restart the VNC server.
service vncserver restartStep 5 – Installing VNC Viewer
Having the VNC server running with XFCE as the default DE (Desktop Environment) on FreeBSD, you can now connect to your VNC server from a local client/computer. But, before that, ensure you have installed VNC viewer software on your local computer.
Below are some VNC viewer software that you can use:
- Remmina: available for most Linux distributions.
- TigerVNC Client: available for most Linux distributions.
- UltraVNC Viewer: available for Windows, MacOS, and Linux.
- RealVNC Viewer: supports Windows, MacOS, and Linux.
Step 6 – Securing VNC Access via SSH Tunneling
With the VNC viewer installed on your client machine, your next step is to connect to the VNC server via a secure SSH tunnel from your client machine. So be sure that OpenSSH is installed on your local machine.
Here’s how you can connect to the VNC server via SSH tunneling:
1. On your local computer, run the ssh command below to create secure SSH tunneling to the VNC server. Be sure the OpenSSH client is installed on your client machine.
ssh -L 59001:localhost:5901 -C -N -l david 192.168.5.80Input yes to add and accept the server fingerprint, then input your user password when prompted.

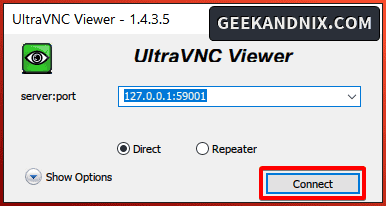
2. Now open your VNC Viewer software and connect to localhost:59001 or 127.0.0.1:59001. In this example, I use UltraVNC Viewer.
Click Connect to confirm.
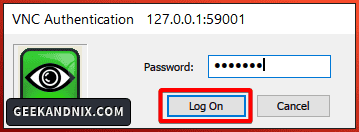
3. Input your VNC server password when asked, then click Log On.
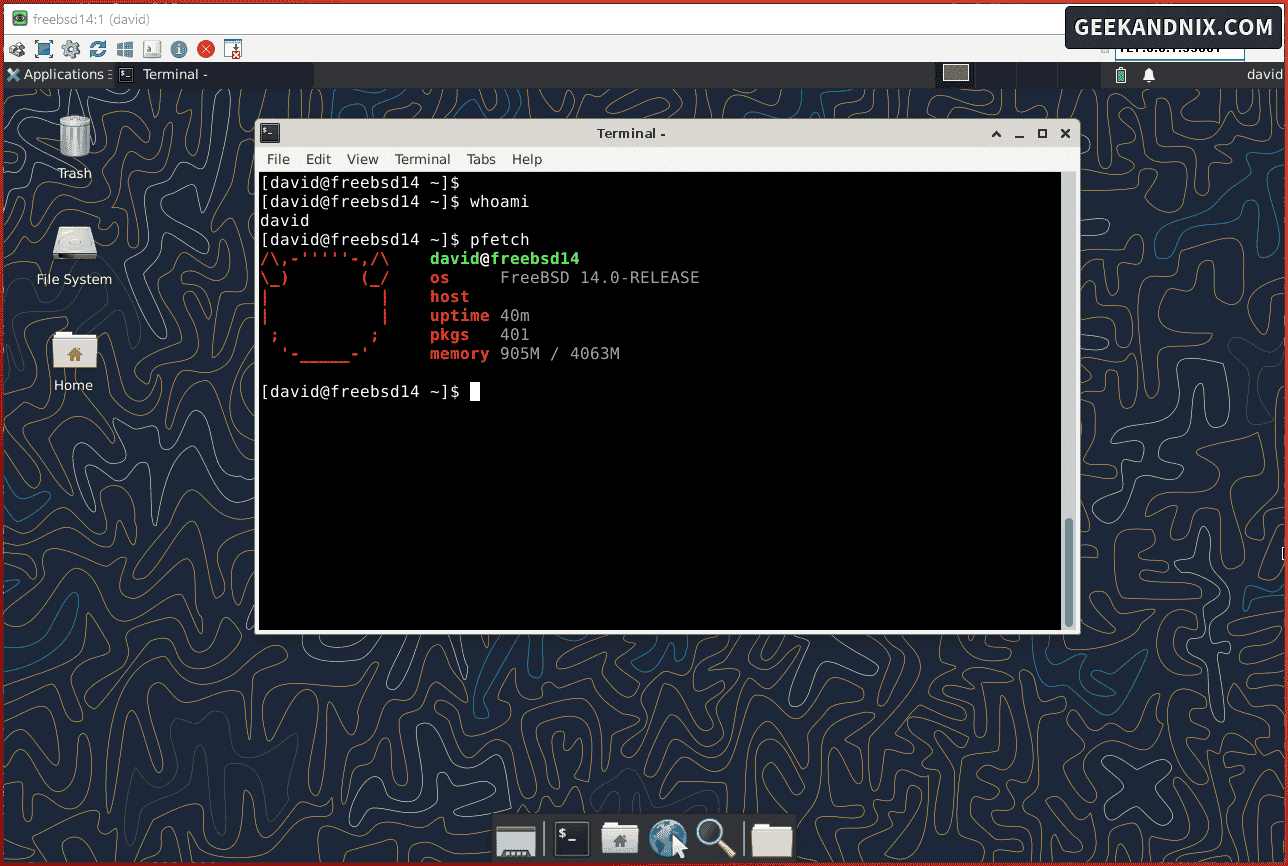
4. If authentication is successful, you should get the XFCE Desktop like the following:
In this example, I opened the Terminal application and executed the pfetch command to get general information about the operating system.
Step 7 – Running Multiple VNC Server on FreeBSD
Note: At this time, there is still no wrapper ro utility that automates the process to run multiple VNC servers on FreeBSD. But you can still achieve that manually.
If you decide to run multiple VNC servers on FreeBSD, you can run it manually. So here’s an example:
- First VNC server with display
1running for userdavidvia thevncserverservice. - The second VNC server displays
2for userjohnthat will be run manually via the command line.
From that example, the first VNC server is up and running. Now let’s take a look at how to run the second VNC server with the following steps:
1. Log in to your user using the command below.
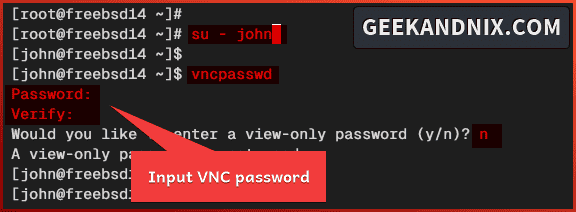
su - username2. Run the command below to configure the VNC server password for your new user.
vncpasswdInput your password and repeat when asked, then type n to disable the view-only password.
3. Now create a new VNC server configuration ~/.vnc/config using vim.
vim ~/.vnc/configInsert the VNC server configuration below.
# Setup authentication method
securitytypes=vncauth,tlsvnc

# define the default screen size
geometry=1400x1050

# allow one desktop to be used by two people
# at the same time
alwaysshared
Save the file and exit the editor after finished.
4. Next, create a new startup script ~/.vnc/xstartup using vim.
vim ~/.vnc/xstartupAdd the following bash script to set up XFCE as the default DE (Desktop Environment) for the new VNC server.
#!/bin/bash
xrdb $HOME/.Xresources
startxfce4 &
When finished, save and exit the file.
5. Make the startup script ~/.vnc/xstartup executable by executing the chmod command below.
chmod +x ~/.vnc/xstartup6. Lastly, run the vncserver command below to run your new VNC server manually. In this example, you will run a new VNC server on display 2 with port 5902.
vncserver :2 -geometry 1400x1050 -rfbport 5902
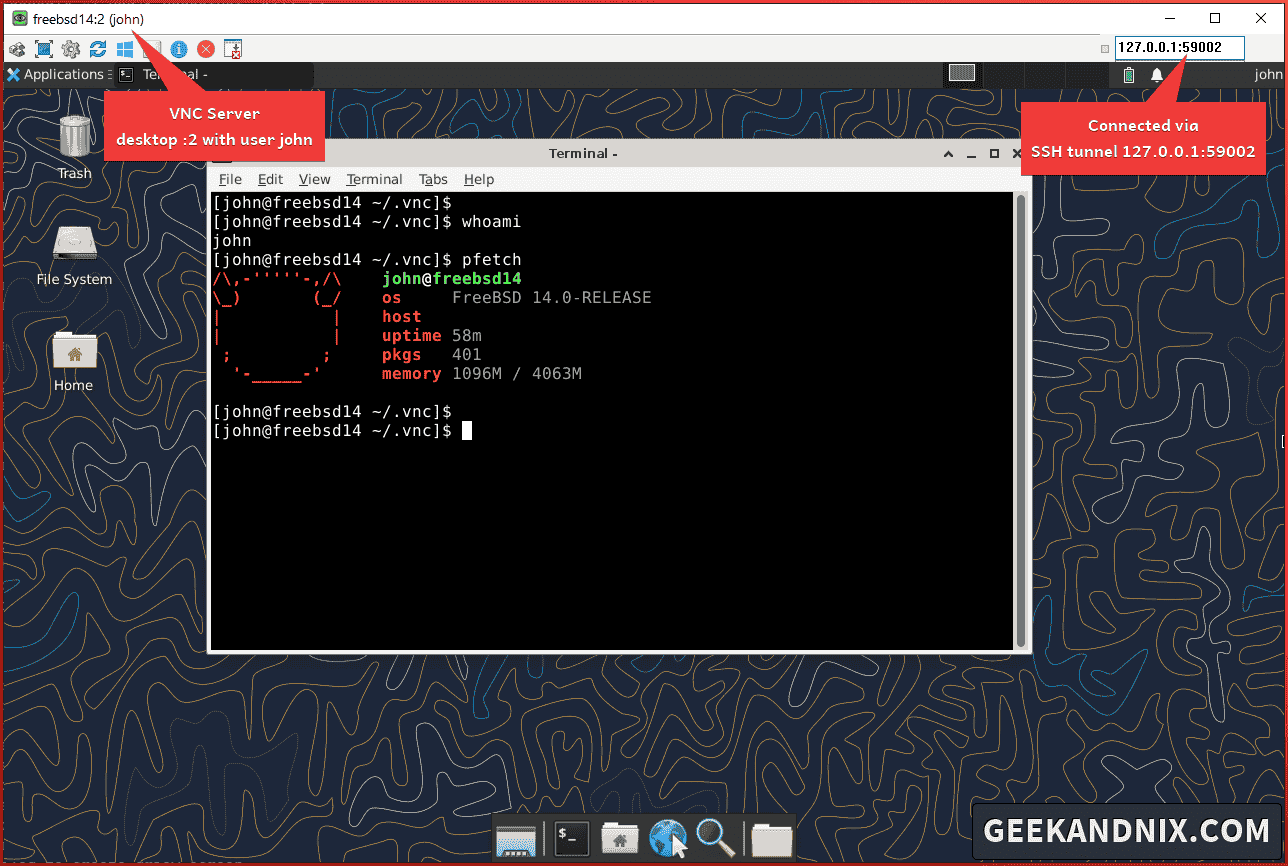
7. Below you can see I’ve connected to the VNC server display 2 under user john via SSH tunneling on 127.0.0.1:59002.
Conclusion
In this guide, you’ve installed the VNC server on a FreeBSD server using TigerVNC Server and XFCE as Desktop Environment. Then, you’ve also learned how to connect to a VNC server securely via SSH tunneling.
With TigerVNC Server and XFCE, you can easily run multiple VNC servers on FreeBSD. You can achieve this manually by running the vncserver process from the terminal.
