How to Install BIND DNS Server on FreeBSD 14
If you’re building a DNS server on FreeBSD, BIND is one of the top choices. And you’re in the right place.
In this tutorial, I will break down the step-by-step installation of the BIND DNS Server on FreeBSD 14. I will also show you how to troubleshoot your DNS server and domain name with the dig (Domain Information Groper) utility. So stay tuned.
Prerequisites
Before advancing, make sure you have the following items:
- Initialized FreeBSD 14 server with administrative/sudo user privileges.
- A domain name pointed to the server IP address.
- pf (Packet Filter) firewall configured.
If you’re installing a public DNS server, make sure you create a glue record such as ns1.testdomain.io from your domain control panel and point to the server IP address.
Setting up FQDN (Fully Qualified Domain Name)
FQDN (Fully Qualified Domain Name) is crucial for DNS servers. So you must ensure that your FreeBSD server has proper FQDN that points to the correct server IP address.
Carry out these tasks to set up FQDN on your FreeBSD server:
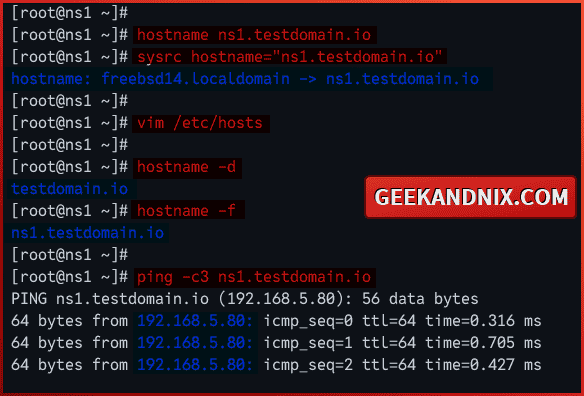
1. First, run the command below to set up the hostname of your FreeBSD server. In this case, I will set up FQDN to ns1.testdomain.io.
hostname ns1.testdomain.io
sysrc hostname="ns1.testdomain.io"
2. Run the vim editor command to open the /etc/hosts file.
vim /etc/hostsAdd the host configuration like the following – here’s the format server IP address, fqdn, and the hostname.
192.168.5.80 ns1.testdomain.io ns1Save the file and exit upon completion.
3. Now, run the hostname command below to verify the default domain and fqdn. In this case, my domain should be geekandnix.io with the fqdn ns1.testdomain.io.
# checking default domain
hostname -d

# checking fqdn
hostname -f
3. Lastly, run the ping command below to ensure that your server fqdn is pointed to a proper external IP address.
ping -c3 ns1.testdomain.ioIn this example, the fqdn ns1.testdomain.io pointed to the proper IP address 192.168.5.80.
Installing BIND on FreeBSD
After you have configured FQDN, you’re now ready to install BIND on FreeBSD. You can install BIND manually via ports, or you can also install it from the FreeBSD repository via the PKG package manager.
Let’s install BIND to the FreeBSD server by following these steps:
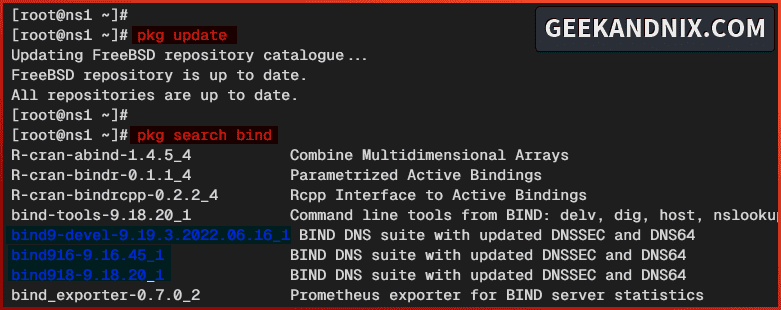
1. First, run the following pkg command to update the FreeBSD repository and find available bind packages.
# update FreeBSD repository
pkg update

# finding bind packages
pkg search bind
At this time, there are two versions of BIND, v9.18 and v9.16.
2. Run the command below to install BIND to your FreeBSD server. Confirm and proceed with y for the installation.
# installing BIND 9.18 and bind-tools
pkg install bind918 bind-tools

# installing BIND 9.6 and bind-tools
pkg install bind916 bind-tools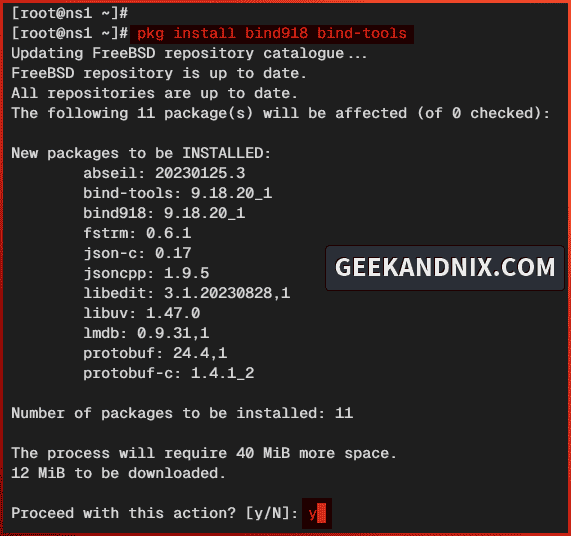
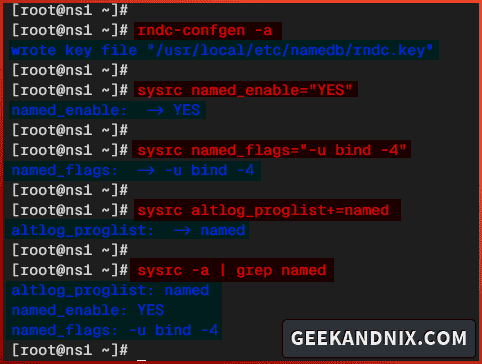
3. Once the installation is complete, run the command below to generate the RNDC () key for BIND.
rndc-confgen -a4. Then, run the following command to enable the named service and set up additional flags when BIND starts. In this case, I will run named on IPv4 only under user bind.
sysrc named_enable="YES"
sysrc named_flags="-u bind -4"
5. Next, run the sysrc command below to add the named service to the chrooted applications under the /var directory. The altlog_proglist variable in the rc.conf file is used to enable chroot for specific applications.
# add named service to chroot
sysrc altlog_proglist+=named
6. Lastly, run the command below to ensure that the named service is enabled.
sysrc -a | grep namedYou can see below named service is enabled and added to the chrooted application lists.
Configuring BIND DNS server on FreeBSD
So now that you have installed BIND, let’s navigate through the following sections to configure the BIND server:
Basic configuration for BIND on FreeBSD
First, you must modify the default BIND configuration named.conf file to set up the default IP address for BIND, enable the rndc key (optional), and then add some additional configurations to BIND.
Follow these actions to configure the BIND DNS server on FreeBSD:
1. Run the vim editor command to open the default named configuration /usr/local/etc/namedb/named.conf.
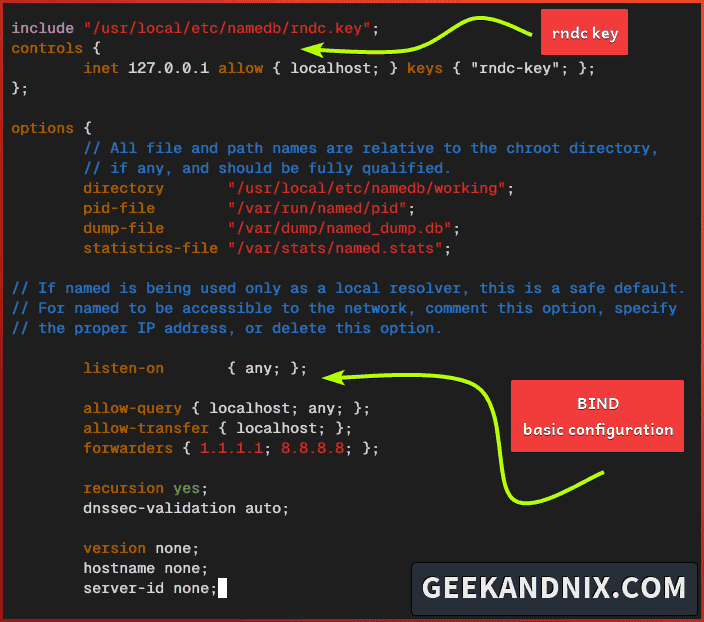
vim /usr/local/etc/namedb/named.conf2. Add the following configuration to the top of the line to enable the RNDC key. With rndc, you can manage BIND locally or from remote machines.
include "/usr/local/etc/namedb/rndc.key";
controls {
        inet 127.0.0.1 allow { localhost; } keys { "rndc-key"; };
};
3. Change the default listen-on to any and add a new configuration like the following:
options {
        ...
        listen-on { any; };

        allow-query { localhost; any; };

        allow-transfer { localhost; };
        allow-update { localhost; };

        forwarders { 1.1.1.1; 8.8.8.8; };

        recursion yes;
        dnssec-validation auto;

        version none;
        hostname none;
        server-id none;
};
Do not close the editor yet, move on to define zone files for your domain name.
Defining zones
Now that you’ve completed the basic configuration for BIND, you’re ready to set up the name server and domain name. But first, you must define the DNS zone within the named.conf file.
So here’s you will define two DNS zones:
- Forward zone for resolving domain to the specific IP address.
- Reverse zone for resolving IP address to the correct domain name.
Still, on the named.conf file, insert the following configuration at the bottom of the line.
zone "testdomain.io" {
        type master;
        file "/usr/local/etc/namedb/dynamic/forward.testdomain.io";
        allow-update { none; };
};

zone "5.168.192.in-addr.arpa" {
        type master;
        file "/usr/local/etc/namedb/dynamic/reverse.testdomain.io";
        allow-update { none; };
};
Save the file and close after editing is complete.
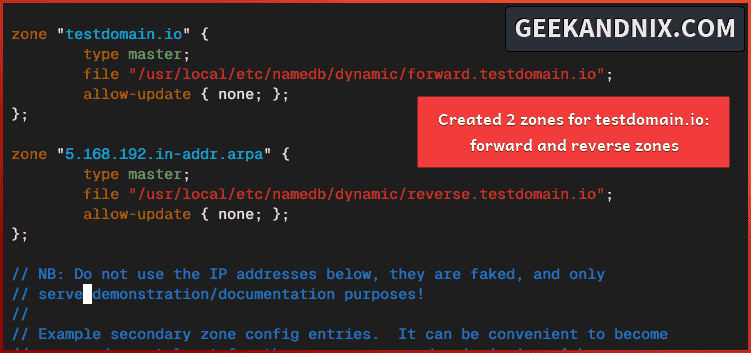
Based on the top configuration, you will define zones with the following:
- Forward zone
testdomain.iowith the default configuration/usr/local/etc/namedb/dynamic/forward.testdomain.io. - Reverse zone
5.168.192.in-addr.arpawith the configuration file/usr/local/etc/namedb/dynamic/reverse.testdomain.io.
Configuring forward zone on BIND
After you’ve defined the DNS zone in the named.conf, let’s move ahead to configure the forward zone. The job of the forward zone is to ensure that your domain name is pointed to the specific IP address.
In this example, I will set forward zone testdomain.io with the following:
| Type | Domain Name | Record/Value |
|---|---|---|
| NS | ns1.testdomain.io | 192.168.5.80 |
| A | www | 192.168.5.50 |
| A | 192.168.5.60 | |
| CNAME | ftp | testdomain.io |
| MX | testdomain.io | mail.testdomain.io |
Let’s get the job done.
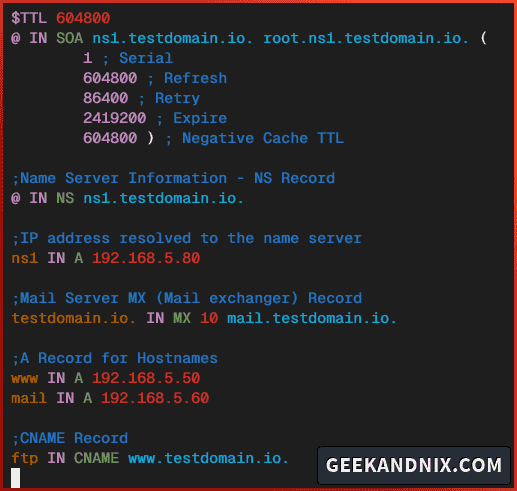
1. Run the vim command below to create a new forward zone configuration /usr/local/etc/namedb/dynamic/forward.testdomain.io.
vim /usr/local/etc/namedb/dynamic/forward.testdomain.io2. Insert the configuration below into the file.
$TTL 604800
@ IN SOA ns1.testdomain.io. root.ns1.testdomain.io. (
        2 ; Serial
        604800 ; Refresh
        86400 ; Retry
        2419200 ; Expire
        604800 ) ; Negative Cache TTL

;Name Server Information - NS Record
@ IN NS ns1.testdomain.io.

;IP address resolved to the name server
ns1 IN A 192.168.5.80

;A Record for Hostnames
@ IN A 192.168.5.50
mail IN A 192.168.5.60

;CNAME Record
ftp IN CNAME testdomain.io.

;Mail Server MX (Mail exchanger) Record
testdomain.io. IN MX 10 mail.testdomain.io.
Save the file and exit.
Creating reverse zone on BIND
As you have configured the forward zone, let’s proceed onward to configure the reverse zone on BIND. The reverse zone (or PTR record) handles translation from the IP address to the domain name. Mostly used to verify the ownership of the domain name, for example in mail server cases.
So here’s I will configure the reverse zone 5.168.192.in-addr.arpa with the following:
| Type | Record/Value | Domain Name | Original IP Address |
|---|---|---|---|
| PTR | 80 | ns1.testdomain.io | 192.168.5.80 |
| PTR | 50 | www.testdomain.io | 192.168.5.50 |
| PTR | 60 | mail.testdomain.io | 192.168.5.60 |
Let’s dive right in.
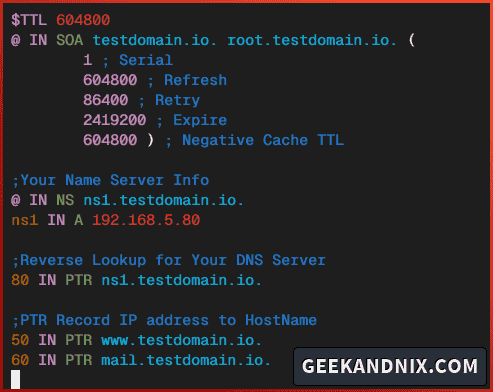
1. Run the following vim command to create a new reverse zone file /usr/local/etc/namedb/dynamic/reverse.testdomain.io.
vim /usr/local/etc/namedb/dynamic/reverse.testdomain.io2. Add the following reverse zone configuration.
$TTL 604800
@ IN SOA testdomain.io. root.testdomain.io. (
        1 ; Serial
        604800 ; Refresh
        86400 ; Retry
        2419200 ; Expire
        604800 ) ; Negative Cache TTL

;Your Name Server Info
@ IN NS ns1.testdomain.io.
ns1 IN A 192.168.5.80

;Reverse Lookup for Your DNS Server
80 IN PTR ns1.testdomain.io.

;PTR Record IP address to HostName
50 IN PTR www.testdomain.io.
60 IN PTR mail.testdomain.io.
When finished editing, save and exit the file.
Setting up proper permission and ownership for BIND files
It’s crucial to maintain proper permission for zone files to allow the named service to load your configuration. By default, the named service is running under user bind, so you must change the ownership of your zone files to the user bind.
Complete these actions to set up proper permission and ownership for your BIND configuration:
1. First, run the command below to change the permission of the rndc key to 0400 with the ownership as a user bind.
chown -R bind:wheel /usr/local/etc/namedb/rndc.key
chmod 0400 /usr/local/etc/namedb/rndc.key
2. Now, run the command below to change the ownership of the /usr/local/etc/namedb/dynamic/ directory to user bind.
chown -R bind:wheel /usr/local/etc/namedb/dynamic/Note: In the future, when you add a new zone file (forward or reverse) configuration, be sure to change the ownership of the file to user bind.
Verify BIND configuration
After configuring permission and ownership, let’s verify the BIND configuration to ensure that your zone files are loaded and you have the correct syntax. You can use the named-checkconf command to verify the main configuration for BIND named.conf, and the named-checkzone command to verify your zone file.
Execute the following tasks to verify BIND configuration:
1. Run the named-checkconf command below to verify the main BIND configuration named.conf.
named-checkconf -zjLook at the bottom of the line and ensure your forward and reverse zones are loaded like the following:

2. Lastly, run the following named-checkzone command to verify the forward and reverse zones configuration.
# check and verify forward zone file
named-checkzone testdomain.io /usr/local/etc/namedb/dynamic/forward.testdomain.io

# check and verify reverse zone file
named-checkzone 5.168.192.in-addr.arpa /usr/local/etc/namedb/dynamic/reverse.testdomain.io
So below you can see both forward and reverse zones are loaded and have proper syntax.

Managing BIND service on FreeBSD
As you’ve recently completed the configuration of the BIND DNS server, you can now start the named service on your FreeBSD server. Carry out these tasks to start and manage the named service on your system:
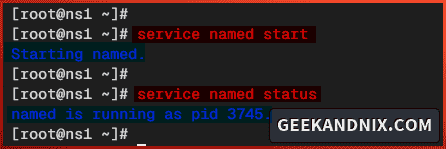
1. To start BIND or named service, run the command below.
service named start2. Once the named starts, run the following command to verify its status.
service named statusThis will show you the PID (Process ID) of the named service, you can see named service is running with PID 3745.
3. Next, if you need to stop named, run the command below.
service named stop4. Then, when restart is needed, run the command below to restart the named service. Especially after making changes to the BIND configuration.
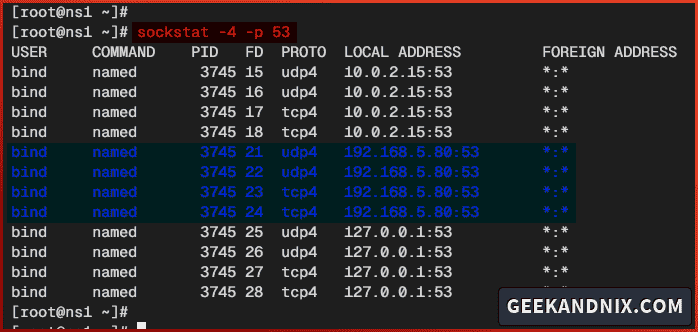
service named restart5. Lastly, run the sockstat command below to verify the DNS port 53.
sockstat -4 -p 53If BIND or named running, you should see that port 53 is used by the named service like the following:
Opening BIND Port via PF (Packet Filter) on FreeBSD
Given that the BIND service is running, let’s move on to open the DNS port 53 for BIND via pf (Paket Filter). So be sure that you have pf configured.
Follow these actions to open DNS port 53 via pf:
1. Run the vim command below to edit the /etc/pf.conf file.
vim /etc/pf.confAdd the domain service to the list of services in your pf configuration.
tcp_services = "{ domain }"
udp_services = "{ domain }"
Save and close the file after finishing.
2. Now, run the command below to reload the service and activate your changes.
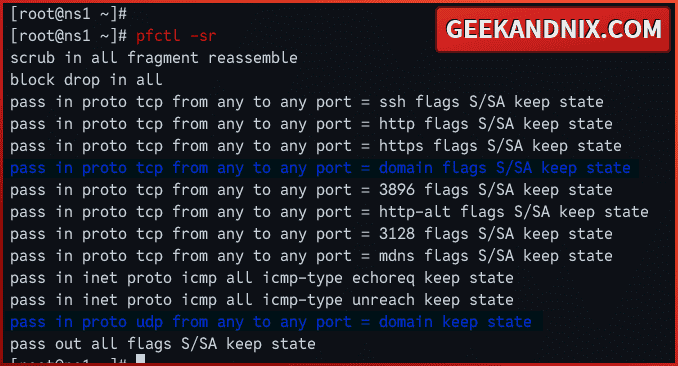
service pf reload3. Lastly, run the pfctl command below to verify enabled rules in pf.
pfctl -srThe following output confirms that traffic is allowed to the DNS port 53 or the domain service.
How do I know if BIND is working on FreeBSD?
To verify your BIND DNS server installation, you can utilize the dig command from your server or Linux client machine. Dig or domain information groper is your go-to tool for troubleshooting the DNS server. Learn how to use dig to verify your BIND DNS server installation with the following steps:
1. Run the vim editor command to open the /etc/resolv.conf file.
vim /etc/resolv.confAdd your BIND dns server as the default nameserver like this:
search testdomain.io
nameserver 192.168.5.80
Save the file and exit after making changes.
2. Now, run the dig command below to verify your NS server. In this case, the ns1.testdomain.io should be pointed to the IP address 192.168.5.80 and the default NS server ns1.testdomain.io.
# checking domain ns1.testdomain.io
dig ns1.testdomain.io

# checking name server for ns1.testdomain.io
dig NS ns1.testdomain.io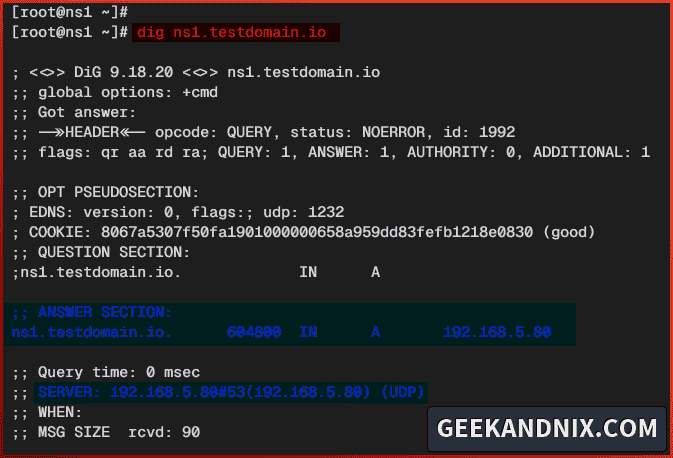
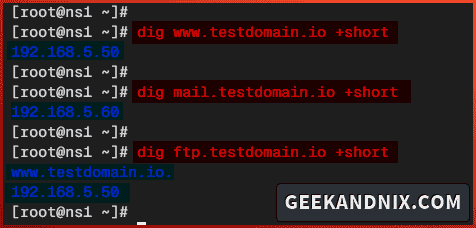
3. Afterward, run again the dig command to verify another domain name that you have created.
# checking www.testdomain.io IP address
dig www.testdomain.io +short

# checking IP address for domain mail.testdomain.io
dig mail.testdomain.io +short

# checking IP address for ftp.testdomain.io
dig ftp.testdomain.io +short
Here’s the list of domain names and IP addresses:
| Domain Name | IP Address |
|---|---|
| www.testdomain.io | 192.68.5.50 |
| mail.testdomain.io | 192.68.5.60 |
| ftp.testdomain.io (CNAME to testdomain.io) | 192.68.5.50 |
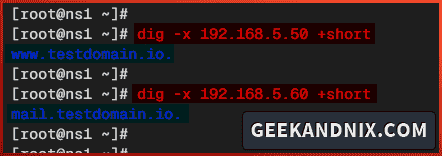
4. Lastly, run the command below to verify the PTR record or reverse DNS configuration.
# checking reverse DNS for IP 192.168.5.80
dig -x 192.168.5.80

# checking reverse DNS for IP 192.168.5.50
dig -x 192.168.5.50 +short

# checking reverse DNS for IP 192.168.5.60
dig -x 192.168.5.60 +short
Here’s the list of IP addresses and domain names:
| IP Address | Domain Name |
|---|---|
| 192.168.5.80 | ns1.testdomain.io |
| 192.168.5.50 | www.testdomain.io |
| 192.168.5.60 | mail.testdomain.io |
Conclusion
Excellent work! You have completed the installation of the BIND DNS Server on FreeBSD 14. So far, you also learned how to set up domain names via forward and reverse zones on BIND. Then, how to troubleshoot your DNS server and domain name via dig utility.
I hope, you can practice more by adding a new zone for your domain name, so you can get more feel and grasp for setting up a domain name with BIND.
