A Complete Guide to Install PowerDNS on FreeBSD 14
PowerDNS is the DNS server solution for Unix such as FreeBSD and Unix-like operating systems. Instead of using text files, PowerDNS uses a database backend to store its data. It supports databases like MySQL, PostgreSQL, and SQLite.
Looking for commercial-grade DNS server software?
In this guide, I will show you how to install PowerDNS with MySQL server as the backend on FreeBSD 14. I also cover the usage of pdnsutil for managing zones and creating domain names, and the dig (domain information groper) for troubleshooting the DNS server.
Prerequisites
To proceed with the installation, ensure that you have the following:
- A FreeBSD 14 server initialized with sudo/administrator privileges and pf (Packet Filter) firewall.
- A domain name pointed to the FreeBSD server IP address.
- The MySQL server 8.x up and running. And not MariaDB.
In addition to that, you may need a Glue Record, if you’re creating a public DNS server. You can create a Glue Record from your domain control panel.
Setting up FQDN (Fully Qualified Domain Name)
The FQDN or Fully Qualified Domain Name is crucial for the DNS server. You must ensure that your fqdn is pointed to the correct server IP address. To achieve this, you can utilize the hostname command and the /etc/hosts file.
To set up fqdn on your FreeBSD server, perform the following tasks:
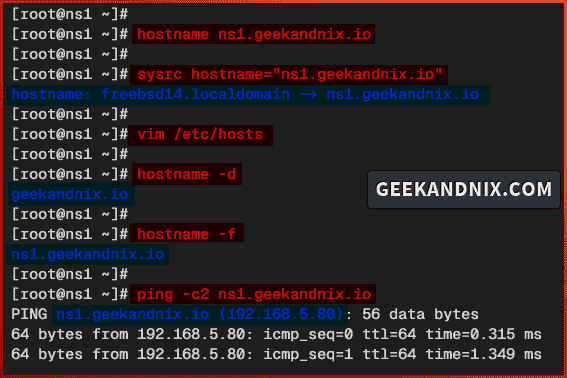
1. First, run the command below to set up the FQDN for your FreeBSD server. In this case, I will set up the fqdn to ns1.geekandnix.io.
hostname ns1.geekandnix.io2. Now, run the following command to make your fqdn configuration permanent via the rc.conf file.
sysrc hostname="ns1.geekandnix.io"3. Afterward, open the /etc/hosts file using vim.
vim /etc/hostsAdd the configuration below and be sure to change the IP address, fqdn, and the system hostname.
192.168.5.80 ns1.geekandnix.io ns1Save the edits and close the file.
3. Next, run the command below to verify the default domain and fqdn for your FreBSD system. So in this case, I will have the default domain geekandnix.io with the fqdn ns1.geekandnix.io.
hostname -d
hostname -f
4. Lastly, run the ping command below to ensure that your fqdn is pointed to the correct IP address.
ping -c2 ns1.geekandnix.ioYou can see below the ns1.geekandnix.io is pointed to the FreeBSD server IP address 192.168.5.80.
Installing PowerDNS on FreeBSD
Now that you’ve configured the proper fqdn, move on to the PowerDNS installation. On FreeBSD, you can install PowerDNS in two different ways: via PKG package manager and Ports. In this example, you will install PowerDNS via PKG from the FreeBSD repository.
To install PowerDNS on FreeBSD, follow through these actions:
1. To get started, run the following command to update your FreeBSD package index.
pkg update2. Now, run the command below to install PowerDNS on your FreeBSD server. Type y to accept the installation.
pkg install powerdns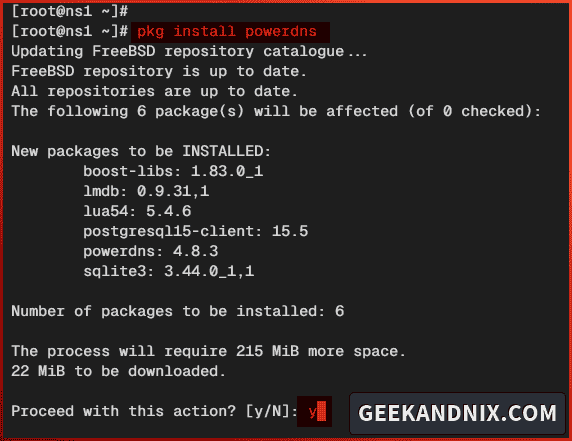
3. Lastly, run the sysrc command below to enable and verify the pdns service.
sysrc pdns_enable="YES"
sysrc -a | grep pdns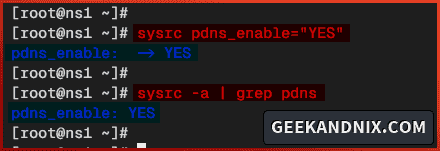
Opening DNS port via PF (Packet Filter)
After you have installed PowerDNS, let’s open the default DNS port 53 to allow traffic to your PowerDNS server. In this case, I will use pf (Packet Filter) firewall on FreeBSD.
Follow these actions to open DNS port via pf:
1. Firstly, open the default pf configuration /etc/pf.conf file using vim.
vim /etc/pf.confAdd the domain service to both tcp_services and udp_services and allow traffic to the default DNS port 53.
tcp_services = "{ domain }"
udp_services = "{ domain }"
When done, save and exit the file.
2. Then, run the command below to reload pf service and take effects of your changes.
service pf reload3. Lastly, run the command below to verify the list of pf rules. Ensure the domain service are enabled.
pfctl -srSetting up MySQL database for PowerDNS server
As you have installed PowerDNS, you will create a new MySQL database and user for PowerDNS. Then, you need to import the PowerDNS database schema into your database.
There are multiple databases that you can use, such as MySQL, PostgreSQL, and SQLite. For this guide, you will be using MySQL server as the database backend for PowerDNS.
To set up the database and import the PowerDNS database schema, execute the following actions:
1. First, log in to the MySQL server via the mysql command below. Type your MySQL root password when asked.
mysql -u root -p2. Now, run the following queries to create a new MySQL database and user for PowerDNS. Feel free to change the details of the user and password with your information.
In this example, I will create the database pdns with the user pdnsadmin and password PowerDNSPassDB.
# creating database pdns
CREATE DATABASE pdns;

# creating user pdnsadmin and permit access to pdns database
CREATE USER pdnsadmin@localhost IDENTIFIED BY 'PowerDNSPassDB';
GRANT ALL PRIVILEGES ON pdns.* TO pdnsadmin@localhost;
FLUSH PRIVILEGES;
quit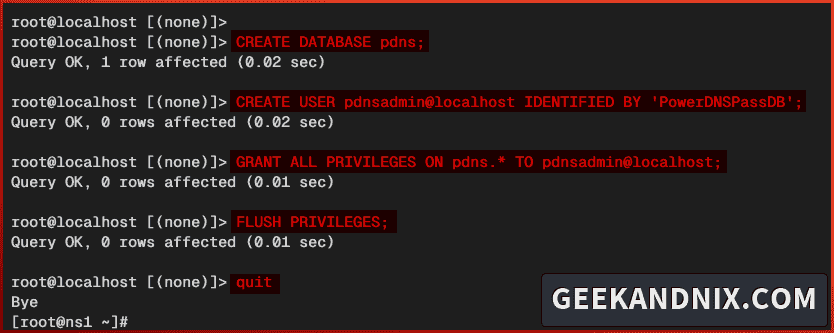
3. Next, run the command below to import the PowerDNS database schema to the pdns database. Type the password for pdnsadmin when prompted.
mysql -u pdnsadmin -p pdns < /usr/local/share/doc/powerdns/schema.mysql.sql
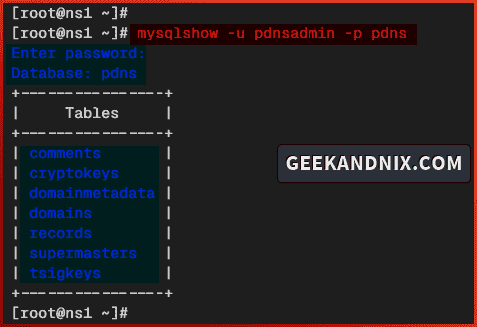
4. Lastly, run the mysqlshow command below to verify the database schema in the pdns database.
mysqlshow -u pdnsadmin -p pdnsIf the operation was successful, you should get the PowerDNS database schema like the following:
Integrating PowerDNS with MySQL database backend
Having the MySQL database ready, you can now integrate PowerDNS with the MySQL server as the database backend. Here, you will modify the file pdns.conf and integrate it with the MySQL server. Then, you will run PowerDNS in the foreground to verify your integration.
To integrate PowerDNS with the MySQL server, complete the following steps:
1. To get started, edit the PowerDNS configuration /usr/local/etc/pdns/pdns.conf using vim.
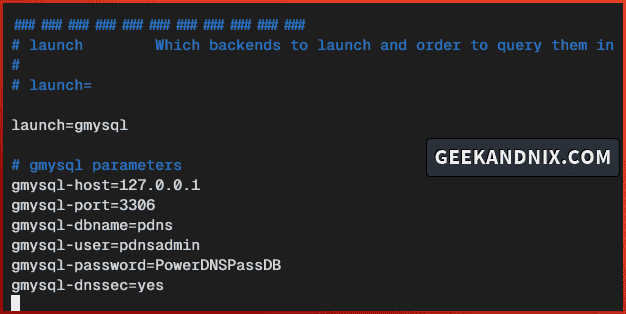
vim /usr/local/etc/pdns/pdns.confInsert the following configuration to set up MySQL as the database backend for PowerDNS. And be sure to change the database details with your information.
# pdns with MySQL/MariaDB backend
launch=gmysql

# gmysql parameters
gmysql-host=127.0.0.1
gmysql-port=3306
gmysql-dbname=pdns
gmysql-user=pdnsadmin
gmysql-password=PowerDNSPassDB
gmysql-dnssec=yes
Close the file after editing is finished.
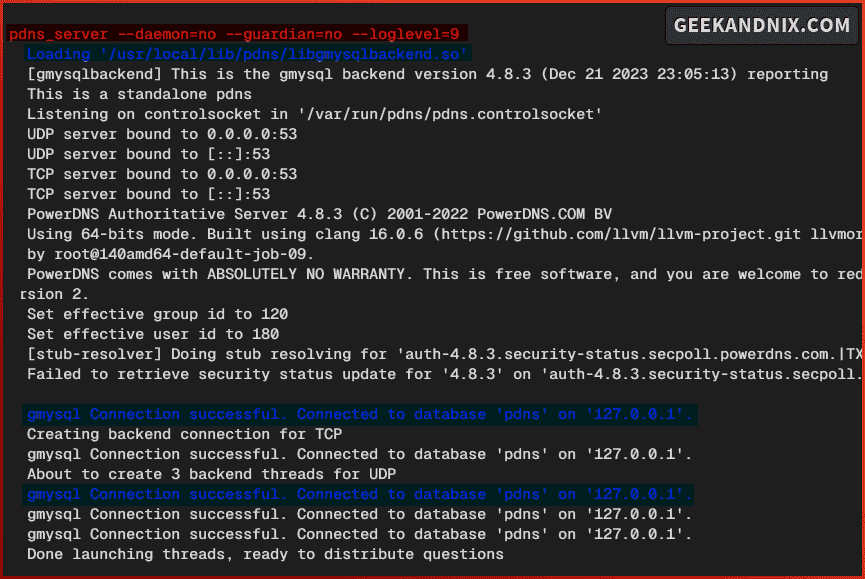
2. Now, run the pdns_server command below to start PowerDNS in the foreground and verify the MySQL integration.
pdns_server --daemon=no --guardian=no --loglevel=9If the PowerDNS integration with MySQL database was successful, you should get the output gmysql Connection successful. Connected to the database pdns.
3. Press Ctrl+c to terminate the process.
Managing PowerDNS service on FreeBSD
So far, you have integrated PowerDNS with MySQL server. You can now advance to start and manage the PowerDNS service pdns on your FreeBSD server.
Carry out these actions to start and manage pdns service on FreeBSD:
1. To start the pdns service, run the following command.
service pdns start2. Once pdns starts, run the command below to verify the service. If PowerDNS running, you should get the PID of the pdns service.
service pdns statusBelow you can see PowerDNS running with PID 3531.

3. If you need to stop the pdns service, run the following command.
service pdns stop4. Lastly, run the command below to restart the pdns service after making changes to the PowerDNS configuration.
service pdns restartHow do I know if PowerDNS is running?
With the PowerDNS started, let’s verify it using two different methods: via sockstat and dig commands. With sockstat, you will ensure the DNS port 53 is used by PowerDNS. And with the dig utility, you will verify the PowerDNS version.
To verify PowerDNS status, follow through these actions:
1. First method, run the sockstat command below to verify the DNS port 53 on your FreeBSD server.
sockstat -4 -p 53If PowerDNS running, you should see that DNS port 53 is used by the pdns_server command.

2. The second method is using the dig (domain information groper) utility. But first, run the command below to install the bind-tools package. The dig command is part of the bind-tools package.
pkg install -y bind-tools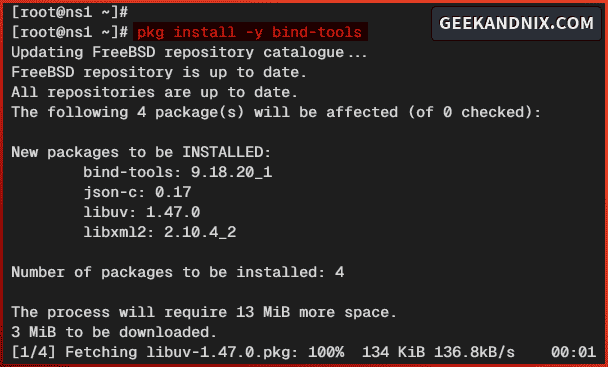
3. Once installation is complete, run the dig command below to verify your PowerDNS server.
dig chaos txt version.bind @127.0.0.1 +shortNow you will see the detailed version of your PowerDNS server like the following:

Creating forward zone and setup name server on PowerDNS
Having the PowerDNS up and running, it’s time to create the name server, which can be performed with the pdnsutil command. The pdnsutil is a command line for managing PowerDNS records and the DNSSEC command control.
To create a name server in PowerDNS via pdnsutil, complete the following actions:
1. First, run the pdnsutil command below to create DNS zone geekandnix.io with the default name server ns1.geekandnix.io.
pdnsutil create-zone geekandnix.io ns1.geekandnix.io
2. Then, run the command below to add the A record within the geekandnix.io zone for ns1.geekandnix.io to the PowerDNS server IP address 192.168.5.80.
pdnsutil add-record geekandnix.io ns1 A 192.168.5.80
3. Now, run the following command to verify the list records within the zone geekandnix.io.
pdnsutil list-zone geekandnix.ioYou should see records for NS (Name Server) for the domain geekandnix.io, A record for ns1.geekandnix.io, and the SOA record (automatically generated).

4. Next, run the command below to modify the default SOA record for zone geekandnix.io. Once the command is executed, you will be presented with the vim text editor.
export EDITOR=vim
pdnsutil edit-zone geekandnix.io
Change the SOA record like the following – then save and exit the file:
geekandnix.io 3600 IN SOA ns1. geekandnix.io root.geekandnix.io 0 10800 3600 604800 3600
Once the vim is closed, you will be asked to verify your changes. Type a to apply your modifications.

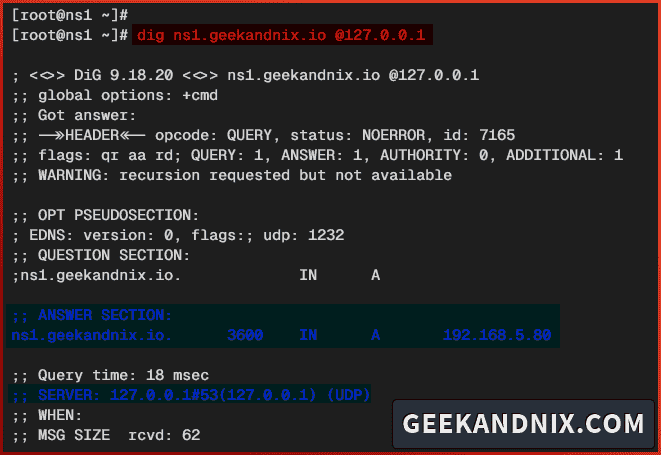
5. Lastly, run the dig command below to verify the A and SOA records for the name server ns1.geekandnix.io.
dig ns1.geekandnix.io @127.0.0.1
dig SOA ns1.geekandnix.io @127.0.0.1
If your name server configuration is successful, you will see the following:
- A record for the
ns1.geekandnix.iois pointed to the FreeBSD server IP address192.168.5.80.
- The default SOA record also has been changed.
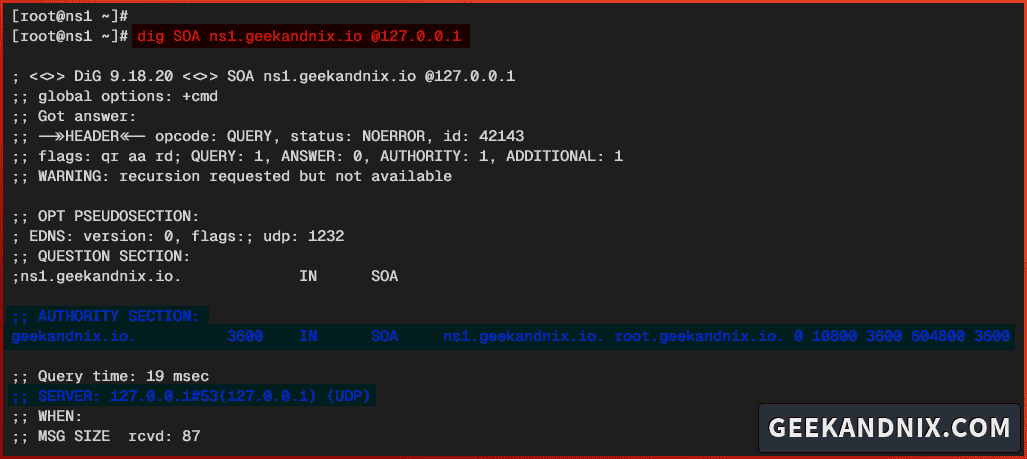
Setting up domain name via pdnsutil
After you have created the forward zone and the name server, let’s now move ahead to add new domain names to the PowerDNS server.
In this example, I will create the following domain names via pdnsutil:
| Domain Name | Type | IP Address or Value |
|---|---|---|
| geekandnix.io | A | 192.168.5.20 |
| www.geekandnix.io | CNAME | geekandnix.io |
| blog.geekandnix.io | A | 192.168.5.25 |
| ftp.geekandnix.io | A | 192.168.5.30 |
| mail.geekandnix.io | A | 192.168.5.35 |
| geekandnix.io | MX | mail.geekandnix.io |
Let’s get things done.
1. Run the command below to create an A record for domain geekandnix.io with IP address 192.168.5.20. Also, create the CNAME record www.geekandnix.io to the main domain geekandnix.io.
# create A record geekandnix.io to IP address 192.168.5.20
pdnsutil add-record geekandnix.io @ A 192.168.5.20

# create CNAME www.geekandnix.io to geekandnix.io
pdnsutil add-record geekandnix.io www CNAME geekandnix.io
2. Now, run the following command to create new sub-domains blog.geekandnix.io with IP address 192.168.5.25, and ftp.geekandnix.io with IP address 192.168.5.30.
# create A record blog.geekandnix.io to IP address 192.168.5.25
pdnsutil add-record geekandnix.io blog A 192.168.5.25

# create A record ftp.geekandnix.io to IP address 192.168.5.30
pdnsutil add-record geekandnix.io ftp A 192.168.5.30
3. Then, run the command below to create a sub-domain for mail server mail.geekandnix.io with IP address 192.168.5.35. Then, add an MX record for domain geekandnix.io with the mail server mail.geekandnix.io.
# create A record for mail server
# mail.geekandnix.io to IP address 192.168.5.35
pdnsutil add-record geekandnix.io mail A 192.168.5.35

# adding MX record for mydomamain.dev to mail server mail.geekandnix.io
pdnsutil add-record geekandnix.io @ MX "10 mail.geekandnix.io"
4. Now, run the command below to check the zone configuration in your PowerDNS server. Then, verify the list of DNS records in the geekandnix.io zone.
# checking zone configurations
pdnsutil check-all-zones

# list available zones for geekandnix.io
pdnsutil list-zone geekandnix.io
Ensure that you have no errors within the zone configuration.

Below you can see the list of DNS records in the zone geekandnix.io.

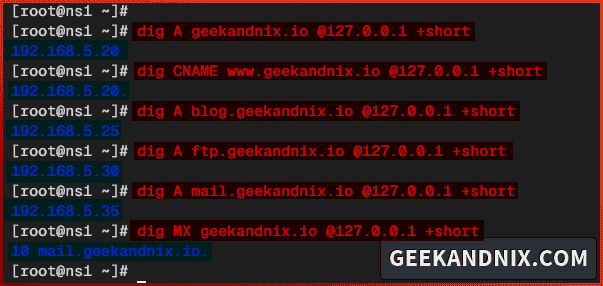
5. Lastly, run the dig command below to ensure that each domain name and sub-domain is pointed to the correct IP address.
# checking A record for geekandnix.io
dig A geekandnix.io @127.0.0.1 +short

# checking CNAME record for www.geekandnix.io
dig CNAME www.geekandnix.io @127.0.0.1 +short

# checking A record for blog.geekandnix.io
dig A blog.geekandnix.io @127.0.0.1 +short

# checking A record for ftp.geekandnix.io
dig A ftp.geekandnix.io @127.0.0.1 +short

# checking A record for mail.geekandnix.io
dig A mail.geekandnix.io @127.0.0.1 +short

# checking MX record for mail.geekandnix.io
dig MX geekandnix.io @127.0.0.1 +short
Below you can see each domain name resolved to the proper IP address, and the MX record pointed to the proper mail server.
Creating reverse zone or PTR record in PowerDNS
Given that you have added domain names, let’s step forward to create the reverse zone in PowerDNS. The reverse zone or PTR record handles the translation of the IP address to the domain name. This is a crucial part of a DNS server, especially when you have a mail server.
In this section, I will create reverse zone 5.168.192.in-addr.arpa with the following details:
| IP Address | Type | Domain Name |
|---|---|---|
| 192.168.5.80 | PTR | ns1.geekandnix.io |
| 192.168.5.20 | PTR | geekandnix.io |
| 192.168.5.25 | PTR | blog.geekandnix.io |
| 192.168.5.30 | PTR | ftp.geekandnix.io |
| 192.168.5.35 | PTR | mail.geekandnix.io |
Let’s dive right in.
1. First, run the command below to create a new reverse zone 5.168.192.in-addr.arpa with the default name server ns1.geekandnix.io. Also, add the A record for the name server ns1.geekandnix.io to the PowerDNS server IP address.
# create reverse zone 5.168.192.in-addr.arpa with
# default name server ns1.geekandnix.io
pdnsutil create-zone 5.168.192.in-addr.arpa ns1.geekandnix.io

# Add a record for name server ns1.geekandnix.io to IP address 192.168.5.80
pdnsutil add-record 5.168.192.in-addr.arpa ns1 A 192.168.5.80
2. Now, run the command below to create a PTR record for each of your domain names. In reverse zone configuration, take the last digit IP address of the target domain name as the value for your PTR record.
# adding PTR record for ns1.geekandnix.io with IP address 192.168.5.80
pdnsutil add-record 5.168.192.in-addr.arpa 80 PTR ns1.geekandnix.io

# adding PTR record for geekandnix.io with IP address 192.168.5.20
pdnsutil add-record 5.168.192.in-addr.arpa 20 PTR geekandnix.io

# adding PTR record for blog.geekandnix.io with IP address 192.168.5.25
pdnsutil add-record 5.168.192.in-addr.arpa 25 PTR blog.geekandnix.io

# adding PTR record for ftp.geekandnix.io with IP address 192.168.5.30
pdnsutil add-record 5.168.192.in-addr.arpa 30 PTR ftp.geekandnix.io

# adding PTR record for mail.geekandnix.io with IP address 192.168.5.35
pdnsutil add-record 5.168.192.in-addr.arpa 35 PTR mail.geekandnix.io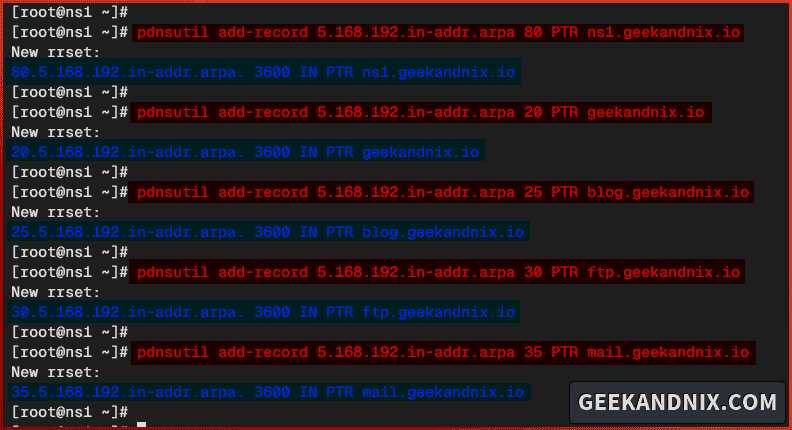
3. Lastly, run the dig command below to verify the PTR record in your PowerDNS server. Ensure that each IP address is pointed to the correct domain name.
# checking PTR record for IP address 192.168.5.80
dig -x 192.168.5.80 @127.0.0.1 +short

# checking PTR record for IP address 192.168.5.20
dig -x 192.168.5.20 @127.0.0.1 +short

# checking PTR record for IP address 192.168.5.25
dig -x 192.168.5.25 @127.0.0.1 +short

# checking PTR record for IP address 192.168.5.30
dig -x 192.168.5.30 @127.0.0.1 +short

# checking PTR record for IP address 192.168.5.35
dig -x 192.168.5.35 @127.0.0.1 +short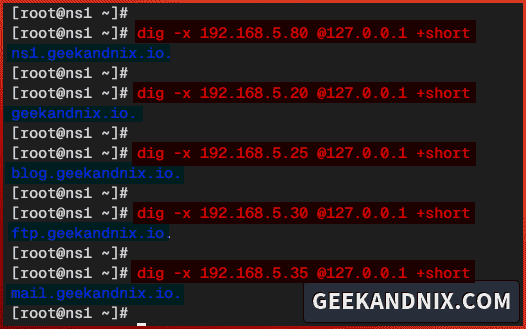
Conclusion
As you have reached the final, you have completed the installation of the PowerDNS DNS Server on FreeBSD 14. You’ve installed PowerDNS with the MySQL server as the database backend and learned how to create a name server, forward zone, and reverse zone in PowerDNS via the pdnsutil command. On top of that, you have also learned how to troubleshoot the DNS server using the dig (domain information groper) utility, which can be used on most Unix and Unix-like operating systems.
Moreover, why not install poweradmin for managing PowerDNS via a web browser?
