How to Install and Use MySQL Server on FreeBSD 14
In this guide, I’m going to show you how to install MySQL Server on FreeBSD 14. Furthermore, I’m going to show you how to secure MySQL installation and how to use MySQL for creating databases and users.
Lastly, I will also show you basic MySQL operations for creating tables, inserting data, retrieving data, updating data, and deleting data on MySQL.
Let’s dive in.
Prerequisites
To proceed with this guide, confirm that you have the following:
- A FreeBSD 14 server.
Read more: FreeBSD 14: Step-by-Step Installation (With Screenshot) - A root user or non-root user with sudo privileges.
Installing MySQL Server on FreeBSD
By default, the FreeBSD repository provides MySQL Server 8.0, which you can install easily via the pkg package manager. Follow these actions to install MySQL server 8.0 on FreeBSD:
1. Firstly, run the following command to update the FreeBSD package index and get the latest package database.
pkg update2. Now run the pkg command below to install the MySQL Server 8.0 to your FreeBSD system. Input y to proceed with the installation.
pkg install mysql80-server mysql80-client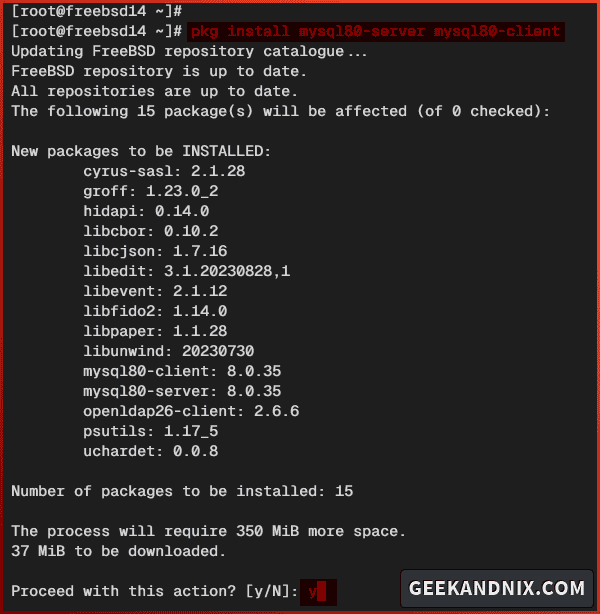
3. Once the installation is complete, enable and verify the mysql service using the command below.
sysrc mysql_enable="YES"
sysrc -a | grep mysql
Managing MySQL Service
Now that you’ve installed and enabled MySQL Server, it’s time to start the mysql-server on your FreeBSD system.
Complete these actions to learn how to manage mysql-server using the service command on FreeBSD:
1. To start the mysql-server service, run the following command. At first, this will also create and initialize the data directory for the MySQL server.
service mysql-server start2. Once mysql-server starts, run the command below to verify it.
service mysql-server statusIf MySQL is running, you will see the process ID (PID) of the mysql-server.

3. Now if you need to stop MySQL, run the following command.
service mysql-server stop4. Lastly, when you need to restart the mysql-server, execute the service command below.
service mysql-server restartHow to Configure/Change MySQL Root Password?
Setting up MySQL root password is crucial for your MySQL server deployment. This is because the default MySQL installation comes without a password.
Follow these instructions to set up the MySQL root password on FreeBSD:
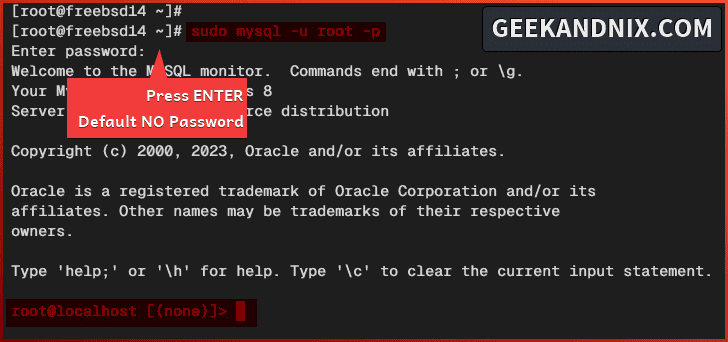
1. First, run the mysql command below to log in to the MySQL server.
mysql -u root -pWhen prompted for a password, press ENTER. The default root user for the MySQL server has no password.
2. Once you’re connected to the MySQL server, execute the following query to set up a password for the root user. Be sure to change the password MySQLRootPassw0rd with your password.
# change password MySQl root user
ALTER USER 'root'@'localhost' IDENTIFIED WITH mysql_native_password BY 'MySQLRootPassw0rd';

# reloading table privileges
FLUSH PRIVILEGES;
3. Now type quit to exit from the MySQL server.

4. Now that you’ve changed the MySQL root password, execute the mysql command below to log in as a root user.
mysql -u root -pInput your MySQL root password when prompted. If you have the correct password, you will be logged in to the MySQL server. If no password is provided, you will get an error like ERROR 1045 (28000): Access denied for user root@localhost....

Securing MySQL Server
With the MySQL root password configured, the security is still not enough. By default, the MySQL server provides a helper script mysql_secure_installation for securing your MySQL installation.
Follow these instructions to secure MySQL Server using mysql_secure_installation:
1. First, run the command below to start the mysql_secure_installation.
mysql_secure_installation2. Input your MySQL root password when prompted. Ensure that you input the correct password, then move on.

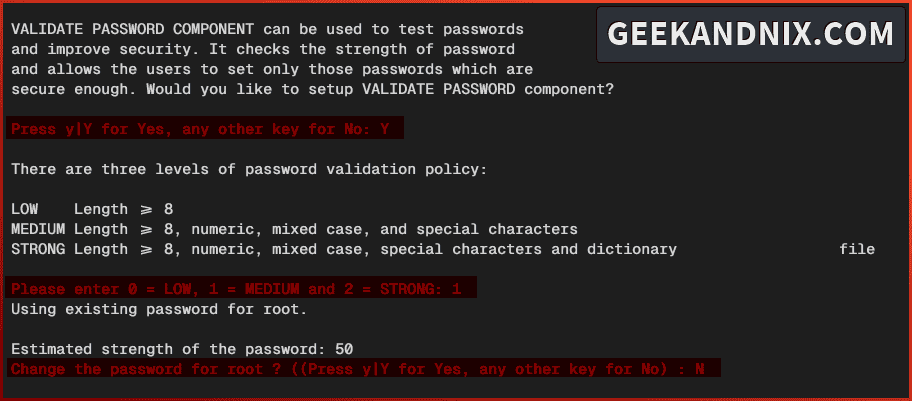
3. Now input Y to enable the VALIDATE PASSWORD component. Then, input the number 1 to select the MEDIUM level. Lastly, input N when asked to change the root password.
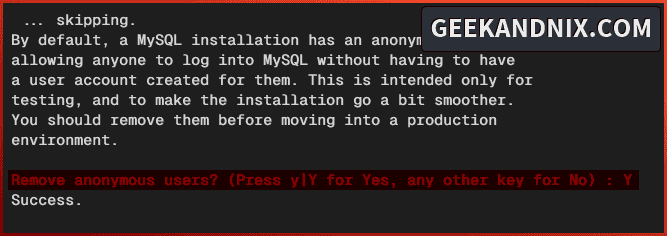
4. Input Y to remove the default anonymous access from your MySQL Server.
5. Always disable remote login for root user. So input Y to disable the remote login of MySQL root user.

6. When asked to delete the default database test and its privileges, input Y to confirm.
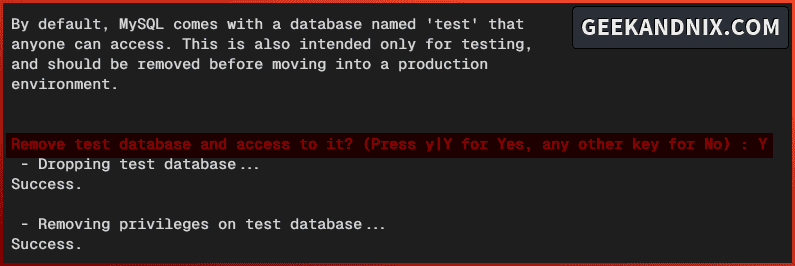
7. Lastly, type Y to reload table privileges and apply your modifications to MySQL Server. Once the process is finished, you will see an output such as All done!.

Creating MySQL Database and User
At this point, you’ve configured the MySQL root password and secured the MySQL server. Now, let’s take a look at the basic usage of MySQL for creating a user and database.
Complete the following tasks to create a new MySQL user and database for your applications.
1. First, run the command below to log in to the MySQL server as a root user. Input your MySQL root password when prompted.
mysql -u root -p2. Once logged in to the MySQL server, run the following queries to create a new database and verify the list of databases on the MySQL server. In this example, you will create a new database myapp.
# creating database myapp
CREATE DATABASE myapp;

# listing available databases
SHOW DATABASES;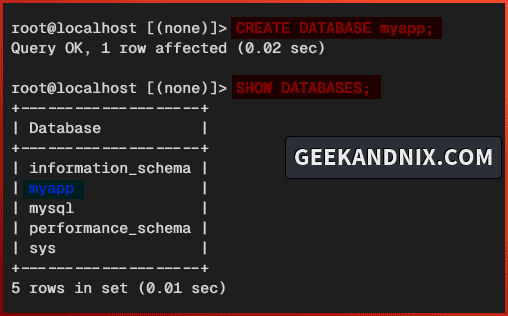
3. Now run the following query to create a new MySQL user myuser and be sure to change the following password with your strong password.
CREATE USER myuser@localhost IDENTIFIED BY 'MyUserp4ssw0rd.9.';4. After that, run the following queries to allow user myuser to access the database myapp. Then, reload table privileges to apply your changes.
# Grant MySQL user privileges to a specific database
GRANT ALL PRIVILEGES ON myapp.* TO myuser@localhost;

# Reload table privileges
FLUSH PRIVILEGES;
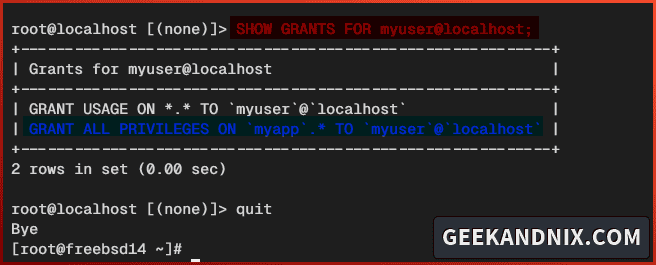
5. Next, run the query below to verify the list privileges for MySQL user myuser@localhost.
SHOW GRANTS FOR myuser@localhost;You will see the myuser@localhost with the privilege to access the database myapp. This confirms you have created a MySQL user and database.
6. Type quit to exit from the MySQL server.
Connecting to MySQL Server using Specific User and Database
After you have created a MySQL user and database, let’s verify it by logging into the MySQL server using your new username and password. Let’s dive in.
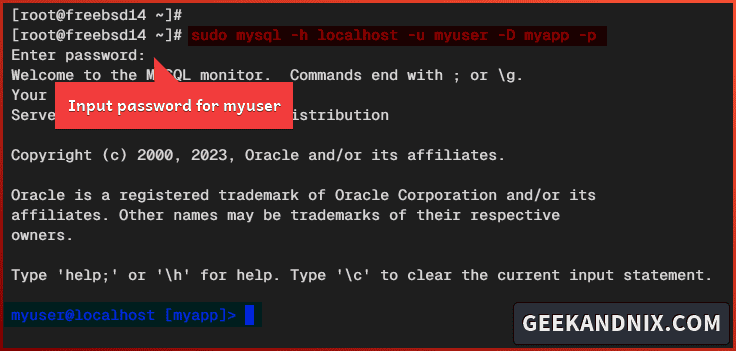
1. First, run the mysql command below to log in to the MySQL server via myuser to the database myapp. Be sure to input your password when prompted.
sudo mysql -h localhost -u myuser -D myapp -pAfter logging in, your MySQL prompt should be like myuser@localhost [myapp]>. The myuser@localhost is your MySQL user and the mydb is the database name that you’re currently connected to.
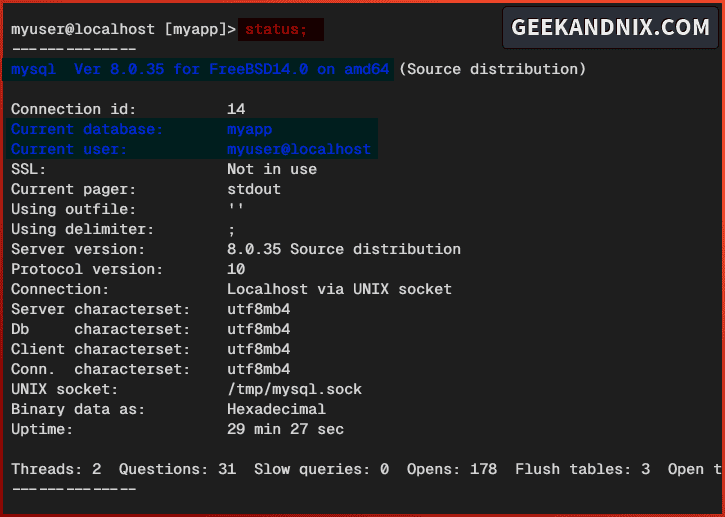
2. Now run the status query to verify your connections. Within the output, can see the MySQL Server version, the connection id, current database and user, and the connection media (via UNIX socket or TCP).
Basic CRUD Operations in MySQL
In this section, you’ll learn the basic operations of MySQL below:
- Creating table in MySQL.
- Adding and Inserting data to MySQL.
- Retrieve data from MySQL.
- Updating data in MySQL.
- Deleting data in MySQL.
Let’s move on.
Creating Table in MySQL
To create a table in MySQL, use the CREATE TABLE query like the following:
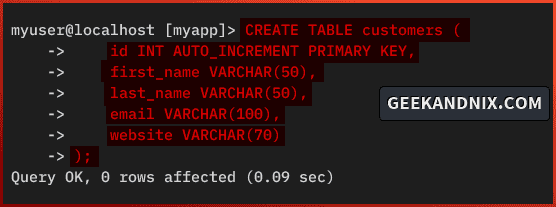
1. Run the CREATE TABLE query below to create a new table customers with columns id, first_name, last_name, email, and website.
CREATE TABLE customers (
    id INT AUTO_INCREMENT PRIMARY KEY,
    first_name VARCHAR(50),
    last_name VARCHAR(50),
    email VARCHAR(100),
    website VARCHAR(70)
);
2. Once the table is created, run the following query check the list tables on the current database and check the list columns on the table customers.
# listing available tables
SHOW TABLES;

# check columns on table customers
DESCRIBE customers;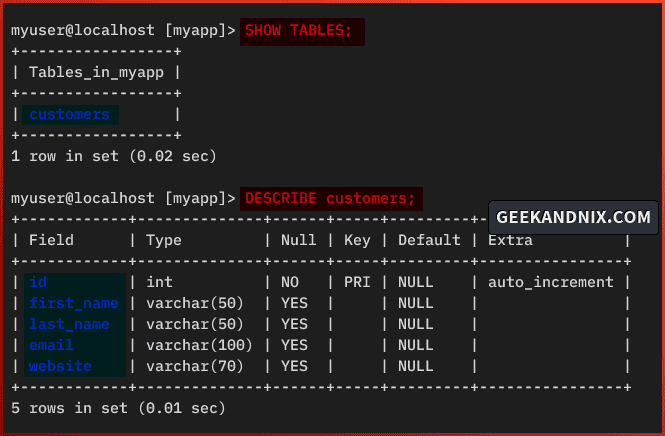
Adding Data to MySQL
To insert and add data to MySQL, use the INSERT query followed VALUES of your data.
1. Now run the INSERT query below to add new data to the table customers.
INSERT INTO customers (first_name, last_name, email, website)
VALUES ('Arvid', 'Ls', '[email protected]', 'geekandnix.com');
NOTE: You don’t need to specify data within the column id because the attribute AUTO_INCREMENT, allows MySQL to generate a unique value for it.
2. How about inserting multiple data to MySQL at once? you can insert multiple data at once using multiple VALUES and separate them with commas like the following:
INSERT INTO customers (first_name, last_name, email, website)
VALUES ('David', 'Smith', '[email protected]', 'testsite.com'),
('Boby', 'Johnson', '[email protected]', 'esite.com'),
('Alex', 'Sans', '[email protected]', 'geekandnix.com');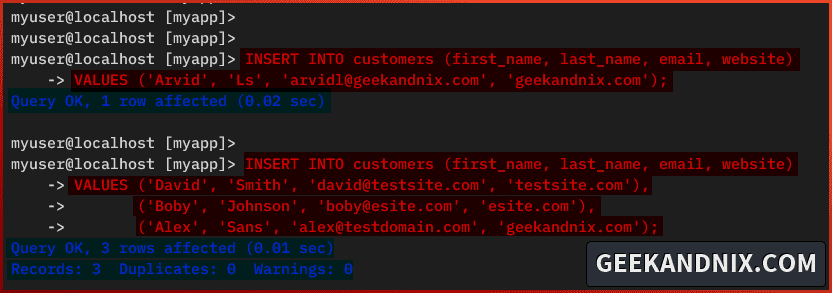
Retrieving Data in MySQL
The SELECT query is what you need to retrieve or show data from a specific table or database in MySQL.
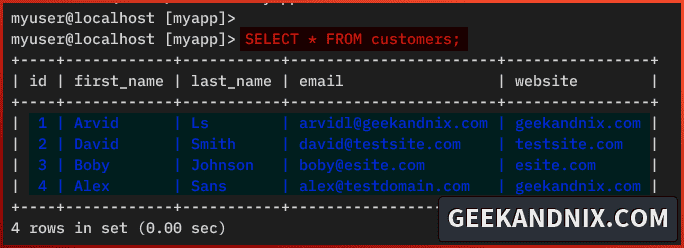
1. Next, run the SELECT query below to retrieve and show available data on the table customers.
SELECT * FROM customers;The symbol * will print everything within the table customers.
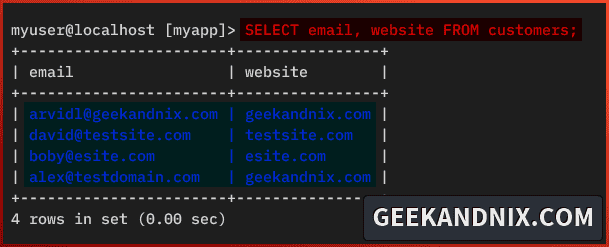
2. To specify the output of columns, type column names within the query like the following.
SELECT email, website FROM customers;You will see output for specific columns email and website.
Updating Data in MySQL
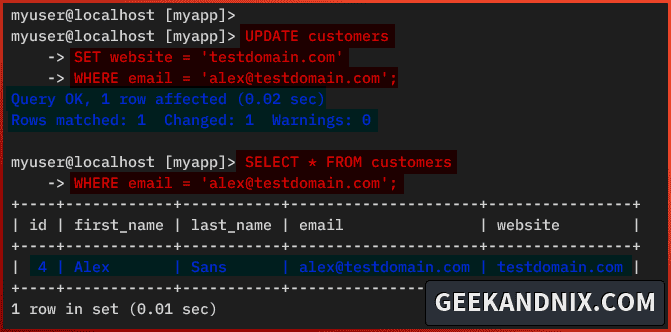
To update existing data on MySQL, use the UPDATE query followed by the WHERE condition.
1. Now, run the UPDATE query below to update the date on MySQL. In this case, you will update the column website to testdomain.com for specific customer [email protected].
UPDATE customers
SET website = 'testdomain.com'
WHERE email = '[email protected]';
2. Once the data is updated, run the SELECT query below to verify it.
SELECT * FROM customers
WHERE email = '[email protected]';
You will see that the website for customer [email protected] has changed to testdomain.com.
Deleting Data from MySQL
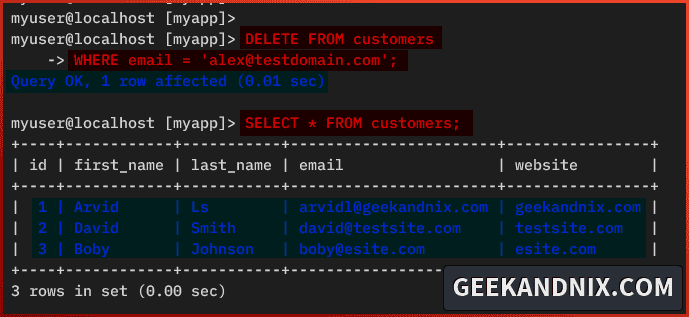
Now if you need to delete data from a specific column in MySQL, use the DELETE query like the following:
1. Run the DELETE query below to delete data from a specific column. The following example will reveal data for customer [email protected].
DELETE FROM customers
WHERE email = '[email protected]';
2. Now run the SELECT query below to verify available data in the customers table.
SELECT * FROM customers;You will see the customer [email protected] is removed from the table customers.
Uninstall MySQL Server
If you need to uninstall and remove MySQL Server from your FreeBSD system, do these steps:
1. First, run the command below to stop and disable the MySQL server.
service mysql-server stop
sysrc -x mysql_enable
2. Then, remove the MySQL server via the pkg delete command below. Furthermore, you will also delete orphaned packages via the pkg autoremove command.
pkg remove mysql80-server mysql80-client
pkg autoremove
3. Lastly, run the command below to delete the mysql user and group.
rmuser mysql
pw groupdel -n mysql
Conclusion
To conclude this journey, you have now installed MySQL Server on FreeBSD 14. In addition, you have configured MySQL root password and secured MySQL Server deployment by utilizing the mysql_secure_installation utility.
Moving beyond the basic, you have also learned how to create a user and database on MySQL Server. Then learned basic operations such as creating tables, inserting data, retrieving data, updating data, and deleting data in MySQL.
With this knowledge, you’re ready to install your application. Look no further, explore the following to deploy PHP applications using the FreeBSD stack:
