Apache: A Guide to Install and Configure on FreeBSD 14
Apache is an open-source and highly customizable web server that can be run anywhere, including FreeBSD. it offers a loadable dynamic module with support of HTTP2 and IPv6 and supports multiple backend language programming, such as PHP, Python, Ruby, etc.
In this guide, you will learn how to install the Apache web server on FreeBSD 14. In addition to that you will also learn the following:
- How to enable Apache modules.
- How to create Apache virtual hosts.
- How to manage Apache on FreeBSD via
serviceandapachectlutilities. - How to monitor Apache in real-time via
apachetop.
Prerequisites
Before proceeding, ensure you have the following:
- A FreeBSD 14 server.
Read more: FreeBSD 14: Step-by-Step Installation (With Screenshot) - A non-root user with sudo/administrator privileges.
- A domain name pointed to the server IP address (Optional: You can use Local domain).
- A pf (Packet Filter) firewall is enabled.
Read more: How to Set Up and Manage PF Firewall on FreeBSD 14
How to Install Apache on FreeBSD?
On FreeBSD, you can install the Apache web server in two different ways, via the pkg FreeBSD repository, or build yourself via Ports tree collection. In this example, you will install Apache via pkg and FreeBSD repository.
Complete the following steps to install Apache on FreeBSD:
1. To get started, run the pkg command below to update the FreeBSD package index and find packages that contain apache.
pkg update
pkg search apache
You will see the Apache web server on FreeBSD is named apache24.

2. Install the apache24 package using the pkg install command below. Input y to confirm with the installation.
pkg install apache24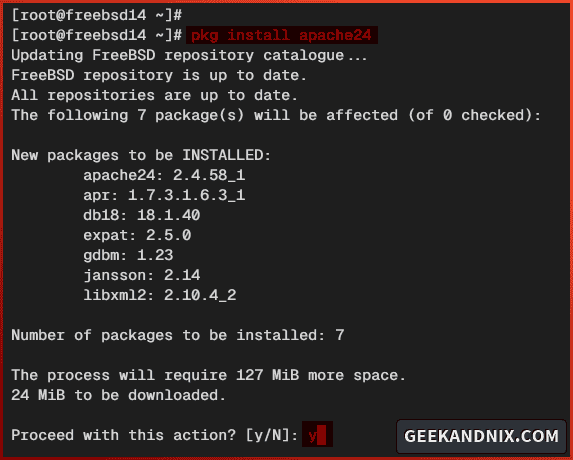
3. Once the installation is finished, run the command below to enable the apache24 service and verify it.
sysrc apache24_enable=yes
sysrc -a | grep apache
Managing Apache Service on FreeBSD
Now that you’ve installed Apache and enabled it via /etc/rc.conf file. Let’s take a look at how to manage Apache service on FreeBSD.
1. To start the apache24 service, run the command below.
service apache24 start2. To verify the apache24 service, use the following command.
service apache24 status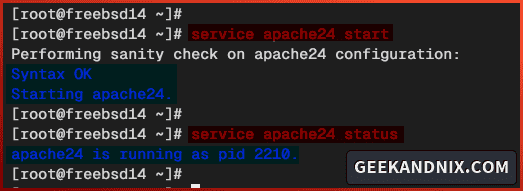
3. Now, if you need to stop the apache24 service, use the command below.
service apache24 stop4. Lastly, whenever you make changes to Apache, restart it using the following command.
service apache24 restartHow to Open HTTP and HTTPS Ports on PF?
In this example, we are using a FreeBSD server with pf (Packet Filter) enabled. In that case, you will need to open both HTTP and HTTPS ports on pf to allow traffic to the Apache web server.
Complete these actions to open HTTP and HTTPS ports via the pf firewall:
1. Open the pf configuration /etc/pf.conf using vim.
vim /etc/pf.confAdd both http and https services to pf.
tcp_services = "{ ssh, http, https, domain}"
...
...
pass in proto tcp to port $tcp_services keep state
Save the file and exit the editor.
2. Now run the command below to reload pf and apply your modification.
service pf restart3. Lastly, launch your web browser and visit http://192.168.5.80/. If the Apache installation is successful, you will see the default index.html page like the following.

Main Configuration and Directories for Apache
The main configuration directory for Apache on FreeBSD:
- /usr/local/etc/apache24: This is the main configuration directory for Apache on FreeBSD.
Configuration files and directories for Apache under the /usr/local/etc/apache24 directory:
- httpd.conf: The main configuration file for the Apache web server, which contains configuration such as ports, default Apache modules, and user and group settings.
- extra: supplement/additional configuration for Apache. In this directory, you will find example configurations such as virtual host, virtual host with HTTPS enabled, and Apache reverse proxy configuration.
- modules.d: If you need to add third-party or external modules to Apache, save the module configuration in the
modules.ddirectory. - Includes: additional snippets for Apache. Every
.conffile within the Includes directory will be loaded by Apache automatically.
Apache modules and document root directory:
- /usr/local/www/apache24/data: The default document root or document root directory for Apache on FreeBSD.
- /usr/local/libexec/apache24: List available modules for Apache web server.
Apache Log files:
- /var/log/httpd-access.log: The default Apache access log.
- /var/log/httpd-error.log: The default Apache error log
How to Enable Apache Modules on FreeBSD?
In this section, you will learn how to enable Apache modules on FreeBSD. So, let’s do this.
1. Run the vim command below to open the default Apache configuration /usr/local/etc/apache24/httpd.conf.
vim /usr/local/etc/apache24/httpd.confFind the LoadModule line and remove the # hash symbol at the beginning of the line. In this example, remove # to enable modules http2, ssl, and rewrite on your Apache web server.
LoadModule http2_module libexec/apache24/mod_http2.so
LoadModule ssl_module libexec/apache24/mod_ssl.so
LoadModule rewrite_module libexec/apache24/mod_rewrite.so
Save the file and exit the editor.
Pro tip: For faster workflow in Vim, use /pattern to search for pattern/keyword. So, for this example, you can use /LoadModule, /http2, /ssl, and /rewrite.
2. Now, run the command below to restart the apache24 service and implement your changes.
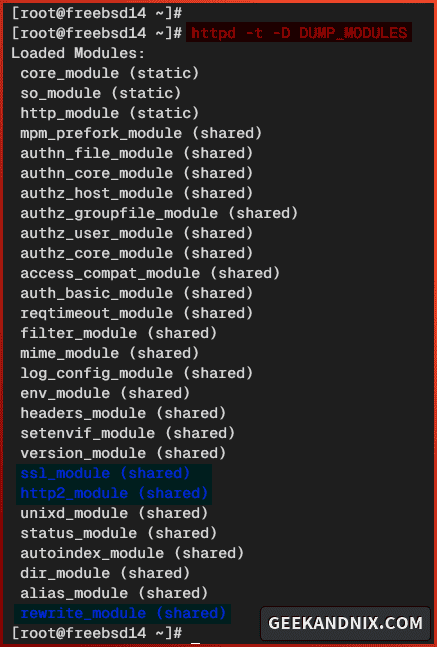
service apache24 restart3. Lastly, run the httpd command below to verify the list of enabled modules in Apache.
httpd -t -D DUMP_MODULESAs seen in the Loaded Modules section, those three modules ssl_module, http2_module, and rewrite_module are enabled.
How to Create Apache Virtual Host on FreeBSD?
After enabling some of the Apache modules, let’s move on to create a virtual host on the Apache web server. The Apache virtual host allows you to have multiple domain names on a single server. For example, you can have multiple web applications such as WordPress with different domain names for each.
Before creating a virtual host, establish the following:
- Domain Name: Decide what domain name for the virtual host.
- Document Root: Decide which document root directory. Your web application must be located in this directory.
- Log Files: path to log files (access and error logs) of your virtual host. this is important, especially for debugging.
In this example, you will create an Apache virtual host with the following details:
| Domain Name | Document Root | Log Files |
|---|---|---|
mydomain.devel | /usr/loca/www/mydomain | /var/log/mydomain.devel-access_log |
Let’s get started.
1. First, run the command below to create the document root directory /usr/local/www/mydomain and the index.html file using vim.
mkdir -p /usr/local/www/mydomain
vim /usr/local/www/mydomain/index.html
Insert the following HTML script into it.
<!doctype html>

<html lang="en">

<head>
  <meta charset="utf-8">
  <title>Welcome to Apache Virtual Host</title>
</head>

<body>
  <h1>Hello from mydomain.devel - Powered by Apache24 FreeBSD</h1>
</body>

</html>
Save and close the file.
2. Run the command below to change the ownership of /usr/local/www/mydomain directory to user and group www.
chown -R www:www /usr/local/www/mydomain3. Now, create the virtual host configuration /usr/local/etc/apache24/extra/mydomain.conf using vim.
vim /usr/local/etc/apache24/extra/mydomain.confAdd the following configuration and be sure to change the information related to the domain name, document root directory, and the path of log files.
<VirtualHost *:80>
    ServerAdmin [email protected]

    ServerName mydomain.devel
    ServerAlias www.mydomain.devel

    DocumentRoot "/usr/local/www/mydomain"

    <Directory "/usr/local/www/mydomain">
        Options Indexes MultiViews
        AllowOverride None
        Require all granted
    </Directory>

    ErrorLog "/var/log/mydomain.devel-error_log"
    CustomLog "/var/log/mydomain.devel-access_log" common
</VirtualHost>
Save and exit the file when finished.
4. After that, open the default Apache configuration /usr/local/etc/apache24/httpd.conf and enable the mydomain.conf virtual host by adding the following configuration to the bottom of the line.
Include etc/apache24/extra/mydomain.conf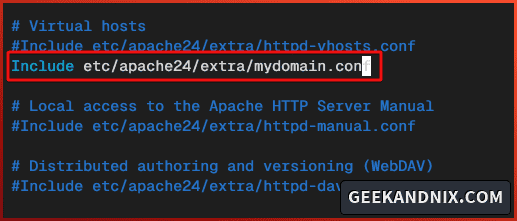
5. Next, run the following httpd command to verify Apache syntax and ensure that the virtual host file mydomain.conf is loaded.
httpd -t
httpd -t -D DUMP_VHOSTS
When you have the correct Apache syntax, you will get an output Syntax OK. If the virtual host mydomain.conf is loaded, you will see your domain name on the list of VirtualHost configuration.

6. Now that you’ve verified both Apache syntax and virtual host configuration, run the command below to restart the apache24 service and apply your modifications.
service apache24 restart7. Lastly, back to your web browser and visit your domain name (i.e: http://mydomain.devel/) to verify your virtual host configuration.
If successful, you will see the index.html page that you’ve created like the following:

apachectl: Utility for Managing Apache Web Server
At this point, you have completed the installation and configuration of the Apache web server on FreeBSD. Now you will learn how to utilize the apachectl utility for managing Apache, which includes verifying Apache syntax, checking enabled modules and virtual hosts, and managing Apache service.
Lore more about the apachectl utility using these actions:
1. To check the Apache version, run the apachectl command below. The second command with the -V (CAPSLOCK) option, will show you a detailed version of Apache including the compile parameters.
apachectl -v
apachectl -V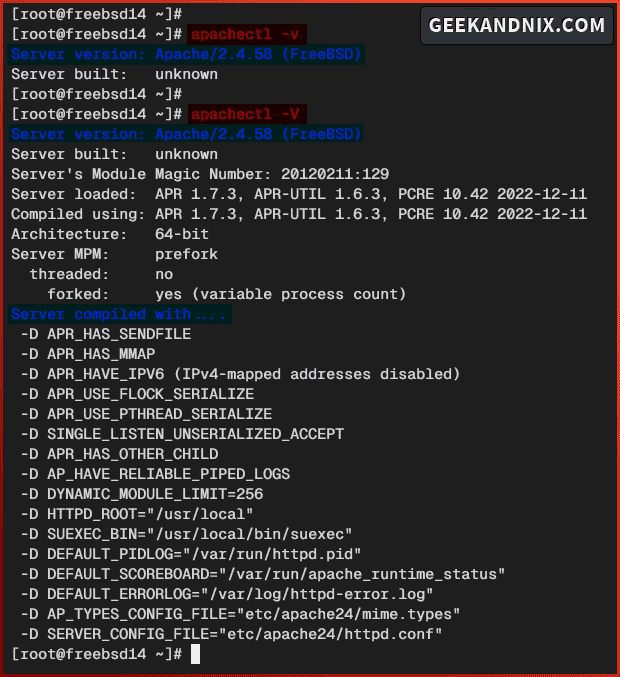
2. To test your Apache syntax, run the command below. If you’ve proper syntax, you will get an output ‘Syntax OK‘. Otherwise, you will see an error message with a detailed line number that causing the error.
apachectl -t3. Now run the apachectl command below to check the enabled virtual host and show the basic configuration of your Apache web server.
apachectl -S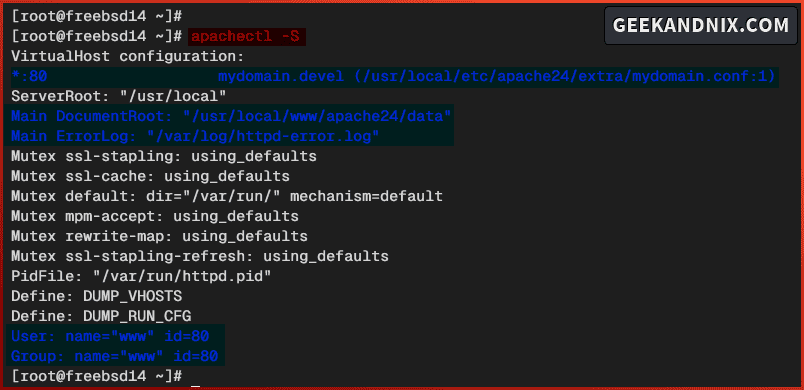
4. Next, check the list of enabled modules on Apache by running the apachectl command below. Within the Loaded Modules section, you will see enabled module lists.
apachectl -M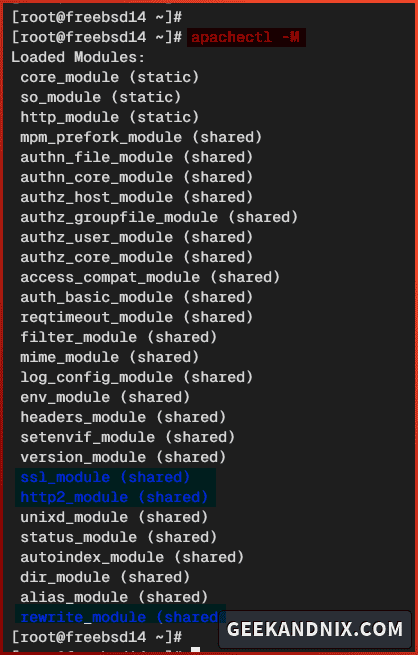
5. Lastly, you can also manage the apache24 service (including start, stop, restart, and status) via the apachectl command below.
# stop apache24
apachectl stop

# start apache24
apachectl start

# restart apache24 service
apachectl restart

# verify apache24 status
apachectl status
apachetop: Monitoring Apache Web Server in Real-Time
Another utility worth exploring is apachetop. The apachetop utility allows you to monitor the Apache web server in real-time. It works by monitoring directly the Apache log file and is available by default on the FreeBSD repository.
Execute the following actions to install and use apachetop for monitoring your Apache web server:
1. First, run the pkg command below to install the apachetop package. Type y and press ENTER to proceed.
pkg install apachetop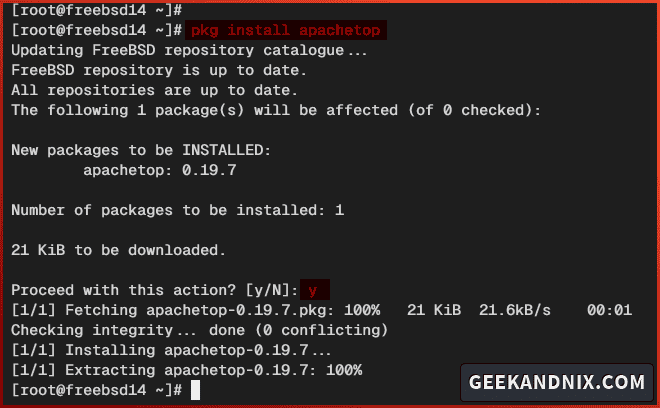
2. Now run the apachetop command below to monitor the Apache web server. Be sure to provide the access log file with the correct path.
apachetop -f /var/log/mydomain.devel-access_logIn the apachetop screen, you can see in real-time every request from clients. Also, you can see HTTP status codes in the percentage of requests.

Uninstalling Apache from FreeBSD
If you need to remove and uninstall Apache from FreeBSd, complete these tasks:
1. First, run the command below to stop and disable the apache24 service.
service apache24 stop
sysrc -x apache24
2. Now remove the apache24 and apachetop packages using the pkg command below. The additional command pkg automreve will automatically remove orphaned packages from your FreeBSD system.
pkg delete apache24 apachetop
pkg autoremove
3. Next, remove the configuration directory /usr/local/etc/apache24.
rm -rf /usr/local/etc/apache244. Lastly, if needed, remove the document root directory /usr/local/www/apache24 using the command below.
rm -rf /usr/local/www/apache24Common Error
During the process of creating an Apache virtual host, I got an error AH01630: client denied by server configuration.
To solve this error, add the Require all granted to the <Directory "/usr/local/www/mydomain">...</Directory> directive like the following:
    <Directory "/usr/local/www/mydomain">
        Options Indexes MultiViews
        AllowOverride None
        Require all granted
    </Directory>
Conclusion
In conclusion, you now have installed the Apache web server on the FreeBSD 14 server. You’ve also learned how to manage Apache service, how to enable Apache modules, and most importantly, how to create and set up Apache virtual host.
Furthermore, you’ve explored two different utilities: The apachectl utility for managing the Apache web server, and the apachetop for monitoring Apache in real-time.
From now on, you can host your web applications on FreeBSD. Combined with PHP and MySQL/MariaDB, you can host web applications such as WordPress on your FreeBSD server.
