How to Install PowerDNS on Ubuntu 24.04/22.04 Server
PowerDNS Authoritative is a DNS server software and alternative to BIND for Unix and Linux operating systems, including Ubuntu. It supports multiple database backends such as MySQL/MariaDB and PostgreSQL, DNSSEC, and provides load balancing and caching via DNSDist.
I also cover the PowerDNS for FreeBSD users, check this out: A Complete Guide to Install PowerDNS on FreeBSD 14.
In this tutorial, we’ll guide you through the installation process of PowerDNS on Ubuntu 24.04 server step-by-step.
Prerequisite
Before we begin, it’s important to ensure that you have the following:
- A Linux server running Ubuntu 24.04.
See more: How to Install Ubuntu 24.04 LTS Server - A non-root user with sudo/root privileges.
- A MariaDB server is installed.
See more: How to Install MariaDB on Ubuntu 24.04 - A domain name is pointed to a server IP address.
In addition, you might also consider setting up glue records on your domain name registrar if you’re interested in hosting your own authoritative servers.
Step 1 – Preparing the Ubuntu Server
Before installing PowerDNS on the Ubuntu server, you must complete the following tasks:
- Disable
systemd-resolvedservice: It is a service that provides name resolution for applications and it’s running on default port53. You must disable thesystemd-resolvedto allow the PowerDNS to run on default DNS port53. - Setting up DNS Resolver: With the
systemd-resolveddisabled, you must make a change on the DNS resolver configuration by using the static/etc/resolv.conffile. Instead of usingsystemd-resolvedfor managing the DNS resolver, you can define the DNS resolver on your own, such as by using Google or CloudFlare public DNS. - Setting up FQDN: To set up a DNS server, you must have the proper FQDN (Fully Qualified Domain Name), which combination of the server hostname, the domain name, and the server IP address.
Disable systemd-resolved Service
1. First, run the following command to disable the systemd-resolved service.
sudo systemctl disable --now systemd-resolved2. Now, verify the status of the systemd-resolved service to ensure that the service is stopped and disabled.
sudo systemctl status systemd-resolvedIf stopped, you should expect to see an output such as Active: inactive (dead).

Setting up DNS Resolver
1. Now, run the following command to remove the symlink file of /etc/resolv.conf. Then, create a new /etc/resolv.conf file with the Google DNS resolver 1.1.1.1.
# remove symlink file /etc/resolv.conf
sudo unlink /etc/resolv.conf

# create a new file /etc/resolv.conf with content
# nameserver 1.1.1.1
echo "nameserver 1.1.1.1" | sudo tee /etc/resolv.conf
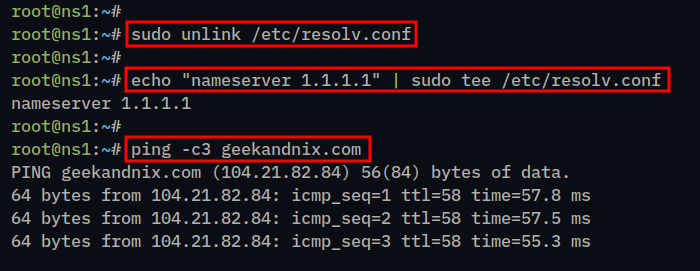
2. Run the ping command below to ensure that the Google DNS resolver is working.
ping geekandnix.com -c3If successful, you should receive ICMP replies from the server geekandnix.com like this:
Setting up FQDN for Ubuntu Server
1. Run the following command to set the FQDN of your server. In this demo, the FQDN of the server would be ns1.geekandnix.st.
sudo hostnamectl set-hostname ns1.geekandnix.st2. Now. open the /etc/hosts file using vim.
sudo vim /etc/hostsInsert the following lines and be sure to change the server IP address, FQDN, and hostname.
192.168.5.65 geekandnix.st ns1Save and close the file.
3. Next, run the following command to check the FQDN of the server. If successful, you should get the output such as ns1.geekandnix.st.
sudo hostname -f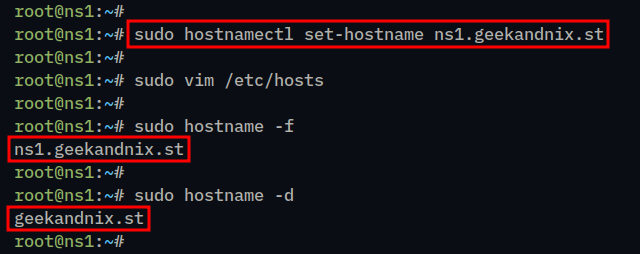
Step 2 – Installing PowerDNS Authoritative on Ubuntu
After preparing the server, we’ll move on to the installation of the PowerDNS Authoritative Server via the official PowerDNS repository.
Without delay, let’s dive in.
1. First, visit the PowerDNS repository manager and select the PowerDNS version for your installation. In this example, we’ll install PowerDNS Authoritative 4.9 for Ubuntu 24.04 “Noble Numbat“.
2. Add the GPG key of the PowerDNS repository using the following command.
curl https://repo.powerdns.com/FD380FBB-pub.asc | gpg --dearmor \
| sudo tee /usr/share/keyrings/pdns.gpg >/dev/null
3. Then, add the PowerDNS repository version 4.9 using the following command.
# for Ubuntu 24.04 Server "Noble Numbat"
echo "deb [arch=amd64 signed-by=/usr/share/keyrings/pdns.gpg] \
http://repo.powerdns.com/ubuntu noble-auth-49 main" \
| sudo tee /etc/apt/sources.list.d/pdns.list

# for Ubuntu 22.04 Server "Jammy Jallyfish"
echo "deb [arch=amd64 signed-by=/usr/share/keyrings/pdns.gpg] \
http://repo.powerdns.com/ubuntu jammy-auth-49 main" \
| sudo tee /etc/apt/sources.list.d/pdns.list
4. Now, run the following command to enable the pinning repository for the PowerDNS package. With this, PowerDNS packages from the PowerDNS repository will be prioritized over the distribution repository.
echo -e "Package: pdns-*\nPin: origin repo.powerdns.com\nPin-Priority: 600\n" \
| sudo tee /etc/apt/preferences.d/pdns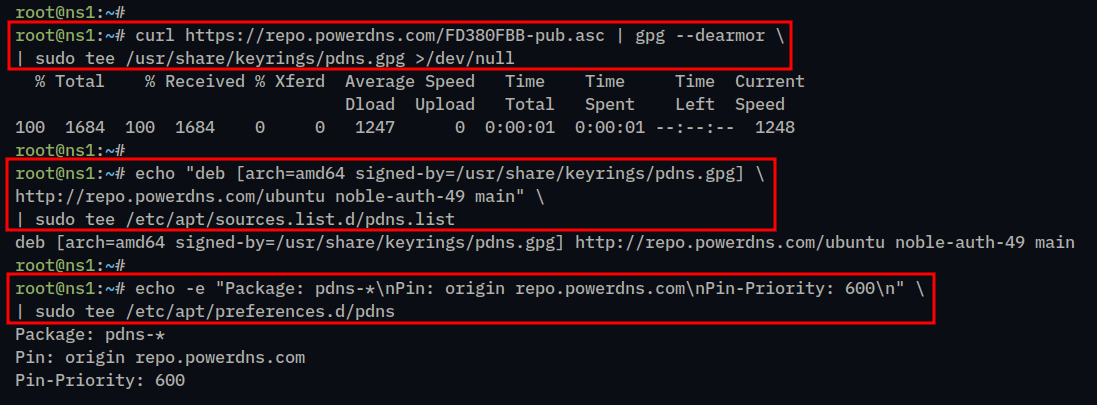
5. Next, run the following command to refresh your package index and apply the new PowerDNS repository.
sudo apt update
6. Now, install the PowerDNS server and PowerDNS backend MySQL to your Ubuntu machine using the apt install command below.
sudo apt install pdns-server pdns-backend-mysqlInput y when prompted, then press ENTER.
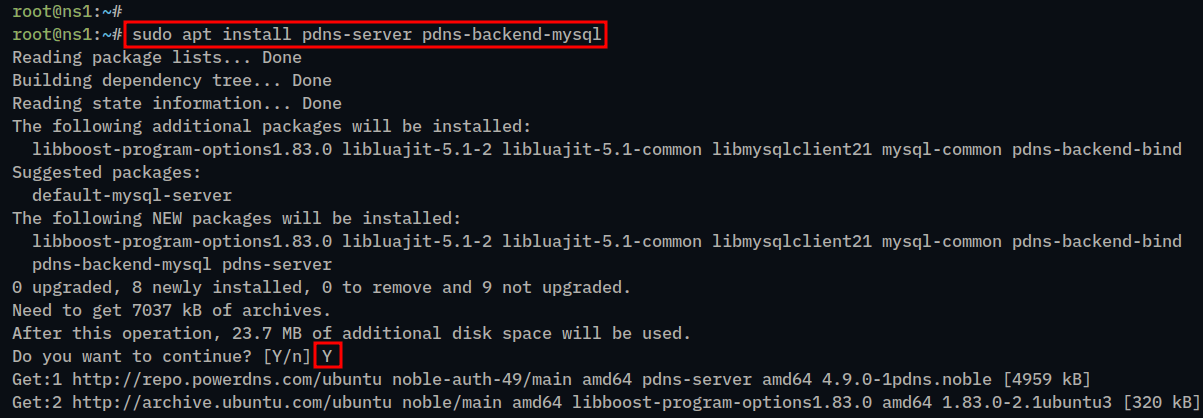
7. After the installation is complete, you will see an error Job for pdns.service failed because the control process exited with error code. As I check, the new PowerDNS is trying to use BIND as the backend. Check the file /etc/powerdns/pdns.d/bind.conf.
You can leave this error for now.
Step 3 – Adding MariaDB Database and Importing Database Schema
After installing the PowerDNS server, you can move on to setting up the MariaDB database and user. Then, you must import the PowerDNS database schema to the new database.
1. Log in to the MariaDB server using the following command. Input your MariaDB root password when prompted.
sudo mariadb -u root -p2. Now, run the following queries to create a new database pdns and user pdnsadmin. And be sure to change the password pdns_P4ssw0rd_db with a new password.
CREATE DATABASE pdns;
GRANT ALL ON pdns.* TO pdnsadmin@localhost IDENTIFIED BY 'pdns_P4ssw0rd_db';
FLUSH PRIVILEGES;
3. Type quit to exit from the MariaDB server.
quit
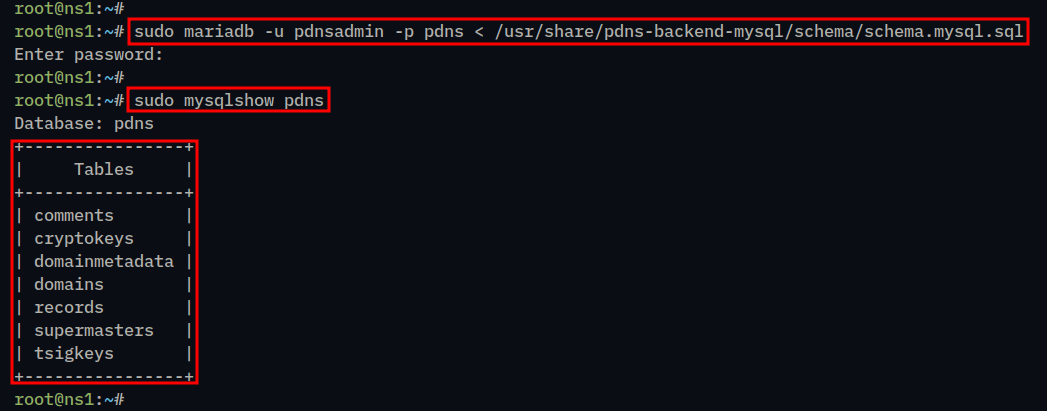
4. Next, run the mariadb command below to import the PowerDNS database schema /usr/share/pdns-backend-mysql/schema/schema.mysql.sql to the pdns database with the user pdnsadmin.
sudo mariadb -u pdnsadmin -p pdns < /usr/share/pdns-backend-mysql/schema/schema.mysql.sqlWhen prompted, input the password of the pdnsadmin user.
5. Lastly, run the following command to ensure that the PowerDNS database schema is available on the pdns database.
sudo mysqlshow pdnsIf successful, you should see multiple tables on the pdns database like this:
Step 4 – Integrating PowerDNS with MariaDB on Ubuntu
This section will cover how to set up and integrate the PowerDNS with the MariaDB database server.
1. Create a new PowerDNS configuration file /etc/powerdns/pdns.d/pdns.local.gmysql.conf using vim editor.
sudo vim /etc/powerdns/pdns.d/pdns.local.gmysql.confInsert the following configuration to enable the integration of PowerDNS and the MariaDB database. Be sure to customize the details of the database name, user, and password.
# pdns with MySQL/MariaDB backend
launch+=gmysql

# gmysql parameters
gmysql-host=127.0.0.1
gmysql-port=3306
gmysql-dbname=pdns
gmysql-user=pdnsadmin
gmysql-password=pdns_P4ssw0rd_db
gmysql-dnssec=yes
# gmysql-socket=
Save and close the file.
2. Now, run the following command to change the permission and ownership of the file /etc/powerdns/pdns.d/pdns.local.gmysql.conf.
# change permission file /etc/powerdns/pdns.d/pdns.local.gmysql.conf
# to 640 and ownership to pdns user
sudo chmod 640 /etc/powerdns/pdns.d/pdns.local.gmysql.conf
sudo chown root:pdns /etc/powerdns/pdns.d/pdns.local.gmysql.conf
3. After that, run the command below to stop the PowerDNS service. Then, verify the integration of PowerDNS and the MariaDB server to ensure that the database connection is successful.
# stopping pdns service
sudo systemctl stop pdns

# starting pdns server from command line
pdns_server --daemon=no --guardian=no --loglevel=9
Assuming the integration is successful, the output you receive should be similar to this:
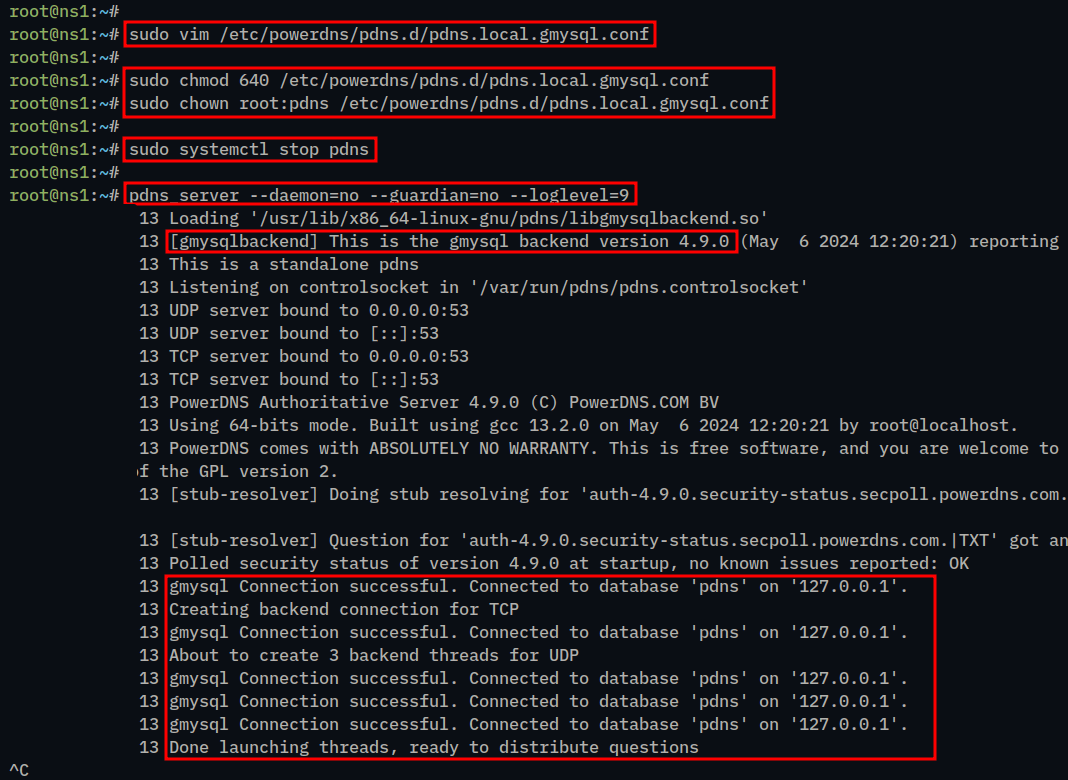
Press Ctrl+c to terminate the process.
4. Next, run the following command to start the PowerDNS service and ensure that the service is running.
# start pdns service
sudo systemctl start pdns

# checking pds service status
sudo systemctl status pdns
If successful, the output you receive should look something like this:

5. Lastly, run the following command to check the PowerDNS version.
dig chaos txt version.bind @127.0.0.1 +shortIf successful, you should get the PowerDNS version 4.9. Also, this confirms that the PowerDNS is running.

Now that you’ve completed the previous step, you should have the PowerDNS running with the MariaDB backend. Moving forward, you’ll be setting up zones using the PowerDNS utility pdnsutil.
Step 5 – Creating the Name Server
In the following steps, we’ll walk you through the configuration of the name server on PowerDNS by utilizing the pdnsutil.
The pdnsutil is a command-line interface for managing zones and DNSSEC on PowerDNS. It interacts with the PowerDNS database backend and can be run remotely.
Below is the name server configuration that we want to achieve:
| Name Server | IP Address |
|---|---|
| ns1.geekandnix.st | 192.168.5.65 |
1. To begin, run the pdnsutil command below to create a new zone mydomain.dev, and the name server ns1.geekandnix.st.
pdnsutil create-zone geekandnix.st ns1.geekandnix.st
2. Now, run the following command to add the PowerDNS server IP address 192.168.5.65 as an A record for the name server ns1.geekandnix.st.
pdnsutil add-record geekandnix.st ns1 A 192.168.5.65
3. Run the following command to modify the zone geekandnix.st. This will open the default text editor on your system.
pdnsutil edit-zone geekandnix.stChange the default SOA record with the proper configuration like this:

Save and close the file, then input a to apply the changes.

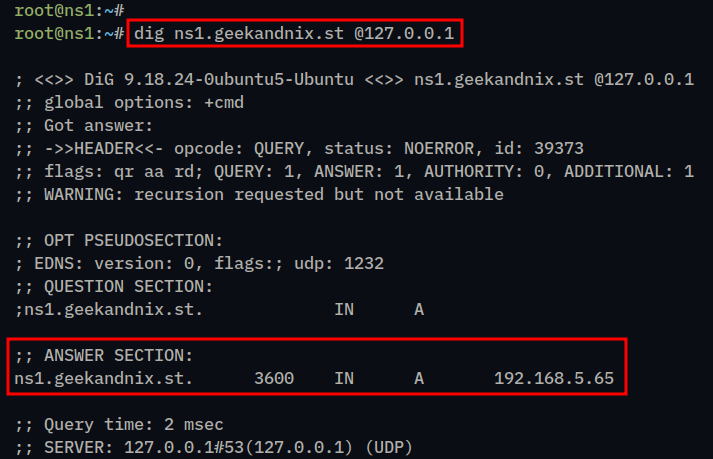
4. Now, run the following command to verify the A record of the name server ns1.mydomain.dev.
dig ns1.geekandnix.st @127.0.0.1If successful, the A record of the ns1.geekandnix.st should return the PowerDNS server IP address 192.168.5.65.
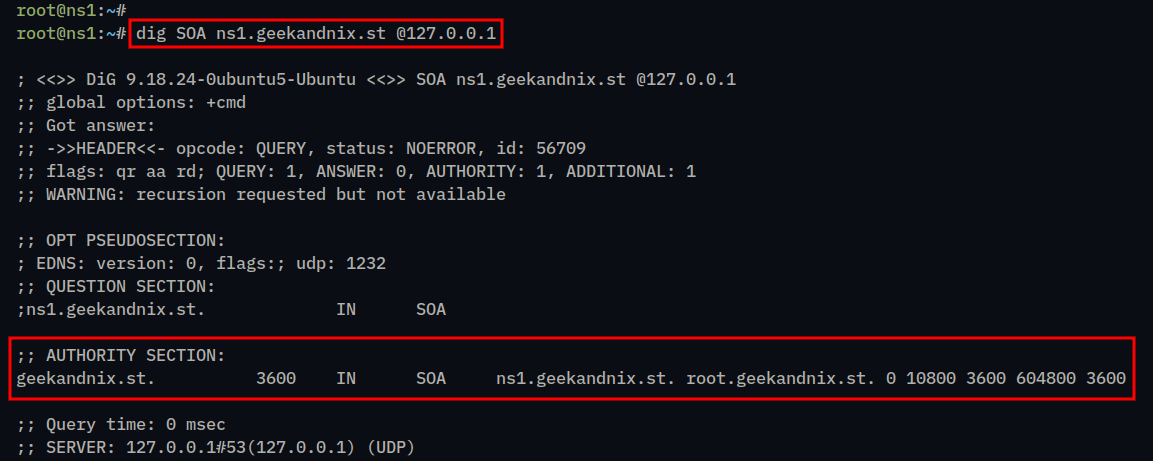
5. Furthermore, you may also verify the SOA record of the name server ns1.geekandnix.st using the following command.
dig SOA ns1.geekandnix.st @127.0.0.1Ensure that you have a proper SOA record configuration like this:
Step 6 – Adding Forward Zone via pdnsutil
Having the name server configured, the next step is to add the forward zone and domain names and sub-domains to the PowerDNS server. The forward zone is the domain mapping that ensures each domain name is pointed to its corresponding IP address.
Before adding the domain name to PowerDNS, you must first create a zone. As for this example, the zone geekandnix.st is created, so we just continue.
Below are the details of domain and sub-domains that you will be creating:
| Domain Name | DNS Record | IP Address/Handled By |
|---|---|---|
| geekandnix.st | A | 192.168.5.30 |
| www.geekandnix.st | CNAME | geekandnix.st |
| blog.geekandnix.st | A | 192.168.5.35 |
| ftp.geekandnix.st | A | 192.168.5.40 |
| mail.geekandnix.st | A | 192.168.5.45 |
| geekandnix.st | MX | mail.geekandnix.st |
1. Run the pdnsutil command below to add the domain names geekandnix.st and www.geekandnix.st to the PowerDNS. In this example, the domain name geekandnix.st will be pointed to the IP address 192.168.5.30, and the www.geekandnix.st is a CNAME or an alias that also points to the geekandnix.st.
# create A record geekandnix.st to IP address 192.168.5.30
pdnsutil add-record geekandnix.st @ A 192.168.5.30

# create CNAME www.geekandnix.st to geekandnix.st
pdnsutil add-record geekandnix.st www CNAME geekandnix.st
2. Now, add sub-domains blog.geekandnix.st and ftp.geekandnix.st using the following command. In this scenario, the sub-domain blog.geekandnix.st will be pointed to IP address 192.168.5.35, and the ftp.geekandnix.st will be pointed to 192.168.5.40.
# create A record blog.geekandnix.st to IP address 192.168.5.35
pdnsutil add-record geekandnix.st blog A 192.168.5.35

# create A record ftp.geekandnix.st to IP address 192.168.5.40
pdnsutil add-record geekandnix.st ftp A 192.168.5.40
3. After that, run the following command to add a new sub-domain mail.geekandnix.st, which will be pointed to IP address 192.168.5.45. Then, add the MX record for the domain geekandnix.st to the mail server mail.geekandnix.st.
# create A record for mail server
# mail.geekandnix.st to IP address 192.168.5.45
pdnsutil add-record geekandnix.st mail A 192.168.5.45

# adding MX record for geekandnix.st to mail server mail.geekandnix.st
pdnsutil add-record geekandnix.st @ MX "10 mail.geekandnix.st"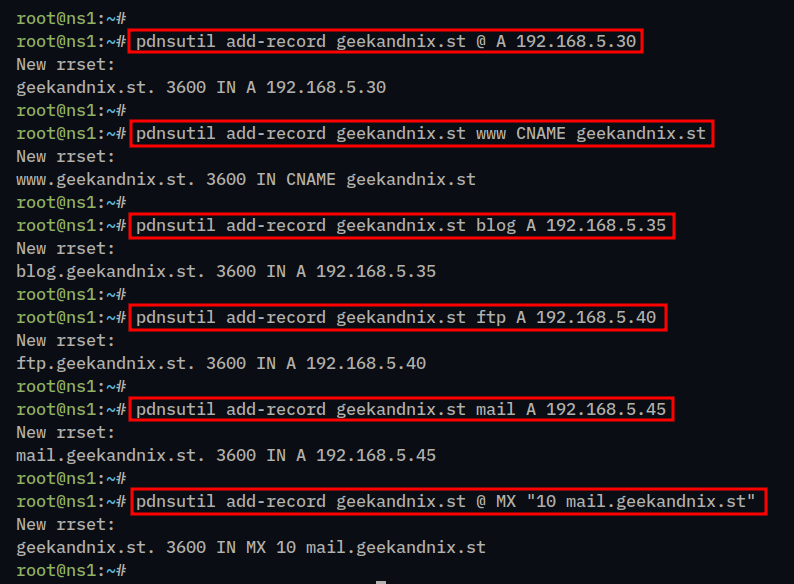
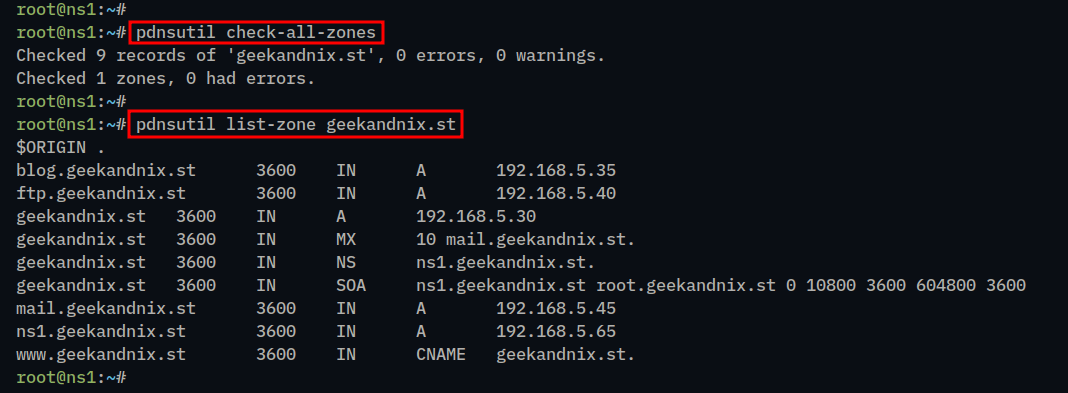
4. Next, run the following command to ensure that you have the proper zone configuration. Then, verify the list of DNS records on the zone geekandnix.st.
# checking zone configurations
pdnsutil check-all-zones

# list available zones for geekandnix.st
pdnsutil list-zone geekandnix.st
If you have proper zone configuration, you should see the following output – And so far, you’ll have the following DNS records on the zone geekandnix.st.
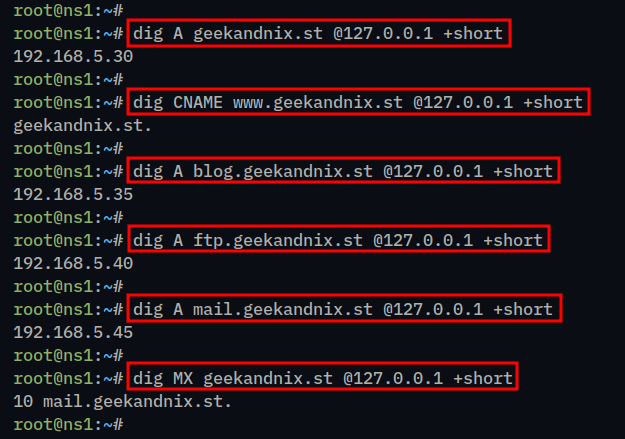
5. Lastly, to ensure that you’re proper forward zones, run the following dig commands to query the domain name and sub-domains that you’ve configured. The parameter +short will print the shortened output.
# checking A record for geekandnix.st
dig A geekandnix.st @127.0.0.1 +short

# checking CNAME record for www.geekandnix.st
dig CNAME www.geekandnix.st @127.0.0.1 +short

# checking A record for blog.geekandnix.st
dig A blog.geekandnix.st @127.0.0.1 +short

# checking A record for ftp.geekandnix.st
dig A ftp.geekandnix.st @127.0.0.1 +short

# checking A record for mail.geekandnix.st
dig A mail.geekandnix.st @127.0.0.1 +short

# checking MX record for mail.geekandnix.st
dig MX mail.geekandnix.st @127.0.0.1 +short
If you’ve proper forward zone configuration, each domain name will be pointed to the correct IP address like this:
Step 7 – Adding Reverse Zone and PTR Records via pdnsutil
Now that you have created a forward zone on PowerDNS, the next step is to create a reverse zone and add a PTR record for each domain name that you’ve configured.
While the forward zone translates the domain name to the IP address, the reverse zone translates the IP address to the corresponding domain name. The reverse zone and PTR records are needed, especially if you want to host a mail server.
1. First, run the following command to create a new reverse zone 5.168.192.in-addr.arpa and add the name server ns1.geekandnix.st into it. Then, add the A record for the name server ns1.geekandnix.st to the proper PowerDNS IP address 192.168.5.65.
The reverse zone name is taken from the reverse IP address prefix. In this example, each domain name is pointed to the subnet IP address 192.168.5.0/24, so the name of the reverse zone should be 5.168.192.in-addr.arpa.
# create reverse zone 5.168.192.in-addr.arpa with
# default name server ns1.geekandnix.st
pdnsutil create-zone 5.168.192.in-addr.arpa ns1.geekandnix.st

# add A record for name server ns1.geekandnix.st to IP address 192.168.5.65
pdnsutil add-record 5.168.192.in-addr.arpa ns1 A 192.168.5.65
2. Now, run the following commands to add the PTR record for each domain name.
| Domain | IP Address | PTR Record |
|---|---|---|
| ns1.geekandnix.st | 192.168.5.65 | 65 |
| geekandnix.st | 192.168.5.30 | 30 |
| blog.geekandnix.st | 192.168.5.35 | 35 |
| ftp.geekandnix.st | 192.168.5.40 | 40 |
| mail.geekandnix.st | 192.168.5.45 | 45 |
# adding PTR record for ns1.geekandnix.st with IP address 192.168.5.65
pdnsutil add-record 5.168.192.in-addr.arpa 65 PTR ns1.geekandnix.st

# adding PTR record for geekandnix.st with IP address 192.168.5.30
pdnsutil add-record 5.168.192.in-addr.arpa 30 PTR geekandnix.st

# adding PTR record for blog.geekandnix.st with IP address 192.168.5.35
pdnsutil add-record 5.168.192.in-addr.arpa 35 PTR blog.geekandnix.st

# adding PTR record for ftp.geekandnix.st with IP address 192.168.5.40
pdnsutil add-record 5.168.192.in-addr.arpa 40 PTR ftp.geekandnix.st

# adding PTR record for mail.geekandnix.st with IP address 192.168.5.45
pdnsutil add-record 5.168.192.in-addr.arpa 45 PTR mail.geekandnix.st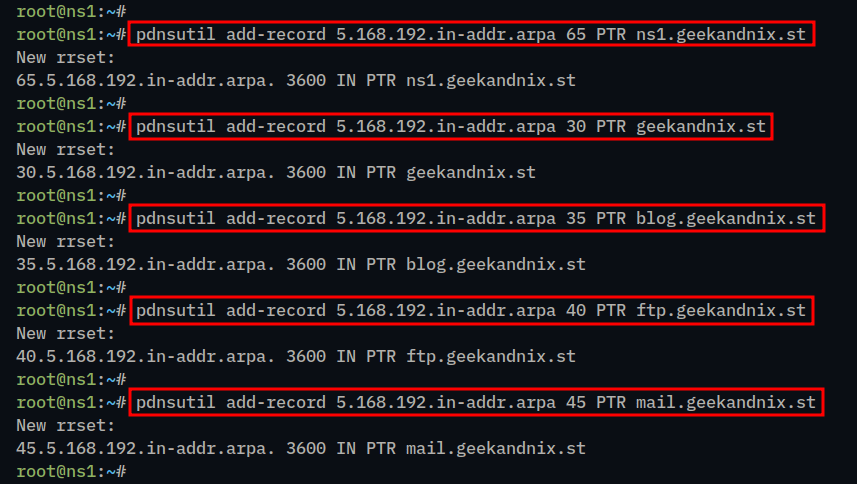
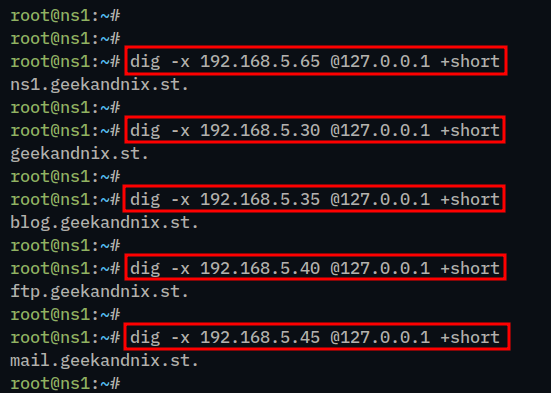
3. Lastly, run the following command to verify the PTR record for each IP address.
# checking PTR record for IP address 192.168.5.65
dig -x 192.168.5.65 @127.0.0.1 +short

# checking PTR record for IP address 192.168.5.30
dig -x 192.168.5.30 @127.0.0.1 +short

# checking PTR record for IP address 192.168.5.35
dig -x 192.168.5.35 @127.0.0.1 +short

# checking PTR record for IP address 192.168.5.40
dig -x 192.168.5.40 @127.0.0.1 +short

# checking PTR record for IP address 192.168.5.45
dig -x 192.168.5.45 @127.0.0.1 +short
If successful, each IP address should be pointed to the proper domain name like this:
Conclusion
Excellent work! You’ve installed PowerDNS on your Ubuntu 24.04 machine with MariaDB as the database backend. Furthermore, you have also created a name server, forward zone, and reverse zone on PowerDNS using pdnsutil.
You can now add more domain names to PowerDNS, set up DNSSEC, and install PowerDNS-Admin or poweradmin for managing PowerDNS via the web browser.
Also, go check our new category about FreeBSD Howto’s.

