How to Install BIND on Ubuntu 24.04/22.04 Server
BIND or Berkeley Internet Name Domain is an open-source DNS server software for Linux distributions, such as Ubuntu. It is an implementation of the DNS (Domain Name System) protocol that translates domain names to IP addresses. BIND can be used for both authoritative and recursive DNS, and also supports DNSSEC, split DNS, and load balancing.
I also cover BIND on FreeBSD, check out How to Install BIND DNS Server on FreeBSD 14.
In this tutorial, you will learn how to install a BIND DNS Server on Ubuntu 24.04 server “Noble Numbat“.
Prerequisites
To complete this guide, you must have the following:
- An Ubuntu 24.04 Server.
- An administrative user or non-root user with sudo/root privileges.
- A domain name pointed to the server IP address.
- An UFW (Uncomplicated Firewall) is up and running.
See more:
How to install Ubuntu 24.04 LTS Server
Master the UFW Firewall on Ubuntu: 17 Practical Examples
It’s also worth mentioning that if you’re implementing for the external domain name, ensure that you have a Glue Record such as ns1.geekandnix.io configured via your domain control panel.
Setting Up FQDN (Fully Qualified Domain Name)
The first step to set up proper BIND installation is by configuring FQDN (Fully Qualified Domain Name) for your server. This example will be using an Ubuntu server with a hostname ns1, and the fqdn will be ns1.geekandnix.io.
1. Run the following command to set up the hostname on your system. In this case, the hostname will be ns1.
sudo hostnamectl set-hostname ns1.geekandnix.io2. Next, open the /etc/hosts file using the vim command below.
sudo vim /etc/hostsAdd the following lines and be sure to change the details of the IP address, fqdn, and the hostname.
192.168.5.65 ns1.geekandnix.io ns1Save the file and exit the file by pressing ESC, then type :wq to write and quit.
3. Lastly, run the command below to verify the fqdn of your system. If the configuration is successful, you should receive an output such as ns1.geekandnix.io.
sudo hostname -f
sudo hostname -d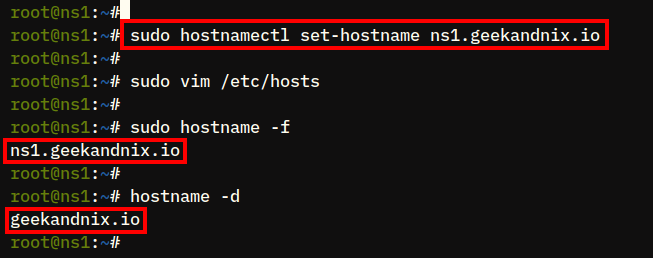
Opening DNS Port 53/udp with UFW
The default DNS port is 53 and running within UDP protocol. After configuring fqdn, you will open port 53/udp via UFW (Uncomplicated Firewall) and allow incoming traffic into it.
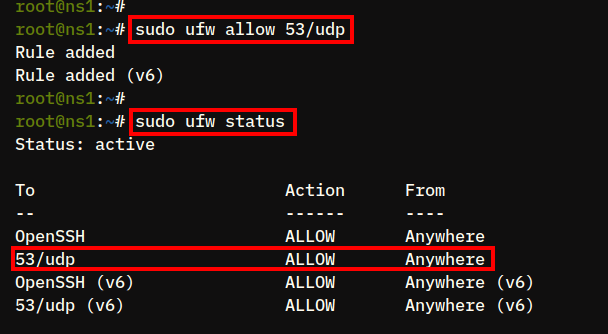
Execute the ufw command below to open the DNS port 53/udp.
sudo ufw allow 53/udp2. Then, reload the UFW and verify the list enabled rules using the command below.
sudo ufw reload
sudo ufw status
Ensure the DNS port 53/udp is available on UFW rule lists.
Installing BIND on Ubuntu Server
Having the fqdn configured, you’re now ready to install BIND to your Ubuntu machine. In this section, you will install BIND packages and set up BIND to run on the IPv4 only.
1. To start, run the following apt command to update your package index and ensure that you have the latest version of package information.
sudo apt update
2. Then, install BIND using the following apt install command. Input y when prompted, then press ENTER.
sudo apt install bind9 bind9utils bind9-doc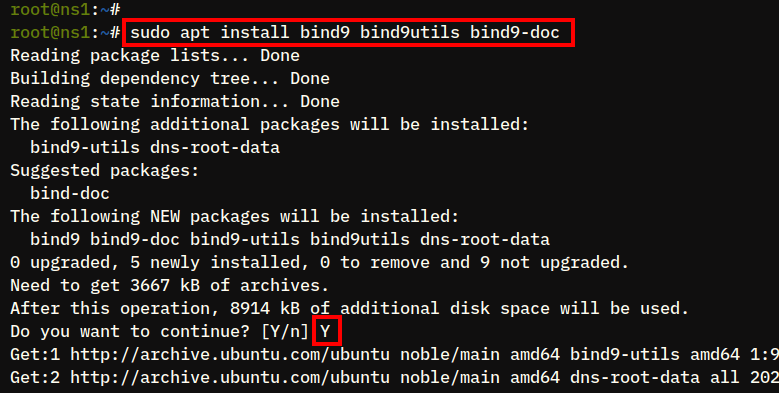
3. Once BIND is installed, open the file /etc/default/named using the vim command below.
sudo vim /etc/default/namedAdd the parameter -4 to the OPTIONS line. This will run BIND on IPv4.
OPTIONS="-u bind -4"Save the file and exit the editor.
4. Next, run the following command to restart the BIND service called named and apply the changes.
sudo systemctl restart named5. Lastly, check the named service using the command below to ensure that the service is running and enabled.
sudo systemctl is-enabled named
sudo systemctl status named
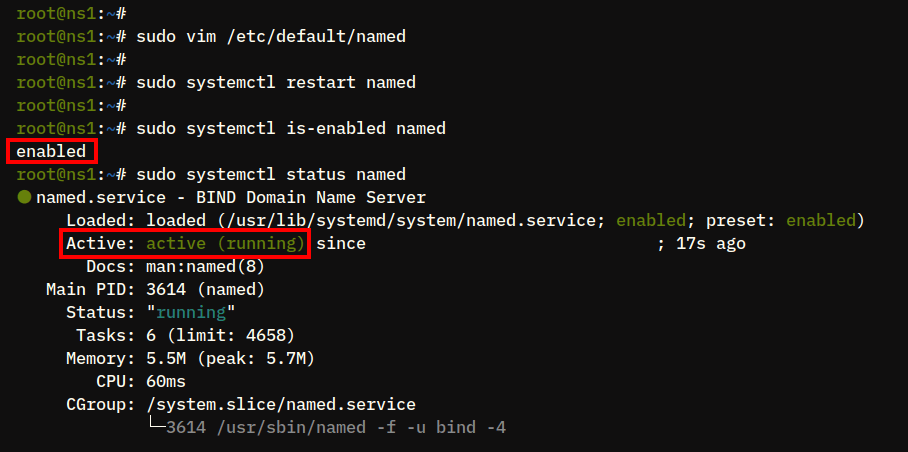
If the the named service is running and enabled, the output you receive should be similar to:
Configuring BIND DNS Server
On Ubuntu systems, the default BIND configuration file is named.conf.options and stored in the /etc/bind directory. After installing BIND, you will configure BIND as an authoritative DNS server by modifying the default config file /etc/bind/named.conf.options.
1. To start, run the following command to backup the default BIND configuration named.conf.options to named.conf.options.orig. The default BIND configurations are located in the /etc/bind/ directory.
sudo cp /etc/bind/named.conf.options /etc/bind/named.conf.options.orig2. Next, open the BIND configuration /etc/bind/named.conf.options using the vim command below.
sudo vim /etc/bind/named.conf.optionsChange the default configuration with the following lines.
acl trusted {
    192.168.5.0/24;
};
options {
    directory "/var/cache/bind";

        allow-query { localhost; trusted; any; };
        allow-transfer { localhost; };
        forwarders { 1.1.1.1; 8.8.8.8; };
        recursion yes;
        dnssec-validation auto;

    // listen-on-v6 { any; };
};
Save the file and exit the editor.
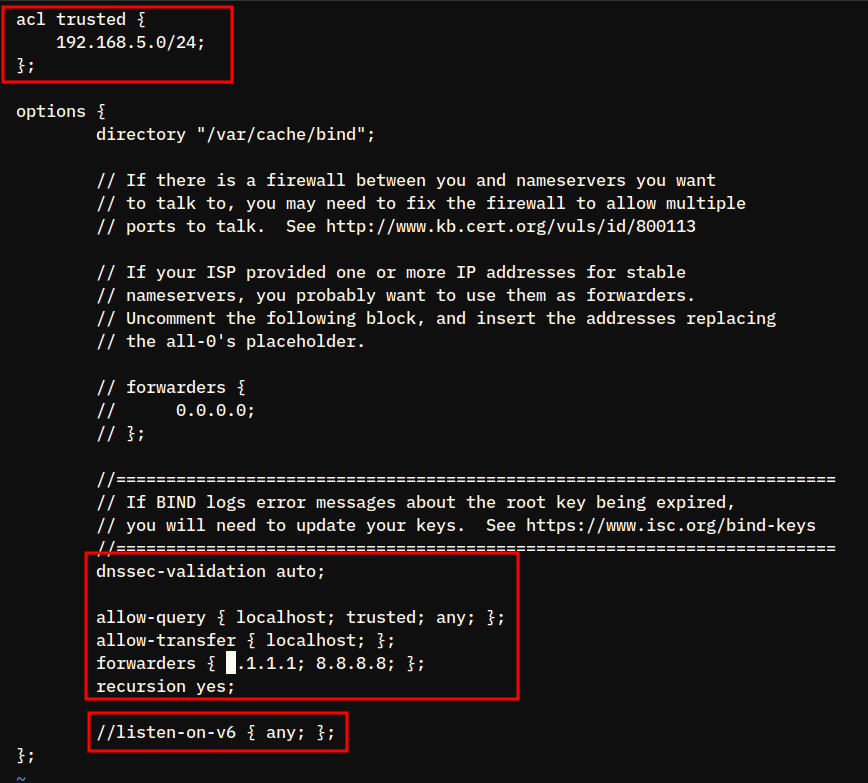
Below some detail configurations you should know:
acl trusted {..};: You will create a new acl or access control list calledtrustedthat contains the internal network subnet192.168.5.0/24.allow-query {..};: Hosts that will be allowed to query this DNS server arelocalhost, thetrustednetwork (acl), andanyto allow query from both internal and external network (internet).allow-transer {..};: Allow transfer zones on localhost. This parameter is used for creating a Master/Slave BIND installation.recursion yes;: enable recursion.// listen-on-v6 { any; };: By adding character//will disable the option. And this, you will disable BIND to run on IPv6.
3. Lastly, run the following command to check and verify the BIND configuration /etc/bind/named.conf.options. If you have a proper BIND configuration, the output should be blank or nothing. When there is an error, you should receive a detailed output related to that error.
sudo named-checkconf /etc/bind/named.conf.optionsCreating Zones
By definition, DNS zones refer to entities part of the domain namespace that is managed by administrators. DNS Zones is a namespace that allows administrators to create, edit, and manage DNS components such as domain names. This section is dedicated to showing you how to define zones on the BIND DNS server.
1. To define zones, open the file /etc/bind/named.conf.local using vim.
sudo vim /etc/bind/named.conf.local2. Add the following configuration to the bottom of the line.
zone "geekandnix.io" IN {
        type master;
        file "/etc/bind/forward.geekandnix.io";
        allow-update { none; };
};
zone "5.168.192.in-addr.arpa" IN {
        type master;
        file "/etc/bind/reverse.geekandnix.io";
        allow-update { none; };
};
Save and close the file when finished.
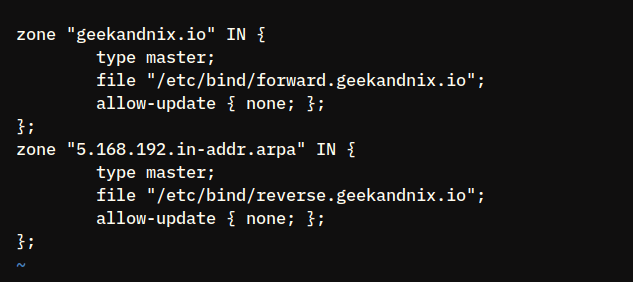
In this case, you will define two types of DNS zones for the geekandnix.io:
- Forward zone
geekandnix.iogeekandnix.iogeekandnix.io/etc/bind/forward..geekandnix.io - Reverse zone
5.168.192.in-addr.arpa: This is the reverse zone for the domaingeekandnix.io/etc/bind/reverse..geekandnix.io
Setting Up Forward Zone
The forward zone is a part of the DNS server that handles the mapping of domain names to their corresponding IP addresses.
When you type geekandnix.iogeekandnix.iogeekandnix.io
Now, let’s delve deeper into setting up a forward zone on the BIND DNS on Ubuntu Server.
1. First, run the following command to copy the default forward zone configuration db.local to forward..geekandnix.io
sudo cp /etc/bind/db.local /etc/bind/forward.geekandnix.io2. Then, open the file /etc/bind/forward. using geekandnix.iovim editor.
sudo vim /etc/bind/forward.geekandnix.io3. Lastly, change the configuration with the following lines. Be aware that there is a dot . at the end of each domain name.
;
; BIND data file for local loopback interface
;
$TTL    604800
@       IN      SOA     ns1.geekandnix.io. root.ns1.geekandnix.io. (
                              3         ; Serial
                         604800         ; Refresh
                          86400         ; Retry
                        2419200         ; Expire
                         604800 )       ; Negative Cache TTL
;

;Name Server Information - NS Record
@ IN NS ns1.geekandnix.io.

;IP address resolved to the name server
ns1 IN A 192.168.5.65

;Mail Server MX (Mail exchanger) Record
geekandnix.io. IN MX 10 mail.geekandnix.io.

;A Record for Hostnames
www IN A 192.168.5.50
mail IN A 192.168.5.60

;CNAME Record
ftp IN CNAME www.geekandnix.io.
Save and exit the file.
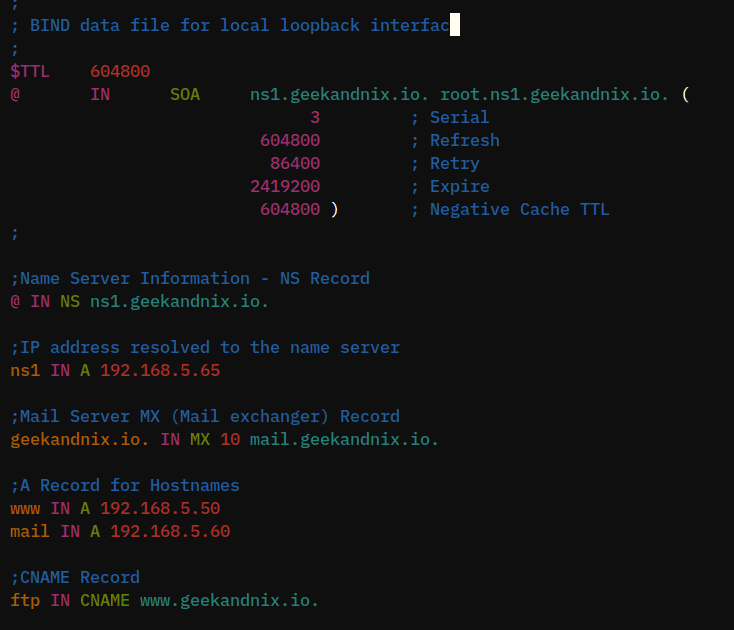
With this configuration, you will create the following DNS records:
- An NS record or name server
ns1.geekandnix.iowill be resolved to the current DNS Server IP address192.168.5.65. - An MX record that handles emailing for the
geekandnix.iomail..geekandnix.io - Two A records for domain names:
www.with IP addressgeekandnix.io192.168.5.50, and themail.with IP addressgeekandnix.io192.168.5.60. - A CNAME record
ftp.will be resolved to the same IP address as thegeekandnix.iowww..geekandnix.io
Setting Up Reverse Zone
Now that the configuration of the forward zone is complete, it’s time to move on to set up the Reverse Zone on the BIND DNS Server. The reverse zone is often called a PTR record.
While the forward zone is translating from domain name to IP address, the reverse zone is the opposite of the forward zone; it translates an IP address to the domain name. The reverse zone is important when you run services like a mail server, as it is used to determine if the source is a spammer or not.
The following section will show you how to create a reverse zone for domain names that are available in the forward zone /etc/bind/forward..geekandnix.io
1. First, run the following command to copy the default reverse zone configuration db.127 to reverse..geekandnix.io
sudo cp /etc/bind/db.127 /etc/bind/reverse.geekandnix.io2. Then, open the reverse zone that you have copied /etc/bind/reverse. using geekandnix.iovim.
sudo vim /etc/bind/reverse.geekandnix.io3. Change the default configuration with the following lines.
;
; BIND reverse data file for local loopback interface
;
$TTL    604800
@       IN      SOA     geekandnix.io. root.geekandnix.io. (
                              2         ; Serial
                         604800         ; Refresh
                          86400         ; Retry
                        2419200         ; Expire
                         604800 )       ; Negative Cache TTL
;
;Your Name Server Info
@ IN NS ns1.geekandnix.io.
ns1 IN A 192.168.5.65

;Reverse Lookup for Your DNS Server
65 IN PTR ns1.geekandnix.io.

;PTR Record IP address to HostName
50 IN PTR www.geekandnix.io.
60 IN PTR mail.geekandnix.io.
Save and close the file when finished.
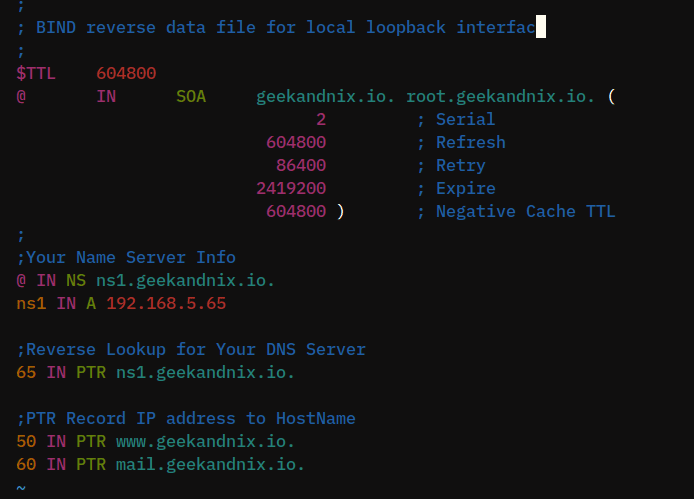
With this example, you will create PTR records for the following domain names:
- A name server
ns1.geekandnix.iowith the value65, which is taken from the end of the IP address192.168.5.65, where the name serverns1.is resolved.geekandnix.io - A domain name
www.with the valuegeekandnix.io50. The number50is taken from the end of the IP address192.168.5.50, where the domainwww.is resolved.geekandnix.io - A domain name
mail.with the valuegeekandnix.io60. The number60is taken from the end of the IP address192.168.5.60, where the domainmail.is resolved.geekandnix.io
Verifying Zones
After completing the previous steps of configuring both forward and reverse zones, you should now be ready to restart the BIND named service and apply the changes. But before that, you will verify BIND configurations and zone files to ensure that you have proper settings.
1. Run the command below to verify your BIND configurations. When you have proper and correct configurations, there will be no output.
sudo named-checkconf2. Next, run the command named-checkzone below to verify the forward zone geekandnix.io5.168.192.in-addr.arpa. When you have correct and proper zone files, you should see the output OK.
sudo named-checkzone geekandnix.io /etc/bind/forward.geekandnix.io
sudo named-checkzone 5.168.192.in-addr.arpa /etc/bind/reverse.geekandnix.io
3. With BIND configuration and zone files verified, run the command below to restart the BIND named service and apply the changes.
sudo systemctl restart namedAt this point, you have successfully reached where the DNS server ns1. is running with domain names geekandnix.iowww., geekandnix.iomail., and geekandnix.ioftp.. You can now proceed to the next step for verifying BIND installation via the geekandnix.iodig DNS Lookup utility.
Testing and Diagnosing BIND with Dig
In this step, you will be testing BIND installation using dig-DNS Lookup Tool. The dig command is available on most Linux distributions, including Ubuntu system.
1. To start, you must ensure that the systemd-resolved are stopped and disabled. Run the following command to stop and disable the systemd-resolved, then verify the service to ensure that it is stopped.
sudo systemctl disable --now systemd-resolved
sudo systemctl status systemd-resolved
2. Now, run the following command to remove the link file /etc/resolv.conf. Then, create a new resolver configuration /etc/resolv.conf using vim.
sudo unlink /etc/resolv.conf
sudo vim /etc/resolv.conf
Add the following lines to the file and be sure to change the domain name and IP address with your DNS Server details.
search geekandnix.io
nameserver 192.168.5.65

nameserver 1.1.1.1
nameserver 8.8.8.8
Save and close the file when finished.
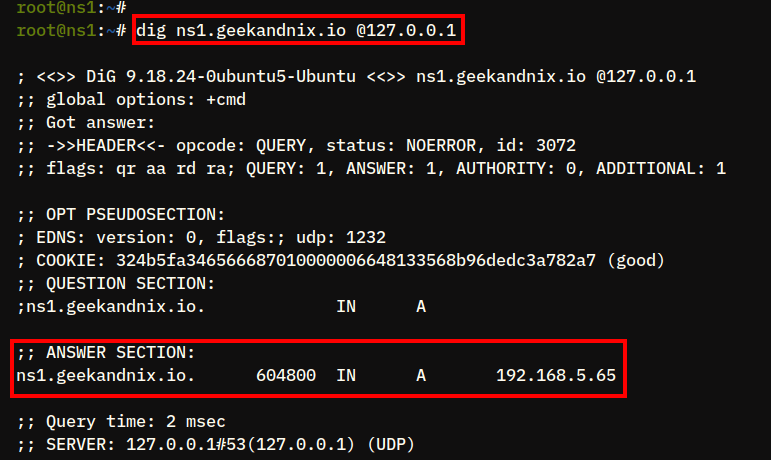
3. After configuring the DNS resolver, run the dig command below to verify the name Server ns1..geekandnix.io
dig ns1.geekandnix.ioIf everything goes smoothly, you should see the name server ns1. is pointed to the server IP address geekandnix.io192.168.5.65. Also, you can see the output status: NOERROR in the HEADER section, which means the query is successful. At the bottom output, you can see that your DNS query is handled by the DNS Server with IP address 192.168.5.65.
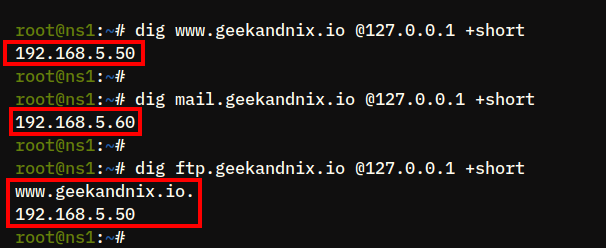
4. Next, run the following dig commands to verify other domain names www., geekandnix.iomail., and geekandnix.ioftp.. The parameter geekandnix.io+short is used to shorten the output.
dig www.geekandnix.io +short
dig mail.geekandnix.io +short
dig ftp.geekandnix.io +short
The result should be the domain www. and geekandnix.ioftp. pointed to the same IP address geekandnix.io192.168.5.50, and the domain mail. to IP address geekandnix.io192.168.5.60.
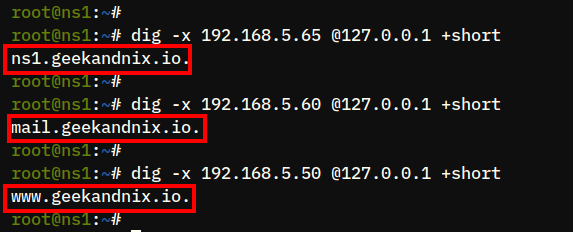
5. Lastly, run the following dig commands to verify the PTR record or reverse zone of the IP address 192.168.5.65, 192.168.5.50, and 192.168.5.60.
dig -x 192.168.5.65
dig -x 192.168.5.50 +short
dig -x 192.168.5.60 +short
You can expect the IP address 192.168.5.50 pointed to the name server ns1..geekandnix.iov
You will also notice that the IP address 192.168.5.50 is pointed to the domain www., and the IP address geekandnix.io192.168.5.60 is pointed to the domain mail..geekandnix.io
Conclusion
In conclusion, by following the steps outlined in this guide, you should now have a good understanding of how to install the BIND DNS Server on Ubuntu 24.04. We covered the installation of BIND, configuring the forward zone and reverse zone, as well as the basic usage of the dig utility for testing and troubleshooting the DNS Server.
Now, you might also want to consider enabling DNSSEC on BIND to prevent cache poisoning attacks and creating additional ACLs (Access Control Lists) to control who is allowed to access the DNS server and who is not.
