17 Beginner’s Guides to UFW (Uncomplicated Firewall) on Ubuntu
UFW or Uncomplicated Firewall is a Python-based firewall software that available by default on Ubuntu Server. It is an alternative to IPTables, which provides a user-friendly command line, and is easier to implement. Compared to IPTables, UFW provides readable command lines that are easy to understand. UFW makes users easier to set up their firewall, even without an in-depth understanding of networking and TCP/IP background.
In this article, you will learn how to use UFW practically. You will learn most UFW commands that you can implement in real-world scenarios.
Prerequisites
Before you start, ensure that you have the Ubuntu server up and running with UFW installed.
Now let’s get started and deep-dive into UFW.
1. Start and Enable UFW on Ubuntu Server
UFW comes pre-installed on the Ubuntu server, but not running. It’s also available for multiple Linux distributions and can be installed via APT for Debian-based distributions and DNF for RedHat-based distributions.
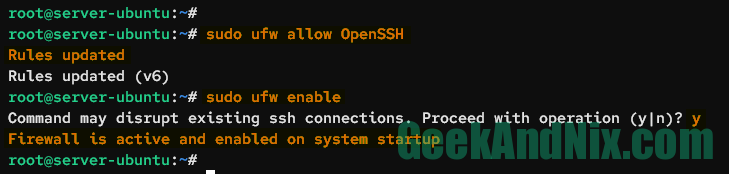
Before you start and enable UFW, you must add the OpenSSH application profile to the using the following command.
sudo ufw allow OpenSSHAn output Rules updated confirms that the new UFW rule has been added.
After the OpenSSH is added, type the following command to start and enable UFW.
sudo ufw enableWhen prompted, input y to confirm, then press ENTER to proceed. With that, you should get an output such as Firewall is active and enabled on system startup.
2. Checking UFW Status on Ubuntu Server
With the UFW running and enabled, you can now verify the UFW status by typing the following command.
sudo ufw statusYou should see the output like this:
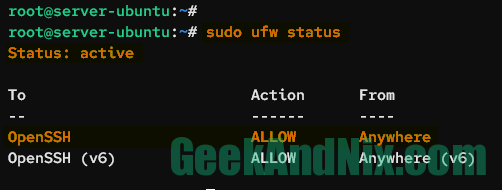
An output Status: active confirms that the UFW is running, enabled, and will start automatically upon the system startup. Furthermore, You also see the list of available rules on UFW. In this case, the OpenSSH application profile is enabled.
3. Opening Port on Ubuntu via UFW
In this section, you will learn how to add a specific port to UFW via the ufw allow command.
Type the following command to allow connections to port 5353 on protocol UDP. When added, you should receive an output such as Rules added.
sudo ufw allow 5353/udpNow if you verify the status of UFW, you should get the port 5353/udp available on the list rules.
sudo ufw status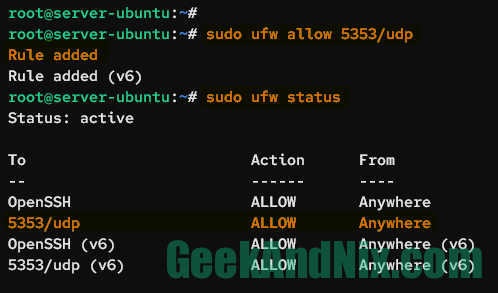
4. Opening Multiple Ports via UFW
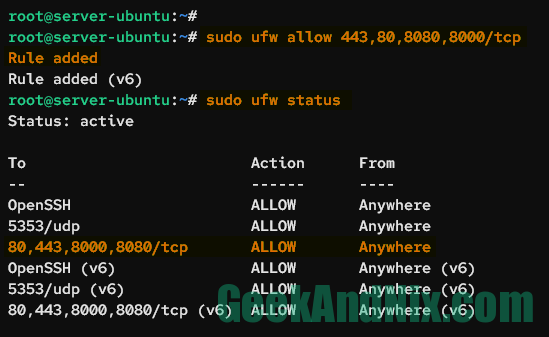
To add multiple ports in UFW, you can separate each port like this 443,80,8080,8000/tcp. This will add a single rule with multiple ports.
sudo ufw allow 443,80,8080,8000/tcpType the following command to list detailed rules on UFW.
sudo ufw statusYou should see the new rule with multiple ports 443,80,8080,8000/tcp.
5. Opening Port Range in UFW
This is used when you have services that use random ports in between of N-N number. To add a range of ports in UFW, you can use : in between the ports such as 30000:32767, then add the following protocol for the port (TCP or UDP).
Enter the following command to allow connections to ports between 30000-32767 with the protocol TCP.
sudo ufw allow 30000:32767/tcpOnce added, you should see the output Rules added.
6. Allow Incoming Traffic from a Specific IP Address
Implement this when you need to secure your services or server from outsiders by limiting remote access via UFW. This way, only IP addresses that listen in the UFW rule will be allowed to access the server/services.
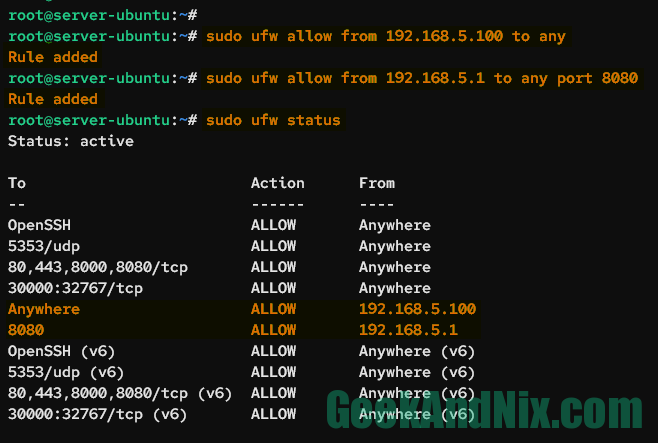
Enter the following command to allow incoming traffic from the IP address 192.168.5.100 to your server.
sudo ufw allow from 192.168.5.100 to anyFor specific ports, add the parameter to any port 8080 to the command.
sudo ufw allow from 192.168.5.1 to any port 8080Now verify the list of UFW rules using the following command.
sudo ufw statusIn the From section, you should see the allowed IP address 192.168.5.1 to port 8080.
7. Allow Incoming Traffic from Subnet
To allow a port from a specific network, you must include the subnet netmask of the target network such as IP/24.
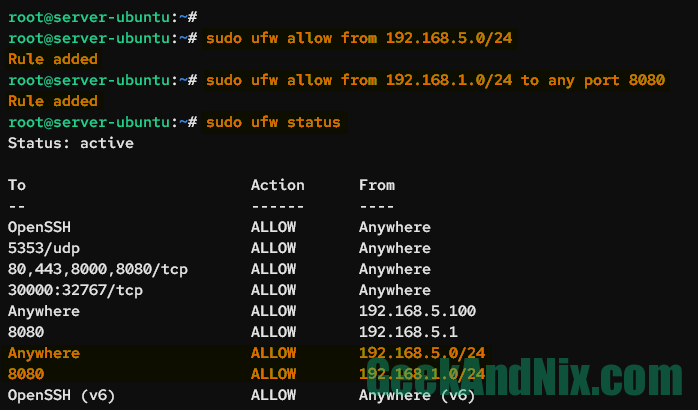
Enter the following command to allow incoming traffic from the network 192.168.5.0/24 to the server.
sudo ufw allow from 192.168.5.0/24Now if you want to specify the target port, you can use the following command. This will allow incoming traffic from 192.168.1.0/24 to only port 8080.
sudo ufw allow from 192.168.1.0/24 to any port 8080Verify the details of the UFW rule using the following command.
sudo ufw statusOn the output, you should see port 8080 is allowed from the specific network 192.168.1.0/24.
8. Block Incoming Traffic from a Specific IP Address
To block incoming connections from the IP address, you can run the ufw deny command below. This will deny the IP address 192.168.5.15 to access the server.
sudo ufw deny from 192.168.1.15 to anyTo block access to a specific port, you can add a parameter such as to any port 80. In this case, you will block the IP address 192.168.1.25 to access the port 80 on the server.
sudo ufw deny from 192.168.1.25 to any port 80Now check the list of UFW rules using the below command. You should see in the new rule Action section with DENY.
sudo ufw status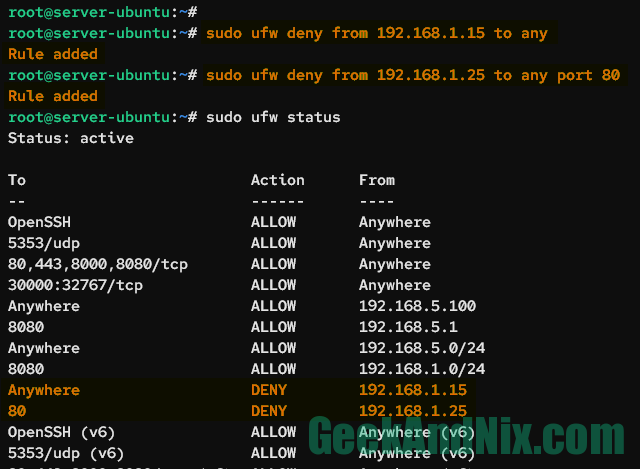
9. Block Incoming Traffic from Subnet
To block incoming connections from the network with UFW, you can add the subnet mask of your network like the following command.
sudo ufw deny from 192.168.1.0/24 to anyNow if you want to block network connection to a specific port, use the following command.
sudo ufw deny from 192.168.5.0/24 to any port 8010. Listing UFW Rules in Numbered Format
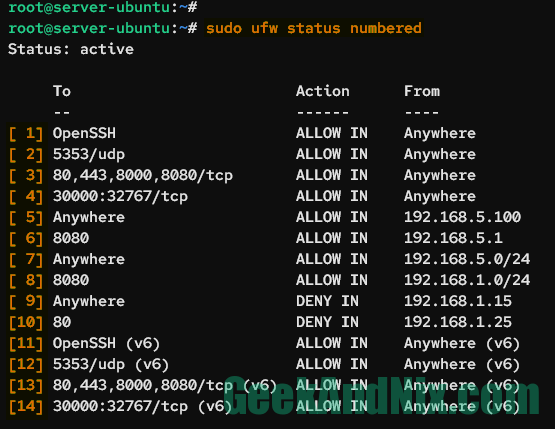
UFW provides a command line that allows you to show the list of rules in the numbered format. Each of the available rules will be assigned a number. This way, you can easily delete or modify available rules without a headache.
Type the following command to get the list of rules in numbered format.
sudo ufw status numberedYou should see the list of UFW rules with the number at the beginning.
11. Deleting Enabled Rule in UFW
To delete a rule in UFW is by using the rule_number. Before you delete the rule, verify the list of rules in the numbered format.
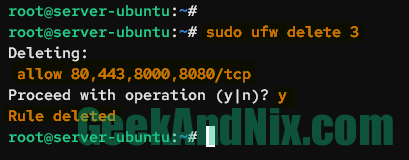
sudo ufw status numberedCheck which rule number that you want to delete and run the command ufw delete rule-number below. This example will delete the rule number 3 on UFW.
sudo ufw delete 3Input y to confirm, then press ENTER to proceed. Once downloaded, you should get an output such as Rule deleted.
12. Disable ICMP/Ping on Ubuntu via UFW
In some cases, you may want to disable ping or ICMP echo requests via UFW on your server. This can mitigate stealth scans from applications such as Nmap.
By default, the ICMP requests are allowed in UFW. To disable it, you must modify the UFW configuration.
First, enter the following command to backup the default UFW config file /etc/ufw/before.rules.
sudo cp /etc/ufw/before.rules /etc/ufw/before.rules_origOpen the file /etc/ufw/before.rules using your preferred text editor, this demo uses nano.
sudo nano /etc/ufw/before.rulesDelete the following lines:
# ok icmp codes for INPUT
-A ufw-before-input -p icmp --icmp-type destination-unreachable -j ACCEPT
-A ufw-before-input -p icmp --icmp-type source-quench -j ACCEPT
-A ufw-before-input -p icmp --icmp-type time-exceeded -j ACCEPT
-A ufw-before-input -p icmp --icmp-type parameter-problem -j ACCEPT
-A ufw-before-input -p icmp --icmp-type echo-request -j ACCEPT
And replace with this:
# ok icmp codes for INPUT
-A ufw-before-input -p icmp --icmp-type destination-unreachable -j DROP
-A ufw-before-input -p icmp --icmp-type source-quench -j DROP
-A ufw-before-input -p icmp --icmp-type time-exceeded -j DROP
-A ufw-before-input -p icmp --icmp-type parameter-problem -j DROP
-A ufw-before-input -p icmp --icmp-type echo-request -j DROP
Save and exit the file.
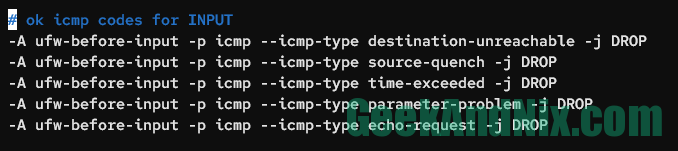
There are multiple ICMP requests in computer networking, such as destination-unreachable, source-quench, time-exceeded, parameter-problem, and echo-request. Implementing this configuration will completely disable ICMP requests to the server. If you want to allow specific ICMP requests, you can replace the parameter DROP to ACCEPT in the target ICMP request.
Now run the following command to reload UFW and apply the changes. You should get an output such as Firewall reloaded.
sudo ufw reload13. Enable UFW Application Profiles
In UFW, there is a feature called application profiles that contains predefined rules for specific applications or services. For example, the OpenSSH server comes with an application profile called OpenSSH, the Apache2 web server comes with Apache Full, and the Nginx web server comes with Nginx Full.
The default UFW application profiles are stored in the /etc/ufw/applications.d/ directory. Each profile can contain multiple ports, also you can set up custom application profiles by creating a new config file in the /etc/ufw/applications.d/ directory.
Verify the list of available application profiles using the following command.
sudo ufw app listYou can now allow incoming traffic to the application profile using the ufw command below. In this case, the Nginx web server is installed, and you will add the application profile Nginx Full to your Ubuntu Server.
sudo ufw allow 'Nginx Full'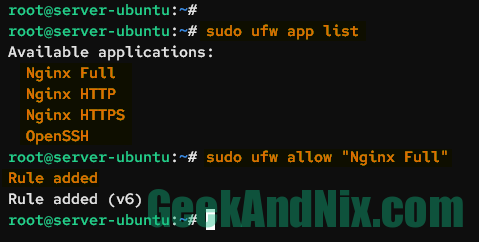
Additionally, you can also show the details of the UFW application profile by running the ufw app command below.
sudo ufw app info 'Nginx Full'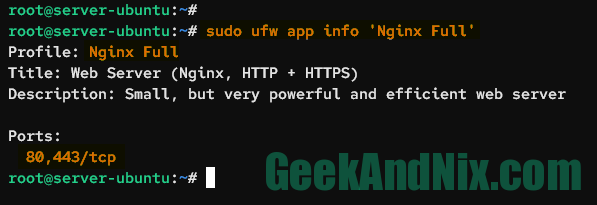
14. Creating Custom Application Profile in UFW
To create a custom application profile in UFW, you need to create a new config file in the directory /etc/ufw/applications.d/. Below is a template of the UFW application profile that you can use to create your custom profile.
[Name]
title=Title of profile
description=Description of profile
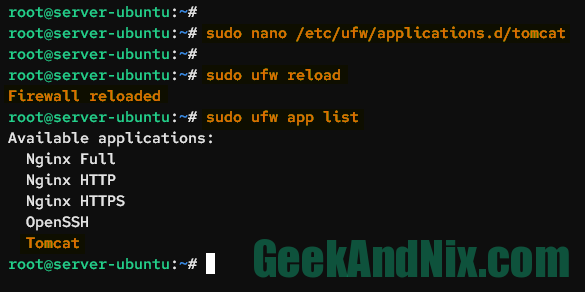
ports=port1,port2/tcpCreate a new file /etc/ufw/applications.d/tomcat using your preferred editor.
sudo nano /etc/ufw/applications.d/tomcatAdd the following configurations to the file.
[Tomcat]
title=Apache Tomcat Default
description=Apache Tomcat default port 8080
ports=8080/tcp
Save the file and exit the editor.
Now reload the UFW and verify the list of available application profiles in UFW.
sudo ufw reload
sudo ufw app list
You should see the new profile called Tomcat is available, which means that you’ve successfully added the custom application profile to UFW.
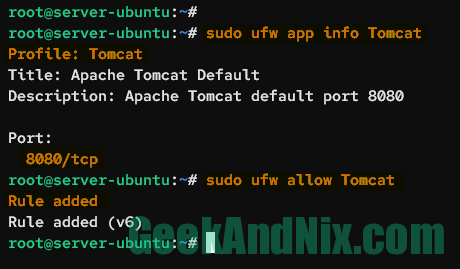
Run the following command to get details of the Tomcat application profile, then enable it.
sudo ufw app info Tomcat
sudo ufw allow Tomcat
The Tomcat application profile will open the TCP port 8080 on the server.
15. Setting up Forwarding in UFW
There are two port forwarding that you can achieve with UFW, below is an example:
- Port Forwarding port via REDIRECT: When you need to redirect an external port to an internal port in the same server.
- Port Forwarding port via DNAT: When you need to redirect a port to another port on a different server.
To set up port forwarding, you must enable the kernel parameter net/ipv4/ip_forward=1 on your system.
Run the following command to add the kernel parameter net/ipv4/ip_forward=1 to the /etc/sysctl.conf file. Then, apply the changes on the current session via the sysctl command.
sudo echo 'net/ipv4/ip_forward=1' >> /etc/sysctl.conf
sudo sysctl -p
Then, open the file /etc/default/ufw using vim.
sudo vim /etc/default/vimChange the default DEFAULT_FORWARD_POLICY to ACCEPT.
DEFAULT_FORWARD_POLICY="ACCEPT"Save and close the file when you’re done.
Now, open the UFW configuration file /etc/ufw/before.rules using the nano editor.
sudo nano /etc/ufw/before.rules15.1 – Setting up Port Forwarding via REDIRECT
Add the following lines to the file before the *filter parameter. In this case, you will redirect incoming traffic from port 80 to port 8080.
*nat
:PREROUTING ACCEPT [0:0]
-A PREROUTING -p tcp --dport 80 -j REDIRECT --to-port 8080
COMMIT
Save the file, then exit the editor.

Next, run the following command to open both ports 80 and 8080 on your server, then reload the UFW.
sudo ufw allow 80,8080/tcp
sudo ufw reload
15.2 – Setting up Port Forwarding via DNAT
if you want to redirect port to port on a different server, you can use DNAT via UFW. Mostly, this helps you when you have an internal application z
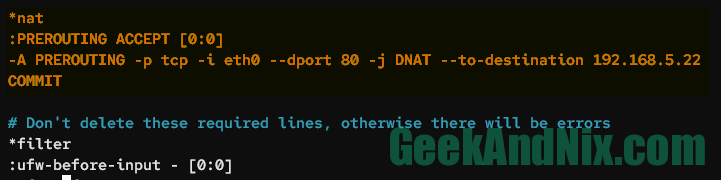
Add the following configuration to the file /etc/ufw/before.rules before the *filter parameter. In this example, all incoming traffic to the interface eth0 within port 80 will be forwarded to the server 192.168.5.10 with port 80.
*nat
:PREROUTING ACCEPT [0:0]
-A PREROUTING -p tcp -i eth0 --dport 80 -j DNAT --to-destination 192.168.5.22
COMMIT
Save the file and exit the editor.
Now, run the following command to reload open port 80 on the current machine, then reload the UFW to apply the changes.
sudo ufw allow 80/tcp
sudo ufw reload
16. Enable Logging in UFW
UFW comes with a logging feature that allows you to get detailed information on your firewall, which includes events like IN and OUT connections, blocked connections,
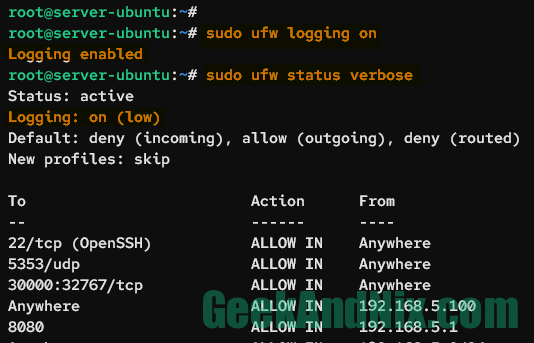
To enable logging in UFW, execute the following command. This will show you an output Logging enabled.
sudo ufw logging onNow, input the following command to check the detailed UFW status, including the log level and default policy.
sudo ufw status verboseAs seen in the following, logging on UFW is enabled at a level low.
Below are five logging levels available in UFW:
- off: This means logging is disabled completely on UFW.
- low: This will log all blocked packets that do not match with the current policy/rule and also log packets with a matching policy.
- medium: In addition to level Low, this also logs all packets that match with the current policy, all INVALID packets, and new connections. And all is done with rate limiting.
- high: This includes the level Medium but without rate limiting and also logs all packets with rate limiting.
- full: This is log level High but without rate limiting.
Next, you can change the logging level in UFW by executing the following command. In this case, you will change the logging level to medium.
sudo ufw logging medium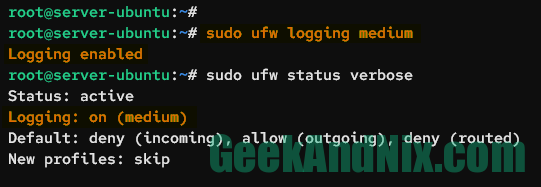
Lastly, you can check the UFW log file /var/log/ufw.log by using the tail or grep commands.
sudo tail -f /var/log/ufw.log
sudo grep "UFW BLOCK" /var/log/ufw.log
17. Setting up Connection Rate Limits
In addition to allow, block, and reject rules, UFW offers a limit rule, which enforces connection rate limits and provides additional protection against brute-force and DoS attacks. By default, the limit rule allows only 6 connection attempts every 30 seconds. And when the attmpt exceeds, the new connection will be blocked.
Execute the ufw limit command below to enable connection rate limits for the OpenSSH application profile.
sudo ufw limit OpenSSHNow, run the command below to check the UFW status and list enabled rules. You should see the OpenSSH rule action is changed to LIMIT.
sudo ufw status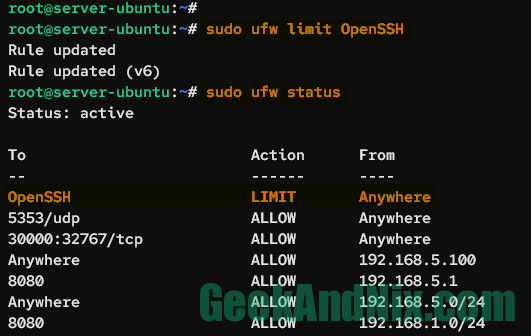
Lastly, you can check blocked connections on /var/log/ufw.log using the log event UFW LIMIT BLOCK via the grep command below.
grep "UFW LIMIT BLOCK" /var/log/ufw.logConclusion
To sum up, you’ve now mastered 17 practical examples of UFW (Uncomplicated Firewall) on the Ubuntu server. With this knowledge, you can implement each example to your server to enhance your server security. Or, you can also integrate UFW with fail2ban to block brute-force attacks.
System administrator and devops enthusiast, leveraging over 10+ years of Linux expertise to optimize operations. Proficient in FreeBSD, VMWare, KVM, Proxmox, PfSense, Ansible, Docker, and Kubernetes.


