How to Configure Static IP Address on FreeBSD 14
Having FreeBSD 14 installed and want to configure static IP address? You’re in the right place.
In this article, I will show you how to configure static IP address on FreeBSD 14 using two different methods: via ifconfig command line, and using the rc.conf file.
Without any delay, let’s get started.
Prerequisites
Before proceeding, ensure you have the following:
- A FreeBSD 14 is installed.
See more: FreeBSD 14: Step-by-Step Installation (With Screenshot) - A root/administrator user of your FreeBSD server.
Note: All the following commands will be run as root or with root privileges.
Checking network interfaces
Before configuring the IP address, ensure to check available network interfaces on your FreeBSD system. You can achieve this via the ifconfig utility, which allows you to configure network parameter parameters.
Run the ifconfig command below to check the list of network interfaces on your FreeBSD system.
ifconfig
ifconfig -a
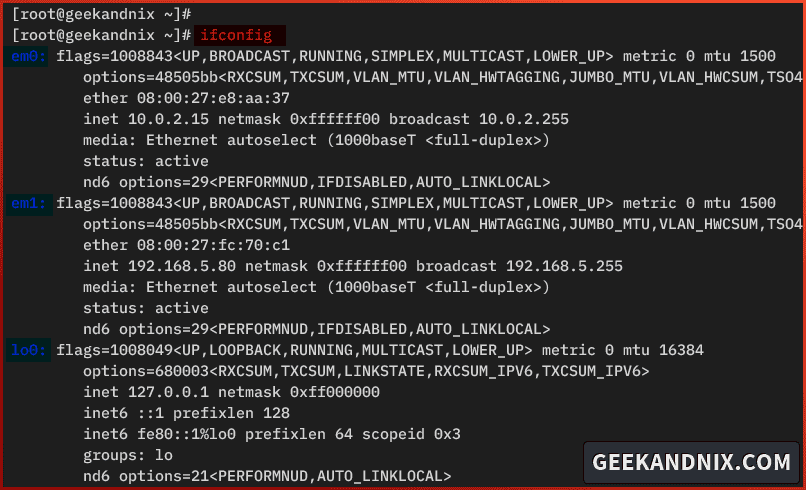
In the following output, you can see 2 interfaces: em0 and em1.
Setting up static IP address via ifconfig on FreeBSD
In this section, you will learn how to set up a static IP address via the ifconfig utility. This method is useful when you need to set up a temporary IP address because the changes will be gone after the system restart.
To set up a static IP address via ifconfig, follow these steps:
1. Execute the ifconfig command below to configure the static IP address 192.168.5.150 for the em1 interface.
# set up static IP address 192.168.5.150 for interface em1
ifconfig em1 inet 192.168.5.150 netmask 255.255.255.0
2. (Optional), if the em1 is for an internet connection, run the command below to make it as default gateway.
# setting up default gateway to 192.168.5.1
# default gateway = internet connection (outside)
route add default 192.168.5.1
3. Now run the ifconfig command to verify the IP address of the em1 interface.
ifconfig em1If your configuration is successful, you should see the em1 interface configured with IP address 192.168.5.150.

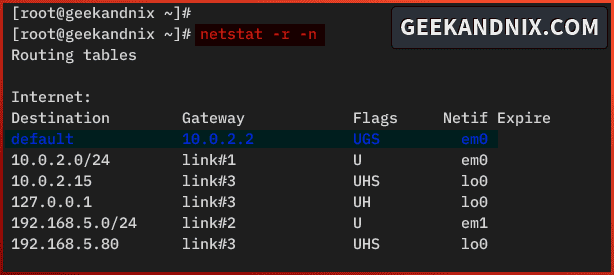
4. Additionally, if you’ve configured the default gateway, use the netstat command below to verify it.
netstat -r -nIn this case, the default gateway is 10.0.2.2.
Setting up static IP address via /etc/rc.conf on FreeBSD
The rc.conf file is a system configuration or FreeBSD system. In this section, you will learn how to set up a static IP address via the /etc/rc.conf file.
This method will grant permanent configuration of your IP address. You can achieve this via the sysrc utility or make modifications to the /etc/rc.conf file.
Complete the following tasks to configure static IP address permanently via the /etc/rc.conf file:
1. Run the sysrc command below to set up the static IP address 192.168.5.150 for interface em1. If you have a different interface name, be sure to change the ifconfig_em1.
# set up static IP address 192.168.5.150
# for interface em1 via sysrc to /etc/rc.conf
sysrc ifconfig_em1="inet 192.168.5.150 netmask 255.255.255.0"
Note: The sysrc is a utility for managing rc.conf file on FreeBSD. This allows you to modify the rc.conf parameter, check enabled parameters, and list all available rc.conf parameters.
2. Now, to set up the default gateway, execute the following command and use the defaultrouter option.
# setting up default gateway via sysrc /etc/rc.conf
sysrc defaultrouter="192.168.5.1"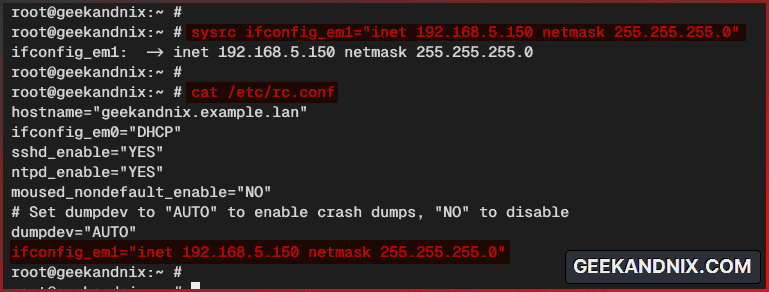
3. After that, run the sysrc command below to verify the list IP address and default gateway.
# checking the list parameters on /etc/rc.conf file
sysrc -a | grep 'ifconfig\|defaultrouter'
4. Lastly, run the service command below to restart the netif service and apply your changes.
Note: This will disconnect you from the server if you’re connected via SSH.
service netif restart
service routing restart
5. Furthermore, you can also new configuration manually to the /etc/rc.conf file. Open the /etc/rc.conf using your preferred editor and insert the following configuration.
ifconfig_em1="inet 192.168.5.150 netmask 255.255.255.0"
defaultrouter="192.168.5.1"
Setting up DNS resolver on FreeBSD
Now that you’ve configured the static IP address on FreeBSD. Let’s configure the DNS resolver on your FreeBSD system. Follow these steps to configure the DNS resolver on your FreeBSD system:
1. Open the /etc/resolv.conf file using vi editor.
vi /etc/resolv.conf2. Insert the following configuration to configure the nameserver with the following.
In this case, you will be using a local DNS resolver (192.168.5.1), Cloudflare DNS (1.1.1.1), and Google DNS (8.8.8.8).
search example.lan
nameserver 192.168.5.1
nameserver 1.1.1.1
nameserver 8.8.8.8
Save the file and exit the editor.
Checking internet connection and default gateway
1. To verify the internet connection on your FreeBSD system, run the ping command below.
ping -c2 geekandnix.com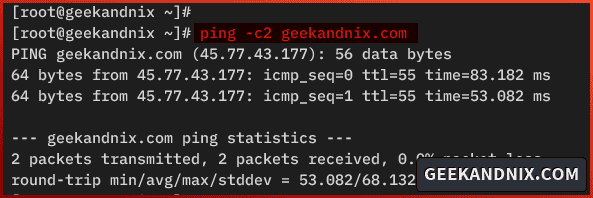
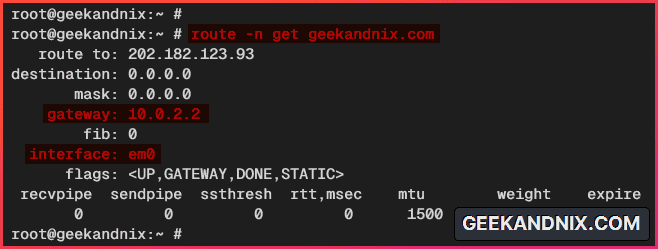
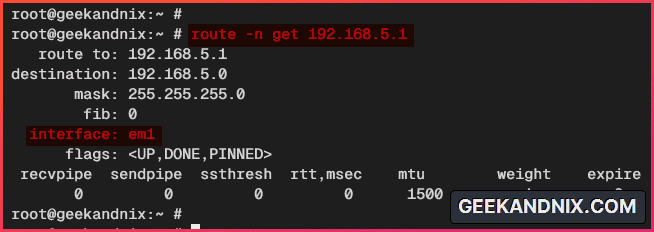
2. Lastly, you can also use the route command below to check your internet connection and gateway in a single command.
# access geekandnix.com and view the current default gateway
route -n get geekandnix.com

# access local network 192.168.5.1
# and view which gateway/interface is used
route -n get 192.168.5.1
In the following output, you can see the default gateway em0 with IP address 10.0.2.2 is used to connect to the geekandnix.com server.
For the local network, you can see the connection is handled by the interface em1, which is the local network connection.
FAQ (Frequently Asked Questions)?
Below are FAQ related FreeBSD networking.
How to set up IP address via DHCP?
To set up DHCP, add the configuration ifconfig_em0: DHCP to the /etc/rc.conf file. You can add it manually by editing the rc.conf or via the sysrc command below.
sysrc ifconfig_em0="DHCP"On the fly or live system, run the dhclient command below.
dhclient em0How to set up the default gateway on FreeBSD?
To set up the default gateway, use the route add command below.
route add default 192.168.5.1Additionally, you can also add the configuration defaultrouter="192.168.5.1" to the /etc/rc.conf file manually or via the sysrc command below.
sysrc defaultrouter="192.168.5.1"How to check the default gateway?
To check the default gateway on FreeBSD, run the command below.
netstat -r -nHow to delete the default gateway on FreeBSD?
To delete the default gateway, run the route delete command below.
route delete default 192.168.5.1Conclusion
In summary, you’ve learned how to set up static IP addresses manually on FreeBSD 14 using two different tools: the ifconfig command and /etc/rc.conf file via sysrc utility.
In addition to that, you’ve also learned how to add a default gateway on FreeBSD via the route add command.
Now that your FreeBSD server is configured with a static IP address, move on and complete 16 things to do after installing FreeBSD 14. Then, you can also install packages such as Apache2, Nginx, MariaDB/MySQL, and PHP for hosting web applications.
