How to Install Varnish on Ubuntu 24.04/22.04 Server
Speed up your websites by installing Varnish as an HTTP accelerator and reverse cache proxy to your Ubuntu Server. Varnish works by caching HTTP contents and tries to deliver to the client from the cache. If client requests are not available in the cache, Varnish will forward the request to the backend, and then store the content in the cache.
If you’re using FreeBSD, take a look at our guide: How to Install Varnish on FreeBSD 14 (with Apache or Nginx).
In this guide, we’ll take you through the step-by-step Varnish installation process on the Ubuntu Server 24.04 “Noble Numbat“.
Prerequisites
Before starting, ensure that you have the following:
- A Linux server with Ubuntu 24.04 server.
- A non-root user with sudo privileges.
- Apache or Nginx web server installed on your server. You will be using the web server as the backend for the Varnish.
See also:
How to Install Ubuntu 24.04 LTS Server
How to Install and Manage Apache on Ubuntu 24.04
How Install and Manage Nginx on Ubuntu 24.04
Installing Varnish on Ubuntu Server
Varnish HTTP cache supports most Linux distributions, such as Ubuntu, Debian, and RHEL. To install Varnish, you must add the official Varnish repository to your system, which is provided by packagecloud.io.
Varnish has two major versions: the latest version and LTS (Long-Term Support). At the time of this writing, the latest version of Varnish is v7.x, while the LTS version is v6.0.
1. Before installing Varnish, run the following command to stop the web server. To avoid confusion during the Varnish installation, you must stop the Apache or Nginx web server that is running on default HTTP port 80.
# if using Apache, stop verify the apache2 service
sudo systemctl stop apache2
sudo systemctl status apache2

# if using Nginx, stop and verify the nginx service
sudo systemctl stop nginx
sudo systemctl status nginx
2. Now, execute the following command to add Varnish repository to your system. At this time, only Varnish 7.5 is available for the latest Ubuntu 24.04 “Noble Numbat”. Make sure to check https://packagecloud.io/varnishcache to get Varnish’s latest version or LTS version.
# Adding repository for Varnish 7.5
curl -s https://packagecloud.io/install/repositories/varnishcache/varnish75/script.deb.sh | sudo bash
If successful, you should expect an output such as The repository is setup!….

3. Then, run the apt install command below to install Varnish. When prompted, type y confirm, then press ENTER.
sudo apt install varnish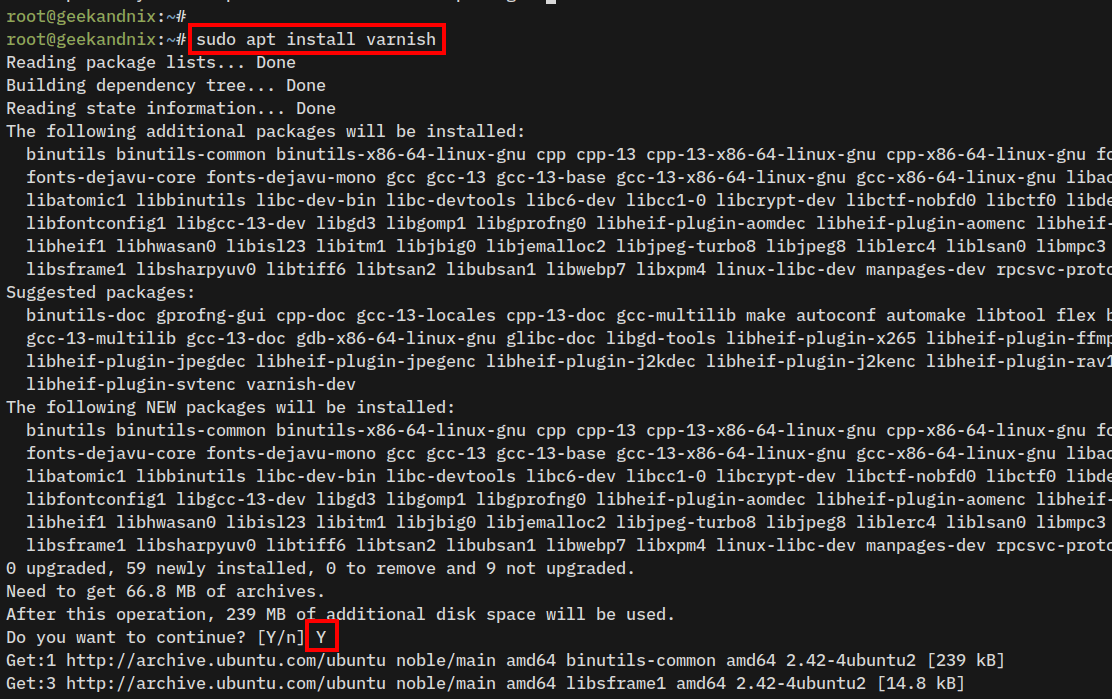
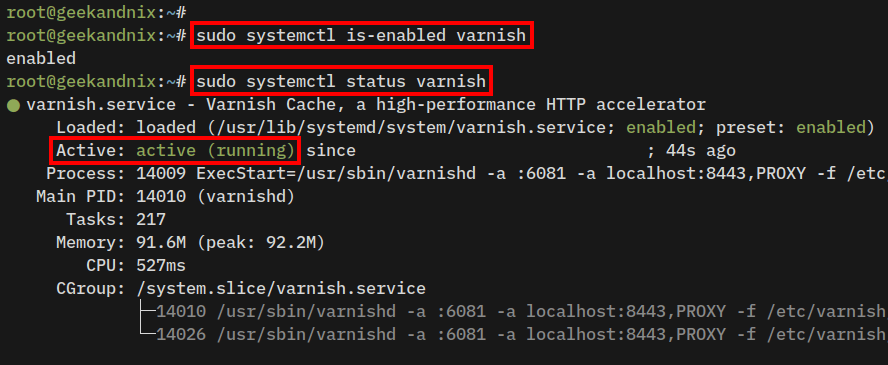
4. After installation is finished, enter the following command to ensure that the Varnish is running and enabled.
# checking if varnish service is enabled
sudo systemctl is-enabled varnish

# checking if varnish service is running
sudo systemctl status varnish
If the Varnish is enabled, the output will be enabled, and if running, the output is active (running).
5. Lastly, enter the following command to find the Varnish default port 6081.
ss -tulpn | grep varnishThe output shows that the Varnish is running on port 6081 by default.

Managing Varnish Service
Before proceeding, it’s important to know how to manage the Varnish service, including starting, stopping, restarting, enabling, and checking the Varnish status.
1. To start Varnish, run the systemctl start command below.
sudo systemctl start varnish2. Now, if you want to stop the Varnish service, use the systemctl stop command like this.
sudo systemctl stop varnish3. Next, after making changes to the Varnish configuration, you need to restart it. Enter the following command to restart Varnish.
sudo systemctl restart varnish4. Additionally, if you want to enable Varnish to run at system startup, run the systemctl enable command below.
sudo systemctl enable varnish5. Lastly, to ensure that the Varnish is running, enter the command below. If Varnish running, the output should be active (running), and if Varnish stopped, you will see the output inactive (dead).
sudo systemctl status varnishConfiguring Varnish Runtime on Ubuntu Server
Varnish is an HTTP cache proxy, which means it must run on HTTP port 80. To accomplish this, you must modify the Varnish runtime parameters on the Varnish service file varnish.service.
The following section explores how to run Varnish on default HTTP port 80, enable the http2 feature, and increase the default cache on Varnish.
1. To start, run the following command to modify the Varnish service file varnish.service. This will open the default text editor on your system.
sudo systemctl edit --full varnishChange the default ExecStart parameters with this.
ExecStart=/usr/sbin/varnishd \
    -a :80 \
    -a localhost:8443,PROXY \
    -p feature=+http2 \
    -f /etc/varnish/default.vcl \
    -s malloc,2g
Save and exit the editor when you’re finished.
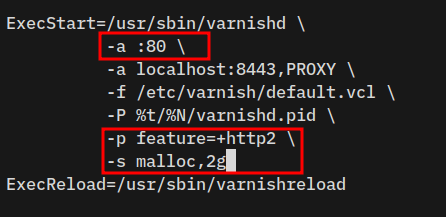
Below are some varnish parameters that you’re using:
-a :80: With this, Varnish will be running on HTTP port 80.-p feature=+http2: Use this to enable the http2 on Varnish.-s malloc,2g: This will upgrade the default cache on Varnish to 2 GB.
2. Now, run the following command to restart Varnish and implement the changes.
sudo systemctl restart varnish3. Lastly, enter the following command to ensure that Varnish is running on HTTP port 80.
ss - tulpn | grep varnishIf successful, the output should display that Varnish is running on HTTP port 80.

If you’ve followed the instructions so far, you should now have Varnish HTTP cache proxy installed, up and running on HTTP port 80 with http2 enabled and the cache size 2 GB. Moving forward, you will set up the backend web server.
Changing Default Port for Apache or Nginx to Port 8080
With the Varnish running on HTTP port 80, you must change the default port on your web server. Below is an illustration of when using Varnish as an HTTP cache proxy:
Client web browser > Varnish HTTP Cache Proxy > Backend web server (Apache – Nginx).
The following section covers how to set up an Apache or Nginx web server that will be used as the backend web server.
Changing Apache Default Port to 8080
For Apache users, you must change the default Apache port on /etc/apache2/ports.conf and /etc/apache2/sites-available/default.conf.
1. At first, open the file /etc/apache2/ports.conf using vim.
sudo vim /etc/apache2/ports.confChange the Listen parameter to 8080.
Listen 8080Save the file and exit the editor.
2. Then, open the default Apache virtual host file /etc/apache2/sites-available/00-default.conf using vim.
sudo vim /etc/apache2/sites-available/00-default.confOn the <VirtualHost ...> section, change the default port to 8080.
<VirtualHost *:8080>Save and exit the file when you’re done.
3. Next, enter the following command to restart the Apache service and apply your changes.
sudo systemctl restart apache24. Lastly, run the command below to ensure that the Apache is running on port 8080.
ss -tulpn | grep apache2
Changing Nginx Default Port to 8080
To integrate Nginx with Varnish, you must change the default port on the Nginx server block.
1. To start, open the default Nginx server block configuration /etc/nginx/sites-available/default using vim.
sudo vim /etc/nginx/sites-available/defaultChange the default listen parameter to port 8080.
listen 8080;
listen [::]:8080;
Save the changes and close the editor.
2. Now, run the following command to restart the Nginx service and apply the changes.
sudo systemctl restart nginx3. Then, verify the new Nginx port 8080 using the command below.
ss -tulpn | grep nginxAs shown below, you’ve configured Nginx to run on port 8080.

Adding Backend Web Server to Varnish
After configuring Apache/Nginx on custom port 8080, you must add the your web server as the backend for Varnish. This can be done by adding the default backend to Varnish configuration /etc/varnish/default.vcl, which is using VCL (Varnish Configuration Language) syntax.
1. First, open the default Varnish configuration /etc/varnish/default.vcl using vim.
sudo vim /etc/varnish/default.vclNow find the default Varnish backend configuration. On the .host is the IP address for your backend web server, while the .port parameter is the port of your web browser. In this case, the Apache/Nginx web server is running on localhost with port 8080.
backend default {
    .host = "127.0.0.1";
    .port = "8080";
}
Close the editor when you’re finished.
2. Then, run the following command to restart Varnish and apply the changes you’ve made.
sudo systemctl restart varnishAt this point, you’ve added the web server backend, whether Apache or Nginx for the Varnish cache and HTTP proxy. In the next step, you will ensure that the Varnish HTTP cache proxy is working.
Testing if Varnish is Working
To verify that Varnish is functioning properly, use the curl utility to obtain detailed information on HTTP headers.
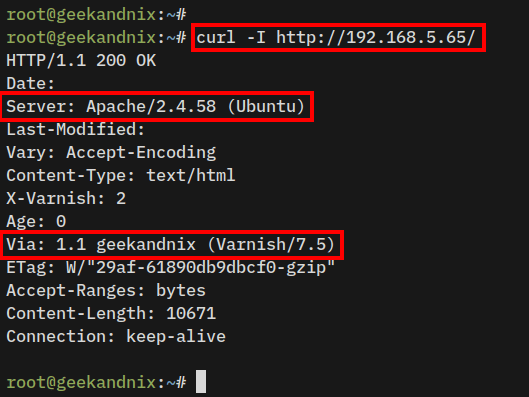
Enter the following command to verify if Varnish is working. Be sure to change the IP address 192.168.5.65 with your server IP address.
curl -I http://192.168.5.65/If everything goes well, you should get an output Via: 1.1 geekandnix (Varnish/7.5) like this:
3 Varnish Utilities You should Know
Varnish provides command utilities for managing and monitoring Varnish’s HTTP cache proxy. Below are some Varnish utilities that you should familiarize:
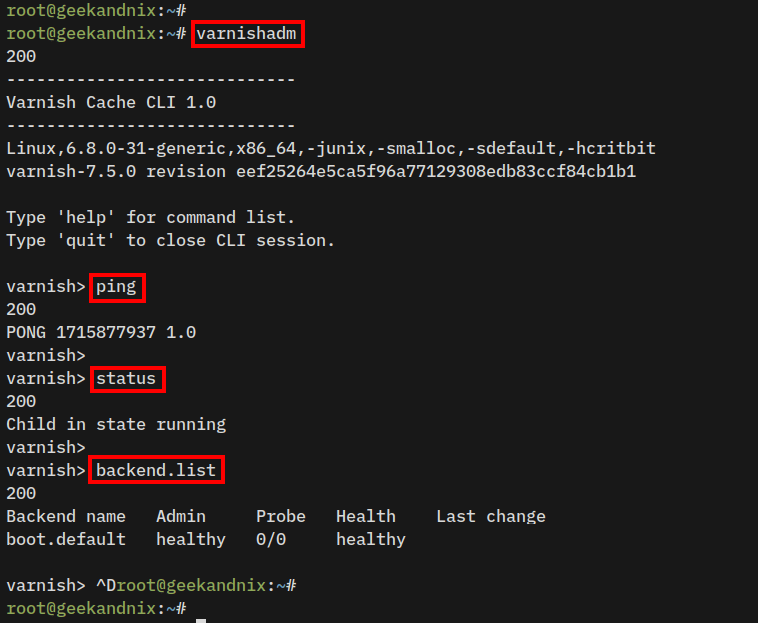
varnishadm
The varnishadm utility is used to interact with Varnish by establishing a connection to the varnishd.
Type the following command to start varnishadm.
varnishadmOnce connected, run the following commands:
ping: Checking the connection tovarnishd.status: Check the Varnish cache status.backend.list: Checking the list of Varnish backends, including the backend name and status.quit: Exit from thevarnishadm.help: To get the list of available commands onvarnishadm.
varnishstat
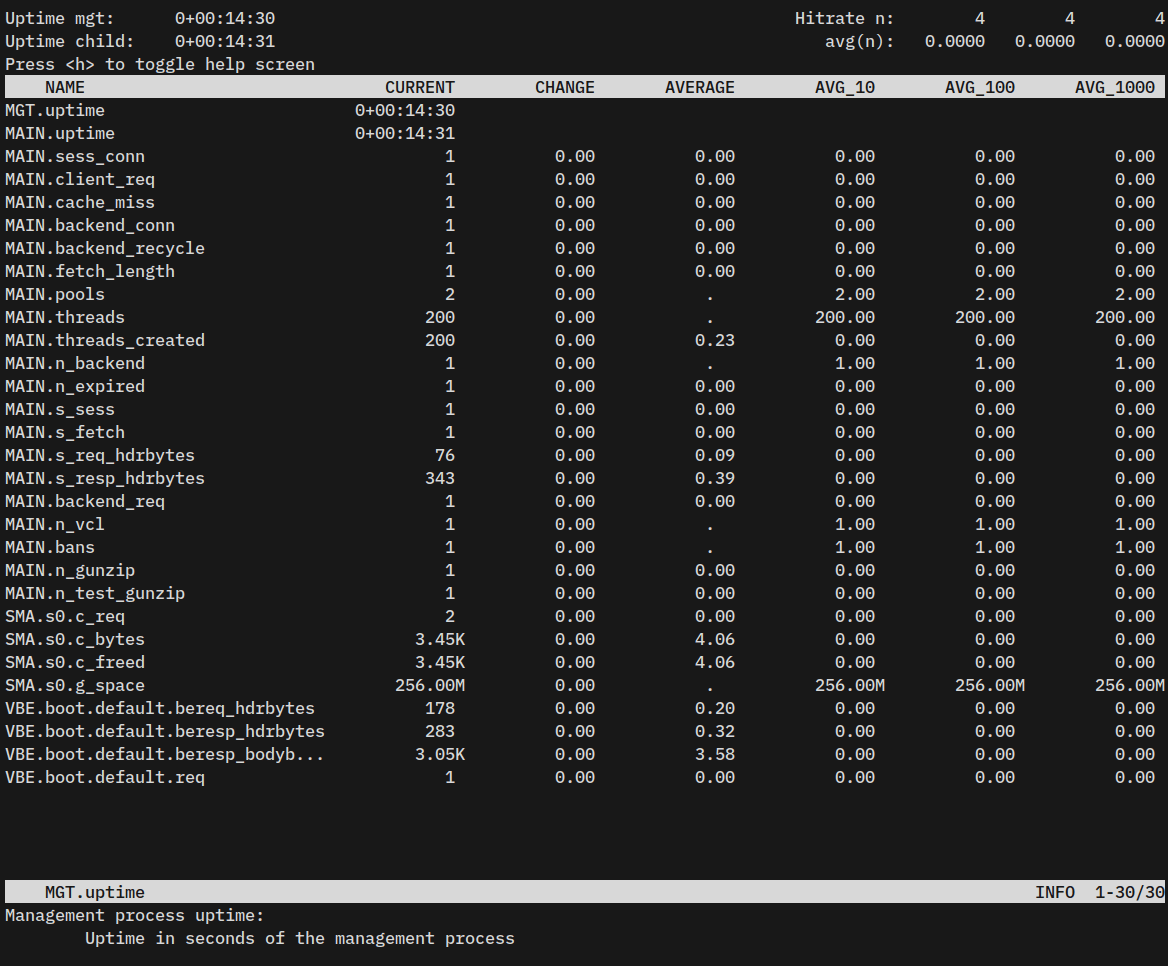
The varnishstat utility is used to check and display the statistics of the Varnish cache. This includes the default configuration of cache size, Varnish uptime, cache HIT and MISS in number, and many more.
Enter the following command to start the varnishstat.
varnishstatBelow you should see statistics of the Varnish cache.
Press q to exit.
varnishtop
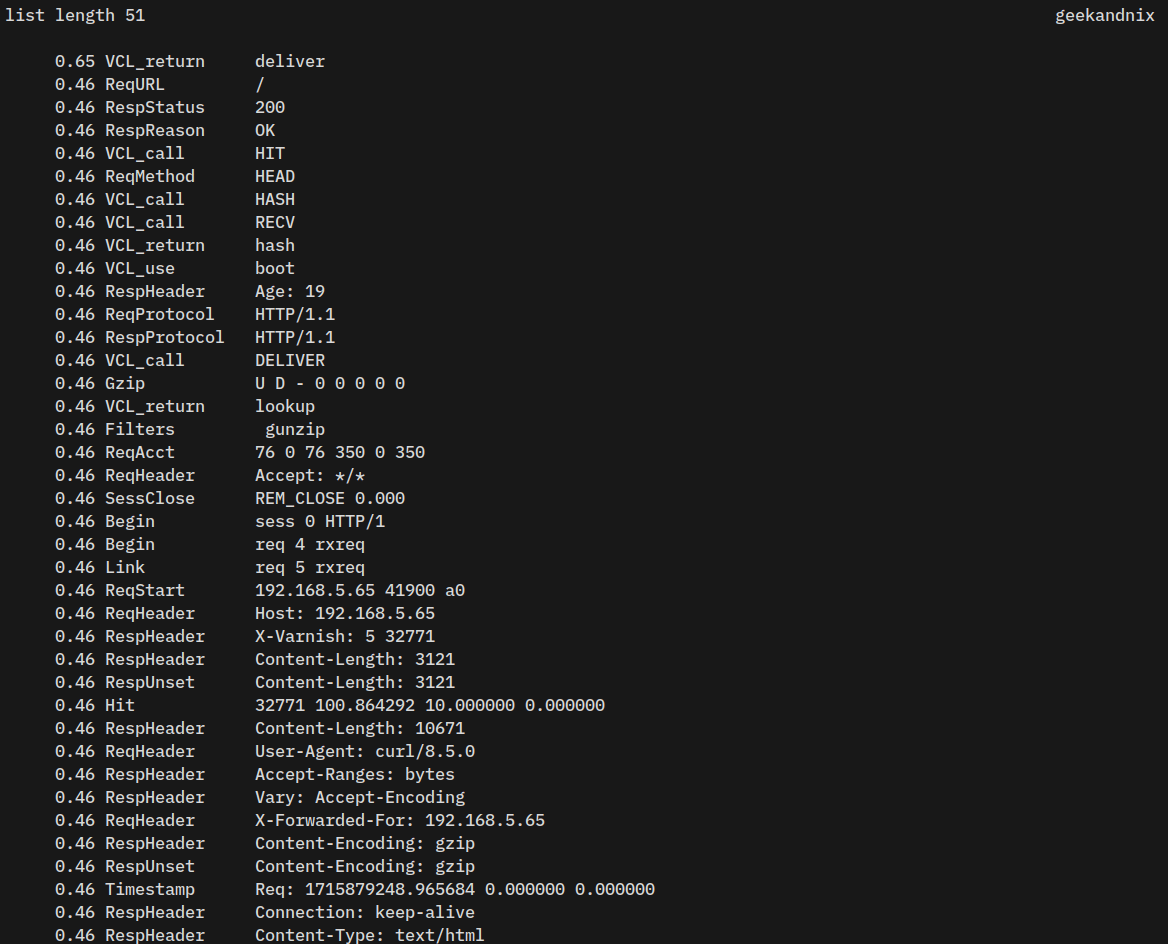
The varnishtop is a utility for displaying details client requests to Varnish. The varnishtop will display the most common output on Varnish logs, for example, client user agent, most requested URL, and HTTP status response.
Type the following command to start varnishtop:
varnishtopBelow is an example of varnishtop output:
Type q to exit from the varnishtop.
Uninstalling Varnish from Ubuntu Server
1. If you want to uninstall Varnish from the Ubuntu server, run the following command. After removing Varnish, you must revert the Apache or Nginx web servers port to default port 80.
sudo apt remove varnish2. After that, remove the Varnish repository and refresh your package index.
# removing Varnish repository
sudo rm -f /etc/apt/sources.list.d/varnishcache_*.list

# refresh package index repository
sudo apt update
3. Lastly, you also need to change the default listen address on your web server.
- Apache users: Be sure to change the Listen parameter to port
80on/etc/apache2/ports.confand the<VortualHost ...>parameter on the/etc/apache2/sites-available/default.conf. - Nginx users: Change the listen parameter to port
80on the file/etc/nginx/sites-available/default.
Conclusion
In conclusion, you’ve completed the step-by-step installation of the Varnish HTTP cache proxy on your Ubuntu 24.04 system! You’ve also configured wether Apache or Nginx web servers as the backend for Varnish and learned Varnish utilities such as varnishadm, varnishstat, and varnishtop that you can add to your arsenal.
Moreover, take a look at this for configuring HTTPS on Varnish via Nginx SSL termination or Apache SSL termination.


