How to Install Varnish on FreeBSD 14 (with Apache or Nginx)
Varnish is an HTTP proxy cache for speeding up your websites. In this guide, I will show you how to install Varnish on a FreeBSD 14 server.
I also cover Varnish integration with Apache and Nginx web servers. And in the last section, I will teach you how to monitor Varnish from your terminal.
Without further waiting, let’s begin.
Prerequisites
Make sure you have the following before proceeding:
- A FreeBSD 14 server.
Read more: FreeBSD 14: Step-by-Step Installation (With Screenshot) - A root user or non-root user with sudo privileges.
- A web server installed and configured – Apache or Nginx.
Installing Varnish on FreeBSD
By default, FreeBSD provides two pre-packages Varnish versions, v6 and v7. Those can be installed easily via the PKG package manager. You can also install varnish via the ports tree.
In this example, you will install Varnish 7 from the official FreeBSD repository. So follow these actions to do it:
1. Before installing Varnish, run the following command to update your FreeBSD repository.
pkg update2. Now run the command below to install Varnish on FreeBSD. Choose between these Varnish versions – 6 for the LTS (Long Term Support) version, or 7 for the latest version.
# installing Varnish 7
pkg install varnish7

# installing varnish 6
pkg install varnish6
Type y to confirm with the installation.
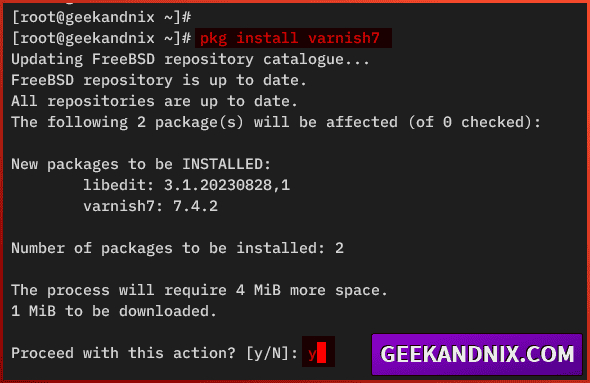
3. Once the installation is complete, run the command below to enable and verify the varnishd service.
sysrc varnishd_enable="YES"
sysrc -a | grep varnishd
Configuring Varnish on FreeBSD
After installing Varnish, it’s time to configure your Varnish installation. Here you will have two actionable steps to configure Varnish:
- Editing the Varnish VCL (Varnish Configuration Language) file and setting up the default backend web server.
- Setting up Varnish service via the
/etc/rc.conforsysrccommand line.
Let’s jump into it.
1. First, run the command below to copy the example of the VCL (Varnish Configuration Language) file to /usr/local/varnish/default.vcl. Then, open it with vim.
# copying Varnish VCL file to /usr/local/varnish/default.vcl
cp /usr/local/share/doc/varnish/example.vcl /usr/local/varnish/default.vcl

# editing the varnish VCL file /usr/local/varnish/default.vcl
vim /usr/local/varnish/default.vcl
Change the default backend for varnish to localhost with port 8080. With this, your main web server should be running on port 8080 (you will configure this later).
backend default {
    .host = "127.0.0.1";
    .port = "8080";
}
Save and close the file when you’re done.
2. Now execute the sysrc commands below to configure how Varnish will be running on FreeBSD.
# run Varnish in port 80
sysrc varnishd_listen=":80"

# define default Varnish VCL to /usr/local/varnish/default.vcl
sysrc varnishd_config="/usr/local/varnish/default.vcl"

# setup storage to malloc with size 1024 MB
sysrc varnishd_storage="malloc,1024m"

# enable http2 in Varnish
sysrc varnishd_extra_flags="-p feature=-http2"
In this example, you will run Varnish with the following:
- Default listen port 80 or HTTP.
- Default Varnish VCL file to
/usr/local/varnish/default.vcl. - Setup the storage to malloc with a size of 1024 MB.
- Add flags/options for enabling the http2 on Varnish
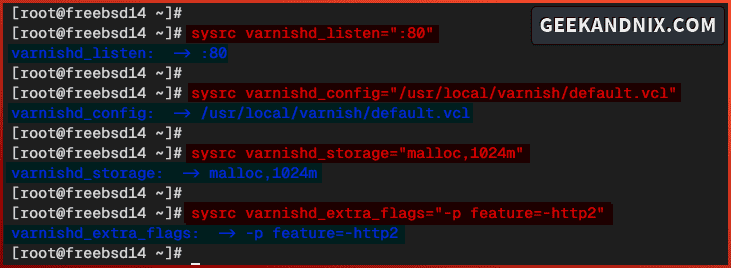
3. Lastly, run the command below to verify your varnishd service parameters. This will show you enabled varnishd parameters in the /etc/rc.conf file.
sysrc -a | grep varnishdEnsure varnishd parameters listen, config, storage, and extra_flags are enabled like the following:

Integrating Varnish with Apache or Nginx Web Servers
By now, you have configured Varnish to run on HTTP port 80 with the default backend web server on localhost and port 8080. Moving forward, you must configure the backend web server to run at port 8080, whether it’s Apache or Nginx.
In this guide, I will cover the integration of both Apache and Nginx with Varnish. So choose the step based on your current web server.
Integrating Varnish with Apache Web Server
To configure the Apache web server with Varnish, follow through with these tasks:
1. Open the default Apache24 configuration /usr/local/etc/apache24/httpd.conf using vim.
vim /usr/local/etc/apache24/httpd.confTo run Apache on port 8080, change the default Listen parameter to 8080.
Listen 8080Save the file and exit the editor.
2. (Optional) If you have Apache virtual host enabled, edit your virtual host configuration using your preferred editor. Then, change default port on <VirtualHost *:80> to port 8080 like the following:
<VirtualHost localhost:8080>3. Now run the service command below to restart the apache24 service and apply the changes that you’ve made. After executing this command, the apache24 should be running on port 8080.
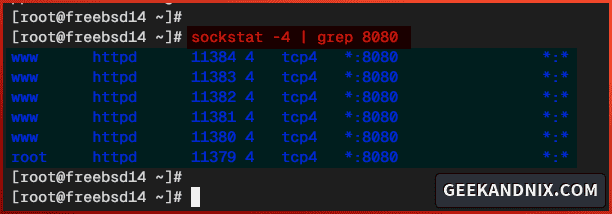
service apache24 restart4. Lastly, run the sockstat command below to verify open ports on FreeBSD.
sockstat -4 | grep 8080As seen in the following, the apache24 service is running on port 8080.
Integrating Varnish with Nginx Web Server
If you’re running a Nginx web server with Varnish, execute the following actions:
1. Open the default Nginx configuration /usr/local/etc/nginx/nginx.conf (or your Nginx server block configuration) using vim.
# Edit default Nginx configuration
vim /usr/local/etc/nginx/nginx.conf

# (optional) if you have server block configuration
vim /usr/local/etc/nginx/server-blocks/mydomainapp.conf
Change the default listen port to 8080 like the following:
listen 8080;Save and exit the file.
2. Now run the command to restart the nginx service and take effects. With this, Nginx should now be running on port 8080.
service nginx restart3. Execute the sockstat command below to verify open ports on your FreeBSD.
sockstat -4 | grep 8080If your changes were successful, you should see the nginx service running on custom port 8080.

Managing Varnish Service
At this stage, you’ve configured both Varnish and the backend web server (Apache or Nginx). Following this, you can now start Varnish service on your FreeBSD server.
Perform these tasks and learn how to manage (start, verify, stop, and restart) varnish service on FreeBSD:
1. To start Varnish, run the command below. Throughout the process, the varnishd will check your Varnish VCL file /usr/local/varnish/default.vcl syntax.
service varnishd startIf you have proper Varnish VCL syntax, you will get an output syntax is ok.
2. Now run the following command to verify the varnishd service. This will show you the process ID (PID) of the varnishd service.
service varnishd statusThe following output shows you Varnish syntax is ok and the varnishd service is running on PID 1915.

3. Whenever you need to stop Varnish, execute the following command.
service varnishd stop4. Lastly, when needed to restart the Varnish, run the command below.
service varnishd restartValidating Varnish Installation
As the Varnish starts, let’s now verify your Varnish installation using the curl command or with a web browser.
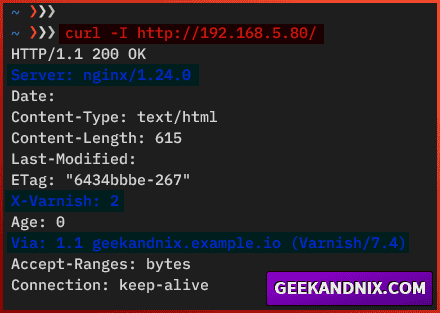
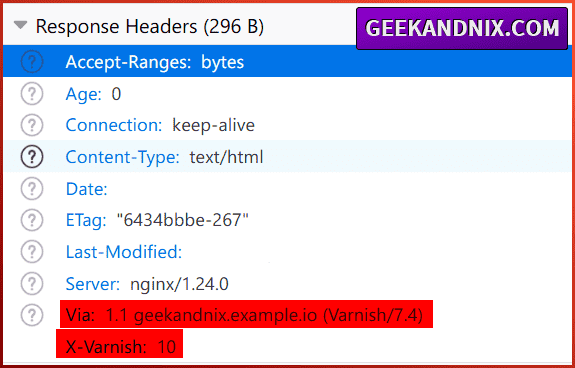
By utilizing curl or a web browser, you can see response headers from your HTTP requests. When Varnish running, you will see the headers such as X-varnish or Via: varnish in the response headers.
Choose the preferred method below to verify your Varnish installation:
1. To test Varnish implementation via the command line, run the curl command below. The -I parameter is used to check the details of the HTTP headers of the target server.
curl -I http://192.168.5.80/If your varnish implementation is successful, you should get the headers X-varnish and Via: domain.com (Varnish/7.4).
2. If you want to use a web browser, the following example using Mozilla Firefox, follow these actions:
- Visit http://server-ip/.
- Right click and select Inspect – or press Q for shortcut.
- Select the Network tab and click Reload.
- Click on your request and navigate to the Response Headers section.
- You will see
X-Varnishconfirmation.
3 Varnish Utilities You Must Know
Varnish provides multiple utilities for managing and monitoring your Varnish instances. Below are three Varnish utilities that are included with the Varnish package:
- varnishadm
- varnishstat
- varnishtop
Here’s some basic usage of those utilities for managing and monitoring Varnish.
varnishadm
The varnishadm is a command-line utility for managing Varnish instances.
Through the varnishadm you can monitor and manage Varnish from the terminal. You can start and verify the Varnish service, listing enabled VCL (Varnish Configuration Language) files, listing available backends, and checking the storage list.
1. Run the varnishadm command on your terminal.
2. You can now type the following command to check and monitor Varnish.
# keep the connection alive to varnish
ping

# listing Varnish backends including status
backend.list

# check varnish cache status
status

# listing commands in varnishadm
help

# show help for varnishadm command
help status
help backend.list

# exit from varnishadm
quit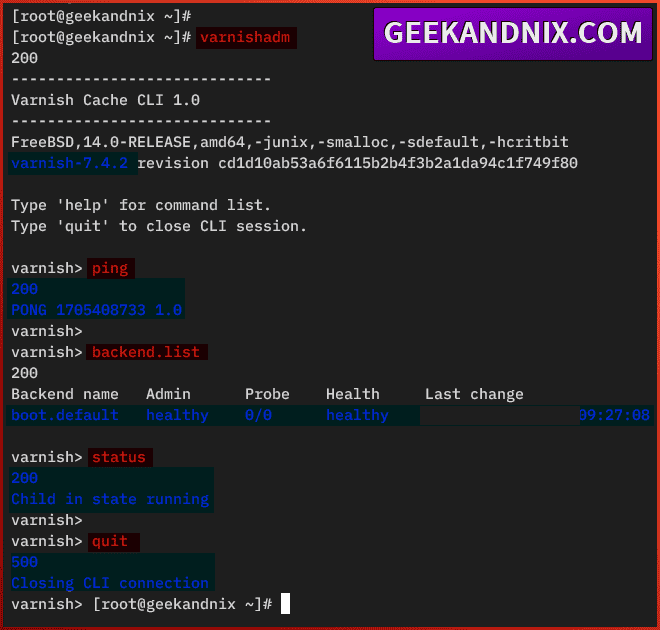
varnishstat
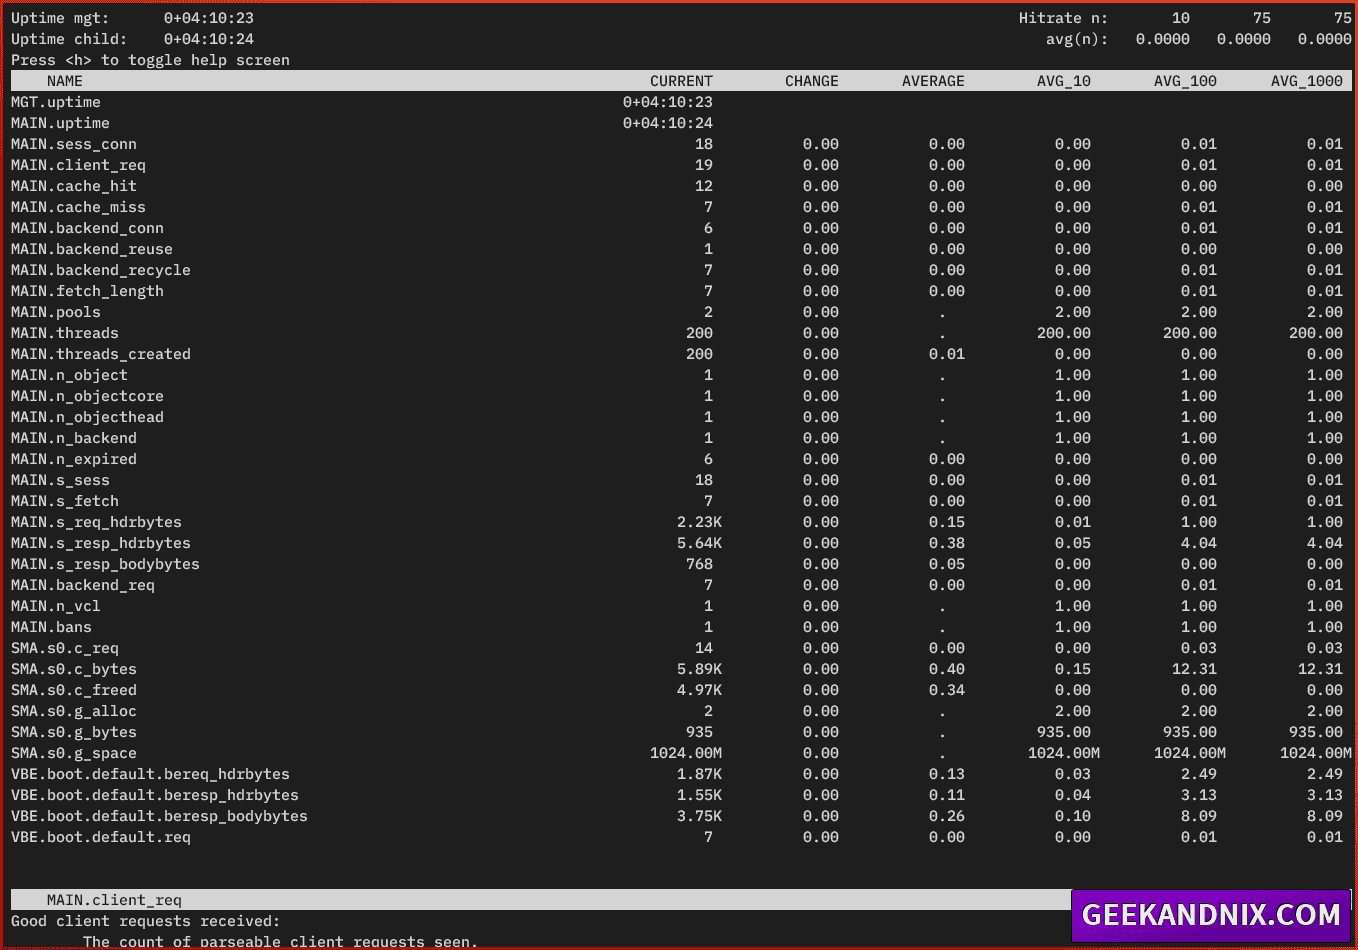
The varnishstat is a utility for monitoring Varnish cache statistics and uptime information in real time. Moreover, you can also stdout output of varnish statistics into JSON format.
To monitor Varnish’s cache status, run the command below.
varnishstatFrom the varnishstat screen, you can see the following:
- At the top of the screen, you can see the uptime information and average hitrate.
- At the mid/center area, you can see the list counters and their values.
- And at the bottom, you can see detailed information about the selected counter.
You can now press q to quit/exit from the varnishstat screen.
varnishtop
The varnishtop is a utility for checking Varnish logs in rank. It also allows you to filter logs via a regular expression, for example, only displaying the URL and user agent.
Run the varnishtop command below to check Varnish logs in real time.
# check varnish logs
varnishtop

# filter only print URL
varnishtop -i ReqURL

# Filter only print user agents
varnishtop -C -I ReqHeader:User-Agent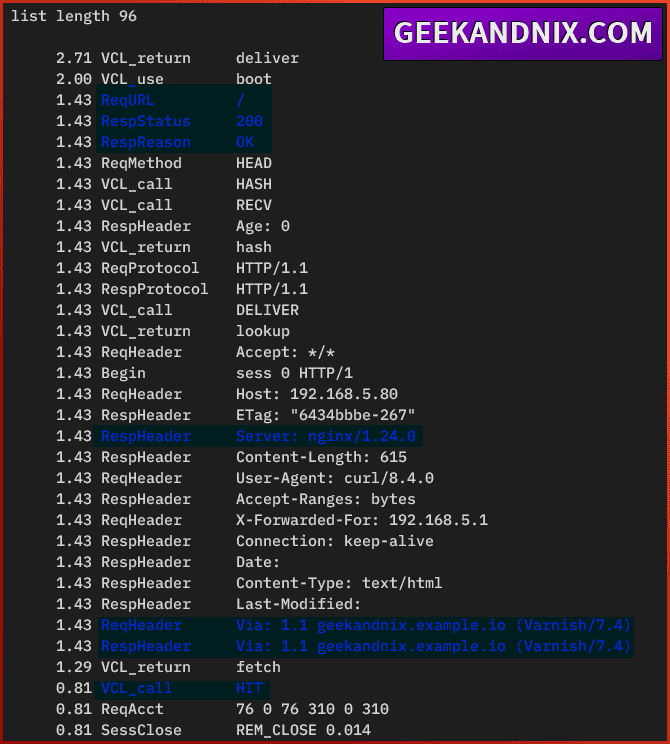
Uninstalling Varnish from FreeBSD
If you need to uninstall or remove Varnish from FreeBSD, go through these actions:
1. First, run the command below to stop the varnish service.
service varnishd stop2. Now execute these commands to remove the varnishd service from the /etc/rc.conf file.
# removing varnishd parameters from rc.conf
sysrc -x varnishd_enable
sysrc -x varnishd_listen
sysrc -x varnishd_config
sysrc -x varnishd_storage
sysrc -x varnishd_extra_flags
3. Next, execute the following command to uninstall Varnish and remove orphaned/unused packages from FreeBSD.
pkg delete varnish7
pkg autoremove
4. Now that Varnish is moved, open your Apache or Nginx configuration and revert the default port to standard HTTP port 80.
# For Apache users
<VirtualHost *:8080>

# For Nginx users
listen 8080;
5. Lastly, restart your web server using the command below.
# for Apache users
service apache24 restart

# for Nginx users
service nginx restart
Conclusion
Superb! You’ve installed the Varnish web cache proxy on the FreeBSD 14 server, integrated Varnish with Apache or Nginx web server, and learned basic usage for managing and monitoring Varnish.
Varnish is a powerful HTTP reverse proxy for caching your websites and improving pagespeed. It is powered by popular websites like Wikipedia and is mostly implemented for websites with huge media/images, including Magento and WordPress.
Check out the official Varnish tutorials to integrate Varnish with your web applications.
