How to Install phpMyAdmin on Ubuntu 24.04/22.04
In this guide, you’re going to learn how to install and secure phpMyAdmin on the Ubuntu 24.04 server. Also, you will learn how to connect to phpMyAdmin via SSH tunneling and phpMyAdmin basic operations.
The phpMyAdmin is a MySQL/MariaDB database management tool with a user-friendly interface, supports remote database management, and is highly customized to enhance its functionality.
Prerequisites
Before delving into this guide, ensure you have the following:
- An Ubuntu 24.04 server.
- A non-root user with
sudo/rootprivileges. - A MySQL or MariaDB database server is installed.
See more:
How to install Ubuntu 24.04 server (step-by-step)
Beginner’s Guide to Installing MySQL Server on Ubuntu 22.04
Step-by-Step Guide: Installing MariaDB on Ubuntu 22.04
Installing phpMyAdmin on Ubuntu
phpMyAdmin can be installed manually via source or using the APT package manager. Complete the following tasks to install phpMyAdmin to your Ubuntu system:
1. First, update your Ubuntu repository using the following apt command.
sudo apt update
2. Now, run the following command to install the phpMyAdmin package to your Ubuntu server.
sudo apt install phpmyadminInput Y to proceed with the installation.

During the process, you will be asked the following:
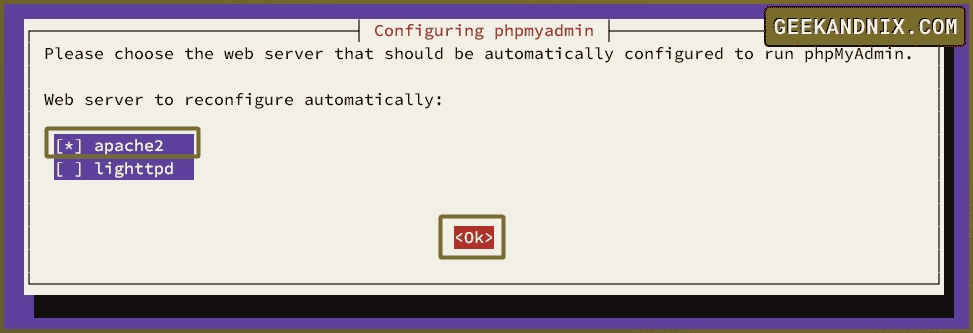
- Press SPACE to select
apache2as the default web server and press TAB to move to OK.
- Select Yes when prompted to set up the phpMyAdmin database via
dbconfig-common.

- Now input your password for the phpMyAdmin database. If left blank, a random password will be generated automatically.

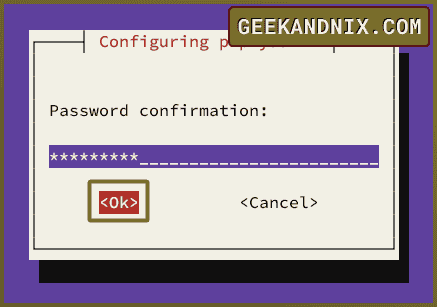
- Repeat your password to confirm, and the installation should be finished.
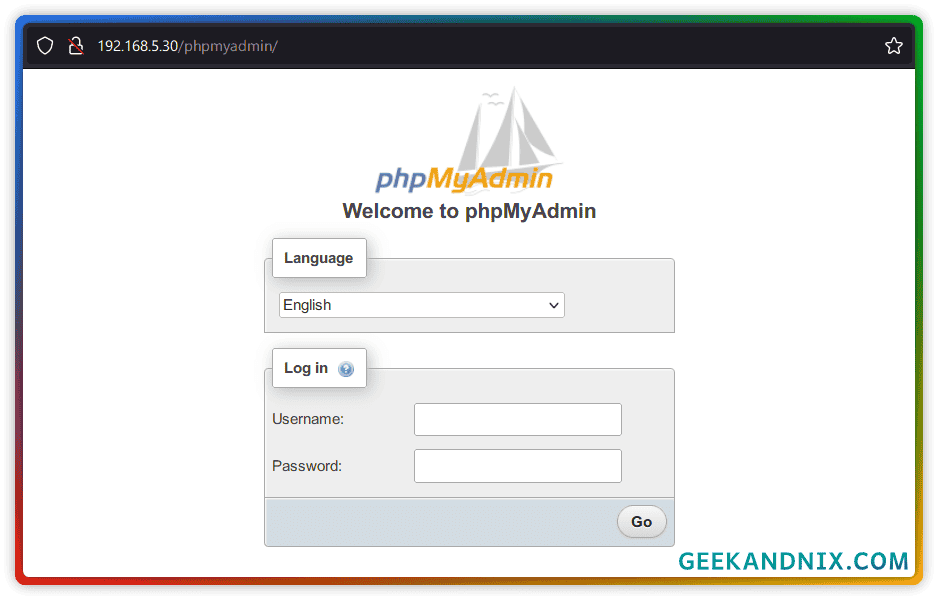
3. After phpMyAdmin is installed, it should be available at the path URL /phpmyadmin.
Visit http://SERVER-IP/phpmyadmin using your preferred web browser. If successful, the phpMyAdmin login page will be displayed.
PhpMyAdmin Configuration Files and Directory
Now that you’ve installed phpMyAdmin, it is important to know the configuration files and directories related to phpMyAdmin.
Below are some of the phpMyAdmin configuration directories and files you should know:
- /etc/phpmyadmin: The default configuration directory for phpMyAdmin.
- config.inc.php: This is the main configuration for phpMyAdmin.
- /etc/apache2/conf-available/phpmyadmin.conf: The snipper Apache configuration for phpMyAdmin. This enables you to access phpMyAdmin via the URL
/phpmyadmin. - /usr/share/phpmyadmin: This is where the phpMyAdmin is installed. The phpMyAdmin source code is stored in this directory.
Creating MySQL/MariaDB User for phpMyAdmin
For security reasons, avoid using MySQL/MariaDB root user to log in to the phpMyAdmin. With this in mind, you must create a new administrator user of MySQL/MariaDB for managing databases via phpMyAdmin.
To create a new administrator user for MySQL/MariaDB, carry out these steps:
1. To start, log in to the MariaDB as a root user using the following command. Input the MariaDB root password when prompted.
sudo mysql -u root -p2. Now, create a new MariaDB user and password using the following query. In this case, you’ll create a new user david with the password StrongP4ssword.
CREATE USER 'david'@'localhost' IDENTIFIED BY 'DavidPassword';3. Once you’ve created a new user, run the query below to set up user david as an administrator for the MariaDB server.
This allows user david to access all databases and tables on the MariaDB server.
GRANT ALL PRIVILEGES ON *.* TO 'david'@'localhost' WITH GRANT OPTION;4. Next, run the query below to take effects by reloading table privileges.
FLUSH PRIVILEGES;
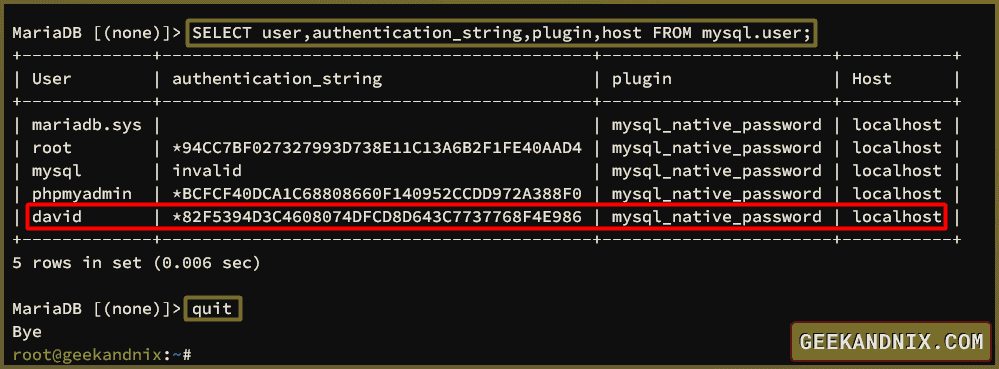
5. After that, verify the list of available users on the MariaDB, then type quit to exit.
SELECT user,authentication_string,plugin,host FROM mysql.user;
quit
Now you should have a user david on the MariaDB server.
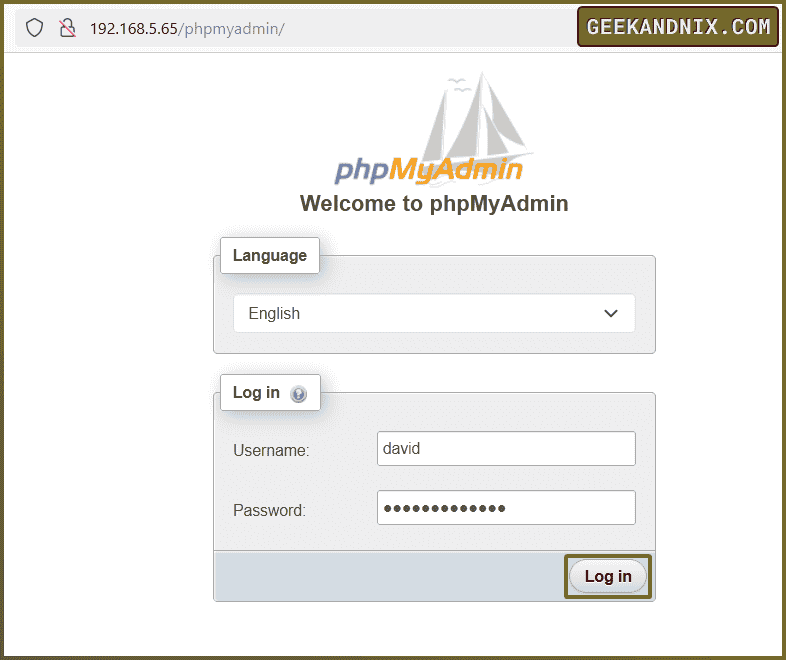
6. Lastly, back to the phpMyAdmin login page, input the new MariaDB user david with the password StrongP4ssword, and then click Go.
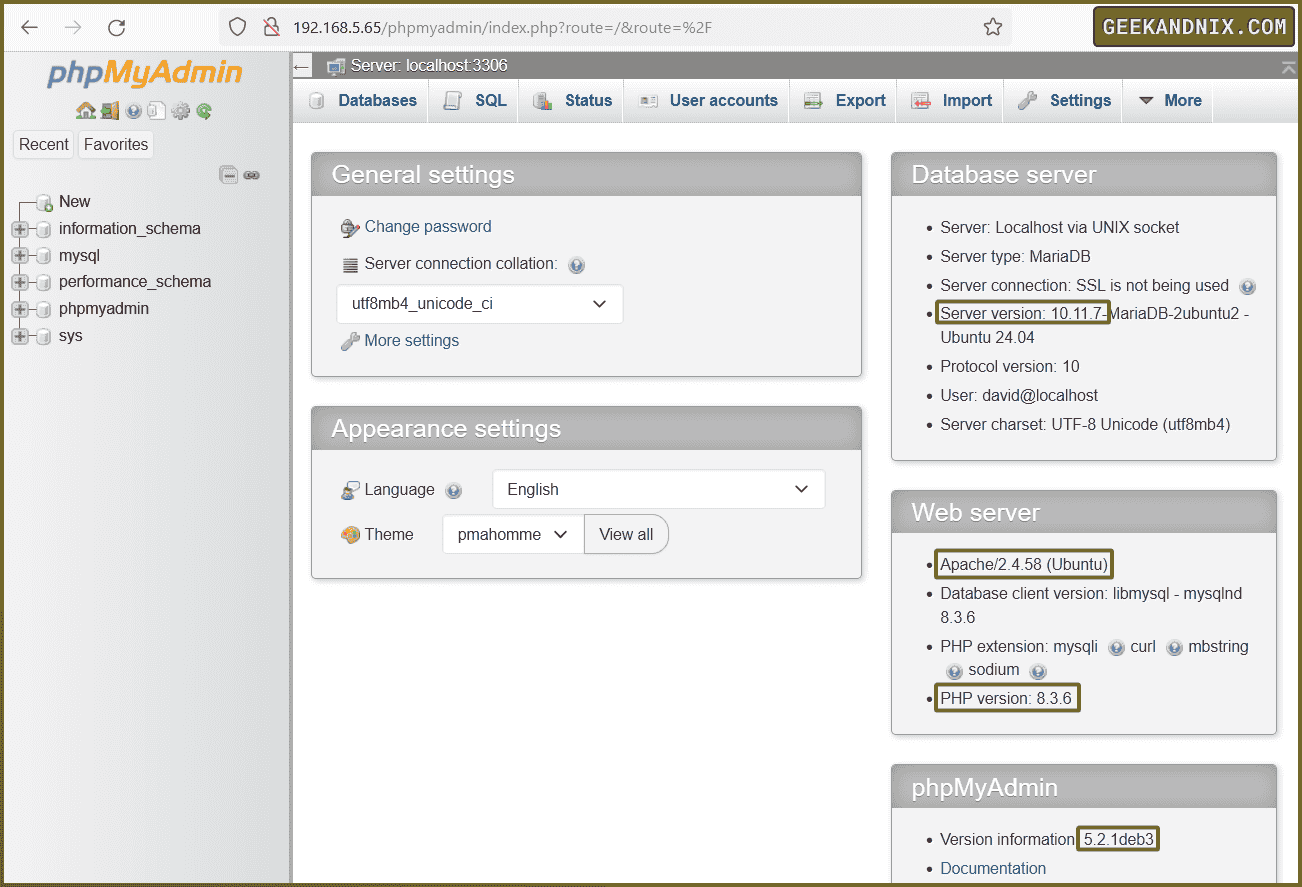
If everything goes well, you should get the phpMyAdmin dashboard.
Securing phpMyAdmin on Ubuntu
Another security consideration related to phpMyAdmin is changing the default URL path /phpmyadmin and enabling additional authentication via the basic_auth module. This will ensure only the owner can access the phpMyAdmin.
To secure your phpMyAdmin installation, follow these steps:
Changing /phpmyadmin URL Path
To change the /phpmyadmin URL, modify the default Apache configuration snippet for phpMyAdmin /etc/apache2/conf-available/phpmyadmin.conf.
1. Open the Apache snippet configuration for phpMyAdmin /etc/apache2/conf-available/phpmyadmin.conf using the vim editor.
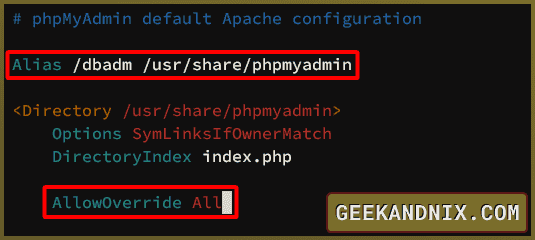
sudo vim /etc/apache2/conf-available/phpmyadmin.conf2. In the line Alias /phpmyadmin, change it with the new path URL. In this example, you will change the phpMyAdmin URL path to /dbadm.
Alias /dbadm /usr/share/phpmyadmin3. Add the AllowOverride All option to the <Directory /usr/share/phpmyadmin> section like this:
AllowOverride AllIf you’ve finished, save and close the file.
Adding Authentication via Apache Basic Auth
Now that you’ve changed the default URL for phpMyAdmin, let’s configure additional authentication via the basic_auth module and .htaccess file.
1. Create a new file /usr/share/phpmyadmin/.htaccess using vim.
sudo vim /usr/share/phpmyadmin/.htaccessAdd the following configuration to set up the Apache basic_auth module for securing phpMyAdmin. In this case, the password file will be taken from /etc/phpmyadmin/.htpasswd.
AuthType Basic
AuthName "Restricted Access"
AuthUserFile /etc/phpmyadmin/.htpasswd
Require valid-user
Save and exit the file.
2. Now that you’ve configured the Apache basic_auth module, execute the htpasswd command below to generate a new password file /etc/phpmyadmin/.htpasswd.
In this case, you will create a new password file with the user david.
sudo htpasswd -c /etc/phpmyadmin/.htpasswd davidNote: If you need to add a new user to the existing password file, remove the -c option from the htpasswd command. For example: sudo htpasswd /etc/phpmyadmin/.htpasswd alex.

3. Lastly, run the command below to verify Apache syntax and restart the apache2 service to apply your changes.
sudo apachectl configtest
sudo systemctl restart apache2
After executing the command, your phpMyAdmin should be accessible via a new URL path and additional authentication via Apache basic_auth.
Logging in to phpMyAdmin with Apache Basic Auth
At this point, you’ve finished and secured phpMyAdmin installation. Let’s verify it to ensure your installation is successful.
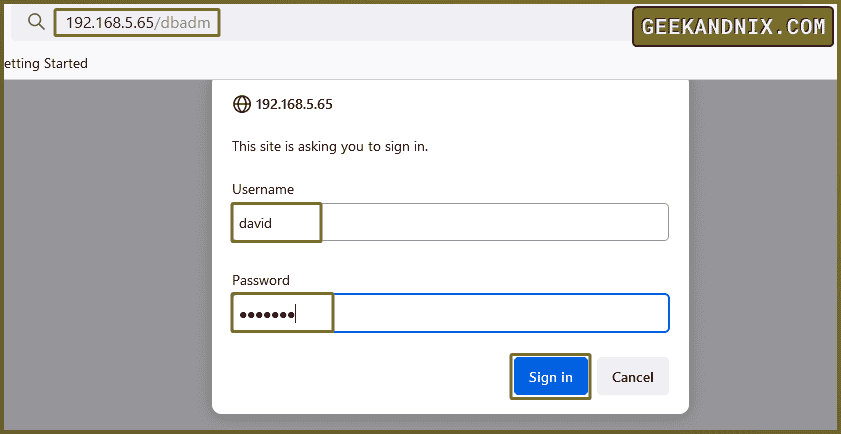
1. Visit the new phpMyAdmin URL path http://192.168.5.65/dbadm and you will be prompted for Apache basic_auth.
Input your username and password, then click Sign In.
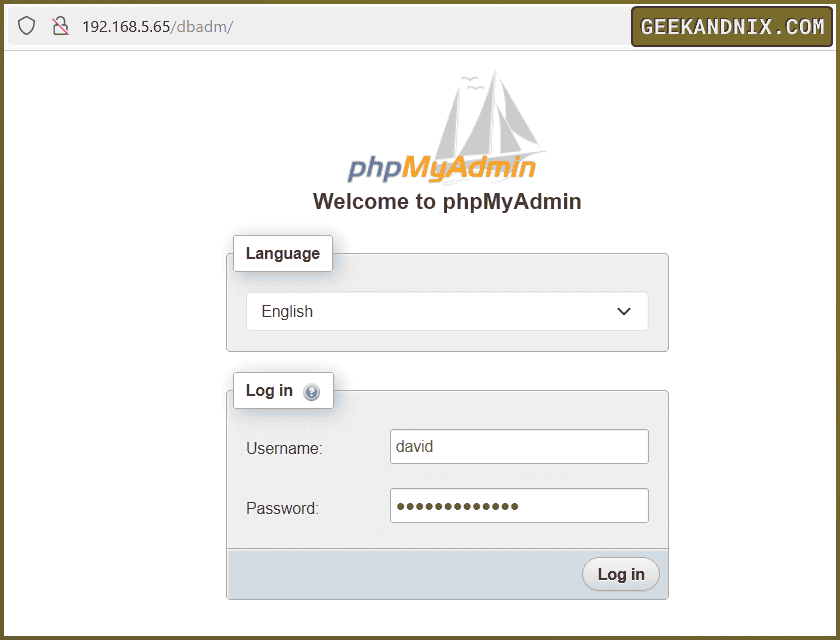
2. If the previous authentication is successful, you should get the phpMyAdmin login page.
Log in with the MariaDB user david and password StrongP4ssword, then click Go to continue.
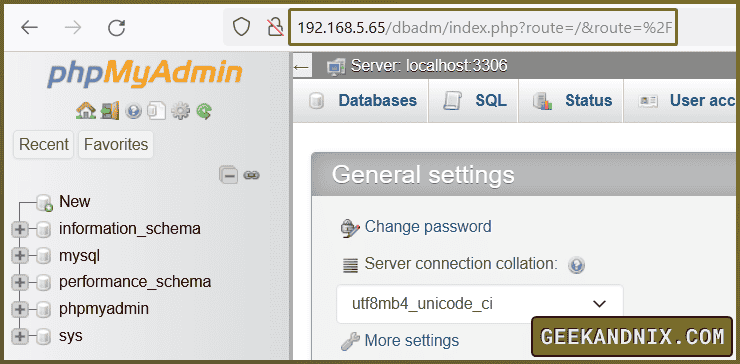
3. And you should get the phpMyAdmin dashboard.
(Optional) Accessing phpMyAdmin Securely via SSH Tunnel
If you don’t have any SSL or HTTPS enabled on your Apache web server, it’s recommended to access phpMyAdmin via secure connection SSH tunneling.
Proceed with these steps to access phpMyAdmin via SSH tunneling:
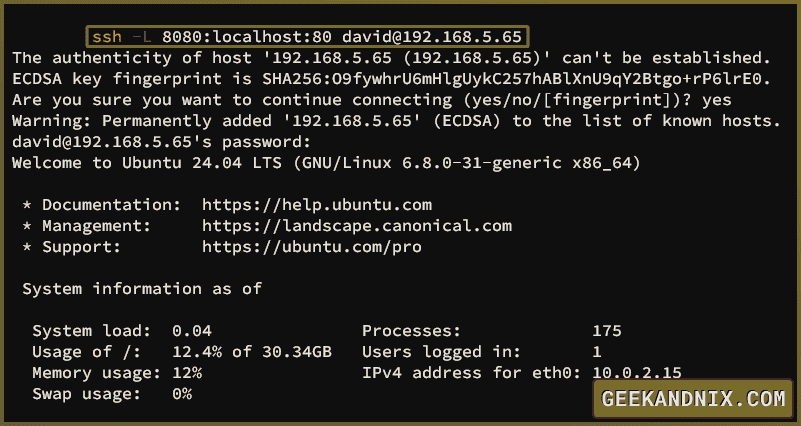
1. On your client machine, create the SSH tunnel using the ssh command below.
With this command, you will create an SSH tunnel to localhost with port 8080 and utilize SSH user david to connect to the phpMyAdmin server 192.168.5.65.
ssh -L 8080:localhost:80 [email protected]Type yes to accept the SSH fingerprint, then input your password when asked.
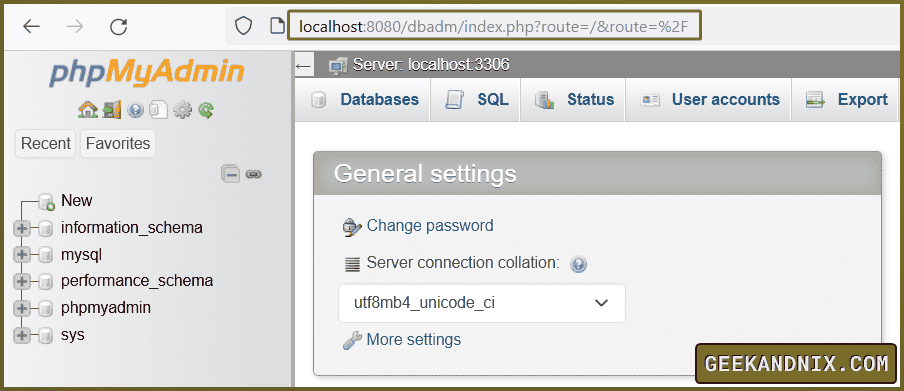
2. Now visit phpMyAdmin via localhost like http://localhost:8080/dbadm via a web browser.
If successful, you should be connected to phpMyAdmin via http://localhost:8080/, which is a secured SSH tunnel to the phpMyAdmin server. Then, log in to the phpMyAdmin.
(Optional) Installing Custom Themes for phpMyAdmin
If you are considering a custom theme for your phpMyAdmin, do this:
1. First, install unzip to your Ubuntu server.
sudo apt install unzip -y2. Choose your preferred phpMyAdmin theme, copy the link, and then download via the wget command below. In this case, we’ll be using the blueberry theme.
wget https://files.phpmyadmin.net/themes/blueberry/1.1.0/blueberry-1.1.0.zip3. Once downloaded, extract the phpMyAdmin via unzip, then move the extracted directory to the /usr/share/phpmyadmin/themes/ directory.
# extract theme blueberry-1.1.0.zip
unzip blueberry-1.1.0.zip

# move phpMyAdmin theme to /usr/share/phpmyadmin/themes/
mv blueberry /usr/share/phpmyadmin/themes/
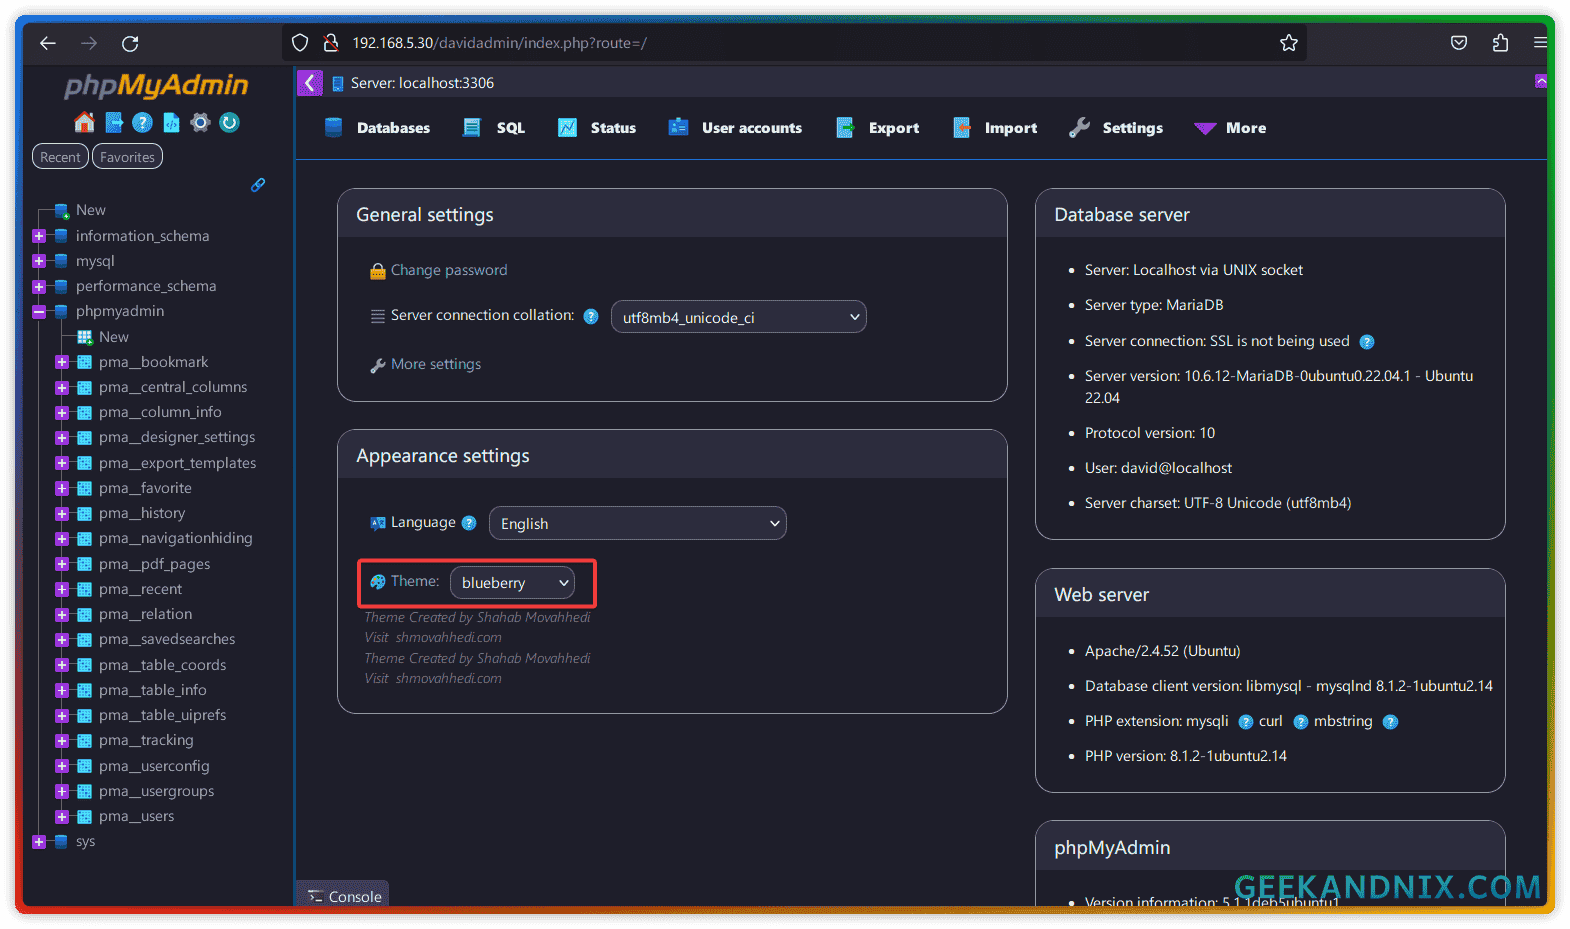
4. Lastly, back to the phpMyAdmin dashboard, and select your theme on the Appearance settings section.
Managing MySQL/MariaDB Databases via phpMyAdmin
In this section, you’re going to learn how to manage MySQL/MariaDB databases via phpMyAdmin. This includes how to create a database on phpMyAdmin, running SQL queries via phpMyAdmin, and how to delete the database on phpMyAdmin.
Creating Database and Table
To create a new database and table on phpMyAdmin, proceed as follows:
1. Click New on the left menu, input your database name, for example testdb, then click Create.
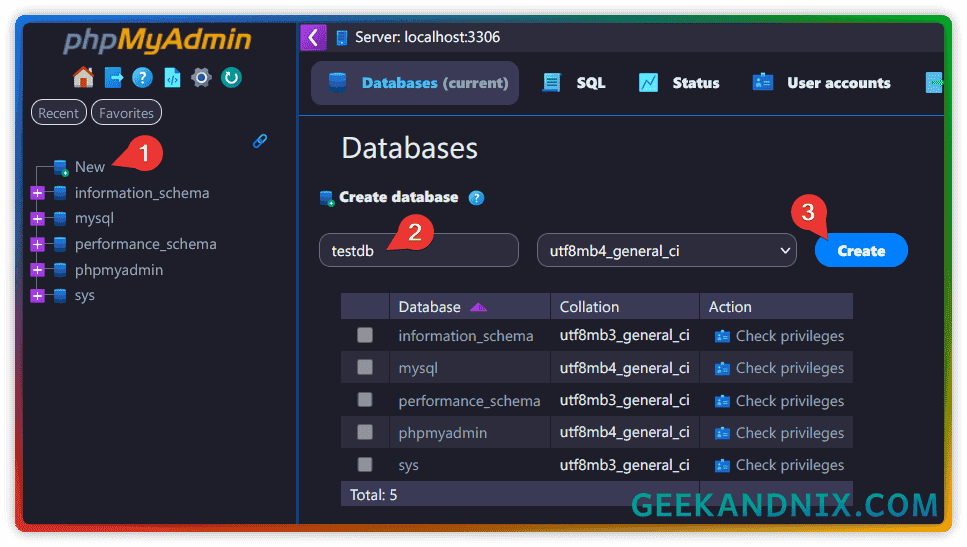
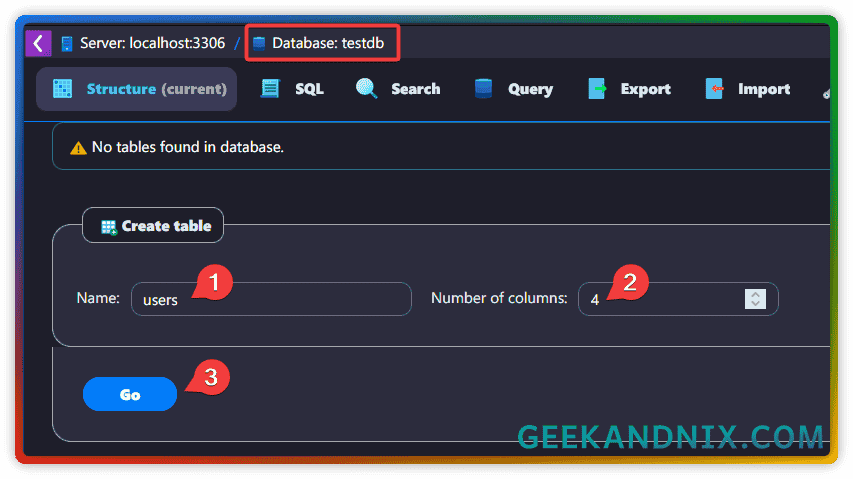
2. Once the database is created, you will be asked to create a new table.
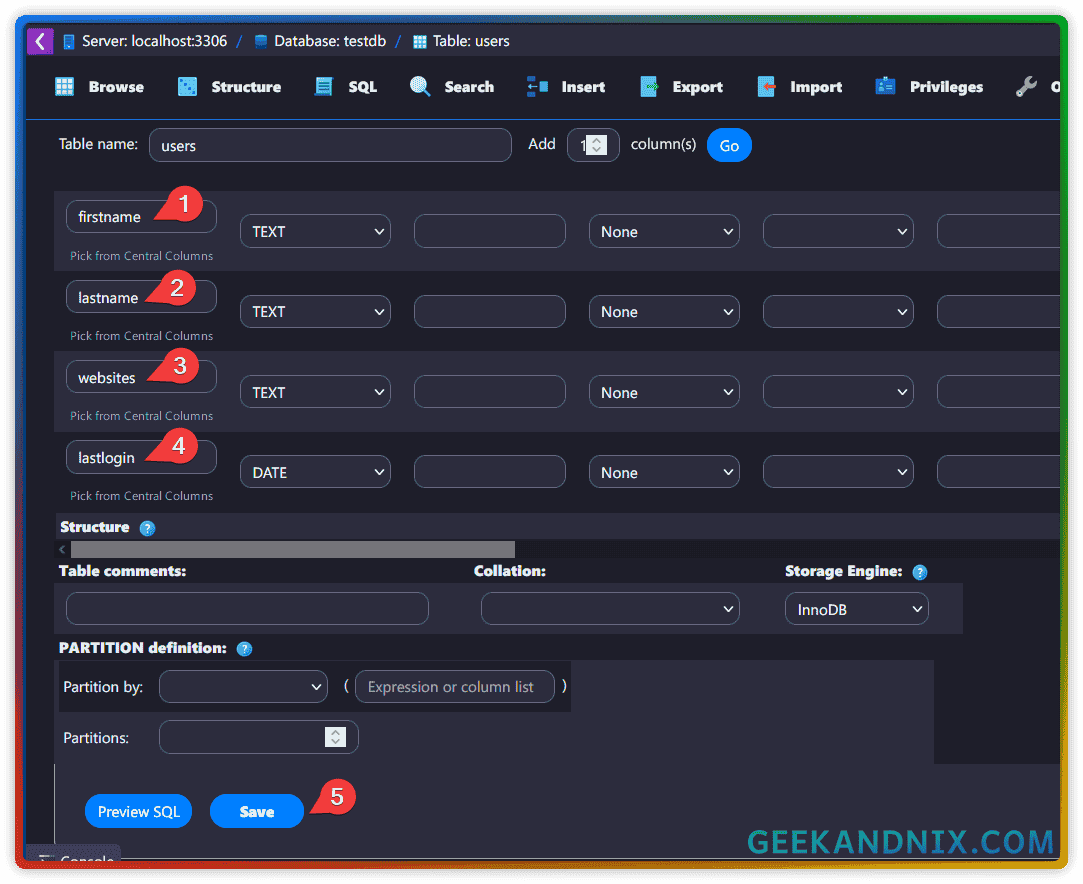
Input your table name, and the number of columns, then click Go. In this case, you will create a new table users with 4 columns.
3. Now input each column name and type, then click Save. In this case, you will create columns firstname, lastname, websites, and lastlogin.
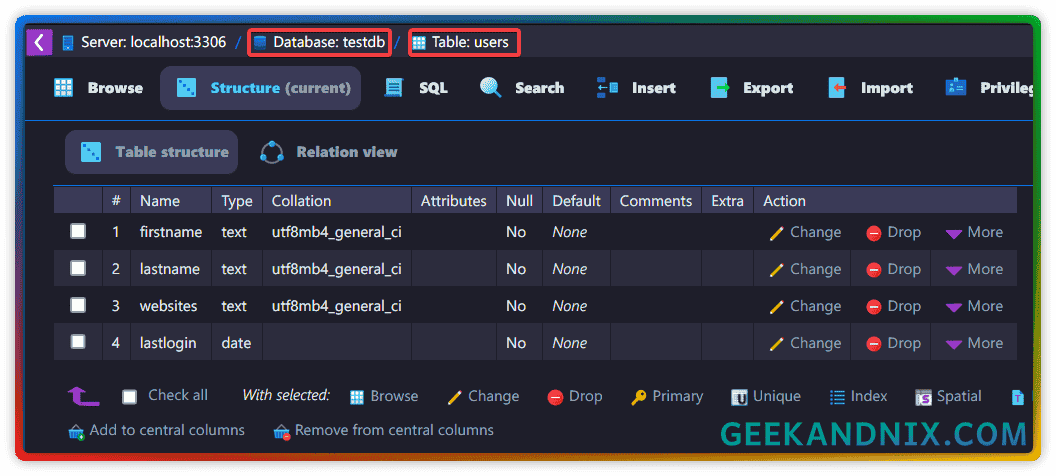
4. Once you’ve created columns, you should see the table structure on phpMyAdmin like this:
Running SQL Queries via phpMyAdmin
After creating the database and table, let’s insert new data by running SQL queries through phpMyAdmin.
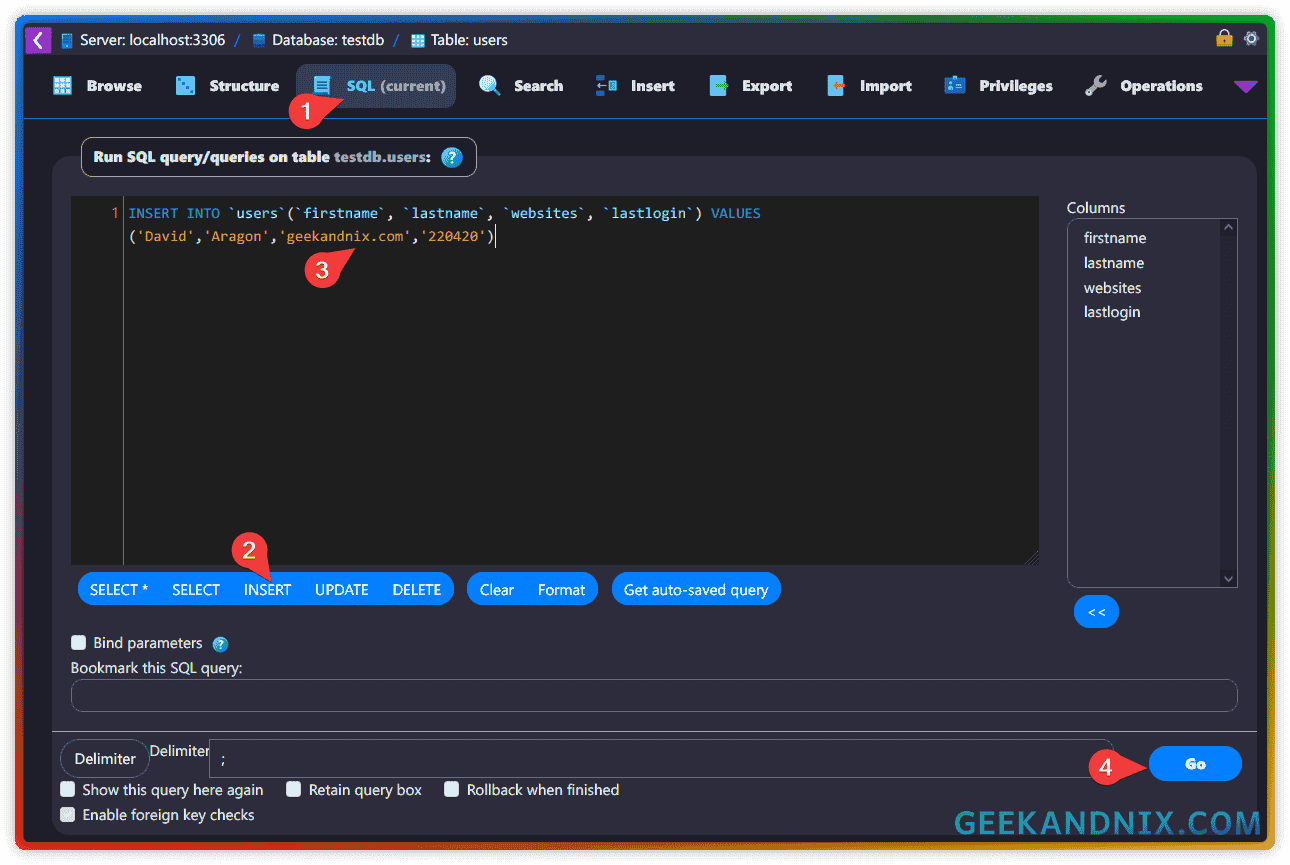
1. Click on the SQL tab and choose the operation type such as SELECT, INSERT, UPDATE, or DELETE.
2. Input your data within the query window, then click Go to confirm.
In this example, you will INSERT new data to the table users.
3. Now you should get the following confirmation after adding new data.

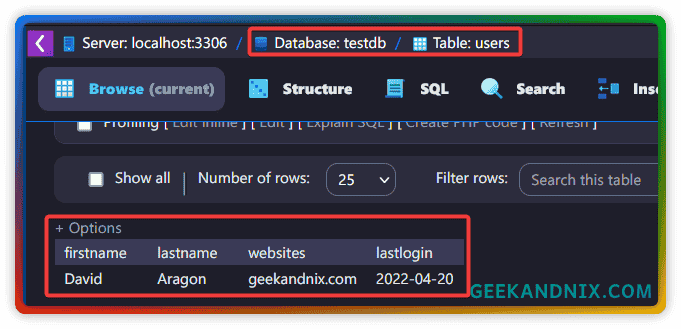
4. Lastly, if you click Browse on the table users, you should get your data.
Deleting Data via phpMyAdmin
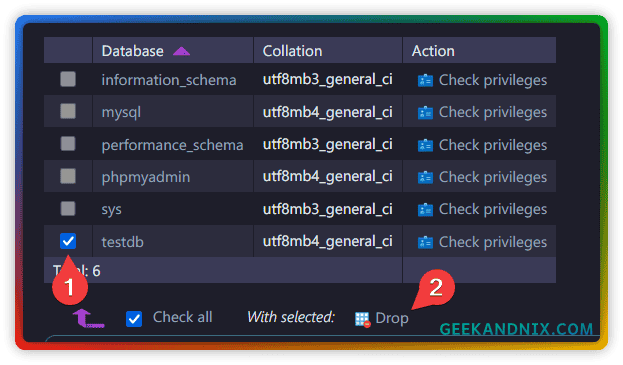
To delete MariaDB data such as database, tables, and columns, select the target data that you want to remove and click Drop.
Uninstalling/Removing phpMyAdmin from Ubuntu
1. To uninstall phpMyAdmin, run the following apt remove command.
sudo apt remove phpmyadmin2. Now, remove or disable the Apache snippet for phpMyAdmin using the command below.
# disable and remove Apache configuration for phpMyAdmin
sudo a2disconf phpmyadmin.conf
sudo rm -f /etc/apache2/conf-available/phpmyadmin.conf
3. Next, remove the phpMyAdmin source code from the /usr/share/phpmyadmin directory, and the default phpMyAdmin configuration /etc/phpmyadmin.
sudo rm -rf /usr/share/phpmyadmin /etc/phpmyadmin4. Lastly, restart the Apache web server to apply your changes.
sudo systemctl restart apache2Conclusion
Well done! You’ve now installed phpMyAdmin on the Ubuntu 24.04 server. You’ve also created a new MySQL/MariaDB administrator for phpMyAdmin, and secured phpMyAdmin by changing the default URL path and additional authentication via the Apache basic_auth module.
Furthermore, you’ve also learned how to connect to phpMyAdmin securely via SSH tunneling, and the basic usage of phpMyAdmin for managing MySQL/MariaDB databases.
At this stage, why not explore another phpMyAdmin feature for managing multiple MySQL/MariaDB database servers?
