How to Setup IP Address on Debian 12 (Static and DHCP)
Setting up an IP address on Debian is one of the first things you need to do once installed it. Most Debian servers use static IP addresses, while Debian desktop users use dynamic IP addresses via DHCP.
In this tutorial, I will show you how to set up static and dynamic IP addresses on Debian 12.
Let’s dive right in.
Prerequisites
Before you begin, make sure you have installed Debian 12 server and have the root access.
Checking network interfaces
Before configuring the IP address, you must check the list of available network interfaces on your Debian machine. Use the ip command to achieve this, which is used to show/manipulate network devices, interfaces, and tunnels.
Run the ip command below to check network interfaces.
ip -c link showIn the following picture, there are 3 network interfaces, lo for localhost, enp0s3 with the status UP, and enp0s8 with the status DOWN.

Setting up static IP address on Debian
A static IP address is an IP address that doesn’t change, mostly used by servers and configured manually. You must have detailed information about your IP address before configuring it manually.
In this demo, I will set up the interface enp0s8 with the following:
| Interface | IP Address | Gateway | DNS resolver |
|---|---|---|---|
| enp0s8 | 192.168.5.20 | 192.168.5.1 | 1.1.1.1 and 8.8.8.8 |
To set up a static IP address on the Debian server, follow these steps:
1. Open the default network configuration /etc/network/interfaces using vi.
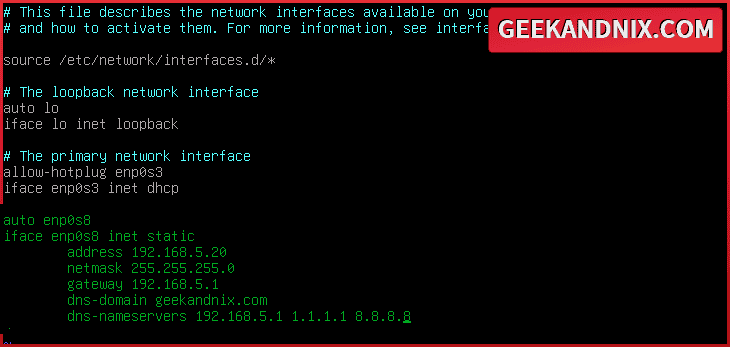
sudo vi /etc/network/interfaces2. Insert the following configuration and be sure to change the details of the interface name, IP address, gateway, and the dns servers.
# The primary network interface
auto enp0s8
iface enp0s8 inet static
    address 192.168.5.20
    netmask 255.255.255.0
    gateway 192.168.5.1
    dns-domain geekandnix.com
    dns-nameservers 192.168.5.1 1.1.1.1 8.8.8.8
Once you’ve finished editing, save the file and exit the editor.

Below are details parameters used:
auto enp0s8: this will start the enp0s8 interface at system boot.inet static: configure the target interface with a static IP address.address: static IP address for the server.netmask: network mask of your networking.gateway: default gateway of your IP address.dns-servers: nameservers that will be used for your interface.
3. Next, enter the following systemctl command to restart the networking service and apply the changes.
sudo systemctl restart networking4. Lastly, run the ip command below to verify the details IP address of the enp0s8 interface.
ip -c address shows enp0s8If everything is working correctly, you’ll see the interface enp0s8 with the status UP and static IP address 192.168.5.20.

Setting up dynamic IP address via DHCP on Debian
A dynamic IP address is an IP address that changes over time, mostly used for computers in local networks and assigned automatically via a DHCP server. For example, when you use a smartphone, computer, or laptop on public WiFi, you’re assigned a dynamic IP address that is distributed by the DHCP server.
Unlike static IP addresses, you don’t need to know the details of the IP address and the gateway to set up the dynamic IP address. Everything is assigned automatically to your Debian machine from the DHCP server on the router.
Here is how you set up the DHCP IP address on Debian:
1. Open the /etc/network/interfaces file using the vi command like this.
sudo vi /etc/network/interfaces2. Inert the following configuration and be sure to change the interface name in this.
allow-hotplug enp0s8
iface enp0s8 inet dhcp
Save the changes and exit the editor to complete the process.
Detailed parameters used:
allow-hotplug: this will start the interface after udev detects the interface, whether after the system boot or later at time.inet dhcp: configure the IP address via DHCP for the target network interface.
3. Now, run the following command to restart the networking service and apply your modification.
sudo systemctl restart networking4. Lastly, run the ip command again to verify the IP address of the enp0s8 interface. You can expect to see the enp0s8 interface get an IP address randomly via DHCP.
ip -c link address enp0s8Setting up DNS resolver
The Nameserver translates the domain name to the correct IP address of the server. That is the reason why when you connect to google.com, you will be presented with the correct IP address of the Google server.
If you do not have DNS resolver configured properly, you will get an error such as ping: google.com: Temporary failure in name resolution when trying to ping a domain name.
On Debian (Linux in general), there are multiple ways to set up the nameserver, such as via the /etc/resolv.conf file, resolvconf program, and the NetworkManager.
Complete the following action to set up the DNS resolver manually via the /etc/resolv.conf file:
1. Open the DNS resolver configuration /etc/resolv.conf using vi editor.
sudo vi /etc/resolv.conf2. Input your preferred nameservers such as 8.8.8.8 (Google DNS) and 1.1.1.1 (Cloudflare DNS).
nameserver 8.8.8.8
nameserver 1.1.1.1
search geekandnix.com
Save the changes and exit the editor to complete.
3. Lastly, execute the ping command below to ensure that you’ve proper nameserver configuration.
ping -c5 geekandnix.comIf you’ve proper nameserver configuration, you should be connected to the geekandnix.com, which is resolved to the IP address.

Optional: Setting up default gateway on Debian
An example scenario: You have 2/3 network interfaces and you ask yourself “Which IP address I will use to connect to the internet?”.
In that case, you need to set up the default gateway on your Debian server here is how to do it:
1. Run the ip command below to change the default gateway to 10.0.2.2.
ip route add default via 10.0.2.22. Once changed, run the following command to verify the default gateway.
ip route | grep ^defAs you can see below, the default gateway is 10.0.2.2 via the interface eth0.

Conclusion
Excellent job! You’ve successfully configured both static and DHCP/dynamic IP addresses on Debian 12. Then, you have learned how to set up a nameserver or DNS resolver via /etc/resolv.conf. Finally, you also learned how to set up the default gateway on Linux in general, which is useful when you have multiple interfaces.
What’s next? Here’s the path that I will take before deploying any applications:


