How to install Fail2ban on Debian 12 (with UFW/IPTables)
If you having public servers, you will see so much brute-force attempts to your server. To prevent this, install Fail2ban for blocking excessive login attempts to your Debian server.
In this guide, I’ll take you through the installation process of fail2ban on Debian 12 Bookworm, step-by-step.
Without further ado, let’s get started.
Prerequisites
To navigate with this guide, make sure you have a running Debian 12 server initialized with sudo for non-root user and UFW (Uncomplicated Firewall) active and running.
If you do not have these requirements in place, follow my guide: Initial server setup with Debian 12 Bookworm.
Installing Fail2ban on Debian
Fail2ban is a security tool written in Python that prevents brute-force attacks and unauthorized access to your server. On Debian, fail2ban is available on the official repository, complete these steps to install it.
1. First, run the apt update to update the Debian repository and get the latest package information. Then, install fail2ban via the apt install command below.
# updating repository
sudo apt update

# installing fail2ban and sendmail
sudo apt install fail2ban sendmail
Type y and press ENTER to proceed with the installation.
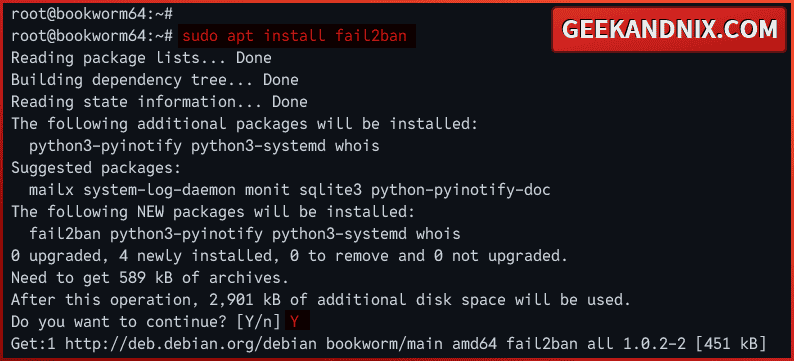
2. Once fail2ban installed, run the command below to copy the default fail2ban configuration /etc/fail2ban/jail.conf to /etc/fail2ban/jail.local. Then, run the sed command below to change the default logging backend to systemd.
# copy file jail.conf to jail.local
sudo cp /etc/fail2ban/jail.{conf,local}

# replacing "backend = auto" with "backend = systemd" on jail.local
sed -i 's/backend = auto/backend = systemd/g' /etc/fail2ban/jail.local
Note: The fail2ban should be run automatically, but you will get an error ERROR Failed during configuration: Have not found any log file for sshd jail. This is because the logging backend for Debian has been changed to systemd. So you must change the default backend = auto to backend = systemd in the jail.local file.
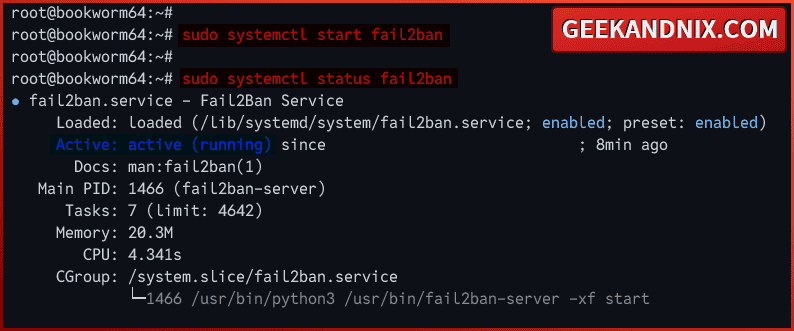
3. Now, run the command below to restart the fail2ban service and apply your changes. Then, verify the service to ensure that the service is running.
# restating fail2ban service
sudo systemctl restart fail2ban

# checking fail2ban status
sudo systemctl status fail2ban
As you can see below, the fail2ban service is running on the Debian server.
Configuring Fail2ban on Debian
After you have installed fail2ban, you must edit the default configuration jail.local and change some default global configurations.
To configure fail2ban, follow these steps:
1. Open the new fail2ban configuration /etc/fail2ban/jail.local using vim.
sudo vim /etc/fail2ban/jail.local2. Find the ignoreip parameter and add whitelist IP addresses into it. The IP address within this parameter will never be banned by fail2ban.
ignoreip = 127.0.0.15/8 192.168.1.2/24Change the default bantime as you need. You can ban an IP address for a day 1d, an hour 1h, or 10 minutes 10m.
bantime = 2h3. Now, change the default maxretry and findtime parameters like the following. In this case, if an IP address is performed 5 times failed login attempts within 10 minutes, the IP address will be banned by fail2ban.
maxretry = 5
findtime = 10m
4. Optional, you can adjust the default banaction to your firewall software. By default, fail2ban used iptables, but you can also change it to use ufw (uncomplicated firewall).
# default uyse iptables
banaction = iptables-multiport

# or change to ufw - make sure ufw installed
banaction = ufw
5. Next, change the default email address in the destmail and sender parameters. When an IP address is blocked by fail2ban, you will get notified. And if don’t want to use an email address, you can use an email address such as root@lolcahost to get notified only in your Debian server.
# Destination email address used solely for the interpolations in
# jail.{conf,local,d/*} configuration files.
destemail = root@localhost

# Sender email address used solely for some actions
sender = root@localhost
6. Lastly, change the default action parameter to $(action_mw)s, which means blocking the IP address and sending an email notification. You can adjust this option depending on your situation, so make sure to read each of the available actions in fail2ban.
# action
action = $(action_mw)s
Do not close vim yet, you will enable jail to secure your services.
Securing SSH and FTP Server with Fail2ban
Now that you have completed the basic configuration of fail2ban, it’s time to secure your services such as SSH and FTP to minimize brute-force attacks and to prevent unauthorized access.
To secure SSH and FTP with fail2ban, follow these steps:
1. In the jail.local file, move to the jail [sshd] section and add the new line enabled = true to enable it. With this, you will protect your SSH server against brute-force attacks.
[sshd]

# To use more aggressive sshd modes set filter parameter "mode" in jail.local:
# normal (default), ddos, extra or aggressive (combines all).
# See "tests/files/logs/sshd" or "filter.d/sshd.conf" for usage examples and details.
#mode   = normal
port    = ssh
logpath = %(sshd_log)s
backend = %(sshd_backend)s

# enable jail
enabled = true
2. Optional, if you have an FTP server such as ProFTPd and vsftpd, you can enable it as follows:
For ProFTPD users, insert the enabled = true to the [proftpd] jail section.
[proftpd]

port     = ftp,ftp-data,ftps,ftps-data
logpath  = %(proftpd_log)s
backend  = %(proftpd_backend)s

enabled = true
If you’re using vsftpd, add the parameter enabled = true to the [vsftpd] jail section.
[vsftpd]
# or overwrite it in jails.local to be
# logpath = %(syslog_authpriv)s
# if you want to rely on PAM failed login attempts
# vsftpd's failregex should match both of those formats
port     = ftp,ftp-data,ftps,ftps-data
logpath  = %(vsftpd_log)s
enabled = true
When done, save and exit the file.
3. Now, run the command below to restart the fail2ban service and apply your modifications.
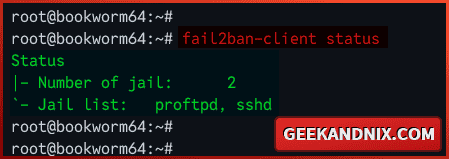
sudo systemctl restart fail2ban4. Once restarted, run the fail2ban-client command below to verify the list of enabled jails on the fail2ban.
sudo fail2ban-client statusAs you can see below, the sshd and proftpd jails are enabled.
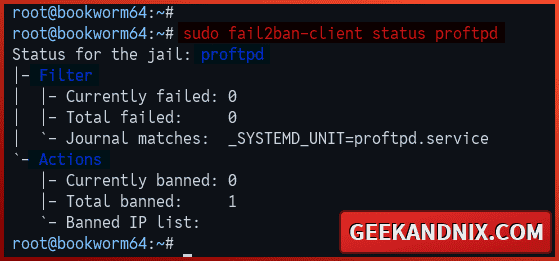
5. Lastly, run the command below to check detailed information on specific jails.
sudo fail2ban-client status proftpdIn the details of jail status, you should get two sections:
- Filter: In this section, you will see the total failed authentication and the systemd journal log that matched with the service.
- Actions: Here, you will see information on banned IP addresses against the jail.
How do I Know if Fail2ban is working on Debian?
By now, you’ve secured SSH and FTP services with fail2ban. Following this, you’ll verify fail2ban jail in action by logging in to the server with an incorrect password.
Note: To test this, make sure you have direct terminal access to your server, so you not getting locked out from your server.
Follow these actions to test your fail2ban installation:
1. Open a new terminal and run the ssh command below to connect to your server.
ssh user@SERVER-IPWhen prompted, input the incorrect password and repeat this 5/8 times.
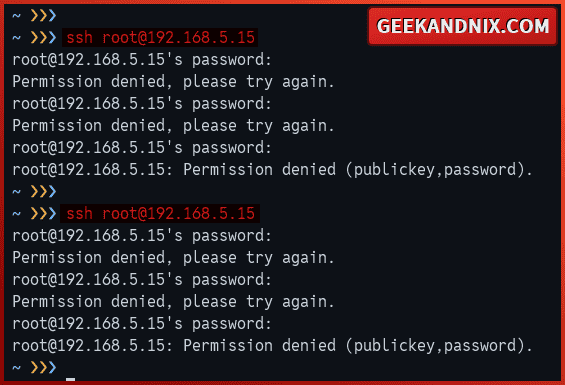
2. Now, move to your terminal server and run the fail2ban-client command below to verify the sshd jail.
fail2ban-client status sshdIf fail2ban installation is successful, your IP address should be blocked by fail2ban:
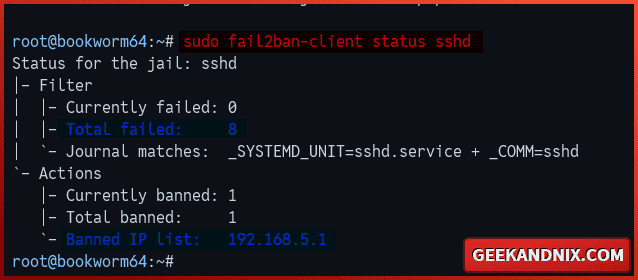
3. Lastly, run the following ufw command to verify the blocked IP address on the firewall side.
sudo ufw status numberedAs you can see below, the IP address 192.168.5.1 is blocked ‘REJECT IN’ by ufw via fail2ban.

4. Additionally, if you’re using iptables for the default banaction, run the command below to check blocked IP addresses by fail2ban.
sudo iptables -S | grep f2bFrequently Asked Questions
Below are some FAQs related to fail2ban.
How to unban IP address with fail2ban?
To unban or remove an IP address from fail2ban, execute the command fail2ban-client unbanip 192.168.5.1.
After that, run the command fail2ban-client banned to make sure your IP address is removed from fail2ban.
How to ban IP addresses manually with fail2ban?
To ban IP address manually with fail2ban, run the command fail2ban-client set proftpd banip 192.168.5.10. Most importantly here, make sure to add the target IP address to the fail2ban jail.
Now verify the list of banned IPs on your specific jail with the command fail2ban-client get proftpd banned.
How to ignore IP address on fail2ban?
To ignore the IP address on fail2ban, execute the command fail2ban-client set sshd addignoreip 192.168.5.15. This will add your IP address as a whitelist to specific jail sshd.
Once added, verify the list ignored/whitelist IP address on jail sshd with the command fail2ban-client get sshd ignoreip.
Conclusion
Well done! You have now installed fail2ban on the Debian 12 server. You also prevented brute-force attacks and unauthorized access against your services (SSH and FTP) using fail2ban and ufw or iptables.
On top of that, you have learned the basic command fail2ban-client utility for managing fail2ban, such as checking jail status, banning and unbanning IP addresses, also ignoring specific IP addresses.
What’s next? if you have followed my guide for Debian Basic, you can now install software and deploy your applications. Here are my recommendations:
