How to Install PHP (8.3, 8.2, 8.1, 8.0) on Debian 12
Hello Geekandnix, today I will show you how to install PHP (8.3, 8.2, 8.1, or 8.0) on the Debian 12 server.
Complete this guide to install PHP, integrate PHP with Apache or Nginx web server, install PHP extensions, and learn how to manage (enable/disable) PHP extensions via the command line.
Prerequisites
Before proceeding with this tutorial, make sure you are equipped with a Debian 12 server initialized with non-root user as administrator privileges. Follow our guide Initial Server Setup with Debian 12 (9 things to do).
Installing PHP on Debian
PHP is an open-source and general programming language for creating web applications. From popular services like Facebook (early) to the most popular CMS like WordPress, both are mainly written in PHP.
On the Debian system, you can install PHP easily via APT, which by default offers PHP 8.2. In addition to that, you can also install the latest versions of PHP 8.3, 8.2, 8.1, or 8.0 via a third-party repository.
Installing PHP via Debian repository
The Debian repository offers PHP 8.2 packages that you can install via APT. If your application requires PHP 8.2, then you can install PHP from the Debian repository.
To install PHP 8.2 via the Debian repository, proceed as follows:
1. First, run the apt command below to update the Debian package index or repository.
sudo apt updateGet:1 http://security.debian.org/debian-security bookworm-security InRelease [48.0 kB]
Hit:2 http://deb.debian.org/debian bookworm InRelease
Get:3 http://deb.debian.org/debian bookworm-updates InRelease [55.4 kB]
Fetched 103 kB in 4s (24.9 kB/s)
Reading package lists... Done
Building dependency tree... Done2. Once updated, run the apt install command below to install PHP via the Debian repository. At this time, the latest Debian repository provides PHP 8.2.
sudo apt install phpEnter y to confirm with the installation when prompted.
Reading package lists... Done
Building dependency tree... Done
...
The following NEW packages will be installed:
  apache2 apache2-bin apache2-data apache2-utils libapache2-mod-php8.2 libapr1 libaprutil1 libaprutil1-dbd-sqlite3 libaprutil1-ldap liblua5.3-0 php
  php-common php8.2 php8.2-cli php8.2-common php8.2-opcache php8.2-readline
0 upgraded, 17 newly installed, 0 to remove and 34 not upgraded.
Need to get 6,754 kB of archives.
After this operation, 29.4 MB of additional disk space will be used.
Do you want to continue? [Y/n] Y
...
Get:11 http://deb.debian.org/debian bookworm/main amd64 php8.2-common amd64 8.2.7-1~deb12u1 [668 kB]
Get:12 http://deb.debian.org/debian bookworm/main amd64 php8.2-opcache amd64 8.2.7-1~deb12u1 [344 kB]
Get:13 http://deb.debian.org/debian bookworm/main amd64 php8.2-readline amd64 8.2.7-1~deb12u1 [12.4 kB]
Get:14 http://deb.debian.org/debian bookworm/main amd64 php8.2-cli amd64 8.2.7-1~deb12u1 [1,732 kB]
Get:15 http://deb.debian.org/debian bookworm/main amd64 libapache2-mod-php8.2 amd64 8.2.7-1~deb12u1 [1,674 kB]
Get:16 http://deb.debian.org/debian bookworm/main amd64 php8.2 all 8.2.7-1~deb12u1 [28.2 kB]
Get:17 http://deb.debian.org/debian bookworm/main amd64 php all 2:8.2+93 [3,628 B]
3. Now, run the command below to verify your PHP version. You will encounter that PHP 8.2 is installed.
php -vPHP 8.2.7 (cli) (built: Jun 9 2023 19:37:27) (NTS)
Copyright (c) The PHP Group
Zend Engine v4.2.7, Copyright (c) Zend Technologies
with Zend OPcache v8.2.7, Copyright (c), by Zend TechnologiesInstalling PHP 8.3, 8.2, 8.1, or 8.0 on Debian
If your application requires PHP’s latest version such as 8.3, then you must install PHP via a third-party repository such as the deb.sury.org repository. The deb.sury.org repository provides multiple PHP versions, from 7.x to 8.x. In this example, you will install PHP 8.3, 8.2, 8.1, and 8.0 on Debian.
To install PHP 8.3, 8.2, 8.1, or 8.0 on Debian 12, follow these steps:
1. To start, execute the command below to install packages apt-transport-https and gnupg2.
sudo apt install -y apt-transport-https gnupg22. Run the command below to add the GPG key for the deb.sury.org repository.
sudo curl -sSLo /usr/share/keyrings/deb.sury.org-php.gpg https://packages.sury.org/php/apt.gpg3. Now, run the following command to add the PHP repository deb.sury.org to your system. This repository provides a range of PHP versions from PHP 5.6, PHP 7.0-7.4, and PHP 8.0-8.3 installable together.
sudo sh -c 'echo "deb [signed-by=/usr/share/keyrings/deb.sury.org-php.gpg] https://packages.sury.org/php/ $(lsb_release -sc) main" > /etc/apt/sources.list.d/php.list'4. Next, run the apt commands below to refresh your package list and install PHP to your system.
# installing PHP 8.3
sudo apt update && sudo apt install php8.3

# installing PHP 8.2
sudo apt update && sudo apt install php8.2

# installing PHP 8.1
sudo apt update && sudo apt install php8.1

# installing PHP 8.1
sudo apt update && sudo apt install php8.0
Hit:1 http://security.debian.org/debian-security bookworm-security InRelease
Hit:2 http://deb.debian.org/debian bookworm InRelease
Hit:3 http://deb.debian.org/debian bookworm-updates InRelease
Get:4 https://packages.sury.org/php bookworm InRelease [7,539 B]
Get:5 https://packages.sury.org/php bookworm/main amd64 Packages [226 kB]
Fetched 234 kB in 2s (141 kB/s)
Reading package lists... Done
Building dependency tree... Done
Reading state information... Done
...
Need to get 4,570 kB of archives.
After this operation, 22.3 MB of additional disk space will be used.
Do you want to continue? [Y/n] Y
Get:1 https://packages.sury.org/php bookworm/main amd64 php8.3-common amd64 8.3.4-1+0~20240316.18+debian12~1.gbpa5171b [706 kB]
Get:2 https://packages.sury.org/php bookworm/main amd64 php8.3-opcache amd64 8.3.4-1+0~20240316.18+debian12~1.gbpa5171b [346 kB]
Get:3 https://packages.sury.org/php bookworm/main amd64 php8.3-readline amd64 8.3.4-1+0~20240316.18+debian12~1.gbpa5171b [12.4 kB]
Get:4 https://packages.sury.org/php bookworm/main amd64 php8.3-cli amd64 8.3.4-1+0~20240316.18+debian12~1.gbpa5171b [1,771 kB]
Get:5 https://packages.sury.org/php bookworm/main amd64 libapache2-mod-php8.3 amd64 8.3.4-1+0~20240316.18+debian12~1.gbpa5171b [1,710 kB]
Get:6 https://packages.sury.org/php bookworm/main amd64 php8.3 all 8.3.4-1+0~20240316.18+debian12~1.gbpa5171b [25.7 kB]5. Once the installation is complete, run the command below to verify your PHP version.
php -vAs displayed in the output below, PHP 8.3 is installed on Debian 12 via the deb.sury.org repository.
PHP 8.3.4 (cli) (built: Mar 16 2024 08:45:20) (NTS)
Copyright (c) The PHP Group
Zend Engine v4.3.4, Copyright (c) Zend Technologies
    with Zend OPcache v8.3.4, Copyright (c), by Zend Technologies
Integrating PHP with Apache or Nginx web server
After you have installed PHP, you will need to integrate PHP with Apache or Nginx web server. For the Apache web server, you can integrate PHP via libapache2-mod-php, while for the Nginx web server, you need to install the php-fpm.
Integrating PHP with Apache web server
If you’re using an Apache web server, you must install the libapache2-mod-php package to integrate your PHP installation. With the libapache2-mod-php, PHP will run as an Apache module that you can control via the a2enmod or a2dismid utility.
To integrate PHP with the Apache web server, proceed with these steps:
1. Run the apt install command below to install the package libapache2-mod-php to your system. The libapache2-mod-php will run PHP as an Apache module and provide integration with the Apache web server.
sudo apt install libapache2-mod-phpWhen prompted, type y to proceed with the installation.
Reading package lists... Done
Building dependency tree... Done
...
2 upgraded, 2 newly installed, 0 to remove and 40 not upgraded.
Need to get 25.2 kB of archives.
After this operation, 64.5 kB of additional disk space will be used.
Do you want to continue? [Y/n] Y
Get:1 https://packages.sury.org/php bookworm/main amd64 debsuryorg-archive-keyring all 2024.02.05+0~20240205.1+debian12~1.gbp343037 [4,412 B]
Get:2 https://packages.sury.org/php bookworm/main amd64 libapache2-mod-php all 2:8.3+94+0~20240205.51+debian12~1.gbp6faa2e [4,068 B]
2. Now, run the following a2enmod command below to enable the PHP version module. If you only have 1 PHP version, you can skip this. But if you have multiple PHP versions installed, select the PHP version as needed.
# enabling PHP 8.3 module
sudo a2enmod php8.3

# enabling PHP 8.2 module
sudo a2enmod php8.2
Considering dependency mpm_prefork for php8.3:
Considering conflict mpm_event for mpm_prefork:
Considering conflict mpm_worker for mpm_prefork:
Module mpm_prefork already enabled
Considering conflict php5 for php8.3:
Enabling module php8.3.
To activate the new configuration, you need to run:
systemctl restart apache2Additionally, for multiple PHP versions, select the default PHP version with the command:
sudo update-alternatives --config phpThere are 2 choices for the alternative php (providing /usr/bin/php).
Selection Path Priority Status
------------------------------------------------------------
* 0 /usr/bin/php8.3 83 auto mode
1 /usr/bin/php8.2 82 manual mode
2 /usr/bin/php8.3 83 manual mode
Press <enter> to keep the current choice[*], or type selection number: 03. Next, run the systemctl command below to restart the Apache web server after you’ve enabled the PHP module.
sudo systemctl restart apache4. Once Apache restarted, execute the command below to create a new PHPINFO file /var/www/html/info.php.
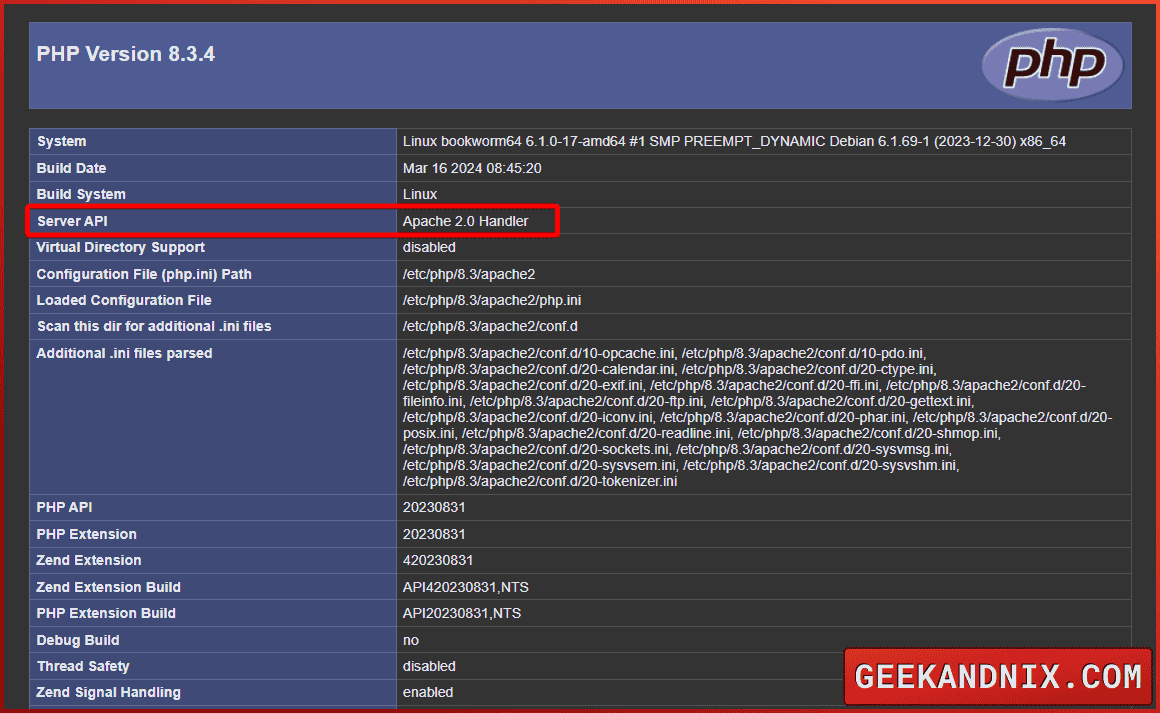
echo '<?php phpinfo(); ?>' > /var/www/html/info.php5. Lastly, visit your http://SERVER-IP/info.php from your web browser to verify PHP integration.
If your PHP integration with the Apache web server is successful, you should get the Server API as Apache 2.0 Handler.

Integrating PHP with Nginx web server
As for Nginx users, you must install the php-fpm package to integrate your PHP installation. The php-fpm will be run as a standalone process and managed via the systemctl utility. Also, the php-fpm will run under the sock file /run/php/phpX.X-fpm.sock or system port 9000.
To integrate PHP with the Nginx web server, perform the following:
1. Execute the apt install command below to install the PHP-FPM package to your system. Make sure to select the PHP-FPM version accordingly.
# installing PHP-FPM 8.3
sudo apt install php8.3-fpm

# installing PHP-FPM 8.2
sudo apt install php8.2-fpm

# installing PHP-FPM 8.1
sudo apt install php8.1-fpm

# installing PHP-FPM 8.0
sudo apt install php8.0-fpm
Enter y to confirm with the installation.
Reading package lists... Done
Suggested packages:
  php-pear
The following NEW packages will be installed:
  php8.3-fpm
0 upgraded, 1 newly installed, 0 to remove and 34 not upgraded.
Need to get 1,778 kB of archives.
After this operation, 5,831 kB of additional disk space will be used.
Get:1 https://packages.sury.org/php bookworm/main amd64 php8.3-fpm amd64 8.3.4-1+0~20240316.18+debian12~1.gbpa5171b [1,778 kB]
2. Once complete, run the command below to ensure that the PHP-FPM service is running and enabled. In this case, I’ve PHP-FPM 8.3 installed, so the service name is php8.3-fpm.
sudo systemctl is-enabled php8.3-fpm
sudo systemctl status php8.3-fpm
An output enabled confirms that PHP-FPM is enabled and will start automatically at boot. While PHP-FPM running, the expected output is active (running).
enabled
...
● php8.3-fpm.service - The PHP 8.3 FastCGI Process Manager
     Loaded: loaded (/lib/systemd/system/php8.3-fpm.service; enabled; preset: enabled)
     Active: active (running) since ; 45s ago
       Docs: man:php-fpm8.3(8)
    Process: 23819 ExecStartPost=/usr/lib/php/php-fpm-socket-helper install /run/php/php-fpm.sock /etc/php/8.3/fpm/pool.d/www.conf 83 (code=exited, >
   Main PID: 23816 (php-fpm8.3)
     Status: "Processes active: 0, idle: 2, Requests: 0, slow: 0, Traffic: 0req/sec"
      Tasks: 3 (limit: 2307)
     Memory: 9.4M
        CPU: 81ms
     CGroup: /system.slice/php8.3-fpm.service
             ├─23816 "php-fpm: master process (/etc/php/8.3/fpm/php-fpm.conf)"
             ├─23817 "php-fpm: pool www"
             └─23818 "php-fpm: pool www"
3. Now, run the ss command below to check the location of the PHP-FPM sock file. The key to integrating PHP-FPM with the Nginx web server is to know where the location of the PHP-FPM sock file.
ss -pl | grep phpNoted in the output below, the PHP-FPM sock file is located at /run/php/php8.3-fpm.sock.
u_str LISTEN 0 4096 /run/php/php8.3-fpm.sock 74678 * 0 users:(("php-fpm8.3",pid=23818,fd=10),("php-fpm8.3",pid=23817,fd=10),("php-fpm8.3",pid=23816,fd=8))4. Next, open the default Nginx server block using vim.
sudo vim /etc/nginx/sites-available/defaultUncomment or input the following configuration between the server {...} section. Also, make sure to change the fastcgi_pass value with the location of your PHP-FPM sock file, such as unix:/run/php/php8.3-fpm.sock.
server {

   .....

   location ~ \.php$ {
      include snippets/fastcgi-php.conf;
      fastcgi_pass unix:/run/php/php8.3-fpm.sock;
   }
}
Save and exit the file.
5. Once finished editing, execute the nginx command below to verify Nginx syntax. Execute this command every time after making changes to Nginx configuration, this will ensure that you have proper Nginx syntax.
sudo nginx -tAssuming you have the correct Nginx syntax, you’ll get an output ... syntax is ok - ... test is successful.
nginx: the configuration file /etc/nginx/nginx.conf syntax is ok
nginx: configuration file /etc/nginx/nginx.conf test is successful
6. Now, run the systmctl command below to restart the Nginx web server and apply the new changes.
sudo systemctl restart nginx7. Execute the command below to create a new PHPINFO file /var/www/html/info.php.
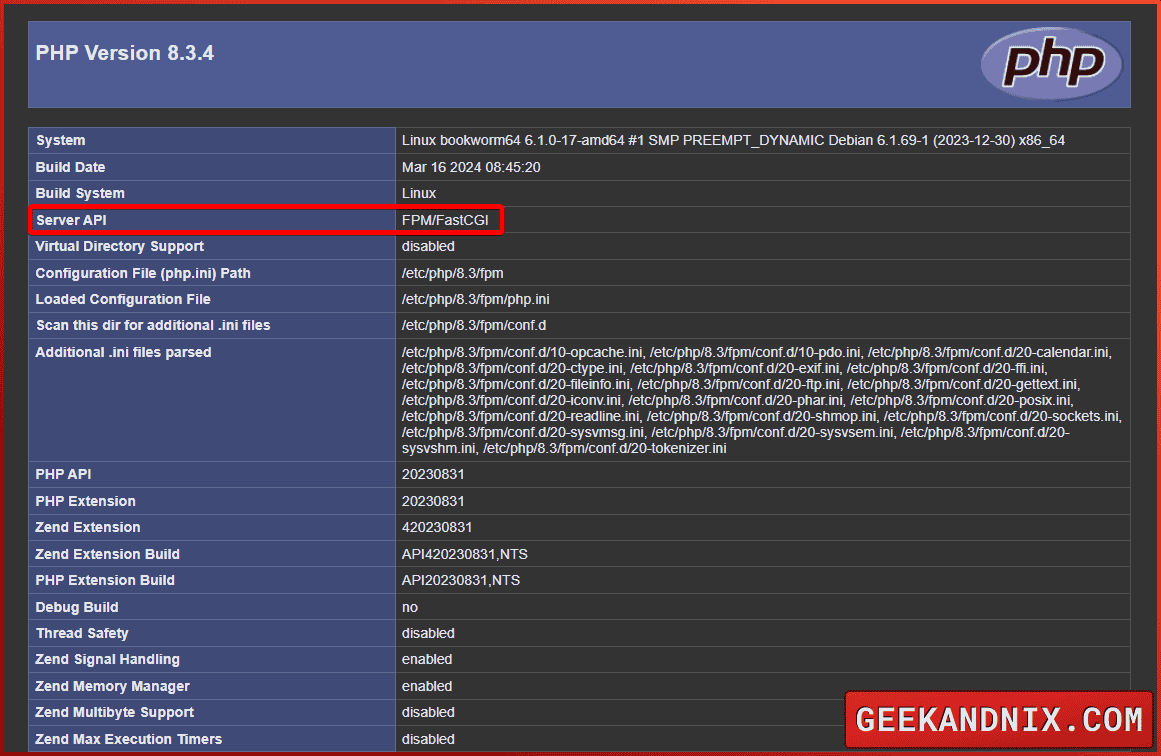
echo '<?php phpinfo(); ?>' > /var/www/html/info.php8. Lastly, visit http://SERVER-IP/info.php from your web browser to ensure that the integration of PHP-FPM with the Nginx web server is successful.
If successful, the PHPINFO page should inform that your PHP installation is integrated with the Nginx web server via Server API FPM/FastCGI.

Installing PHP Extensions
After you have integrated PHP with web servers, you need to install PHP extensions that are required by your application. With the apt search command, you can list and find available PHP extensions. Also, by combining with grep, you can filter the output list of PHP extensions.
To install PHP extensions that are needed by your applications, execute the following actions:
1. First, run the apt search command below to find the PHP extension you need. This is followed by the grep command to filter output only specific extension names.
sudo apt search php
sudo apt search php | grep name
php-mariadb-mysql-kbs/stable 1.2.14-1 all
php-mdb2-driver-mysql/stable 1.5.0b4-2.1 all
php-mysql/bookworm 2:8.3+94+0~20240205.51+debian12~1.gbp6faa2e all
php-mysqlnd-ms/bookworm 1.6.0+svn333622-17+0~20231125.2+debian12~1.gbp3bc33e amd64
php-mysqlnd-ms-all-dev/bookworm 1.6.0+svn333622-17+0~20231125.2+debian12~1.gbp3bc33e all2. If the PHP extension is available, run the apt install command below to install it. In this example, you will install PHP extensions that are mostly needed by your applications.
sudo apt install php-cli php-curl php-gd php-intl php-mbstring php-bcmath php-mysql php-xml php-zipType y when prompted to confirm the installation.
Reading package lists... Done
Building dependency tree... Done
Reading state information... Done
The following additional packages will be installed:
  libonig5 libxslt1.1 libzip4 php8.3-bcmath php8.3-curl php8.3-gd php8.3-intl php8.3-mbstring php8.3-mysql php8.3-xml php8.3-zip
The following NEW packages will be installed:
  libonig5 libxslt1.1 libzip4 php-bcmath php-cli php-curl php-gd php-intl php-mbstring php-mysql php-xml php-zip php8.3-bcmath php8.3-curl
  php8.3-gd php8.3-intl php8.3-mbstring php8.3-mysql php8.3-xml php8.3-zip
0 upgraded, 20 newly installed, 0 to remove and 34 not upgraded.
Need to get 1,445 kB of archives.
After this operation, 4,738 kB of additional disk space will be used.
Do you want to continue? [Y/n] Y
Get:1 http://deb.debian.org/debian bookworm/main amd64 libonig5 amd64 6.9.8-1 [188 kB]
Get:2 http://deb.debian.org/debian bookworm/main amd64 libxslt1.1 amd64 1.1.35-1 [242 kB]
Get:3 http://deb.debian.org/debian bookworm/main amd64 libzip4 amd64 1.7.3-1+b1 [55.5 kB]
Get:4 https://packages.sury.org/php bookworm/main amd64 php8.3-bcmath amd64 8.3.4-1+0~20240316.18+debian12~1.gbpa5171b [15.5 kB]
Get:5 https://packages.sury.org/php bookworm/main amd64 php-bcmath all 2:8.3+94+0~20240205.51+debian12~1.gbp6faa2e [3,864 B]
Get:6 https://packages.sury.org/php bookworm/main amd64 php-cli all 2:8.3+94+0~20240205.51+debian12~1.gbp6faa2e [4,320 B]
3. Once the installation is complete, run the following command to restart the PHP-FPM or Apache service and apply your new configurations.
# restarting PHP-FPM for Nginx users
sudo systemctl restart php8.3-fpm

# restarting Apache web server
sudo systemctl restart apache2
4. Lastly, run the php command below to verify the PHP modules that are installed on your system.
php -m
php -m | grep name
Highlighted below, you can see the list of installed PHP extensions.
[PHP Modules]
bcmath
...SNIP...
intl
json
libxml
mbstring
mysqli
mysqlnd
openssl
...SNIP...

[Zend Modules]
Zend OPcache
How to enable/disable PHP extensions?
With PHP extensions installed, you can now enable or disable extensions as needed. On Debian-based distribution, use the phpenmod and phpdismod to enable or disable enable PHP extensions.
To enable or disable PHP extensions via the command line, perform the following:
1. First, run the command below to check the PHP module directory /etc/php/8.3/mods-available.
ls -ah /etc/php/8.3/mods-available/You will get the list of configuration of PHP modules.
.             ctype.ini  ffi.ini       gettext.ini   mysqli.ini   pdo_mysql.ini  shmop.ini      sysvsem.ini    xmlreader.ini
..            curl.ini   fileinfo.ini  iconv.ini     mysqlnd.ini  phar.ini       simplexml.ini  sysvshm.ini    xmlwriter.ini
bcmath.ini    dom.ini    ftp.ini       intl.ini      opcache.ini  posix.ini      sockets.ini    tokenizer.ini  xsl.ini
calendar.ini  exif.ini   gd.ini        mbstring.ini  pdo.ini      readline.ini   sysvmsg.ini    xml.ini        zip.ini
2. If a PHP module is available, run the phpendmod command below to enable the PHP extension.
phpenmod gd3. Now, if you want to disable a specific PHP extension, run the phpdismod command below.
phpdismod gd4. Next, run the systemctl command below to restart Apache or PHP-FPM services to apply your changes.
# restarting apache2
sudo systemctl restart apache2

# restarting PHP-FPM
sudo systemctl restart php8.3-fpm
5. Lastly, run the command below to ensure that the PHP module is enabled. In this case, if the PHP gd module is enabled, you will see an output gd.
php -m
php -m | grep gd
Guide to PHP configuration files and directories
Below are some of the important configuration files and directories related to PHP:
/etc/php/8.x/: The main configuration directory for PHP installation. If you have multiple PHP versions, you will find multiple directories such as8.3and8.2in the/etc/phpdirectory./etc/php/8.x/apache2: This directory stored configurations related to Apache integration. You will see thephp.inifile and theconf.ddirectory where PHP modules are enabled./etc/php/8.x/fpm: This is the PHP-FPM configuration directory. Here, you will get the filephp.inifile, thephp-fpm.conffile, theconf.ddirectory for PHP modules, thepools.ddirectory where the PHP-FPM pool configuration is stored, and thewww.conffile as the default pool for PHP-FPM./etc/php/8.x/cli: This directory is used for storing PHP CLI configuration. You can see thephp.iniandconf.ddirectory./etc/php/8.x/mods-available: List configuration for PHP modules.php.ini: The main configuration file for PHP, which is available in theapache,cli, andfpmdirectories.php-fpm.conf: The main configuration for PHP-FPM. Only available in thefpmdirectory.www.conf: The default PHP-FPM pool configuration and available in the/etc/php/8.x/fpm/pool.ddirectory.
Conclusion
Well done! you have installed PHP (8.3, 8.2, 8.1, or 8.0) on Debian 12 server. You also integrated PHP with the Apache web server via libapache2-mod-php and the Nginx web server via php-fpm. Following that, you also learned how to install and manage PHP extensions via the command line.
What’s next? You may ensure you have completed the following to install your software stack, LAMP (Linux, Apache, MySQL/MariaDB, and PHP) or LEMP (Linux, Nginx, MySQL/MariaDB, and PHP-FPM).


