How to Install vsftpd on Ubuntu 24.04/22.04 Server
Security is an essential part of Data Transfer, here vsftpd (Very Secure FTP Daemon), fast and secure FTP server software for your Ubuntu server. The vsftpd is a small FTP server implementation with SSL/TLS integration and supports virtual IP configuration, virtual users, and bandwidth throttling.
FreeBSD users? Don’t miss out on our latest guide: How to Install and Secure vsftpd on FreeBSD 14.
Through this tutorial, you’ll discover how to install VSFTPD on Ubuntu 24.04 server “Noble Numbat“. Furthermore, you will be setting up virtual users on VSFTPD with PAM (Pluggable Authentication Module) authentication, securing VSFTPD via SSL/TLS certificates and UFW, and then you will be connecting and uploading files to the VSFTPD server with FileZilla.
Prerequisites
To get the most out of this tutorial, you must have the following:
- A Linux server running Ubuntu 24.04.
- An administrative user or non-root user with sudo/root privileges.
- A UFW (Uncomplicated Firewall) is up and running.
See more:
How to Install Ubuntu Server 24.04 LTS Server
Master the UFW Firewall on Ubuntu: 17 Practical Examples
Installing VSFTPD on Ubuntu
The vsftpd or “Very Secure FTP Daemon” is a small and secure FTP server software that is available on most Linux distributions, including Ubuntu.
To begin, you will start by installing vsftp from the Ubuntu repository, start the vsftpd service, and then verify the vsftpd to ensure that the service is activated and running.
1. Run the following command to update your Ubuntu repository and ensure that you have the latest package information.
sudo apt update
2. Install vsftpd to your Ubuntu system using the apt install command below.
sudo apt install vsftpdInput y to confirm the installation, then press ENTER.
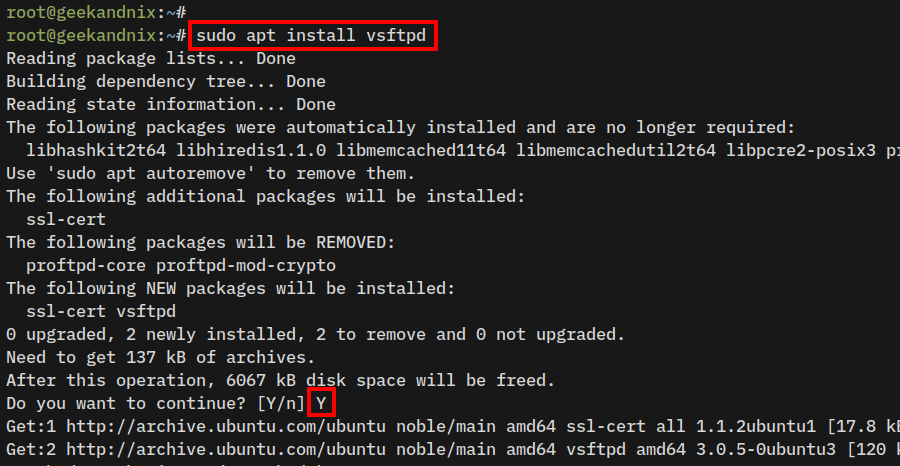
3. Now, run the following command to ensure that the vsftpd service is running and enabled.
# Checking if vsftpd service is enabled
sudo systemctl is-enabled vsftpd

# Checking vsftpd service status
sudo systemctl status vsftpd
If the vsftpd running, you can expect to see the output active (running). In addition, you might also notice the output enabled, which means the vsftpd will start automatically upon system startup.

Configuring VSFTPD on Ubuntu
On Ubuntu, the vsftpd configuration is located at /etc/vsftpd.conf. Let’s now take a closer into it and configure the vsftpd installation.
1. First, run the following command to back up the original file /etc/vsftpd.conf to /etc/vsftpd.conf.orig.
sudo cp /etc/vsftpd.conf /etc/vsftpd.conf.orig2. Open up the file /etc/vsftpd.conf in the text editor that you prefer. This example uses vim.
sudo vim /etc/vsftpd.confNow let’s deep dive into the vsftpd configuration.
Running vsftpd Standalone Mode on Ubuntu
The vsftpd can be run in two ways, via inetd and standalone with systemd. To run vsftpd in standalone mode, use the parameter listen=YES. Also, if you prefer to disable IPv6 supports, use the parameter listen_ipv6=NO.
# run as standalone
listen=YES

# disable IPv6 support
listen_ipv6=NO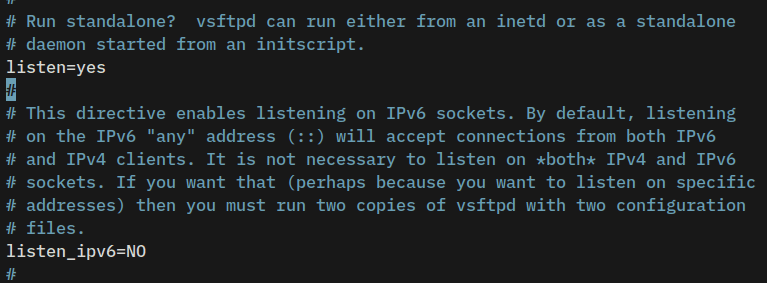
Enable Upload and Local Users
Use the option local_enable=YES to allow local users to log in to vsftpd, then uncomment write_enable=YES to enable users to upload, and uncomment the local_umask=022 to set up default permission of files on vsftpd.
# allow local users to log in
local_enable=YES

# enable upload
write_enable=YES

# default umask file
local_umask=022
Setting up Idle and Timeout
Uncomment and adjust the parameter idle_session_timeout to set up the timing out of idle session, and the parameter data_connection_timeout for timing out of data connection.
# idle connection
idle_session_timeout=600

# data timeout
data_connection_timeout=300
Enable Chroot on VSFTPD
On vsftpd, the chroot will trap users in their home directory. This way, a user can not see another user directory.
Now, uncomment the chroot_local_user=YES parameter to enable chroot, then add the parameter hide_ids=YES to hide the owner identity on listing files.
# enable chroot for all users
chroot_local_user=YES

# hide identity on listing files
hide_ids=YES
Security Note: you must disable WRITE on the chroot directory and never use the parameter allow_writeable_chroot=YES on vsftpd, even when you’re using virtual users. By disabling WRITE access on the chroot directory will prevent the ROARING BEAST ATTACK against your FTP server.
Setting Up Passive Mode VSFTPD
Passive mode is an alternative method for establishing FTP connections. In passive mode, clients can connect to the vsftpd server via random ports, especially when blocked by the firewall.
Add the following parameters to enable passive mode on vsftpd, disable ftp-data port 20, then specify ports for passive mode connections in between 7000-7500.
# enable passive
pasv_enable=YES
connect_from_port_20=NO
pasv_min_port=7000
pasv_max_port=7500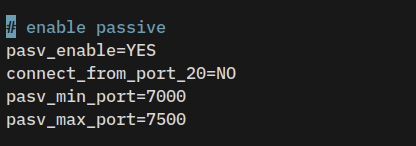
Enable VSFTPD Virtual Users on Ubuntu
Now add the following lines to enable virtual user settings on vsftpd. You will get into these details in the next section.
# Virtual User Settings
user_config_dir=/etc/vsftpd/user-conf
guest_enable=YES
virtual_use_local_privs=YES
pam_service_name=vsftpd
nopriv_user=vsftpd
guest_username=vsftpd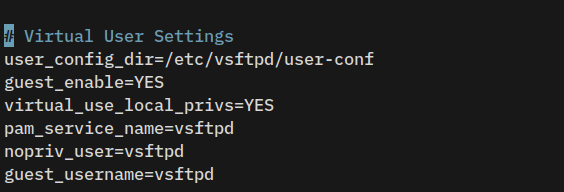
When finished, press ESC, then type :wq to save and exit.
Setting Up Virtual Users on VSFTPD
The following section explores how to set up virtual users on vsftpd.
Creating vsftpd User
First, run the following command to create a new group nogroup, and a new user called vsftpd.
Since you have enabled guest_enable=YES and configured the guest_username=vsftpd, you must create a new user vsftp. All non-anonymous logins will be identified as guest logins, which is using the user vsftpd.
# Creating group nogroup
sudo groupadd nogroup

# Creating new user vsftpd
sudo useradd --home-dir /home/vsftpd --gid nogroup -m --shell /bin/false vsftpd
Creating Password File
Now, run the command below to create a new configuration directory /etc/vsftpd.
mkdir -p /etc/vsftpd2. After that, run the openssl command below to generate the encrypted password for new vsftpd users. Input the new password and press ENTER.
openssl passwd -1 -noverify -stdinBased on the following output, you should notice the password passuser1 encrypted as $1$2kDZnn87$e5QTdle.EpCzLDFIRLApf., and the password passuser2 encrypted as $1$6roXoW0C$0o6/pU1yTbf2Bo.sqrgBY/.
Copy both encrypted passwords and press Ctrl+C to exit.

3. Next, create a new password file /etc/vsftpd/ftpusers.passwd using vim.
sudo vim /etc/vsftpd/ftpusers.passwdAdd the following lines to create a new vsftpd user1 and user2. Make sure to modify the encrypted password.
# Username:Password
user1:$1$2kDZnn87$e5QTdle.EpCzLDFIRLApf.
user2:$1$6roXoW0C$0o6/pU1yTbf2Bo.sqrgBY/
Save and close the file.
Creating Virtual User Configurations
1. Run the following command to create a new configuration directory /etc/vsftpd/user-conf. This directory will be used to store the virtual user’s configuration, as described in the parameter user_config_dir=/etc/vsftpd/user-conf.
mkdir -p /etc/vsftpd/user-conf2. Execute the following command to create a new virtual user configuration for the user user1 and user2.
In this example, you will set up a home directory for user1 to /var/www/user1 and user user2 to /var/www/user2 via the local_root parameter. You can add more parameter per-user configuration accordingly.
echo "local_root=/var/www/user1" > /etc/vsftpd/user-conf/user1
echo "local_root=/var/www/user2" > /etc/vsftpd/user-conf/user2
Creating Home Directory VSFTP Virtual Users
1. Now, run the following command to create a new home directory for user1 and user2. Then, change the ownership to the root user and permission to 755.
sudo mkdir -p /var/www/user1 /var/www/user2

sudo chown -R root:root /var/www/user1 /var/www/user2
sudo chmod 755 /var/www/user1 /var/www/user2
2. Next, run the command below to create new directories data and public_html within the home directory of users user1 and user2.
With WRITE access disabled on the chroot home directory, a user can’t upload files to the chroot home directory. This means that user1 can’t upload files to the directory /var/www/user1, but can still upload files to directories data and public_html. This also applied to the user2.
mkdir -p /var/www/user1/{data,public_html} /var/www/user2/{data,public_html}
sudo chown -R vsftpd:nogroup /var/www/user1/{data,public_html} /var/www/user2/{data,public_html}
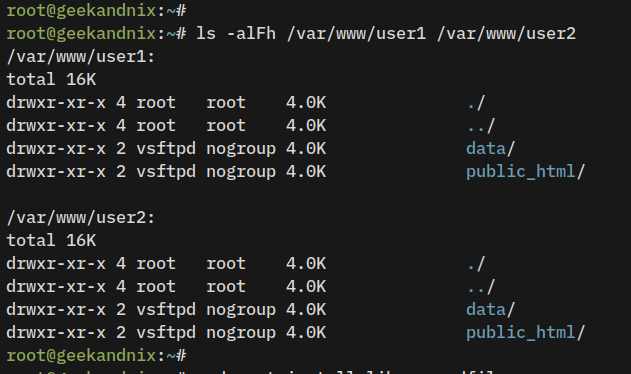
3. Lastly, run the following command to verify the permission and ownership of the virtual user’s home directory.
ls -alFh /var/www/user1 /var/www/user2The proper permission and ownership should look like this – The chroot home directory for each user should be owned by user root, but directories data and public_html must be owned by user vsftpd and nogroup.
Setting Up PAM Authentication for VSFTPD
After configuring virtual users with all necessary settings, the next step is to set up vsftpd authentication via the libpam-pwdfile module.
The libpam-pwdfile is a PAM module that allows authentication to be done via /etc/passwd-like file. It supports libc’s crypt and md5crypt password file, which, at this point, you have generated crypt password file /etc/vsftpd/ftpusers.passwd for vsftpd users via openssl.
1. Run the apt install command below to install the libpam-pwdfile package.
sudo apt install libpam-pwdfile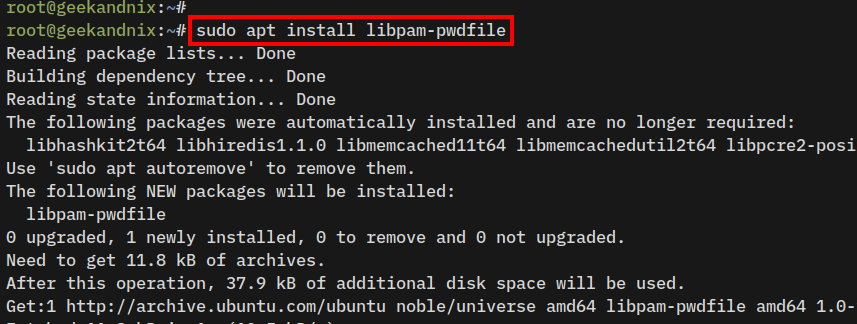
2. Now, run the command below to back up the default PAM configuration for vsftpd to /etc/pam.d/vsftpd.orig. Then, open the original vsftpd PAM configuration /etc/pam.d/vsftpd with vim.
sudo cp /etc/pam.d/vsftpd /etc/pam.d/vsftpd.orig
sudo vim /etc/pam.d/vsftpd
Replace the configuration with the following lines. In this example, the password file /etc/vsftpd/ftpusers.passwd refers to the database password file that you have created during the virtual user configuration on vsftpd.
# custom PAM for vsftpd virtual users
auth required pam_pwdfile.so pwdfile /etc/vsftpd/ftpusers.passwd
account required pam_permit.so
Save the file and exit the editor.
Securing VSFTPD via SSL/TLS
SSL/TLS is mandatory for FTP servers, it helps you secure and encrypt both client connections and data transfer between the client and server. This section covers how to secure vsftpd with SSL/TLS certificates.
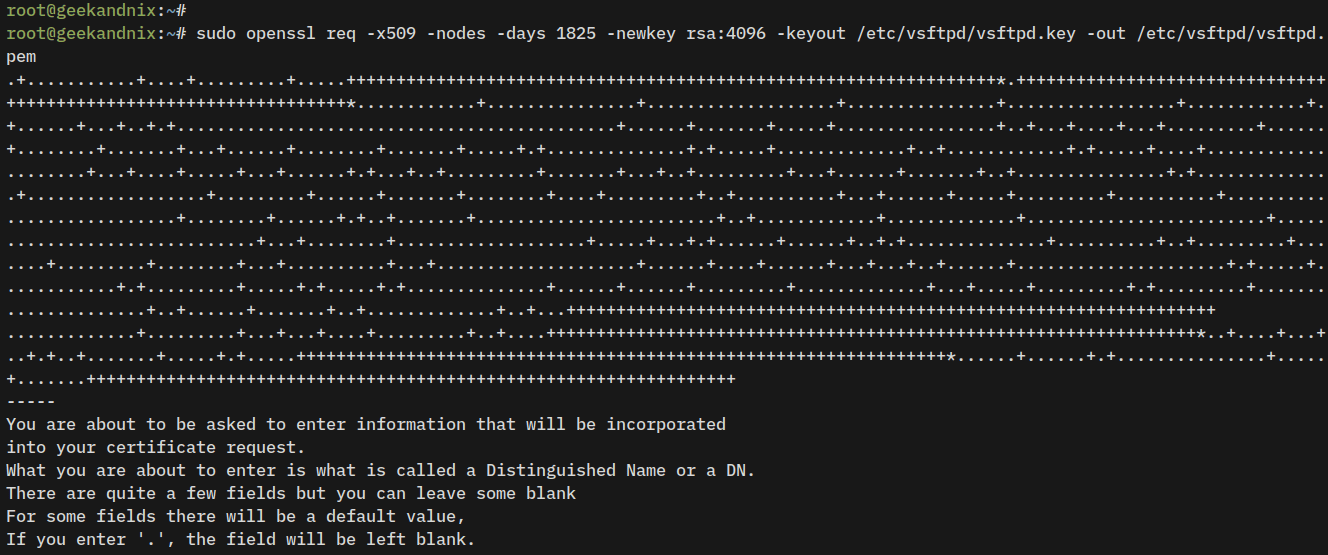
1. Run the openssl command below to generate self-signed certificates for the vsftpd server. As you proceed, you will be asked to provide information about your certificate details.
sudo openssl req -x509 -nodes -days 1825 -newkey rsa:4096 -keyout /etc/vsftpd/vsftpd.key -out /etc/vsftpd/vsftpd.pemWhen finished, your certificate will be available at /etc/vsftpd/vsftpd.key (private key) and /etc/vsftpd/vsftpd.pem (public key).
2. Now, run the following command to change the permission of SSL/TLS certificates to 0600. This ensures only the root user can read and write certificate files.
sudo chmod 0600 /etc/vsftpd/vsftpd.key /etc/vsftpd/vsftpd.pem3. Next, open the vsftpd configuration /etc/vsftpd.conf using vim.
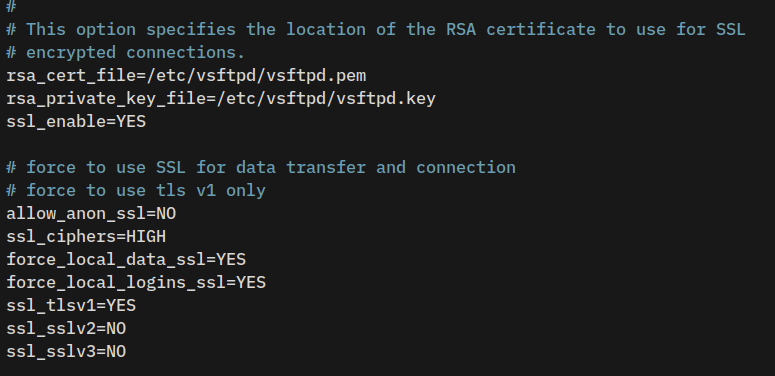
sudo vim /etc/vsftpd.confAt the bottom of the line, find SSL parameters and replace them with the following lines.
rsa_cert_file=/etc/vsftpd/vsftpd.pem
rsa_private_key_file=/etc/vsftpd/vsftpd.key
ssl_enable=YES

# force to use SSL for data transfer and connection
# force to use tls v1 only
allow_anon_ssl=NO
ssl_ciphers=HIGH
force_local_data_ssl=YES
force_local_logins_ssl=YES
ssl_tlsv1=YES
ssl_sslv2=NO
ssl_sslv3=NO
Save the file, then close the editor when finished.
4. Lastly, run the following systemctl command to restart the vsftpd service and apply the changes. Then, verify the vsftpd service status to ensure that the service is running.
sudo systemctl restart vsftpd
sudo systemctl status vsftpd
If everything goes smoothly, the output you receive should be similar to:

After completing the previous steps, you should now have the vsftpd server up and running in standalone mode with chroot virtual users, and the passive mode enabled. Not only that, you have also secured vsftpd with SSL/TLS certificates.
Securing VSFTPD With UFW on Ubuntu Server
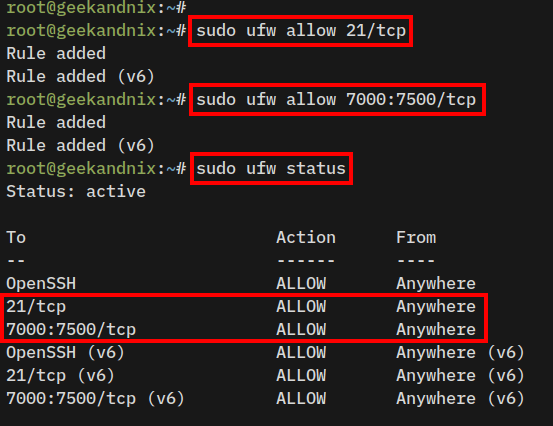
The vsftpd required port 21/tcp for client connections, port 20/tcp for ftp-data (optional), and random ports within the parameter pasv_min_port and pasv_max_port for vsftpd passive mode.
With this in mind, you will now open the required ports for vsftpd via UFW (Uncomplicated Firewall).
1. Open the default FTP port 21/tcp using the following command.
sudo ufw allow 21/tcp2. Now, run the following command to open random ports of vsftpd passive mode.
In this example, the vsftpd passive mode is running on ports between 7000:7500/tcp, which refer to the parameter pasv_min_port and pasv_max_port on the /etc/vsftpd.conf file.
sudo ufw allow 7000:7500/tcp3. Once reloaded, run the following command to verify the detailed status of UFW.
sudo ufw statusYou should expect an output like this:
Connecting to VSFTPD Server via FileZilla
1. Download FileZilla for your operating system, the install it.
2. Open FileZilla, type the host or IP address of your vsftpd server, username, password, and default port 21.
Now click Quickconnect to connect.

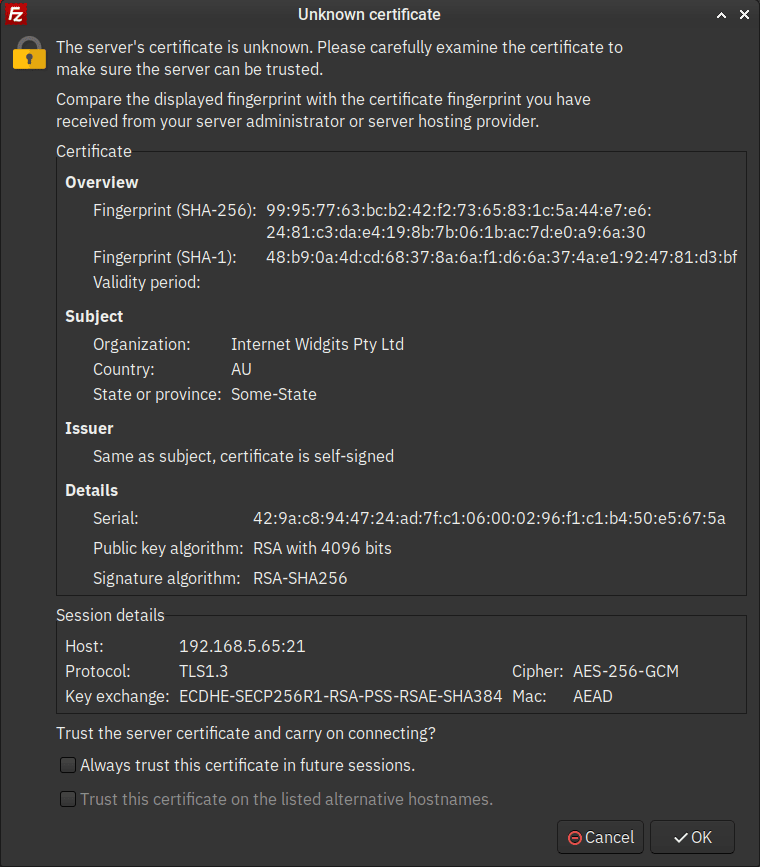
3. Click OK to accept the self-signed certificates from the vsftpd server.
4. When the connection is successful, you should receive something like this:
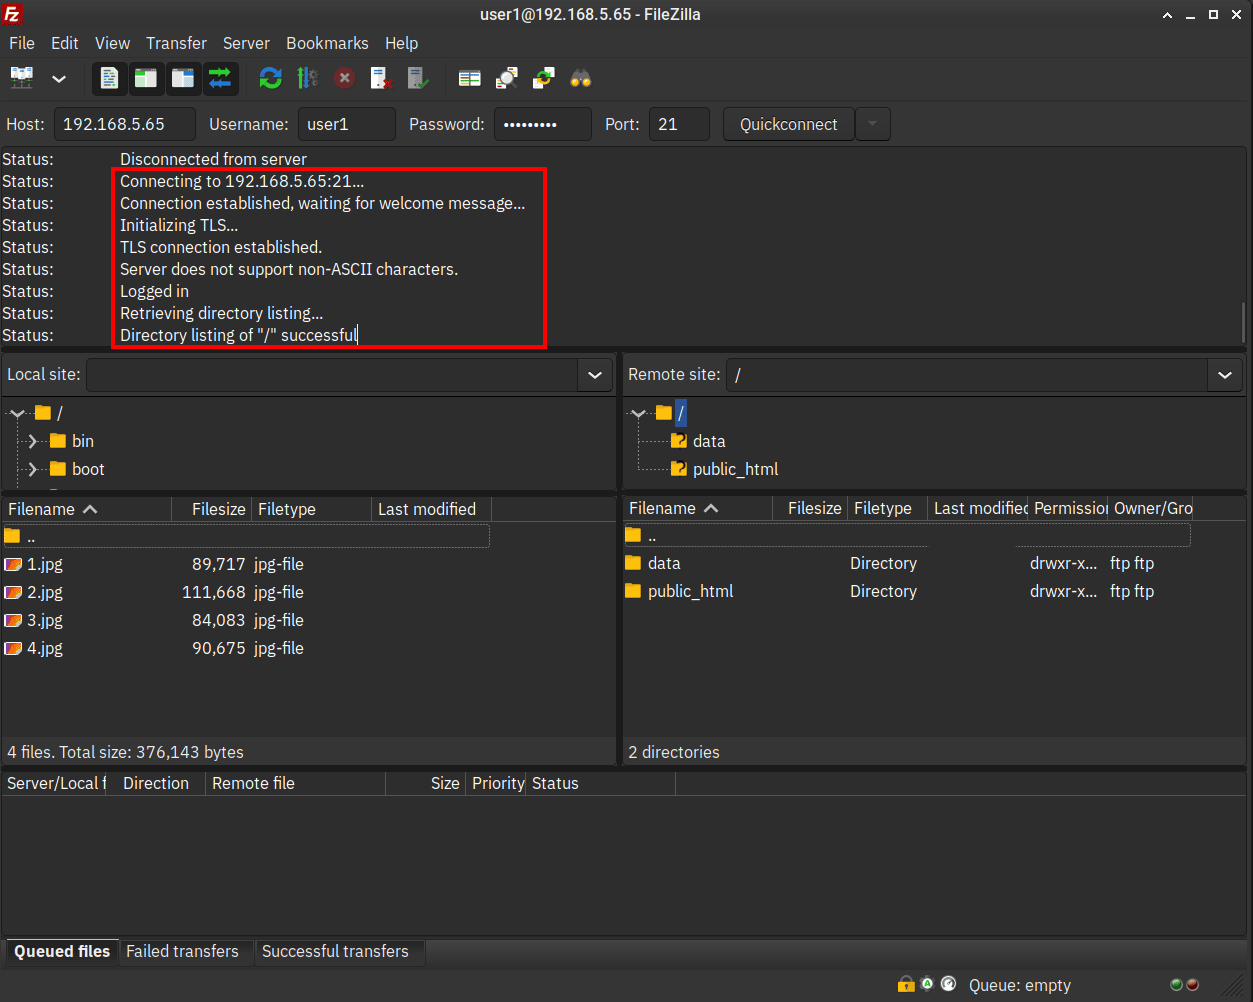
At the log section, you should get an output such as Logged in - Directory listing of "/" successful.
Below some detail informations on FileZilla screen:
- Because the chroot is enabled, each user’s home directory is identified by “/” or root path.
- On the Remote site section, you should see two directories that you’ve prepared, the
dataandpublic_htmldirectories. - With the chroot enabled, you can’t upload files directory to the “/” or root home directory, but you can upload files to
dataandpublic_htmldirectories. - On the Local site section, you can browse your local files and select which files that you want to upload.
Uploading Files to VSFTPD
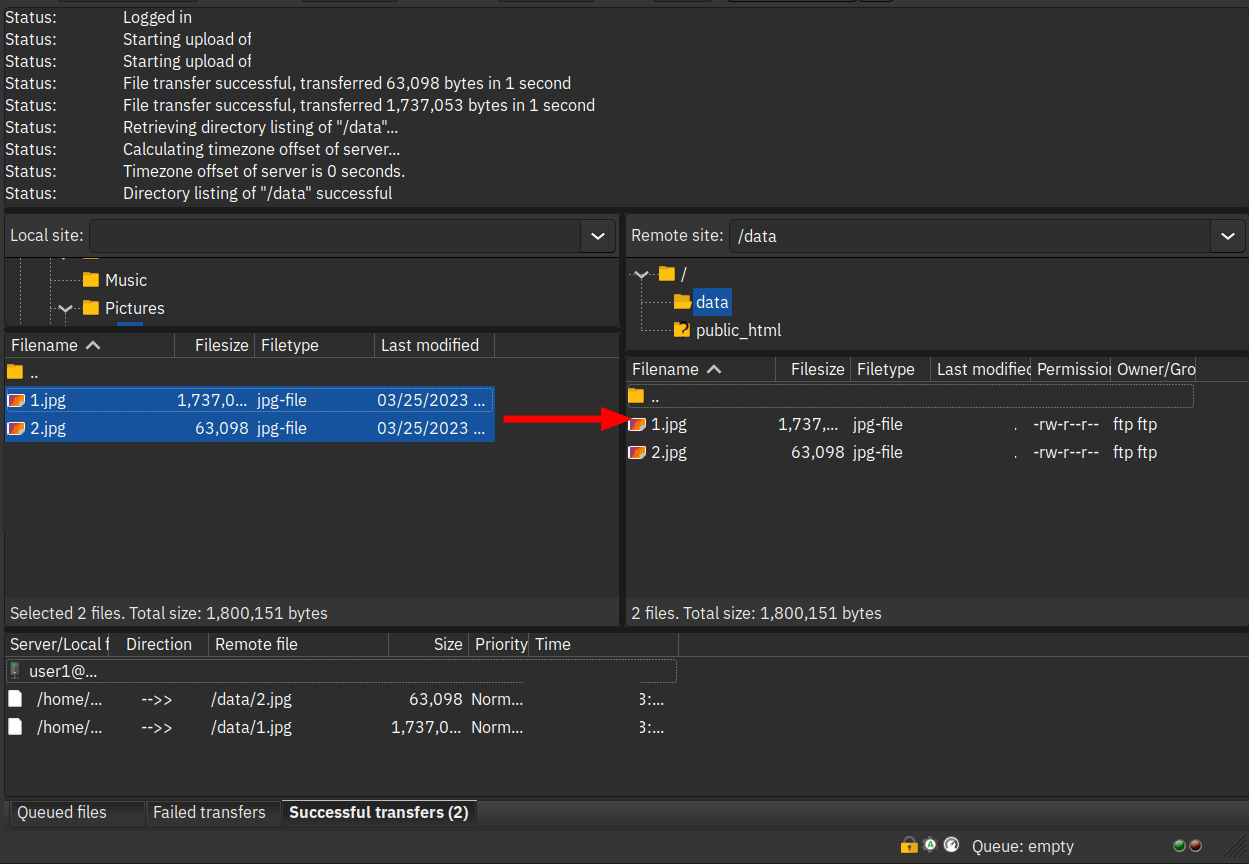
To upload files to the vsftpd server via FileZilla, click the target directory on the Remote site section. Then, select files on the Local site section and drag files to the target directory on the Remote site section.
When files are uploaded, you should see the logs on the Successful Transfer tab at the bottom menu. When it fails, it will go to the Failed Transfers tab.
Uninstalling VSFTPD from Ubuntu Server
In case you want to uninstall the vsftpd package, follow these steps.
1. Remove the vsftpd and libpam-pwdfile packages using the apt purge command below.
sudo apt remove vsftpd libpam-pwdfile -y2. Now, remove the vsftpd configuration directory /etc/vsftpd using the following command.
sudo rm -rf /etc/vsftpd3. Lastly, remove home directories for vsftpd virtual users using the command below.
sudo rm -rf /var/www/{user1,user2}Conclusion
Congratulations! By following these steps, you should now have the vsftpd installed, up and running on the Ubuntu 24.04 server. Furthermore, you have also enabled chroot and virtual users, and secured vsftpd with SSL/TLS certificates and UFW. By the end of the step, you have also connected and uploaded files to the vsftpd server with FileZilla.


