How to Install and Secure vsftpd on FreeBSD 14
In this article, I will show you step-by-step installing and securing vsftpd on FreeBSD 14 server. By completing this guide, you will have a fully secured FTP server with SSL/TLS running under FreeBSD with pf (Packet Filter) enabled.
Building an FTP server with SSL/TLS enabled is crucial to ensure your data is encrypted. With the vsftpd, you can create a secure FTP server with ease.
Let’s start and get this done!
Prerequisites
Before proceeding, ensure you have the following:
- A FreeBSD 14 server.
Read more: FreeBSD 14: Step-by-Step Installation (With Screenshot) - A root user or non-root user with sudo or administrator privileges.
- A PF (Packet Filter) is enabled on your FreeBSD server.
Read more: How to Set Up and Manage PF Firewall on FreeBSD 14
Installing vsftpd on FreeBSD
vsftpd or Very Fast FTP Daemon is an FTP server software for UNIX-like operating systems. On FreeBSD, you can install it from the ports collection or FreeBSD repository via the PKG package manager.
For this case, you will install vsftpd via the FreeBSD repository. So here’s how you can install vsftpd on your FreeBSD server.
1. First, run the command below to update your FreeBSD repository and find available packages for the name vsftpd.
pkg update
pkg search vsftpd
There will be two vsftpd packages on FreeBSD, the vsftpd-ext or extended version and vsftpd-ssl with SSL support.

2. Run the command below to install the vsftpd-ssl package. Type y to proceed with the installation.
pkg install vsftpd-ssl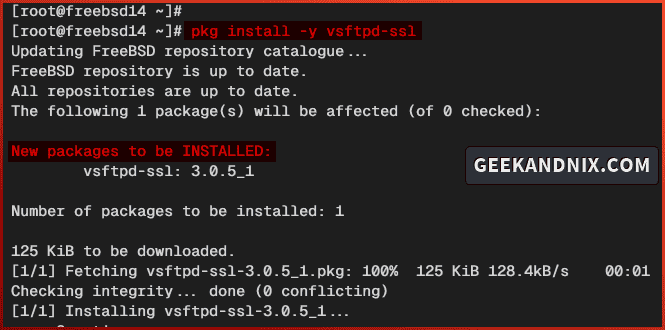
3. Once the installation is complete, run the sysrc command below to enable and verify the vsftpd service.
sysrc vsftpd_enable="YES"
sysrc -a | grep vsftpd
Allowing FTP Traffic via pf (Packet Filter)
After you’ve installed vsftpd, let’s open the ftp service port and additional ports range 7000:7500 for FTP passive mode via pf (Paket Filter).
Follow these actions to allow FTP traffic via the PF firewall:
1. Open the default pf configuration /etc/pf.conf using vim.
vim /etc/pf.confAdd the ftp service to allow FTP traffic and custom port 7000:7500 for the passive mode connections.
tcp_services = "{ ssh, http, https, domain, ftp}"
...
tcp_custom = "{ 3896, 8080, 7000:7500}"


pass in proto tcp to port $tcp_services keep state
...
pass in proto tcp to port $tcp_custom keep state
Save and exit the file when you’re done.
2. Now run the command below to take effect by reloading the pf service.
service pf reload3. Lastly, run the pfctl command below to verify the list rules on pf. Ensure the ftp service and ports range 7000:7500 is available on the pf rules.
pfctl -srConfiguring vsftpd on FreeBSD
Now let’s take a look at configuring vsftpd by modifying the default configuration file /usr/local/etc/vsftpd.conf. Follow these best practices to set up vsftpd and let’s dive in.
1. Open the vsftpd configuration /usr/local/etc/vsftpd.conf using vim.
vim /usr/local/etc/vsftpd.conf2. Change the anonymous_enable parameter to NO to disable anonymous access to the vsftpd.
# Allow anonymous FTP? (Beware - allowed by default if you comment this out).
anonymous_enable=NO
3. Uncomment the following lines to enable local users and write access for FTP users.
# allow local users to log in
local_enable=YES

# enable upload
write_enable=YES

# default umask file
local_umask=022
4. Add the following lines to disable the ftp-data connection port 20 and adjust the timeouts for the session and data connections.
# Make sure PORT transfer connections originate from port 20 (ftp-data).
connect_from_port_20=NO

# idle connection
idle_session_timeout=600

# data timeout
data_connection_timeout=300
5. Insert the following lines to enable chroot and enable the hide_ids feature.
# enable chroot for all users
chroot_local_user=YES

# hide identity on listing files
hide_ids=YES
6. Uncomment and change the listen parameter to YES to enable vsftpd to run in standalone mode, and change the listen_ipv6 to NO to disable IPv6 support.
# run as standalone
listen=YES

# disable IPv6 support
listen_ipv6=NO
7. Uncomment the background=YES parameter to enable vsftpd to run in the background.
background=YES8. Insert the configuration below to enable FTP passive mode in vsftpd. In this example, you’ll be using ports range 7000:7500 for the FTP passive mode.
# enable passive
pasv_enable=YES
pasv_min_port=7000
pasv_max_port=7500
9. Lastly, insert the configuration below to enable virtual users for on vsftpd. In this case, vsftpd user settings will be stored in the file /usr/local/etc/vsftpd/conf-users.
# Virtual User Settings
user_config_dir=/usr/local/etc/vsftpd/conf-users
guest_enable=YES
virtual_use_local_privs=YES
pam_service_name=vsftpd
nopriv_user=vsftpd
guest_username=vsftpd
Save the file and exit the editor when finished.
Securing vsftpd with SSL/TLS Certificates on FreeBSD
Implementing SSL/TLS is crucial in vsftpd installation to secure data transfer between the client to the FTP server. This section covers how to generate SSL/TLS certificates via openssl and enable SSL/TLS connections on vsftpd.
Complete these tasks to secure your vsftpd server with SSL/TLS certificates:
1. First, run the pkg command below to install the openssl package to your system. Input y to proceed with the installation.
pkg install openssl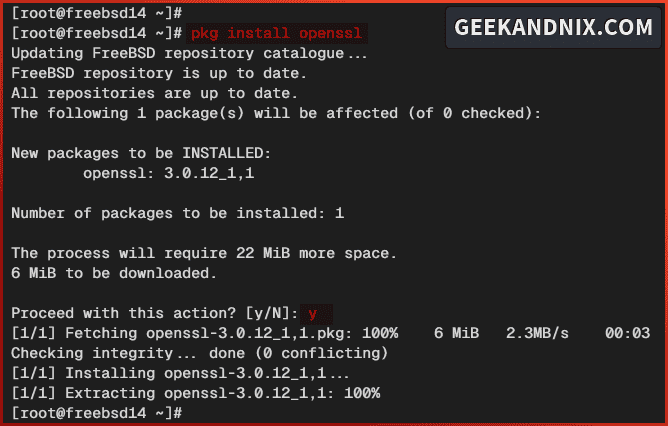
2. Now run the command below to create a new directory /usr/local/etc/vsftpd/, which will be used to store TLS certificates for the vsftpd.
mkdir -p /usr/local/etc/vsftpd/3. Next, execute the openssl command below to generate TLS certificates.
openssl req -x509 -nodes -days 1825 -newkey rsa:4096 -keyout /usr/local/etc/vsftpd/vsftpd.key -out /usr/local/etc/vsftpd/vsftpd.pemDuring the process, input your server hostname or fqdn to the certificate Common Name.
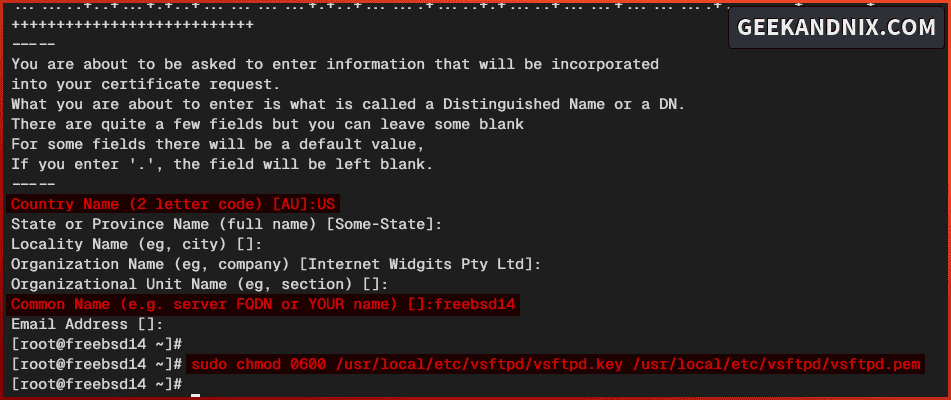
4. Once TLS certificates are generated, run the command below to change the permission to 0600. This action will allow only the owner of files to access certificates.
sudo chmod 0600 /usr/local/etc/vsftpd/vsftpd.key /usr/local/etc/vsftpd/vsftpd.pem5. Lastly, insert the following configuration in the /usr/local/etc/vsftpd.conf file to enable TLS on vsftpd.
rsa_cert_file=/usr/local/etc/vsftpd/vsftpd.pem
rsa_private_key_file=/usr/local/etc/vsftpd/vsftpd.key
ssl_enable=YES

# force to use SSL for data transfer and connection
# force to use tls v1 only
allow_anon_ssl=NO
force_local_data_ssl=YES
force_local_logins_ssl=YES
ssl_ciphers=HIGH
ssl_tlsv1=YES
ssl_sslv2=NO
ssl_sslv3=NO
Integrating vsftpd with pam_pwdfile Module on FreeBSD
Instead of using UNIX system users for authentication, you will be using virtual users as FTP users. Those FTP users will be authenticated via the pam_pwdfile module.
Now let’s install and configure the pam_pwdfile module with the following steps:
1. Run the command below to install the pam_pwdfile package to your FreeBSD server. Type y to confirm with the installation.
pkg install pam_pwdfile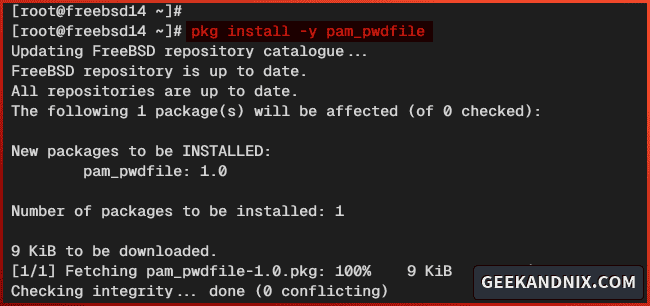
2. Once the installation is complete, open the PAM configuration /usr/local/etc/pam.d/vsftpd using vim.
vim /usr/local/etc/pam.d/vsftpdInsert the configuration below to set up the pam_pwdfile module for the vsftpd server.
# Custom PAM for vsftpd virtual users
auth required /usr/local/lib/pam_pwdfile.so pwdfile /usr/local/etc/vsftpd/ftpusers.db
account required /usr/lib/pam_permit.so
Save the file and exit the editor.

Adding base user vsftpd
Before adding the vsftpd user, take a look at the following configuration in the vsftpd.conf file:
virtual_use_local_privs=YES
pam_service_name=vsftpd
nopriv_user=vsftpd
guest_username=vsftpd
With these settings, you will mask FTP users as the user vsftpd. With this in mind, you must add the user vsftpd on your FreeBSD server.
1. Run the command below to add a new vsftpd user.
adduser -s /usr/sbin/nologin -g nogroup2. Answer with the following when asked for user settings:
- Input the Username and Full Name as
vsftpd, then input your password. - Leave everything as default.
- Input
yesto confirm. - Input
nowhen asked to add another user.
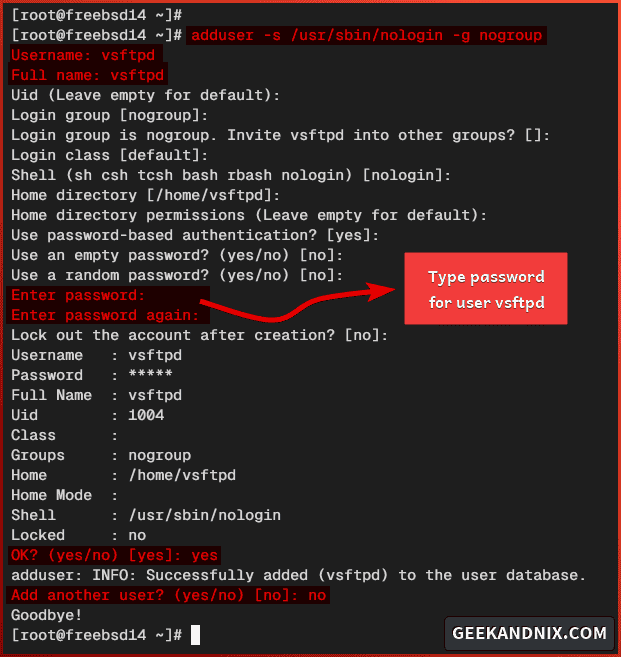
Adding FTP User
In this guide, you will store FTP users within the file /usr/local/etc/vsftpd/ftpusers.db, which contains the username and encrypted password.
Here I will show you how to set up FTP users by generating an encrypted password via openssl and creating a database file /usr/local/etc/vsftpd/ftpusers.db.
1. First, run the openssl command below to generate an encrypted password. Input your password and copy the generated password.
openssl passwd -1 -noverify -stdin2. Create a new file /usr/local/etc/vsftpd/ftpusers.db using vim.
vim /usr/local/etc/vsftpd/ftpusers.dbAdd your FTP user with the format username:encrypted-password. In this example, you will create a new user alice and be sure to change the encrypted password with your password.
alice:$1$6uAf0RMK$M1MwYxQeOiYMj49LqQjtB.Save the file and exit the editor.
Adding FTP User Configuration
Now that you’ve created an FTP user, move on to create an FTP user configuration.
Within the vsftpd.conf, you have the line user_config_dir=/usr/local/etc/vsftpd/conf-users, which means FTP user settings must be stored in the /usr/local/etc/vsftpd/conf-users directory. And each user will have a specific configuration.
Follow these actions to create an FTP user configuration and home directory.
1. First, run the command below to create a new directory /usr/local/etc/vsftpd/conf-users. This directory will be used to store FTP user configurations.
mkdir -p /usr/local/etc/vsftpd/conf-users2. Run the following command to create a configuration for user alice to the /usr/local/etc/vsftpd/conf-users/alice file. In this case, you will configure the /usr/local/www/alice directory as the default home directory for user alice.
echo "local_root=/usr/local/www/alice" > /usr/local/etc/vsftpd/conf-users/alice3. Now execute the command below to create a new home directory for user alice to /usr/local/www/alice and change the permission to 0755.
mkdir -p /usr/local/www/alice
chmod 755 /usr/local/www/alice
4. Next, run the command below to add the data and public_html directories and change the ownership to the vsftpd user. This will enable read/write access to FTP users.
mkdir -p /usr/local/www/alice/{data,public_html}
chown -R vsftpd:nogroup /usr/local/www/alice/{data,public_html}
5. Lastly, run the command below to verify the permission of the /usr/local/www/alice directory.
ls -alFh /usr/local/www/aliceBe sure both data and public_html directories are configured with the ownership vsftpd user.

Managing vsftpd Service on FreeBSD
If you have followed this guide so far, you’ve now completed the vsftpd server configuration. Let’s start the vsftpd service and run your FTP server.
1. Start the vsftpd service using the command below.
service vsftpd start2. Once vsftpd starts, run the following command to verify it.
service vsftpd statusYou will see below the vsftpd is running on PID (Process ID) 3482.

3. When you need to stop the vsftpd, run the command below.
service vsftpd stop4. Lastly, you can restart the vsftpd when needed by executing the following command.
service vsftpd restartConnecting and Uploading Files to vsftpd via FileZilla
With the vsftpd up and running, let’s verify your installation by connecting and uploading files to your FTP server from the client machine.
Complete these tasks to connect and upload files to the FTP server:
1. In this case, we’ll be using FileZilla as an FTP client. So download FileZilla for your operating system and install it. Once installed, open FileZilla.
2. Input detail Host, Username, Password, and Port for your FTP server. Be sure to use the ftpes:// as the default address on the Host section.
Click Quckconnect to start the connection to the FTP server.

3. When prompted about the unknown certificate from FTP server, click OK to confirm.
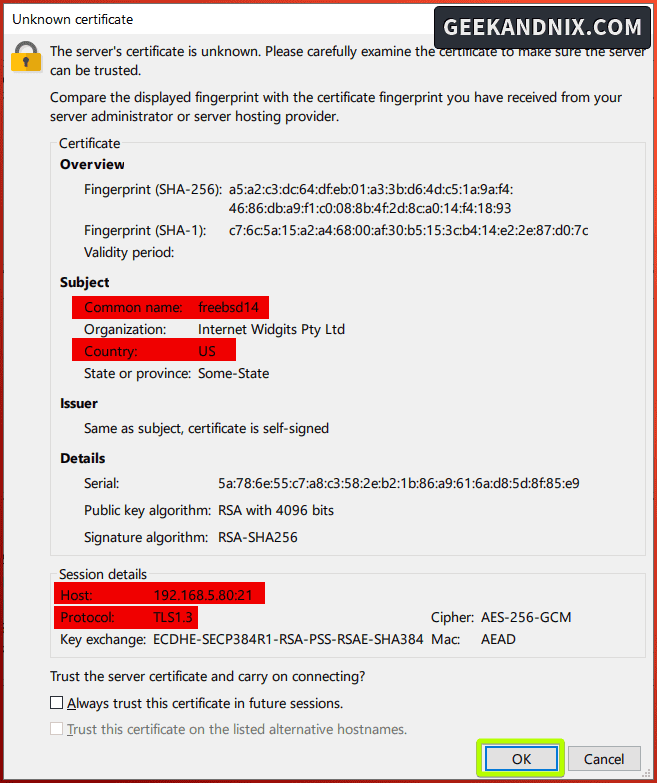
4. Once connected, you should get an output such as Status: TLS connection established.. Status: Logged in.
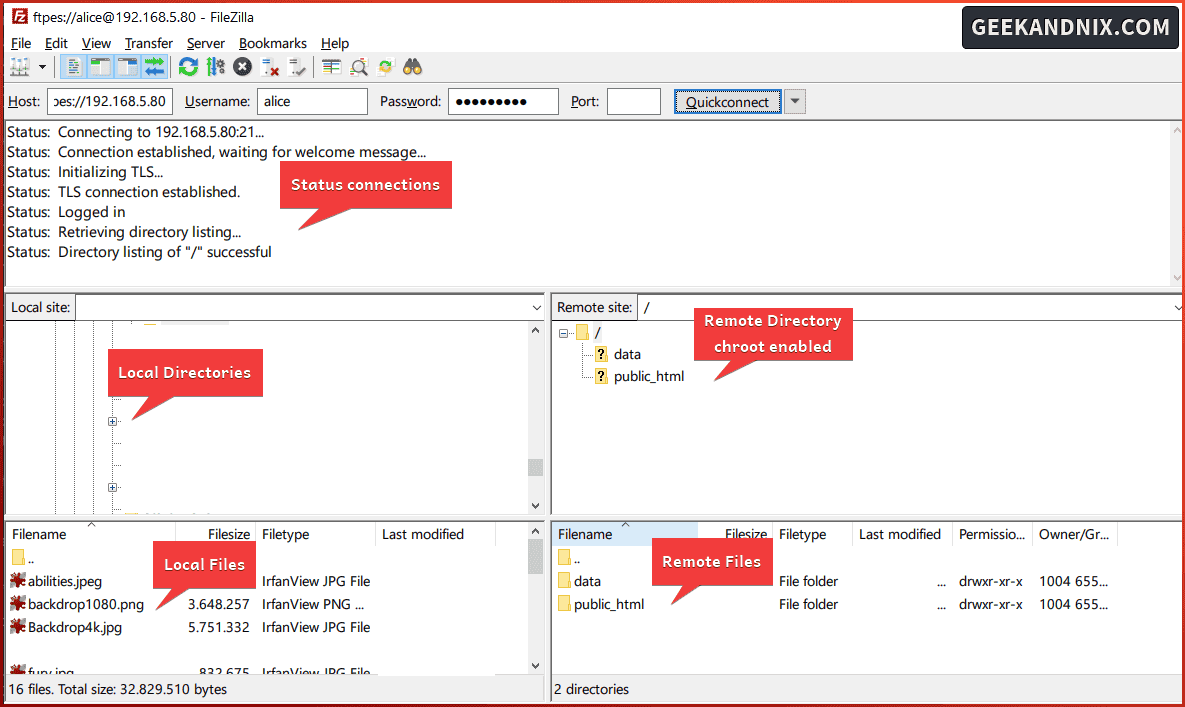
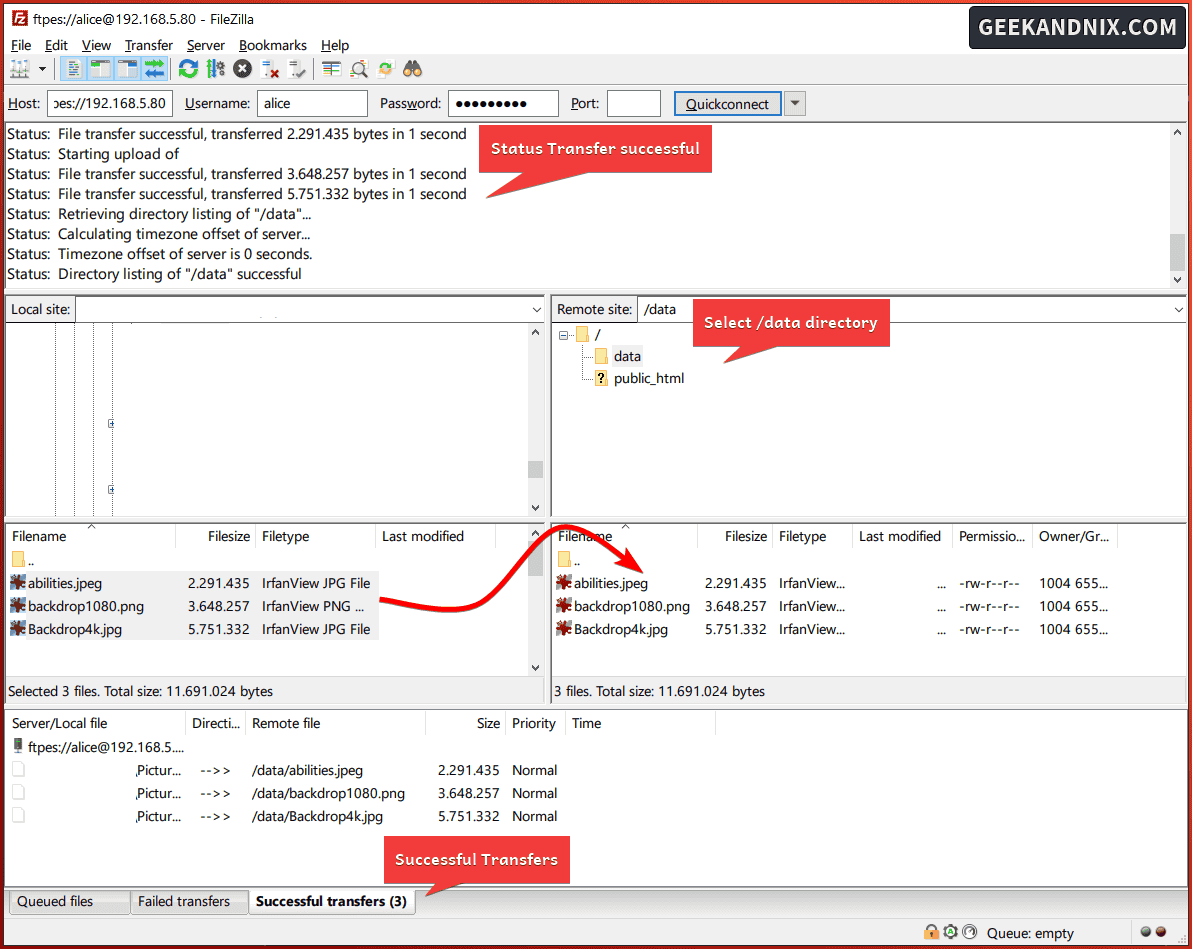
5. On the Remote site section, click the data directory. Then, upload your files to the data directory by dragging your files from the Local site to the Remote site directory.
On the Successful transfers tab, you can see the list of uploaded files to the FTP server.
Uninstalling vsftpd from FreeBSD
If you need to uninstall vsftpd, follow these instructions:
1. First, run the command below to stop and disable the vsftpd service.
service vsftpd stop
sysrc -x vsftpd_enable
2. Now run the command below to remove both packages vsftpd-ssl and pam_pwdfile from your FreeBSD system.
pkg delete vsftpd-ssl pam_pwdfile
pkg autoremove
3. Lastly, remove the vsftpd configuration file and directory, also the FTP user home directory when needed.
rm -rf /usr/local/etc/vsftpd /usr/local/www/alice/ \
/usr/local/etc/vsftpd.conf /usr/local/etc/pam.d/vsftpd
Common Error
When testing the vsftp installation, I encountered the error 500 OOPS: error:0A0000B5:SSL routines::no ciphers available.
To solve this, be sure to specify SSL cipher within the vsftpd.conf file via the ssl_ciphers parameter. Use one of these:
# Force to high cipher suits
ssl_ciphers=HIGH

# From Mozilla guide
ssl_ciphers=ECDHE-ECDSA-AES128-GCM-SHA256:ECDHE-RSA-AES128-GCM-SHA256:ECDHE-ECDSA-AES256-GCM-SHA384:ECDHE-RSA-AES256-GCM-SHA384:ECDHE-ECDSA-CHACHA20-POLY1305:ECDHE-RSA-CHACHA20-POLY1305:DHE-RSA-AES128-GCM-SHA256:DHE-RSA-AES256-GCM-SHA384:DHE-RSA-CHACHA20-POLY1305

# Required by FileZilla
ssl_ciphers=ECDHE-RSA-AES256-GCM-SHA384:ECDHE-RSA-AES128-GCM-SHA256:ECDHE-RSA-AES256-SHA384:ECDHE-RSA-AES128-SHA256
Conclusion
In summary, you’ve installed and secured vsftpd on the FreeBSD 14 server. You’ve configured the FTP server via vsftpd with SSL/TLS and virtual user enabled with the pam_pwdfile module. Moreover, you’ve also learned how to connect and upload files to the FTP server via FileZilla.
Equipped with this knowledge, you can now create additional FTP users. Go ahead to implement additional features in vsftpd, such as adding the tcp_wrappers parameter to integrate with tcp_wrappers, and adding max_clients or max_per_ip parameter to limit client connections.
