How to Configure a Static IP Address on Ubuntu Server (3 Methods)
In this article, you will learn the different methods for configuring a static IP address on Ubuntu Server 22.04.
Most often, people use DHCP for internal networks, which gives clients IP addresses automatically. But, if you’re building a public server that will be used to run web applications and accessible from anywhere, then you should set up a public static IP address.
These are three different methods that you can use to set up a static IP address on the Ubuntu system:
- via Netplan.
- via NetworkManager.
- via
/etc/network/interfacesfile.
Now, let’s deep dive into each method
Method 1: Configuring Static IP Address on Ubuntu via Netplan
Netplan is a utility that allows you to set up an IP address on a Linux server simply via a YAML file. Since Ubuntu 17.x, Netplan is shipped by default.
To set up an IP address via Netplan, you can simply create a YAML file on the Netplan configuration directory /etc/netplan, then verify the configuration to ensure that you have a proper config file, then apply via the netplan command.
In this case, you will set up static IP address 192.168.5.45 with the default gateway 192.168.5.1 on the interface eth1.
1. First, execute the following command to check the detail of interface eth1.
ip a show eth1The eth1 interface with state DOWN.

2. Secondly, move the working directory to /etc/netplan and create a new YAML file 01-eth1.yaml using nano.
cd /etc/netplan/
nano 01-eth1.yaml
To set up a static IP address, add these YAML configurations and be sure to change the details of the IP address, gateway, and nameservers.
network:
  version: 2
  renderer: networkd
  ethernets:
    eth1:
      dhcp4: false
      dhcp6: false
      addresses: [192.168.5.45/24]
      routes:
        - to: default # could be 0.0.0.0/0 optionally
          via: 192.168.5.1
          metric: 100
          on-link: true
      nameservers:
        addresses: [1.1.1.1, 8.8.8.8]
Save the file by pressing Ctrl+x, then input y and press ENTER to confirm.
Below we also include the Netplan configuration for configuring IP address via DHCP.
network:
  version: 2
  renderer: networkd
  ethernets:
    eth1:
      dhcp4: true
      dhcp6: false
      optional: true
      nameservers:
        addresses: [4.2.2.1, 4.2.2.2, 208.67.220.220]
3. Now, type the following command to ensure that you have proper Netplan configurations. If there is no error or warning message, press ENTER to confirm and you should see the output such as Configuration accepted.
sudo netplan try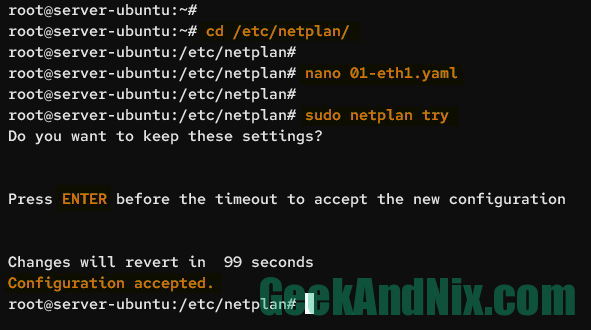
4. Then, enter the following command to apply the Netplan configurations.
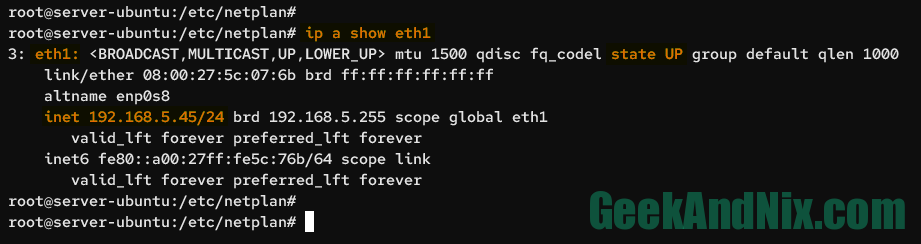
sudo netplan apply5. Lastly, verify again the interface eth1 using the ip command below.
ip a show eth1You should see the interface eth1 with the state UP and the IP address 192.168.5.45, which configured via Netplan.
Method 2: Configuring Static IP Address via NetworkManager
NetworkManager is a network management tool for Linux systems that provides NetworkManager GUI and nmtui (NetworkManager Terminal User Interface). It supports ethernet, WiFi, WWAN (mobile broadband), PPPoE devices, and VPN protocols such as OpenVPN, Wireguard, and IPSec.
In this case, you will set up static IP address 192.168.5.90 to the interface eth1 via NetworkManager command line nmcli.
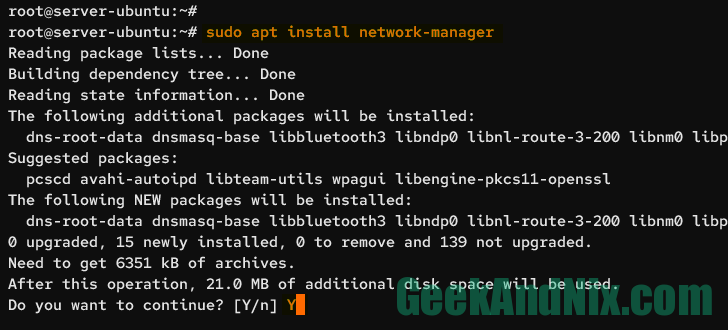
1. To start, you must ensure that the network-manager package is installed. or you can install it via the apt command below.
sudo apt install network-managerWhen prompted, input Y and press ENTER.
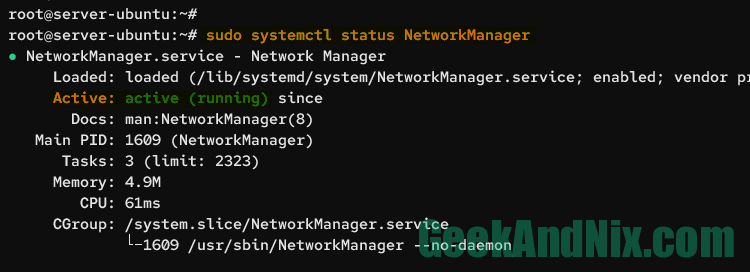
2. Now that the network-manager is installed, run the following systemctl command to ensure that the NetworkManager service is running.
sudo systemctl status NetworkManagerThe following output active (running) confirms that the NetworkManager is running.
3. Next, run the following command to check the list of network interfaces. You can see the eth1 interface with the status unmanaged, which means you can’t manage the interface eth1 via NetworkManager.
sudo nmcli -p device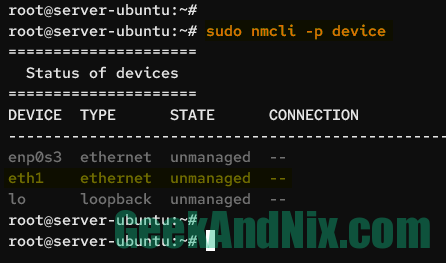
4. After that, enter the following command to allow NetworkManager to manage devices such as wifi and ethernet. This command will create a new config file etc/NetworkManager/conf.d/allow-ethernet.conf that allows NetworkManager to manage devices such as wifi and ethernet.
cat <<EOF >/etc/NetworkManager/conf.d/allow-ethernet.conf
[keyfile]
unmanaged-devices=*,except:type:wifi,except:type:gsm,except:type:cdma,except:type:ethernet
EOFNote: If you get an error such as device eth0 not available because the device is strictly unmanaged, you can solve this by adding a new config file /etc/NetworkManager/conf.d/allow-ethernet.conf via the command on top.
5. Next, run the following command to create a new connection name eth1 with the default interface eth1. Be sure to change the detailed IP address and the default gateway.
nmcli con add type ethernet con-name eth1 ifname eth1 ip4 192.168.5.90/24 gw4 192.168.5.16. Now, set up the default DNS resolver for the interface eth1 using the following command.
nmcli con mod eth1 ipv4.dns "1.1.1.1 8.8.4.4"7. Given that the IP address, default gateway, and the DNS resolver are configured, enter the following command to activate the connection profile eth1.
nmcli con up eth1Once activated, you should get an output such as Connection successfully activated.

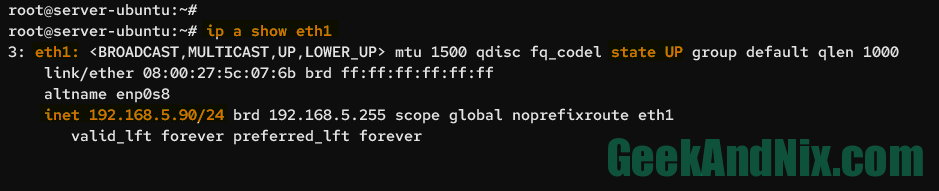
8. Lastly, type the following command to verify the IP address configuration of the eth1 interface.
ip a show eth1You should see the eth1 interface is configured with the static IP address 192.168.5.90 via NetworkManager.
Method 3 : Setup Static IP Address via /etc/network/interfaces File
The /etc/network/interfaces is a network configuration which ifup and ifdown command used. Using /etc/network/interfaces file to configure static IP address is the most popular among Linux users (especially Debian-based distribution users). This is the old method, but you can still use it for managing both old and new versions of the Ubuntu server.
For this example, you will set up the static IP address 192.168.5.115 for the ethernet interface eth1 via the /etc/network/interfaces file.
1. First, install the ifupdown-ng package by executing the following command. The ifupdown-ng is the next generation of ifupdown utiliy on Ubuntu.
sudo apt install ifupdown-ng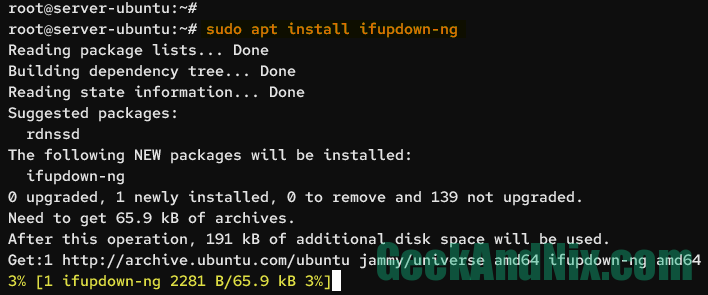
2. Open the file /etc/network/interfaces using the nano editor.
sudo nano /etc/network/interfacesAdd the following lines to the file and be sure to change the details of the IP address, gateway, and the default resolver/nameservers.
auto eth1
iface eth1 inet static
    address 192.168.5.115
    netmask 255.255.255.0
    gateway 192.168.5.1
    dns-nameservers 1.1.1.1 8.8.8.8
Save the file by pressing Ctrl+x, then input y to confirm, and press ENTER to exit.
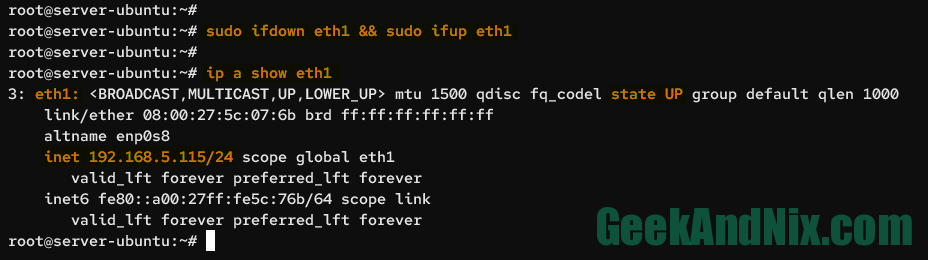
3. Next, enter the following command to bring down and bring up the eth1 interface on your Ubuntu server.
sudo ifdown eth1 && sudo ifup eth14. Lastly, verify the detail of interface eth1 using the following ip command.
ip a show eth1You should see the eth1 interface is now configured with IP address 192.168.5.115 via the /etc/network/interfaces file.
Conclusion
To sum up, you’ve learned three methods for configuring a static IP address on Ubuntu Server. You’ve learned how to set up a static IP address via Netplan, NetworkManager, and manually via /etc/network/interfaces file on the Ubuntu system.
Now, you can dive in to configure your Ubuntu server by installing server packages such as Apache web server, PHP, and MariaDB/MySQL database server. Furthermore, you can implement UFW (Uncomplicated Firewall), then install fail2ban to secure your Ubuntu server from brute-force attacks.
System administrator and devops enthusiast, leveraging over 10+ years of Linux expertise to optimize operations. Proficient in FreeBSD, VMWare, KVM, Proxmox, PfSense, Ansible, Docker, and Kubernetes.


