How to Install ProFTPD on Ubuntu 24.04/22.04 Server
Are you ready to learn how to install and secure ProFTPD? This guide will provide you with step-by-step how to install and secure ProFTPd on Ubuntu Server 24.04 “Noble Numbat“. By following these simple steps, you can create a secure FTP server that allows you to upload files securely to the FTP server. So, let’s do it!
Also, don’t miss out on our latest guide How to Install and Secure ProFTPD on FreeBSD 14.
Prerequisites
Before starting this guide, it’s important to have the following requirements:
- A Linux server running Ubuntu 24.04.
- Administrative user or non-root user with sudo privileges.
- A UFW firewall is running and enabled.
See also:
How to Install Ubuntu 24.04 LTS Server
Master the UFW Firewall: 17 Practical Examples
Step 1 – Installing ProFTPD on Ubuntu Server
In this section, you will install the ProFTPD package to your server, then you will also open the default FTP Server port 21 via UFW. By default, the ProFTPD package is available on the Ubuntu repository, you can install it via the APT package manager.
1. To start, run the following command to update and refresh Ubuntu repositories. This will ensure that you have the latest version of the package index.
sudo apt update
2. Now, install the ProFTPD server using the command below. Input Y when prompted, then press ENTER to proceed.
sudo apt install proftpd-core proftpd-mod-crypto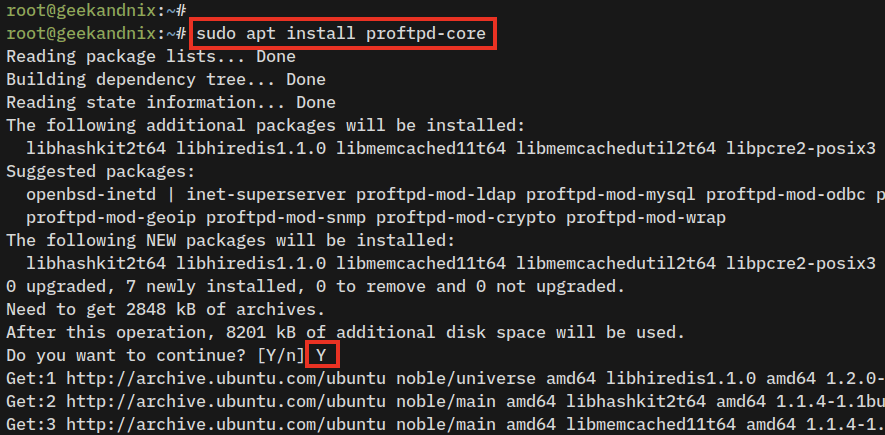
3. Once ProFTPD is installed, the service called proftpd will automatically be enabled and running. Verify using the following command to get the details of the proftpd service status.
sudo systemctl is-enabled proftpd
sudo systemctl status proftpd
If the proftpd service is enabled and running, you should receive an output that looks similar to this:
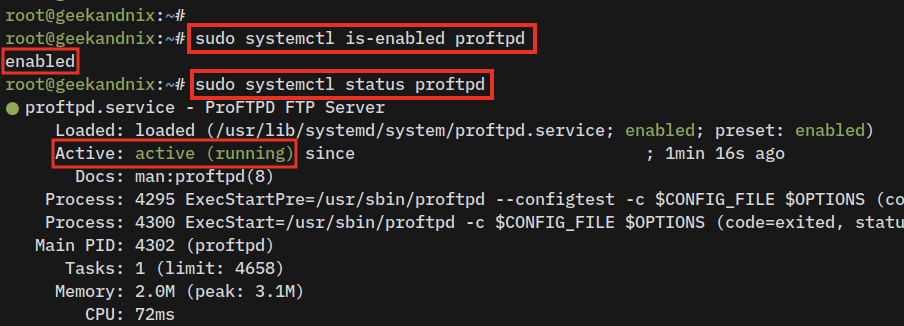
4. Furthermore, you can also check ProFTPD by running the command below to get the list of open ports on your system. If ProFTPD is running, you can expect to see that the FTP server port 21 is currently used by proftpd.
ss -tulpn | grep 21
5. Lastly, run the following command to open port 21 on UFW. Then, verify the UFW status to ensure that port 21 has been added.
# allow ftp connections
sudo ufw allow 21/tcp

# allow FTP passive port range 49152-65534
sudo ufw allow 49152:65534/tcp

# checking ufw status
sudo ufw status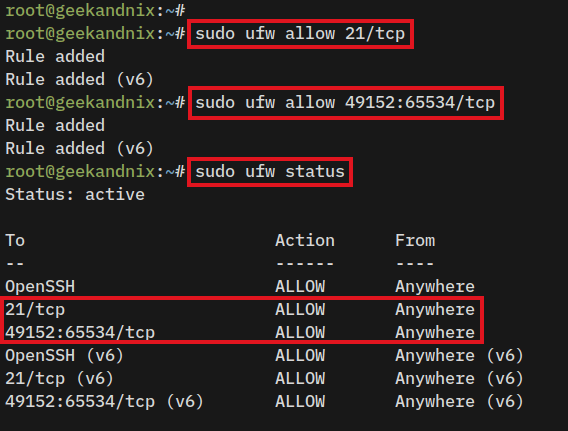
Step 2 – Configuring ProFTPD on Ubuntu Server
After installing ProFTPD, you will next configure ProFTPD installation by enabling the chroot for FTP users, setting up the server name, and disabling IPv6 for the ProFTPD server.
With the chroot enabled, each user will be trapped in their home directory and can not view other users’ directories.
1. The default ProFTP configuration is stored in the /etc/proftpd/ directory. Copy the default ProFTPD configuration proftpd.conf to proftpd.conf.orig.
sudo cp /etc/proftpd/proftpd.conf /etc/proftpd/proftpd.conf.orig2. Now, open the ProFTPD configuration file proftpd.conf using your preferred editor. In this example, we use vim as the text editor.
sudo vim /etc/proftpd/proftpd.confChange the default configuration with the following lines. With this, you will disable IPv6 support for ProFTPD, set up the ProFTPD server name to “geekandnix.com“, enable chroot for every FTP user, and then enable passive ports 49142-65534.
# disable IPv6
UseIPv6 off

# setup FTP name
ServerName "geekandnix.com"

# setup chroot
DefaultRoot ~ !ftp

# enable FTP passive ports
PassivePorts 49152 65534
Save the file by pressing the ESC key, then input :wq for write and exit.
3. Finally, run the following command to restart the proftpd service and apply the changes.
sudo systemctl restart proftpdWith the ProFTPD configuration completed, the next step is to create and set up an FTP user.
Step 3 – Adding User to ProFTPD Server
This section will cover how to add FTP users to the ProFTPD server. But, before that, you will be setting up the dummy shell that will be used only by FTP users. In this case, the dummy shell here will prevent FTP users from accessing the SSH server.
1. First, run the following command to create a new dummy shell /bin/ftpdummy and make it executable. Any users with the default shell /bin/ftpdummy cannot log in to the server via SSH.
echo -e '#!/bin/sh\necho "Shell for FTP users only."' | sudo tee -a /bin/ftpdummy
sudo chmod a+x /bin/ftpdummy
2. Afterward, add the dummy shell /bin/ftpdummy to the /etc/shells file using the command below. This will make the /bin/ftpdummy a valid shell, but only for FTP users.
sudo echo "/bin/ftpdummy" >> /etc/shells
3. Lastly, run the following command to create a new FTP user named testuser and set up the password. When prompted, input a new password and repeat.
- The parameter
-sis used to set up the default shell, which uses a dummy shell/bin/ftpdummyfor the FTP user. - The parameter
-mwill automatically create a new home directory.
sudo useradd -s /bin/ftpdummy -m testuser
sudo passwd testuser
Step 4 – Securing ProFTPD with SSL/TLS Certificates
Having the FTP user created, the next step is to secure the ProFTPd server with SSL/TLS certificates. This step is essential to secure the user’s connection by encrypting both user login and data transfer.
1. To start, ensure that the OpenSSL package is installed by running the following command.
sudo apt install openssl -y2. Now, run the following command to generate the Self-Signed certificates for the ProFTPD server. When prompted, input details of the server information. After finished, the public key will be saved at /etc/ssl/certs/proftpd.crt and the private key will be available at /etc/ssl/private/proftpd.key.
sudo openssl req -x509 -newkey rsa:4096 -keyout /etc/ssl/private/proftpd.key -out /etc/ssl/certs/proftpd.crt -nodes -days 365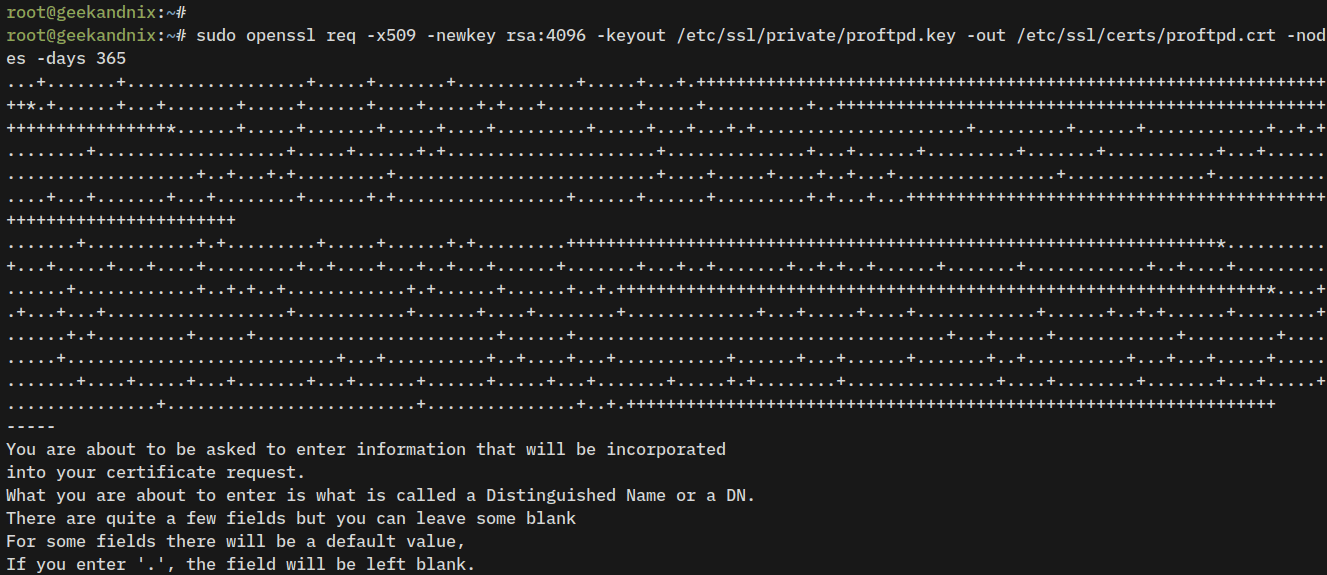
3. Next, run the following command to change the permission of ProFTPD certificates to 600, which means only the owner of the file (which is the root) will be able to read the certificate file.
sudo chmod 600 /etc/ssl/private/proftpd.key
sudo chmod 600 /etc/ssl/certs/proftpd.crt
4. Afterward, open the ProFTPD module configuration /etc/proftpd/modules.conf using vim.
sudo vim /etc/proftpd/modules.confUncomment the parameter LoadModule mod_tls.c to enable the TLS module for the ProFTPD server.
# Install proftpd-mod-crypto to use this module for TLS/SSL support.
LoadModule mod_tls.c
Save the file and exit the editor.
5. Then, open the ProFTPD configuration file /etc/proftpd/proftpd.conf using vim to include the default TLS settings.
sudo vim /etc/proftpd/proftpd.confUncomment the following line to include TLS configuration tls.conf.
# Include the tls.conf to proftpd.conf
Include /etc/proftpd/tls.conf
Save the file and exit the editor.
6. Lastly, open the TLS configuration for ProFTPD server /etc/proftpd/tls.conf using vim.
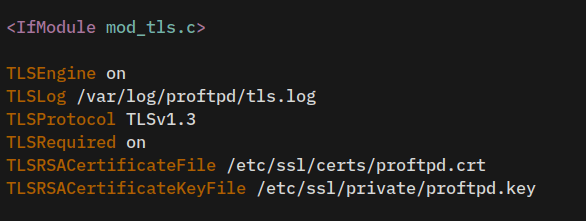
sudo vim /etc/proftpd/tls.confChange the default configuration with the following lines, and be sure to change the path of SSL/TLS certificates with the correct path.
TLSEngine on
TLSLog /var/log/proftpd/tls.log
TLSProtocol TLSv1.3
TLSRequired on
TLSRSACertificateFile /etc/ssl/certs/proftpd.crt
TLSRSACertificateKeyFile /etc/ssl/private/proftpd.key
Save and close the file when finished.
7. Given that SSL certificates generated and the TLS module enabled and configured, run the following command to restart the proftpd service and apply the changes.
sudo systemctl restart proftpdAt this point, the ProFTPD server is now running on your Ubuntu Server with SSL/TLS enabled. Your data transfer from the local machine to the ProfTPD server will be secured and encrypted via SSl/TLS certificates.
Step 5 – Tranfering Files via FileZilla
Now that the ProFTPd server has been set up, it’s time to verify your installation by connecting to the ProFTPd server from the client machine via FTP client and then uploading files to your server.
1. On your local machine, download and install the FTP client software. In this case, we FileZilla as an FTP client.
2. Once FileZilla is installed, open the application. Then, input the details FTP server IP address, username, password, and port. On the Host section, start the ProFTPD server IP address with ftpes://SERVER-IP, which means this will force you to use secure SSL/TLS connections.
Click Quickconnect to start the connection.

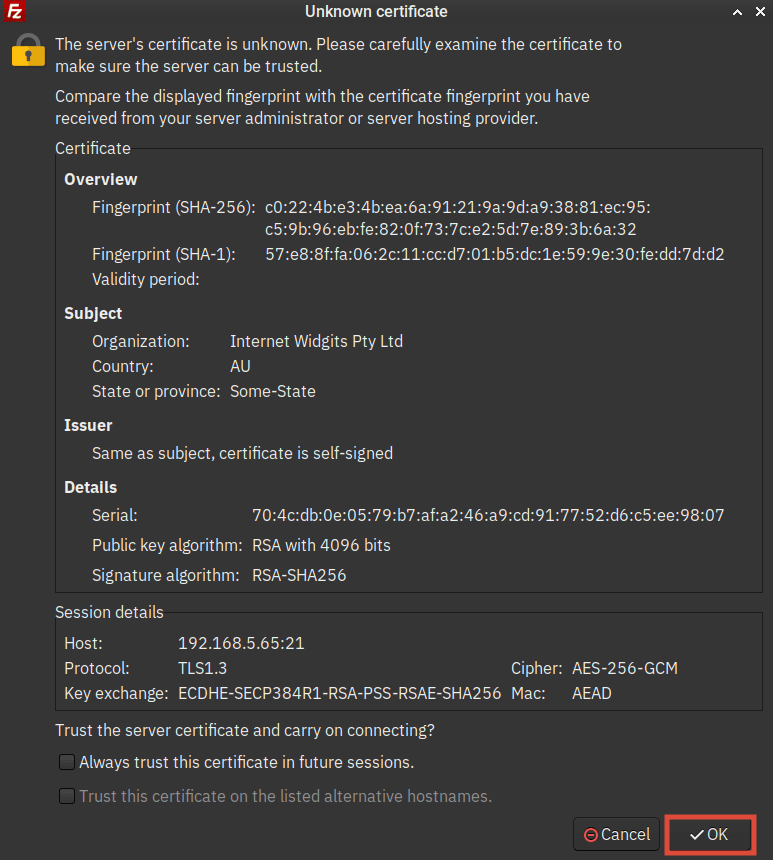
3. Now, you will be prompted to confirm Self-signed certificates of the ProFTPD server. Click OK to confirm.
4. When the connection is successful, you should expect the following output:
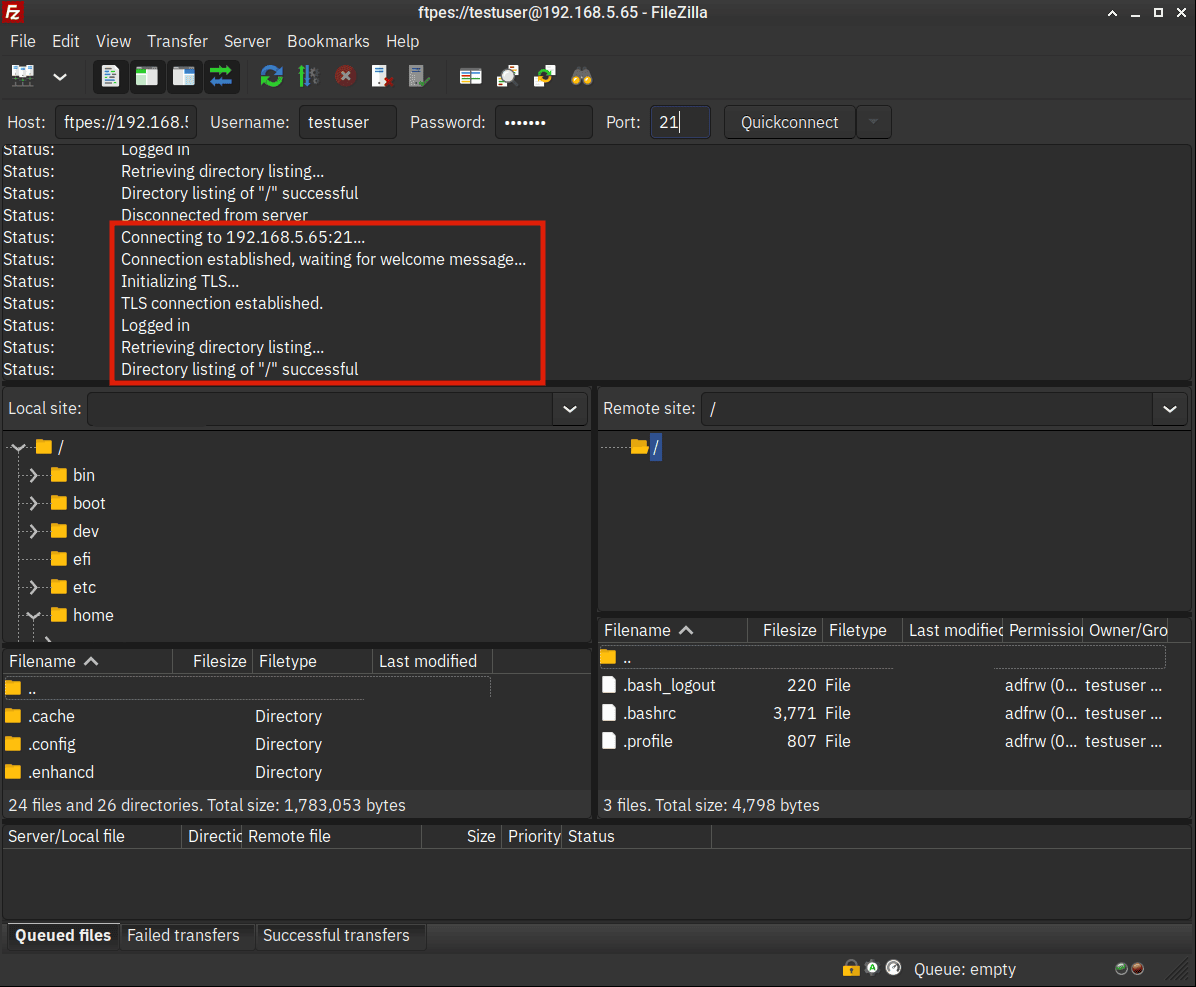
- The output ‘Status: TLS connection established‘ should indicate you’re connected to the ProFTPD server securely via SSL/TLS connections.
- Also, on the Remote site section, you can only see the / or root path of your user home directory. This indicates that the chroot is enabled on the ProFTPD server.
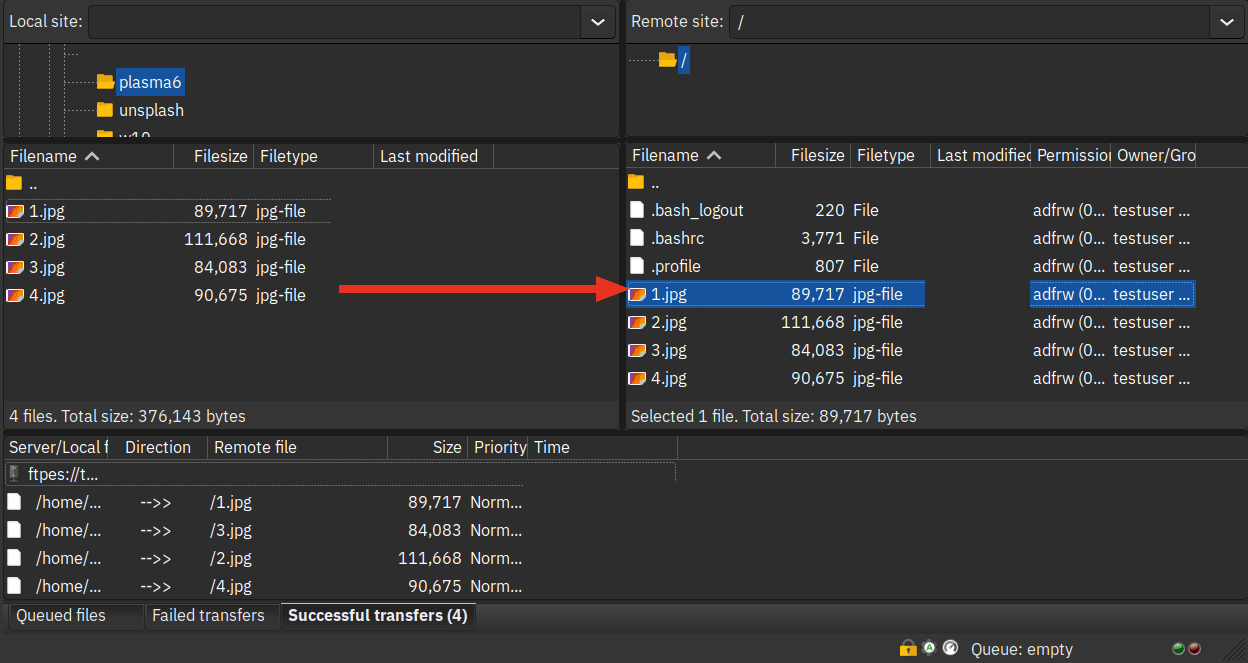
5. Lastly, drag and drop the file that you want to upload from the Local site section to the Remote site. When files are uploaded, you should see the details of data transfer on the bottom tab Successful transfers.
Conclusion
To sum up! By following these steps, you should have now the ProFTPd Server installed on the Ubuntu 24.04 system. You have also secured your ProFTPd installation with UFW, chroot enabled, and also secured with SSL/TLS certificates. Moreover, you have also learned how to connect to the ProFTPD server via FileZilla and upload files from your local computer to the FTP server securely.
As a next step, you may want to integrate ProFTPd with external databases such as MySQL/MariaDB, secure ProFTPd server with Fail2ban to block brute-force attacks, or you can also integrate with external authentication via LDAP Server or Radius.


