How to Install and Secure ProFTPD on FreeBSD 14
In this post, you’re going to learn how to install and secure ProFTPD on a FreeBSD 14 server.
Building a secure FTP is crucial to encrypt your data when transferring files. This can be done using TLS certificates and enabling the mod_tls module on ProFTPD. And this guide will show you exactly how you can achieve both.
Without further ado, let’s dive in.
Prerequisites
To proceed with this guide, ensure you have the following:
- A FreeBSD 14 server.
Read more: FreeBSD 14: Step-by-Step Installation (With Screenshot) - A root user or non-root user with sudo privileges.
- The pf (Packet Filter) is up and running.
Read more: How to Set Up and Manage PF Firewall on FreeBSD 14
Installing ProFTPD on FreeBSD
By default, the proftpd is available on the FreeBSD repository and ports tree collection. In this guide, you will install proftpd via the FreeBSD repository using the pkg package manager.
So complete these actions to install proftpd to your FreeBSd server.
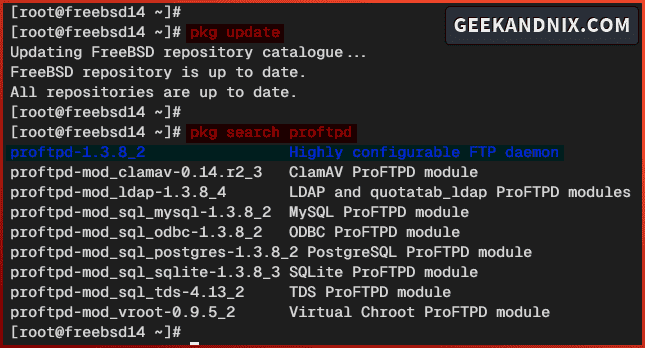
1. First, run the pkg command below to update the FreeBSD package index and search for proftpd packages.
pkg update
pkg search proftpd
Here’s the FreeBSD repository that provides the proftpd v1.3.8.2 with additional integration modules such as MySQL and PostgreSQL support, and the LDAP integration.
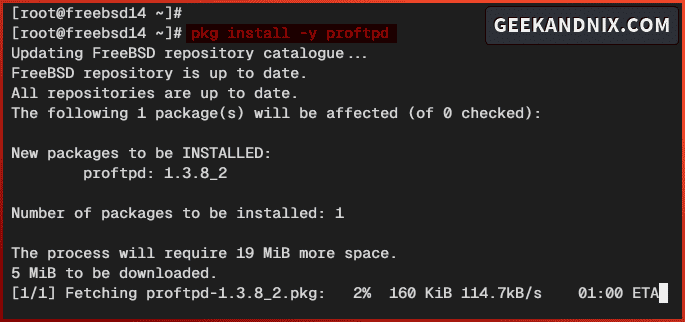
2. Now run the command below to install ProFTPD to your FreeBSD server.
pkg install proftpdWhen prompted, input y to proceed with the installation.
3. Once the installation is complete, execute the sysrc command below to enable and verify the proftpd service.
sysrc proftpd_enable="YES"
sysrc -a | grep proftpd
Managing ProFTPD Service on FreeBSD
Now that you’ve installed proftpd, take a look at these steps to manage the proftpd service.
1. Run the service command below to start proftpd service.
service proftpd start2. Once proftpd starts, run the following command to verify it. You will see the PID (Process ID) of the proftpd service.
service proftpd status
3. Now if you need to stop proftpd, use the command below.
service proftpd stop4. Lastly, run the command below to restart proftpd when needed, especially after making changes to the proftpd configuration.
service proftpd restartAllowing FTP Traffic via PF (Packet Filter)
This guide will be using pf (Packet Filter) as the default firewall. With that in mind, you must open port 21 to allow FTP traffic and additional ports range 60000:65535 for the passive mode FTP server.
Follow these steps to allow FTP traffic via pf (Packet Filter):
1. Run the vim editor to open the pf configuration /etc/pf.conf.
vim /etc/pf.confInsert the ftp to the TCP protocol list and add the custom ports range 60000:65535 that will be used by the proftpd passive mode. The passive mode allows clients to send the PASV command to the FTP server and initialize data transfer.
tcp_services = "{ ssh, http, https, domain, ftp}"
...
tcp_custom = "{ 3896, 8080, 60000:65535}"


pass in proto tcp to port $tcp_services keep state
...
pass in proto tcp to port $tcp_custom keep state
Save the file and exit the editor when finished.
2. Now run the command below to reload the pf service and take effect of your changes.
service pf reload3. Lastly, execute the pfctl command below to check the list rules on pf. Make sure the ftp service and ports range 60000:65535 is available on the pf.
pfctl -srGuide to ProFTPD Configuration Files and Directories
Before configuring proftpd, take a look at the proftpd configuration files and directories:
- /usr/local/etc/proftpd: The main configuration directory for ProFTPD on FreeBSD.
- /usr/local/etc/proftpd.conf: The main configuration file for the ProFTPD.
- /usr/local/libexec/proftpd: A directory where ProFTPD modules are stored.
Generating TLS and DHPARAM Certificates
In this guide, you will set up a secure FTP server via proftpd. To achieve that, you must generate TLS and DHPARAM certificates and enable the mod_tls module on proftpd.
To generate TLS and DHPARAM certificates, proceed with the following actions:
1. First, run the command below to install the openssl package.
pkg install -y opensslInput y when prompted to proceed.
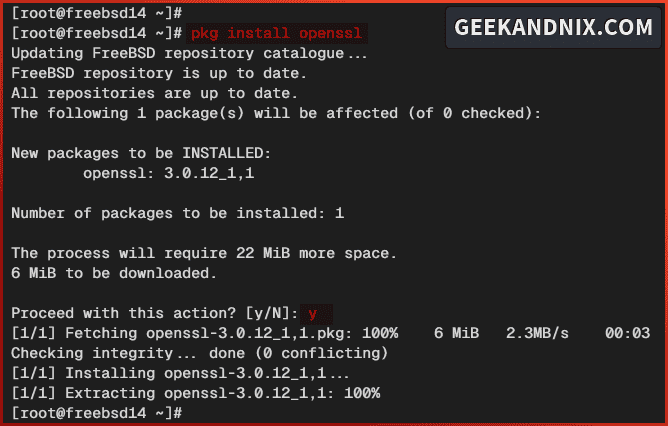
2. Next, run the command below to create a new directory /usr/local/etc/proftpd/certs/. This directory will be used to store TLS certificates for proftpd.
mkdir -p /usr/local/etc/proftpd/certs/3. Now execute the openssl command below to generate Self-Signed certificates for the proftpd server.
openssl req -x509 -newkey rsa:4096 -keyout /usr/local/etc/proftpd/certs/proftpd.key -out /usr/local/etc/proftpd/certs/proftpd.crt -nodes -days 365Input your server hostname or FQDN as the certificate Common Name. As for the rest, leave it as default and press ENTER.
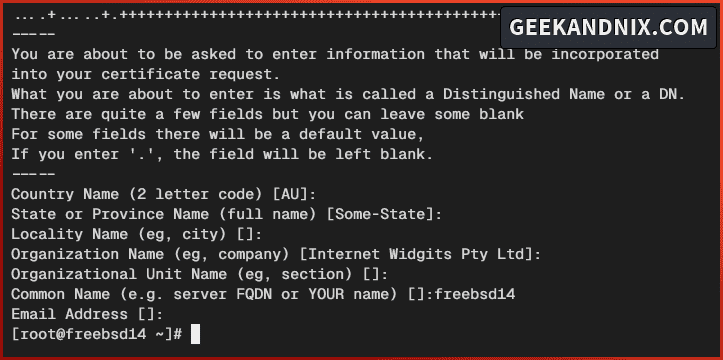
4. Next, run the command below to generate the DHPARAM certificate.
openssl dhparam -out /usr/local/etc/proftpd/certs/dh4096.pem 4096
5. Lastly, run the following command to change the permission of TLS certificates to 0600. This allows only the owner to read and write to the certificate file.
chmod 600 /usr/local/etc/proftpd/certs/proftpd.key
chmod 600 /usr/local/etc/proftpd/certs/proftpd.crt
Configuring ProFTPD on FreeBSD
Having TLS and DHPARAM certificates generated, let’s configure the proftpd installation. In this guide, you will run proftpd with:
- IPv6 disabled.
- Chroot or jail enabled.
- Passive mode enabled.
- mod_tls and mod_tls_shmcache modules enabled.
Let’s dive in.
1. To start, open the proftpd configuration /usr/local/etc/proftpd.conf using vim.
vim /usr/local/etc/proftpd.confChange the parameter UseIPv6 to no to disable IPv6 support. In this example, we’ll disable IPv6 for the proftpd.
# Use IPv6 support by default.
UseIPv6     no
Uncomment the Default ~ parameter to enable chroot or jail for FTP users.
# To cause every FTP user to be "jailed"
# directory, uncomment this line.
Default     ~
Add the PassivePorts parameter below to enable passive mode for proftpd. In this case, we’ll be using port range 60000:65535 for the proftpd passive mode.
# Specify PassivePorts ProFTPD
PassivePorts 60000 65535
Uncomment the following lines to enable mod_tls.c and mod_tls_shmcache.c modules. This will enable a secure FTP server or FTPES for your proftpd installation.
# Load TLS module mod_tls and mod_tls_shmcache
# See the directory /usr/local/libexec/proftpd
LoadModule mod_tls.c
LoadModule mod_tls_shmcache.c
Add the following configuration to configure the TLS module for the proftpd. Be sure to adjust the path of TLS certificates and the DHPARAM file.
<IfModule mod_tls.c>
    TLSEngine                     on
    TLSLog                        /var/log/proftpd-tls.log
    TLSProtocol                   TLSv1.2 TLSv1.3
    TLSCipherSuite                AES128+EECDH:AES128+EDH:ECDHE-RSA-CHACHA20-POLY1305:DHE-RSA-CHACHA20-POLY1305:ECDHE-RSA-AES128-GCM-SHA256:ECDHE-RSA-AES256-GCM-SHA384:DHE-RSA-AES128-GCM-SHA256:DHE-RSA-AES256-GCM-SHA384:ECDH+AES256:ECDH+AES128:DHE-RSA-AES256-SHA:DHE-RSA-CAMELLIA256-SHA:DHE-RSA-AES128-SHA:DHE-RSA-CAMELLIA128-SHA:ECDH+3DES:CAMELLIA256-SHA:CAMELLIA128-SHA:ECDH+3DES:RSA+3DES:ECDHE-RSA-RC4-SHA:RC4-SHA:!aNULL:!MD5
    TLSServerCipherPreference     on
    TLSOptions                    AllowClientRenegotiations NoSessionReuseRequired NoEmptyFragments

    TLSRSACertificateFile /usr/local/etc/proftpd/certs/proftpd.crt
    TLSRSACertificateKeyFile /usr/local/etc/proftpd/certs/proftpd.key
    TLSDHParamFile /usr/local/etc/proftpd/certs/dh4096.pem

    TLSTimeoutHandshake           30
    TLSVerifyClient               off
    TLSRequired                   no
    RequireValidShell             no
    TLSRenegotiate                ctrl 3600 data 25165824 required off timeout 180
</IfModule>
When you’re finished, save and exit the file.
2. Now run the command below to restart the proftpd service and apply your modifications.
service proftpd restart3. Lastly, run the sockstat command below to verify the FTP port 21.
sockstat -4 | grep ftpIf proftpd is running, you should see port 21 is used by the proftpd service like the following:

Adding FTP User
Now that you’ve configured proftpd, it’s time to add an FTP user for your clients.
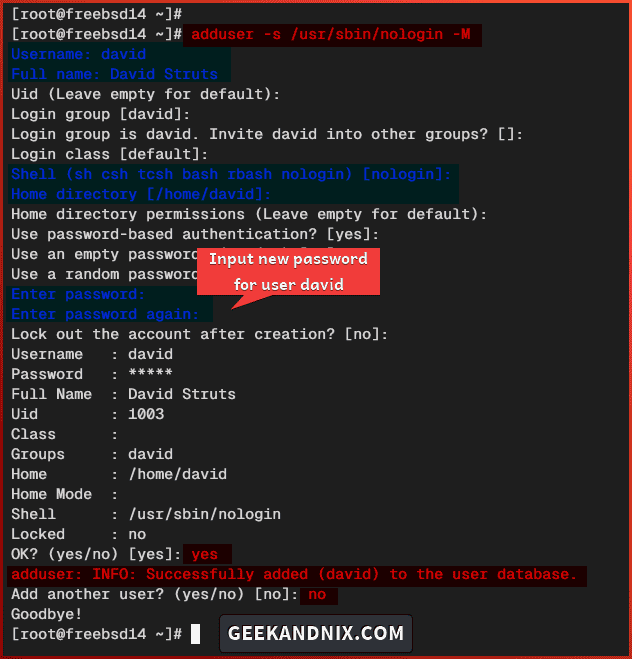
Execute the adduser command below to create a new FTP user. In this case, you will specify the default shell to the /usr/sbin/nologin via the -s option and automatically create a home directory with the -M option.
adduser -s /usr/sbin/nologin -M- Input your username, full name, and password. Leave other configurations as default.
- Type
yesto confirm and add the user. - Type
nowhen asked to add another new user.
Connecting and Uploading Files to ProFTPD Server
With the proftpd running and the FTP user created, get ready to connect and upload files to your FTP server from the client machine.
Perform these tasks to connect and upload files to the FTP server:
1. Download and install FileZilla to your local client. FileZilla is FTP client software which supports most operating systems such as Windows, Linux, and MacOS.
2. Open the FileZilla and input details Host, Username, Password, and Port of your FTP server. In the Host section, input the ftpes://server-ip to enable a secure connection.
Click Quickconnect to start the connection.

When asked for an unknown certificate, click OK to confirm.
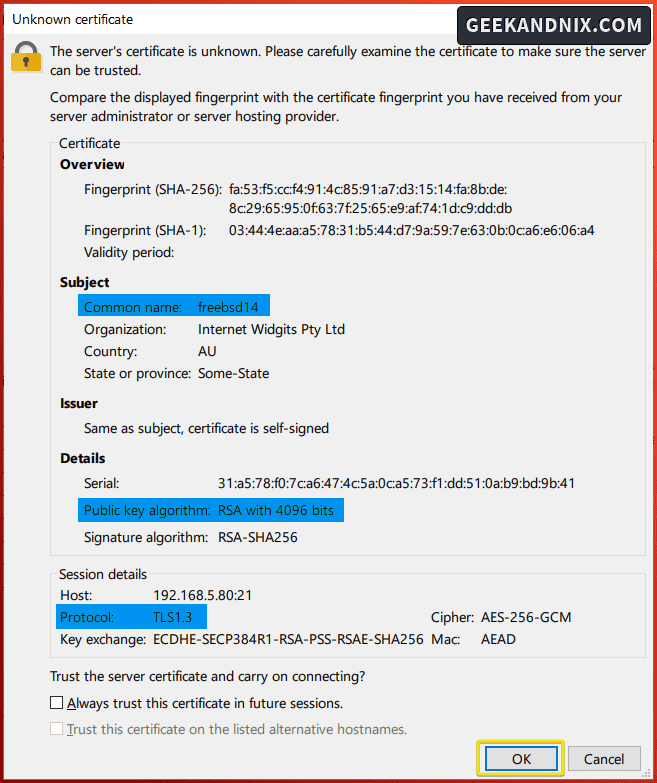
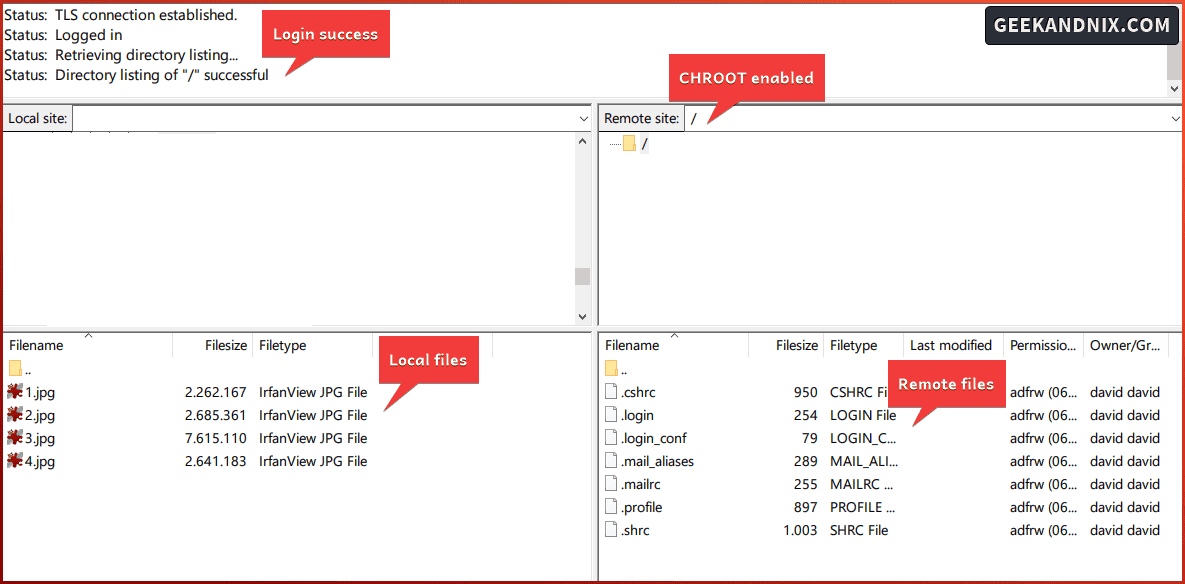
3. If the connection is successful, you should get an output such as Status: Logged in on the FileZilla connection details.
Also, on the Remote site section, you’re chrooted or jailed with the path / as the home directory.
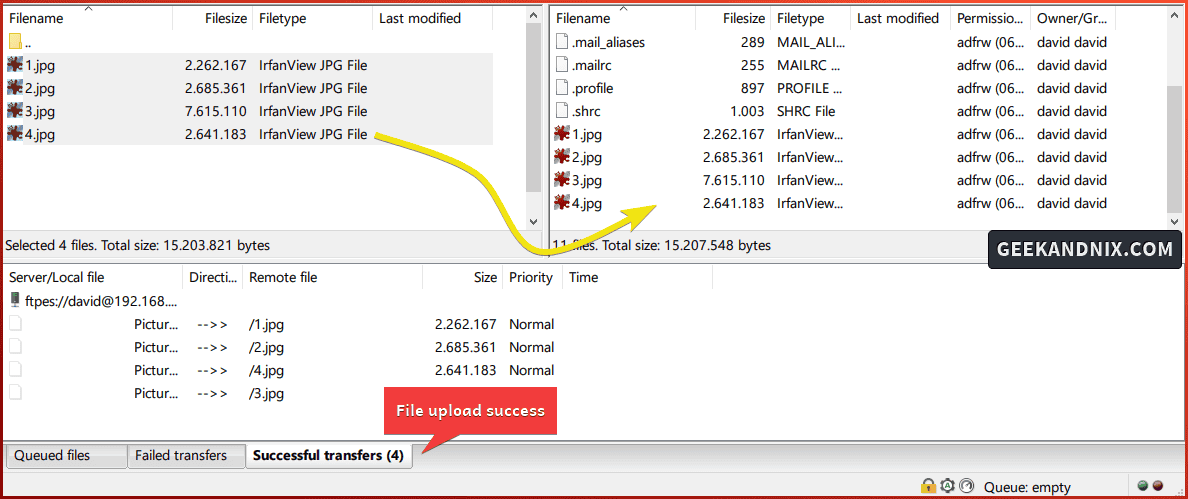
4. To upload files from a local client to the FTP server, drag your files from the Local files section to the Remote files.
If files are uploaded, you will see the confirmation on the Successful transfers tab.
Checking ProFTPD Logs
When you get an error during the installation, be sure to check the proftpd log files. You can use the tail command to check the last part of the proftpd log file.
1. To check FTP users’ login via TLS, run the tail command below to check the log file /var/log/proftpd-tls.log. See the TLSLog parameter in the proftpd.conf file.
tail -f /var/log/proftpd-tls.log2. To check the status file upload from FTP users, check the log file /var/log/xferlog. This is enabled by default on proftpd.
tail -f /var/log/xferlogUninstalling ProFTPD from FreeBSD
If you need to remove or uninstall proftpd, follow these actions:
1. Before uninstalling proftpd, run the command below to stop and disable the proftpd service.
service proftpd stop
sysrc -x proftpd_enable
2. Now run the command below to uninstall proftpd from your FreeBSD server.
pkg remove proftpd
pkg autoremove
3. Lastly, run the following command to remove configuration files and directories related to proftpd.
rm -rf /usr/local/etc/proftpd /usr/local/etc/proftpd.confCommon Error
Below are some errors I encountered during the process of making this guide:
500 AUTH not understood
When connecting via FileZilla, I got an error 500 AUTH not understood. As I troubleshoot, this is because I forgot to enable both mod_tls and mod_tls_shmcache modules in the proftpd.conf file.
# Load TLS module mod_tls and mod_tls_shmcache
# See the directory /usr/local/libexec/proftpd
LoadModule mod_tls.c
LoadModule mod_tls_shmcache.c
Cannot connect after applying PF
This error occurs after I apply the pf (Packet Filter). Turn out that I need to enable the passive mode on proftpd.
Be sure to add the PassivePorts parameter to the proftpd.conf file.
# Specify PassivePorts ProFTPD
PassivePorts 60000 65535
Then, add the port range for passive mode 60000:65535 to the pf.conf file.
tcp_custom = "{ 3896, 8080, 60000:65535}"Conclusion
Good job and well done! You’ve now installed ProFTPD on the FreeBSD 14 server. Moreover, you have also secured ProFTPD with TLS and DHPARAM certificates, and the pf (Packet Filter).
From the client’s perspective, you have learned how to connect to the FTP server and successfully upload files to the FTP server via FileZilla.
With this knowledge, you can add more FTP users for your clients. Or you can level up your ProFTPD deployment with MySQL/MariaDB or PostgreSQL database backend, also implementing the virtual chroot via mod_vroot module.
