How to Install OpenVPN Server on Ubuntu 22.04
VPN or Virtual Private Network is mandatory to secure your connections from any intruder. OpenVPN is an implementation of VPN protocol with a strong reputation for securing and encrypting your internet traffic. Follow our tutorial to install and configure OpenVPN on your Ubuntu 22.04 server.
Let’s get started.
I also cover this topic for FreeBSD users, visit An Extensive Guide to Install OpenVPN Server on FreeBSD 14.
Prerequisites
Before you move forward, confirm that you have:
- An Ubuntu 22.04 server.
See more: 15 Steps to Install Ubuntu Server 22.04 LTS - A non-root user with
sudoorrootprivileges. - UFW (Uncomplicated Firewall) up and running.
See more: Master the UFW Firewall on Ubuntu: 17 Practical Examples - A client machine – This can be Linux/Windows/macOS.
Installing OpenVPN on Ubuntu
OpenVPN is an implementation of VPN protocol with a strong reputation for its maturity and security. OpenVPN is free and open-source and can be installed on almost any operating system.
To install OpenVPN on your Ubuntu server, execute the following tasks:
1. To get started, run the following apt command to refresh the Ubuntu server repository and get the latest package index.
sudo apt update
2. Now, install the OpenVPN Server, Easy-rsa, and tree packages by executing the command below. Type Y to proceed with the installation.
sudo apt install openvpn easy-rsa haveged tree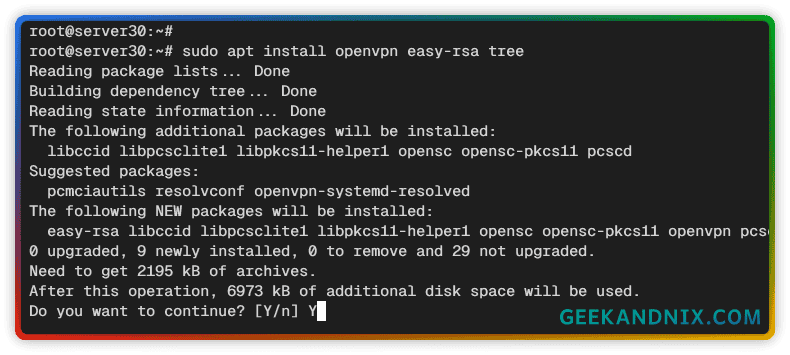
Details package that you’ve installed:
openvpn: The OpenVPN Server package.easy-rsa: The PKI (Public Key Infrastructure) management tool. You can call this as a tool for managing certificates.haveged: Entropy generator to speed up keys/certificates generation time.tree: An additional package to list files in a readable format.
Configuring easy-rsa
easy-rsa is a utility for building and managing PKI (Public key Infrastructure). You will be utilizing easy-rsa for generating OpenVPN certificates. But, before that, complete these tasks to configure easy-rsa:
1. First, create a new project directory /opt/easy-rsa, and move into it.
mkdir -p /opt/easy-rsa; cd /opt/easy-rsa2. Copy the easy-rsa configuration and script to your current working directory and change the permission to 700 (rwx only for the owner).
cp -r /usr/share/easy-rsa/* .
chmod 700 /opt/easy-rsa
3. Now, copy the file vars.example to vars and modify it using vim. This file will be loaded automatically when generating certificates.
cp vars.example vars
vim vars
Change the default crypto algorithm to ec or elliptic curve, increase the cryptographic digest to sha512, and then change the default information for your certificates.
set_var EASYRSA_ALGO "ec"
set_var EASYRSA_DIGEST "sha512"

set_var EASYRSA_REQ_COUNTRY    "US"
set_var EASYRSA_REQ_PROVINCE   "California"
set_var EASYRSA_REQ_CITY       "San Francisco"
set_var EASYRSA_REQ_ORG        "Copyleft Certificate Co"
set_var EASYRSA_REQ_EMAIL      "[email protected]"
set_var EASYRSA_REQ_OU         "My Organizational Unit"
When finished, save and close the file.
Initializing PKI and Generating CA (Certificate Authority)
PKI or Public Key Infrastructure is the home where certificate trust is established for both OpenVPN servers and clients.
Now, follow these steps to initialize PKI (Public Key Infrastructure) and generate CA (Certificate Authority) for your OpenVPN infrastructure:
1. First, execute the following command to initialize PKI (Public Key Infrastructure).
This will apply environment variables within the vars file and create a new pki directory for storing certificates.
./easyrsa init-pki2. After that, run the command below to generate CA (Certificate Authority).
When prompted, input the passphrase for your CA and repeat. Once finished, the CA certificate will be available at pki/ca.crt and the CA key at pki/private/ca.key.
./easyrsa build-ca
NOTE: Be sure to keep your ca.key secret.
Generating Server Certificates with easy-rsa
Now that you’ve generated CA (Certificate Authority), let’s generate a server certificate for OpenVPN using the following steps:
1. Generate the OpenVPN server certificate using the command below. This will generate a keypair and certificate request that you will sign in in the next step.
In this case, we’ll use server30 as the file name for new certificates and the parameter nopass to disable encryption for the key.
./easyrsa gen-req server30 nopass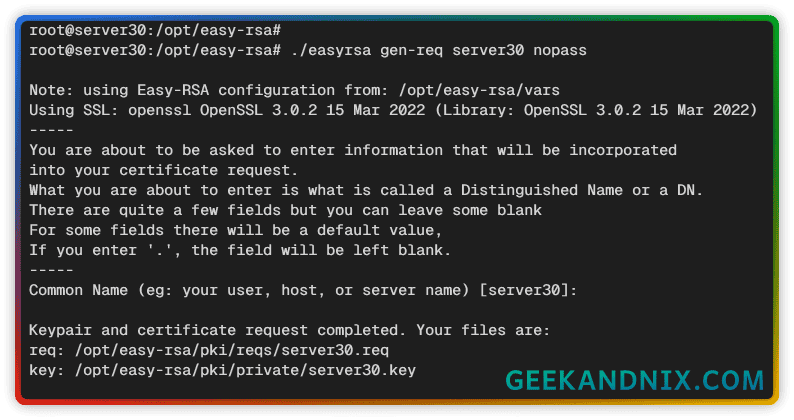
2. Now, run the command below to sign the certificate request for the OpenVPN server server30 with your CA (Certificate Authority).
Input yes to proceed and type the CA passphrase when prompted. Once finished, your server certificate will be available at pki/issued/server30.crt.
./easyrsa sign-req server server30
3. Lastly, run the following command to generate the DH (Diffie-Hellman) parameters.
By default, the DH parameters will be generated to pki/dh.pem.
./easyrsa gen-dh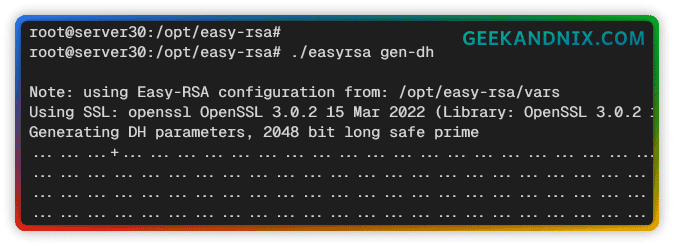
Generating Client Certificates with easy-rsa
After generating server certificates, it’s time to generate certificates for clients. Perform these actions to generate client certificates.
1. To generate a client certificate request, run the following command.
In this case, we’ll be using the base filename david for the client certificate. The client key will be available at pki/private/david.key.
./easyrsa gen-req david nopass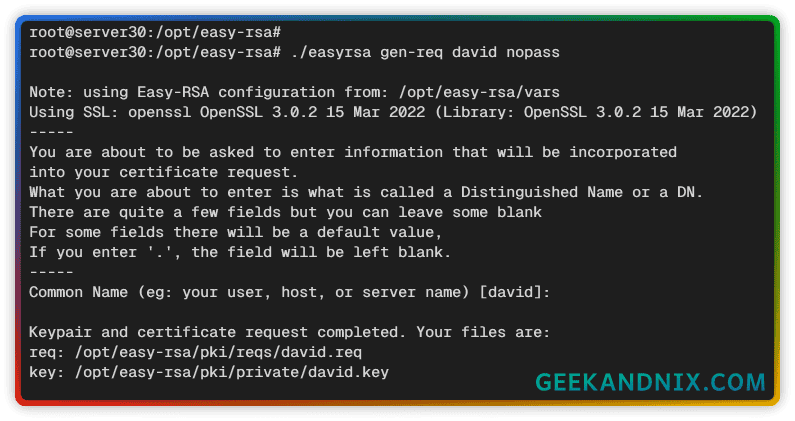
2. Now run the command below to sign the client certificate request with the CA (Certificate Authority).
./easyrsa sign-req client davidInput yes to proceed, then input the passphrase for your CA. Once finished, your client certificate will be available at pki/issued/david.crt.

Populating OpenVPN Certificates
At this point, you’ve generated certificates for both the OpenVPN server and the client. It’s time to populate certificates for the OpenVPN Server and Client to the proper location.
Consider the following scenario:
- Server certificates: OpenVPN server certificates will be saved in the
/etc/openvpn/server/directory. - Client certificates: Client certificates will be saved in the
/etc/openvpn/client/directory. You also need to copyca.crtandta.keyfile to the client. - Other certificates (
ca.crt,dh.pem,ta.key): Those certificates will be available in the/etc/openvpndirectory.
Now let’s start.
1. First, run the following command to generate the ta.key for the OpenVPN authentication process.
openvpn --genkey tls-auth ta.key2. Copy certificate file ca.crt, dh.pem. And ta.key to the /etc/openvpn/ directory.
cp pki/{ca.crt,dh.pem,ta.key} /etc/openvpn/3. For OpenVPN server certificates, copy pki/issued/server30.crt and pki/private/server30.key to the /etc/openvpn/server/ directory.
cp pki/issued/server30.crt /etc/openvpn/server/
cp pki/private/server30.key /etc/openvpn/server/
4. As for client certificates, copy ca.crt, ta.key, pki/issued/david.crt, and pki/private/david.key to the /etc/openvpn/client/ directory.
cp pki/{ca.crt,ta.key} /etc/openvpn/client/
cp pki/issued/david.crt /etc/openvpn/client/
cp pki/private/david.key /etc/openvpn/client/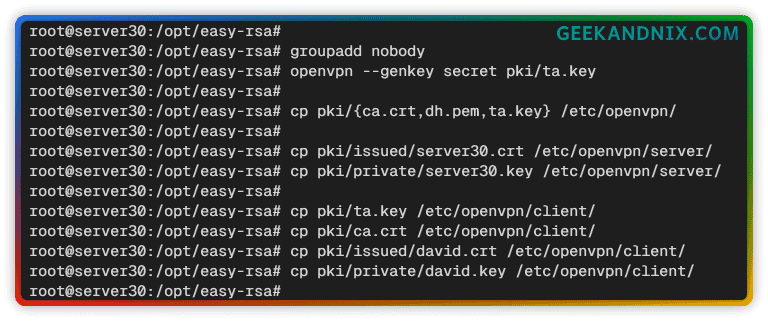
5. Lastly, run the tree command below to check the /etc/openvpn directory in a tree-like format. Ensure required certificates are available in the place.
tree /etc/openvpn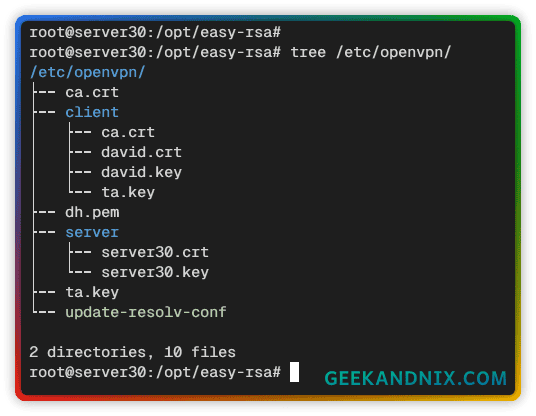
Configuring OpenVPN Server on Ubuntu
In this section, you will set up the OpenVPN bind/listen interface, default topology, and local IP address for clients. This can be done via the /etc/openvpn/server.conf file.
Proceed with the following to configure the OpenVPN server installation:
1. Copy the default OpenVPN configuration to /etc/openvpn/server.conf and modify it using vim.
cp /usr/share/doc/openvpn/examples/sample-config-files/server.conf \
/etc/openvpn/server.conf
sudo vim /etc/openvpn/server.conf
2. Input your public IP address to the local parameter.
local 192.168.5.303. Change the path of server certificates like this:
ca ca.crt
cert /etc/openvpn/server/server30.crt
key /etc/openvpn/server/server30.key # This file should be kept secret
dh dh.pem
4. Remove the ; or semicolon from the topology option to enable it. In this case, you will set up the default network topology to subnet.
topology subnet5. Adjust network and netmask configuration within the server directive. Below is the default network configuration for the OpenVPN server.
server 10.8.0.0 255.255.0.06. Change the path of ifconfig-pool-persist to ipp.txt. This will persist IP addresses for clients.
ifconfig-pool-persist ipp.txt7. IMPORTANT, uncomment the following lines to redirect client connections (including web browsing and DNS lookups) through the OpenVPN server.
push "redirect-gateway def1 bypass-dhcp"8. Uncomment the following lines to specify DNS resolvers for clients via the DHCP option.
push "dhcp-option DNS 1.1.1.1"
push "dhcp-option DNS 8.8.8.8"
9. Insert the tls-crypt option below to encrypt and authenticate all channel packets via certificate key ta.key. The tls-crypt does not require the client to set up key-direction, while tls-auth is required.
tls-crypt ta.key10 Add the auth option below to specify the default authentication algorithm to SHA256. IMPORTANT, both OpenVPN server and client must have the same auth algorithm.
auth SHA25611. Uncomment the user and group options. Then, change the group to nogroup.
user nobody
group nogroup
Save the file and exit the editor when you’re finished.
Managing OpenVPN Server on Ubuntu
Now that you’ve configured the OpenVPN server, you can now start and enable the OpenVPN service. Take these steps to start, enable, and verify the OpenVPN service:
1. Execute the following command to start the OpenVPN Server.
sudo systemctl start openvpn@server2. Now, enable OpenVPN to run at system boot using the command below.
sudo systemctl enable openvpn@server3. Then, verify the OpenVPN status to ensure that the service is running. If OpenVPN is running, you should get an output active (running)
sudo systemctl status openvpn@server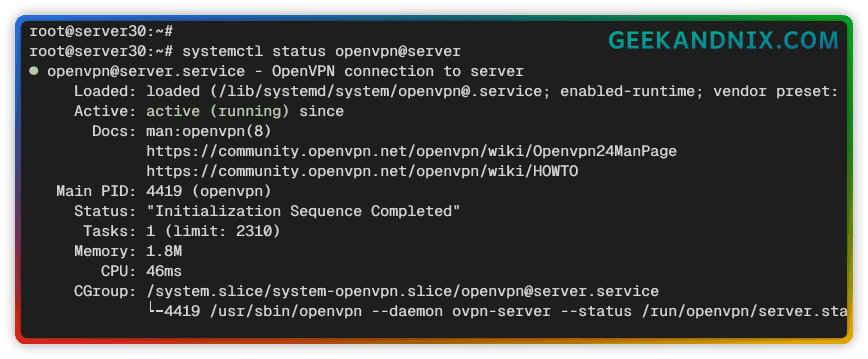
4. Next, run the following command after editing the server.conf file to apply your changes.
sudo systemctl restart openvpn@server5. If you want to stop the OpenVPN, execute the command below.
sudo systemctl stop openvpn@serverEnable port-forwarding on Ubuntu
For OpenVPN to work, you must enable port-forwarding on your Ubuntu system, which can be done by modifying kernel parameters via the /etc/sysctl.conf file.
Proceed as follows to enable port forwarding on your server:
1. To enable port-forwarding, add the net.ipv4.ip_forward=1 to the /etc/sysctl.conf file using the following command.
echo "net.ipv4.ip_forward=1" >> /etc/sysctl.conf2. Then apply your changes using the sysctl command below.
sudo sysctl -pThe output net.ipv4.ip_forward=1 confirms that port-forwarding is enabled.
Setting Up Routing via UFW (Uncomplicated Firewall)
Now that you’ve enabled port-forwarding, proceed to configure UFW (Uncomplicated Firewall) to route client connections via OpenVPN Server.
Go through these steps to set up forwarding OpenVPN connections via UFW (Uncomplicated Firewall).
1. Before configuring UFW, check the default internet gateway using the following command. In this example, the enp0s3 interface is the default internet gateway.
ip route list default
2. Now, open the UFW configuration /etc/default/ufw using vim.
sudo vim /etc/default/ufwChange the DEFAULT_FORWARD_POLICY to ACCEPT to enable forwarding via UFW.
DEFAULT_FORWARD_POLICY="ACCEPT"Save the file and exit the editor.
3. Then, open the UFW rules file /etc/ufw/before.rules with vim.
sudo vim /etc/ufw/before.rulesAdd the following configuration to the top of the line.
This will create forwarding or MASQUERADE for OpenVPN networks 10.8.0.0/8 via default internet gateway enp0s3. So, be sure to change both configurations with your details.
#
# rules.before
#
# Rules that should be run before the ufw command line added rules. Custom
# rules should be added to one of these chains:
#   ufw-before-input
#   ufw-before-output
#   ufw-before-forward
#

# INSERT: START OPENVPN RULES
# NAT table rules
*nat
:POSTROUTING ACCEPT [0:0]
# Allow traffic from the OpenVPN client to enp0s3 (change with your default gateway: ip route list default)
-A POSTROUTING -s 10.8.0.0/8 -o enp0s3 -j MASQUERADE
COMMIT
# END OPENVPN RULES
Save and close the file when finished.
4. Next, run the following ufw command to add OpenVPN port 1194/udp and reload UFW to apply your changes.
sudo ufw allow 1194/udp
sudo ufw reload
5. After UFW is reloaded, verify it using the following command.
sudo ufw status verboseIf successful, you should see the OpenVPN port 1194/udp, and the forwarding or routed is allowed.

Creating OpenVPN Client Configuration
With the OpenVPN successfully configured, the next stage is to create an OpenVPN configuration for clients.
Follow these steps to create an OpenVPN configuration for clients:
1. First, copy the default OpenVPN client configuration to /etc/openvpn/client/client.conf, then open it using vim.
cp /usr/share/doc/openvpn/examples/sample-config-files/client.conf \
/etc/openvpn/client/client.conf
sudo vim /etc/openvpn/client/client.conf
2. Now, input the OpenVPN server IP address to the remote option.
remote 192.168.5.30 11943. Modify OpenVPN client certificates like the following:
ca ca.crt
cert david.crt
key david.key
4. Change the tls-auth to tls-crypt option like this:
tls-crypt ta.key5. Specify the authentication algorithm to SHA256, just like on the OpenVPN server.
auth SHA256Save the file and exit the editor when finished.
6. Next, go to the /etc/openvpn directory and compress the client directory to the david.tar.gz file using the tar command below.
cd /etc/openvpn
tar -czvf david.tar.gz client
7. Lastly, move the david.tar.gz file to the proper directory for the client to download.
In this case, we’ll move file david.tar.gz to the user home directory to allow the client to download a file via scp.
mv david.tar.gz /home/username/
sudo chown username:username /home/username/david.tar.gz
Connecting to OpenVPN Server
Now that you’ve created the OpenVPN client configuration, you’re ready to connect to the OpenVPN server via the client machine. You can use any operating system as a client, such as Linux, Windows. or macOS.
Take these actions to verify your OpenVPN installation by connecting to it via the client machine:
1. Before connecting to the OpenVPN server, download and extract the file david.tar.gz to your client machine.
In this example, we’ll download the david.tar.gz file via scp or Secure Copy. Alternatively, you can also use ftp via SSH.
# download OpenVPN client configuration via SCP
scp [email protected]:~/david.tar.gz .

# extract OpenVPN client
tar -xf david.tar.gz
cd client/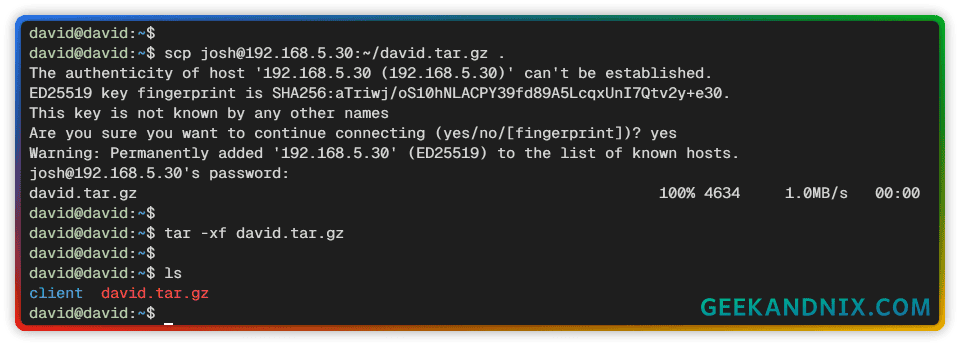
2. Install the OpenVPN client for your operating systems.
- For Linux desktops, install the
openvpnandnetwork-manager-openvpn-gnomepackages via the package manager. You can use NetworkManager as an OpenVPN client GUI. - For MacOS, install the official OpenVPN client or third-party application such as Tunnelblick.
- As for Windows machines, download and install the OpenVPN client for Windows.
3. Import the client.conf to the client application, then connect to the OpenVPN server.
4. Or if you’re using a Linux client, you can also connect via the terminal using the command below.
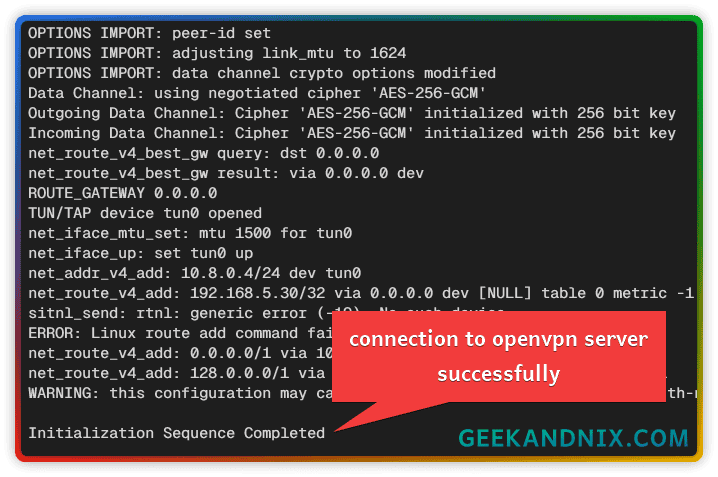
sudo openvpn --config client.confOnce connected, you should get an output Initialization Sequence Completed.
Intercepting VPN Connections with tcpdump
To ensure that your OpenVPN working correctly, you can use tcpdump to intercept VPN connections on your Ubuntu server.
Use the following technique to intercept the OpenVPN connection and verify your OpenVPN installation.
1. Execute the tcpdump command below to monitor the tun0 interface. The tun0 interface is the default network interface for OpenVPN.
tcpdump -i tun02. Back to the client machine and run ping to 1.1.1.1. When installation is successful, you should get ICMP replies from 1.1.1.1 (Cloudflare DNS).
ping 1.1.1.1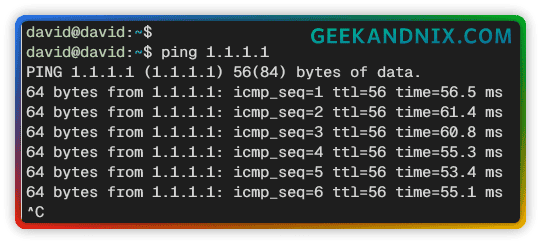
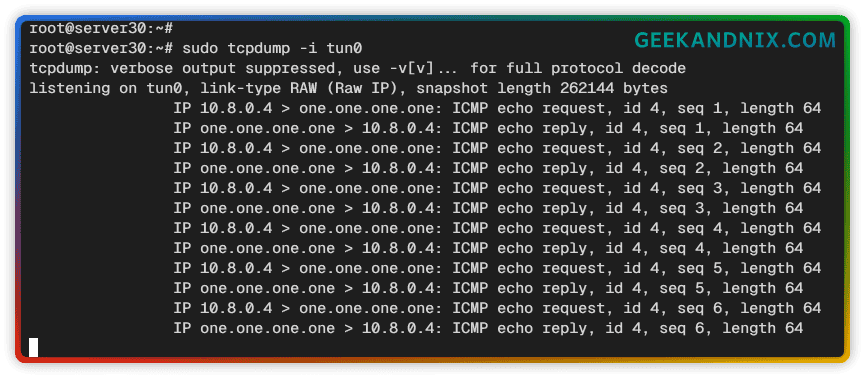
3. Now, back again to the OpenVPN server and you should get the similar output below:
In this case, the client machine with private network IP address 10.8.0.4 successfully sends the ICMP request to Cloudflare DNS one.one.one.one.
OpenVPN Common Errors During the Process
1. First, I got the error failed to find GID for group nobody and the OpenVPN refused to start.
To solve this, change the default group option to nogroup within the /etc/openvpn/server.conf file.
user nobody
group nogroup
Then start or restart the OpenVPN service.
sudo systemctl restart openvpn@server2. Secondly, I also got the error TLS Error: tls-crypt unwrapping failed from when trying to connect to the OpenVPN server.
To solve this, ensure the tls-crypt configuration below is available on both server.conf and client.conf, or client.ovpn.
tls-crypt ta.key3. Lastly, I also got this error Authenticate/Decrypt packet error: packet HMAC authentication failed during the client to server connection.
To solve this error, ensure both the OpenVPN server and client have the same cipher cryptographic and auth algorithm.
In this case, both server.conf and client.conf files should have the same cipher and auth configuration like this:
cipher AES-256-CBC
auth SHA256
Conclusion
Congratulations and well done! You’ve installed OpenVPN on the Ubuntu 22.04 server. You’ve also connected to the OpenVPN server via the client machine and confirmed that OpenVPN is working via tcpdump.
Moving forward, why not implement site-to-site OpenVPN mode to connect two different networks via a secure OpenVPN tunnel, you can also use VPN to secure Samba shared folders.


