How to Install OpenVPN Server on FreeBSD 14
In this guide, I will show you how to install OpenVPN on a FreeBSD 14 server, step-by-step. I also cover the integration of pf (Packet Filter) to set up routing for OpenVPN server, and configuration of OpenVPN client for Windows and Linux clients.
Prerequisites
Before you begin, make sure you have the following:
- A FreeBSD 14 server initialized with sudo/administrator privileges.
- A pf (Packet Filter) firewall is up and running.
Installing OpenVPN and easy-rsa on FreeBSD
OpenVPN is an open-source VPN daemon for securing your networks and connections. OpenVPN is available for most operating systems, on FreeBSD, you can install it via pkg package manager or manually via Ports.
Follow these steps to install OpenVPN on your FreeBSD server:
1. First, run the command below to update your FreeBSD package index. By updating the package index, you will get the latest version of package information.
pkg update
2. Now, run the command below to install the openvpn, easy-rsa, and tree packages to your FreeBSD server.
pkg install openvpn easy-rsa treeEnter y to confirm and proceed with the installation.

3. Once the installation is done, run the command below to enable the OpenVPN service. Then, set up OpenVPN to run in tun mode.
You can run OpenVPN in two modes: tun (virtual point-to-point IP link) and tap (virtual ethernet adapter). You cannot mix those two modes, use one and stick to it.
sysrc openvpn_enable=YES
sysrc openvpn_if=tun
4. Now, run the command below to set the default OpenVPN directory to /usr/local/etc/openvpn. Then, set up the default OpenVPN configuration to /usr/local/etc/openvpn/geekandnix.conf.
sysrc openvpn_dir=/usr/local/etc/openvpn
sysrc openvpn_configfile=/usr/local/etc/openvpn/geekandnix.conf
5. Lastly, run the command below to verify OpenVPN parameters in the rc.conf file.
sysrc -a | grep openvpnMake sure you have OpenVPN parameters as highlighted like the following:

Initializing PKI (Public Key Infrastructure) via easy-rsa
After you have installed OpenVPN, you’ll generate PKI or Public Key Infrastructure for your OpenVPN server.
Public Key Infrastructure (PKI) is the place where you can generate, issue, sign, and revoke certificates for OpenVPN servers and clients. Here, you can utilize easyrsa for those tasks related to Public Key Infrastructure.
To initialize PKI (Public Key Infrastructure), complete the following actions:
1. First, run the command below to create a new directory /usr/local/etc/certificates and move into it. This directory will be used for storing the PKI (Public Key Infrastructure) of the OpenVPN server.
mkdir -p /usr/local/etc/certificates; cd /usr/local/etc/certificates2. Now, run the following command to copy the file vars.example to the vars file. Then, modify the vars file using vim.
cp /usr/local/share/easy-rsa/vars.example vars
vim vars
Change the default EASYRSA_ALGO and EASYRSA_DIGEST with the following, and be sure to adjust the certificate information.
set_var EASYRSA_ALGO "ec"
set_var EASYRSA_DIGEST "sha512"

set_var EASYRSA_REQ_COUNTRY    "US"
set_var EASYRSA_REQ_PROVINCE   "Geekandnix"
set_var EASYRSA_REQ_CITY       "Geekandnix"
set_var EASYRSA_REQ_ORG        "GeekAndNix.Inc"
set_var EASYRSA_REQ_EMAIL      "[email protected]"
set_var EASYRSA_REQ_OU         "Admin Ops"
When done, save and exit the file.
3. Lastly, run the easyrsa command below to initialize your Public Key Infrastructure. This will generate a new directory pki, which contains the required configurations for your PKI. Also, your OpenVPN certificates will gen generated to the pki directory.
easyrsa init-pki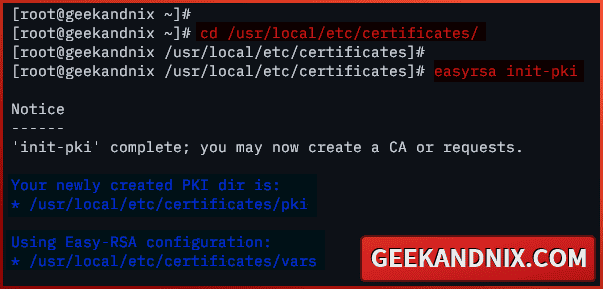
Generating CA (Certificate Authority)
Now that you’ve initialized PKI, let’s generate certificates for the OpenVPN server.
The first certificate that you must create is CA or Certificate Authority, which will be used to sign certificates for both the OpenVPN server and clients. The private key for CA is the most important certificate, you must keep it secret.
Execute the following tasks to generate CA (Certificate Authority):
1. To generate CA (Certificate Authority) for your OpenVPN server, run the easyrsa command below.
easyrsa build-ca2. When asked for passphrase, enter the new passphrase for your new CA and repeat. Then, enter the FreeBSD server hostname or fqdn as the Common Name.

Once the process is complete, your CA certificates will be available at:
- Private key: /usr/local/etc/certificates/pki/private/ca.key
- Public key: /usr/local/etc/certificates/pki/ca.crt
Generating OpenVPN server certificates
With Certificate Authority (CA) generated, move on to generate and sign the OpenVPN server certificate via the easyrsa utility.
Perform these actions to generate server certificates for your OpenVPN server:
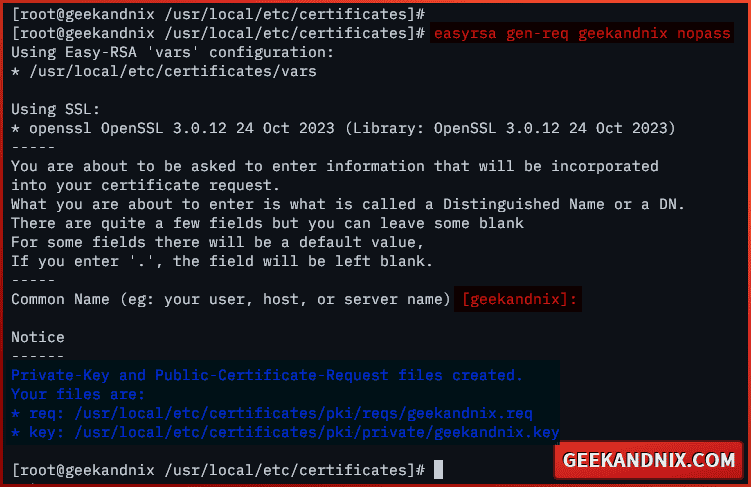
1. First, run the command below to generate a certificate request for the OpenVPN server. In this example, I will use geekandnix as the base filename for server certificates and disable encryption in the private key via the nopass option.
easyrsa gen-req geekandnix nopassWhen prompted, enter your OpenVPN server hostname or fqdn as the Common Name. Here, I will use geekandnix as the Common Name.
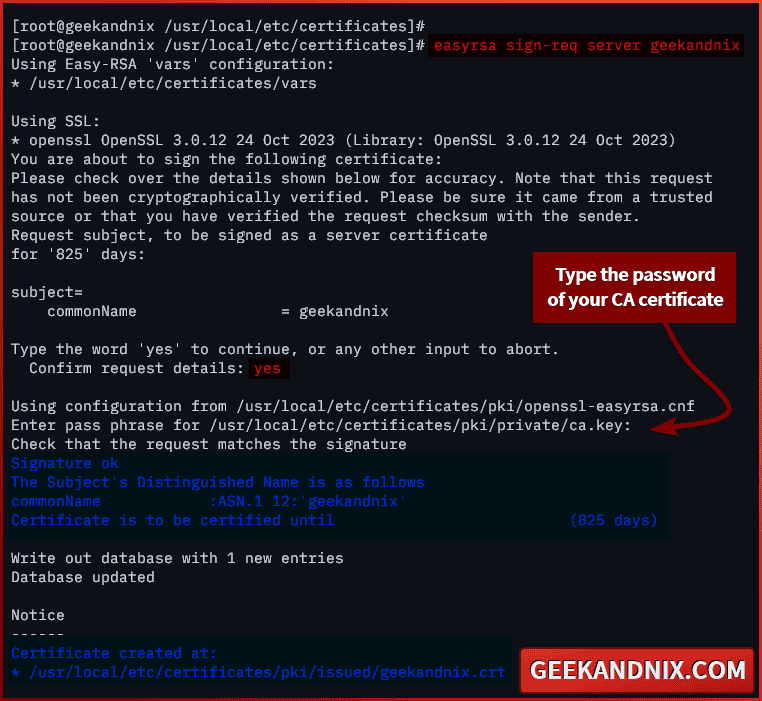
2. Now, run the easyrsa command below to sign your server certificate geekandnix with the CA (Certificate Authority).
easyrsa sign-req server geekandnixEnter yes to sign your certificate. Then, type the password of your CA (Certificate Authority) when prompted.
3. Lastly, run the following command to generate the DHPARAM certificate.
easyrsa gen-dh
After everything is done, your OpenVPN server certificate and DHPARAM certificate should be available in the following:
- OpenVPN server private key:
/usr/local/etc/certificates/pki/private/geekandnix.key. - OpenVPN server public key:
/usr/local/etc/certificates/pki/issued/geekandnix.crt. - DHPARAM certificate:
/usr/local/etc/certificates/pki/dh.pem.
Generating OpenVPN client certificates
After you’ve generated the OpenVPN server certificate, proceed to the next stage to generate certificates for OpenVPN clients. It’s recommended to use one certificate for one client. Yes, you can use one certificate for multiple users, but it’s not recommended.
Follow these instructions to generate an OpenVPN client certificate:
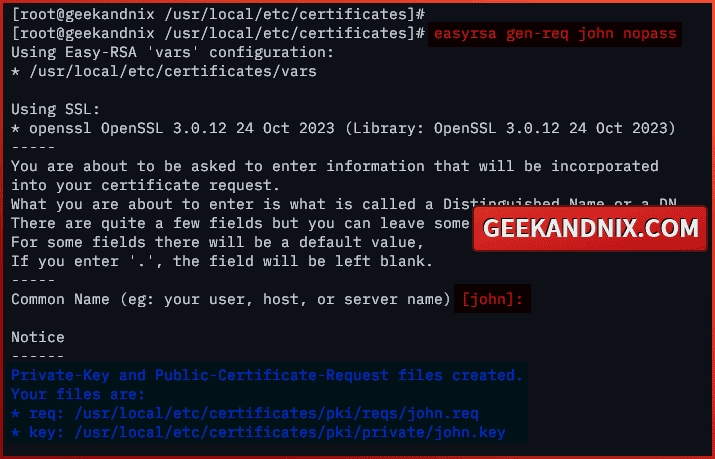
1. First, run the command below to generate a certificate request for a client with the base filename john and disable encryption in the private key. So the idea here is to create certificates for user john.
easyrsa gen-req john nopassWhen prompted for the Common Name configuration, input your client name.
2. Secondly, run the command below to sign the client certificate request john with your CA (Certificate Authority).
easyrsa sign-req client johnAs seen below, enter yes to confirm, then input the password of your CA (Certificate Authority) when asked.

Once done, your client certificate should be available in the following:
- Client private key:
/usr/local/etc/certificates/pki/private/john.key. - Client public key:
/usr/local/etc/certificates/pki/issued/john.crt.
Populating certificates for OpenVPN server and client
So far, you have generated certificates CA, server certificates, and client certificates. Next, you will populate those certificates for both the OpenVPN server and the client.
Here certificates that you need for each, server and client:
- OpenVPN server:
ca.crt,ta.key,dh.pem,geekandnix.crt(server certificate), andgeekandnix.key(server key). - OpenVPN client:
ca.crt,ta.key(you will generate this later),john.crt(client certificate), andjohn.key(client key).
Let’s move on to populate your OpenVPN certificates for server and client:
1. Before populating your certificates, run the openvpn command below to generate the ta.key certificate. The ta.key file will be used with the tls-auth or tls-crypt in both the OpenVPN server and clients.
openvpn --genkey tls-auth pki/ta.key2. Now, run the command below to create new directories server and client within the /usr/local/etc/openvpn/. Those directories will be used to store required certificates for the OpenVPN server and client.
mkdir -p /usr/local/etc/openvpn/{server,client}3. Afterward, run the command below to copy certificate files ca.crt, dh.pem, and ta.key to the /usr/local/etc/openvpn/ directory.
cp pki/{ca.crt,dh.pem,ta.key} /usr/local/etc/openvpn/4. Then, copy certificates for the OpenVPN server to the /usr/local/etc/openvpn/server directory using the command below.
cp pki/issued/geekandnix.crt /usr/local/etc/openvpn/server
cp pki/private/geekandnix.key /usr/local/etc/openvpn/server
5. Next, run the command below to copy client certificates, ca.crt, and ta.key to the /usr/local/etc/openvpn/client/ directory.
cp pki/{ca.crt,ta.key} /usr/local/etc/openvpn/client/
cp pki/issued/john.crt /usr/local/etc/openvpn/client/
cp pki/private/john.key /usr/local/etc/openvpn/client/
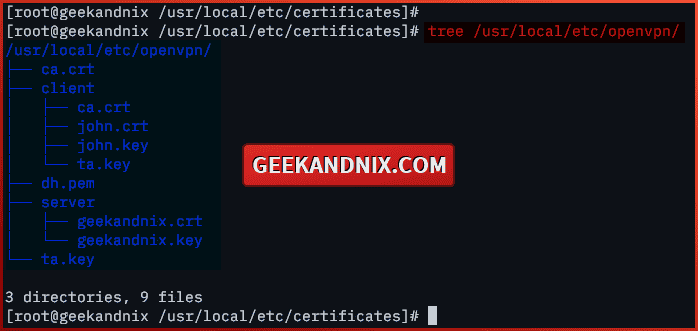
6. Lastly, run the command below to verify the list of certificates on the /usr/local/etc/openvpn/ directory.
tree /usr/local/etc/openvpn/So far, the list contents of your /usr/local/etc/openvpn/ directory should be like following:
Creating OpenVPN server configuration on FreeBSD
Having certificates ready, let’s move on to configure the OpenVPN server by creating a new configuration file /usr/local/etc/openvpn/geekandnix.conf.
Navigate through these steps to configure the OpenVPN server on the FreeBSD server:
1. To configure the OpenVPN server, run the command below to copy the default configuration to /usr/local/etc/openvpn/geekandnix.conf. Then, edit the geekandnix.conf file using vim.
cp /usr/local/share/examples/openvpn/sample-config-files/server.conf
/usr/local/etc/openvpn/geekandnix.conf
vim /usr/local/etc/openvpn/geekandnix.conf
2. Enter your FreeBSD server IP address to the local option like the following. This is where you bind the OpenVPN service.
local 192.168.5.803. Here, you must provide the file name CA certificate ca.crt, OpenVPN server public key server/geekandnix.crt, OpenVPN server private key server/geekandnix.key, and the DHPARAM certificate dh.pem.
ca ca.crt
cert server/geekandnix.crt
key server/geekandnix.key # This file should be kept secret
dh dh.pem
4. Now, change the default network topology for clients to subnet. Then, disable the DCO (Data Channel Offload) function in your OpenVPN configuration.
topology subnet
disable-dco
5. Configure the IP address for VPN clients in the following line. In this case, I will leave the configuration default, and VPN clients should get the local IP address 10.8.0.0/24.
server 10.8.0.0 255.255.0.06. Make the IP address for clients persists and stored in file ipp.txt via the ifconfig-pool-persist option.
ifconfig-pool-persist ipp.txt7. Enable the following configuration to set up OpenVPN as default gateway for clients. This means all client connections such as web browser and DNS requests, will go through the OpenVPN server.
push "redirect-gateway def1 bypass-dhcp"8. Uncomment the following options to set up the default name server for clients. In this case, I will use Cloudflare public DNS 1.1.1.1 and Google DNS 8.8.8.8.
push "dhcp-option DNS 1.1.1.1"
push "dhcp-option DNS 8.8.8.8"
9. Uncomment the tls-auth option below to enable the HMAC firewall with the ta.key file in your OpenVPN server.
The tls-auth option will protect you from DoS attacks and UDP port flooding. On the OpenVPN server, the tls-auth must be 0, while on the client must be 1.
tls-auth ta.key 010. Lastly, replace the cipher option with the auth SHA256 option below. This will be used for data channel encryption, and both the OpenVPN server and clients must have the same option.
;cipher
auth SHA256
When done, save the file and exit the editor.
Managing OpenVPN service on FreeBSD
Now that you’ve configured the OpenVPN server, let’s move on to start and manage the OpenVPN service on the FreeBSD server.
Follow these actions to start and manage the OpenVPN service:
1. To start OpenVPN on FreeBSD, run the following command.
service openvpn start2. Once OpenVPN starts, run the command below to verify the service. If OpenVPN is running, you should get the pid (process ID) of the OpenVPN service.
service openvpn status
3. Now, when you need to stop and terminate OpenVPN, run the command below.
service openvpn stop4. Lastly, run the command below to restart OpenVPN when needed. For example, after editing the OpenVPN configuration geekandnix.conf file.
service openvpn restartSetting up Port Forwarding on FreeBSD
To ensure VPN traffic from clients is routed by the server, you must enable port-forwarding on your FreeBSD server. This can be done through the /etc/rc.conf file to make the OpenVPN server a gateway, then enable the port-forwarding via kernel parameter /etc/sysctl.conf file.
To enable port-forwarding on FreeBSD, execute these tasks:
1. Firstly, run the command below to make your FreeBSD server the default gateway.
sysrc gateway_enable=YES2. Then, run the command below to enable port-forwarding in FreeBSD. You will add the configuration net.inet.ip.forwarding=1 to the /etc/sysctl.conf file.
echo "net.inet.ip.forwarding=1" >> /etc/sysctl.conf3. Finally, run the command below to restart the sysctl service. Through this, you will implement your modification to the /etc/sysctl.conf file without reboot.
service sysctl restart
Setting up routing OpenVPN via PF (Packet Filter) on FreeBSD
After you’ve enabled port-forwarding, let’s move on to set up routing for the OpenVPN server via the pf (Packet Filter) firewall. Implementing routing will ensure clients can connect to the internet and access resources behind the OpenVPN server.
Complete these actions to set up OpenVPN routing via pf (Packet Filter) firewalld on the FreeBSD server:
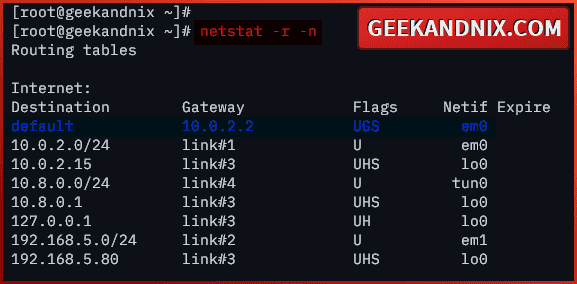
1. At first, run the command below to check the default gateway (internet gateway) on your FreeBSD server. You will be using this as a gateway for your VPN clients.
netstat -r -nIn this case, I have an internet gateway on interface em0.
2. Afterward, edit the default pf configuration /etc/pf.conf using vim.
vim /etc/pf.conf3. Insert the following configuration to the top of the line. In this example, you will create three macros (variables) on pf:
- vpnclients as subnet IP for VPN clients
10.8.0.0/24. - wanint as the default internet gateway
em0. - vpnint as default OpenVPN tun interface
tun0.
# default vpn network
vpnclients = "10.8.0.0/24"

# WAN interface - internet gateway
wanint = "em0"

# default vpn interface
vpnint = "tun0"
4. Add the openvpn service to the udp_services to allow traffic to the OpenVPN server. By default, OpenVPN running on UDP protocol with port 1194.
udp_services = "{ domain, openvpn }"5. Under the set skip on lo, add the configuration below to enable NAT on your FreeBSD server.
In this case, you will enable NAT on the wanint interface em0. All connections from vpnclients 10.8.0.0/24 to the wantint interface.
set skip on lo

# enable NAT on em0 - connections from "10.8.0.0/24"
# will be thrown via em0
nat on $wanint from $vpnclients to any -> $wanint
6. Under the block in option, add the new configuration to allow connections to vpnclients subnet.
block in
pass out all keep state
# alternative: pass out quick

# (optional) you can make this stricter
pass in on $vpnint from any to any
When you’re done, save the file and exit.
7. Next, run the command below to reload pf service and take the effects of your changes.
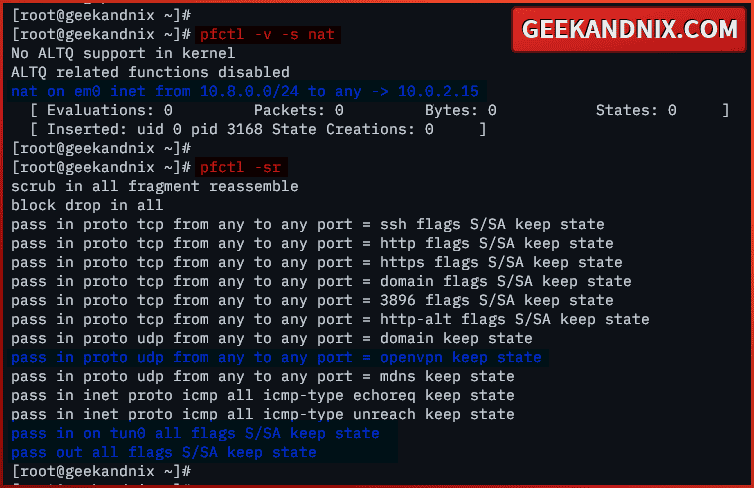
service pf reload8. Lastly, run the following command to verify NAT and the list of enabled rules in pf.
pfctl -v -s nat
pfctl -sr
You should get the following:
- NAT on
em0is enabled and all connections from10.8.0.0/24will be routed throughem0via IP10.0.2.15. - Traffic to
openvpnservice are allowed, as well for thetun0interface.
Creating OpenVPN client configuration
As you’ve now enabled port-forwarding and routing on the OpenVPN server, move on to create a new OpenVPN configuration for the client. This configuration should be distributed to the client, as well as CA and client certificates.
Execute the following actions to create OpenVPN client configuration:
1. First, run the command below to copy the OpenVPN client configuration to /usr/local/etc/openvpn/client/client.ovpn. Then, open it using vim.
cp /usr/local/share/examples/openvpn/sample-config-files/client.conf
/usr/local/etc/openvpn/client/client.ovpn
sudo vim /usr/local/etc/openvpn/client/client.ovpn
2. On the remote option, enter your OpenVPN server IP address followed by the default port 1194.
remote 192.168.5.80 11943. Change the path for client certificates. For clients, you need the CA certificate ca.crt, user public key john.crt, and client private key john.key
ca ca.crt
cert john.crt
key john.key
4. Enable the tls-auth option followed by the ta.key file and the value 1. The tls-auth is used to enable an HMAC firewall that prevents DoS and UDP port flooding.
Remember, the tls-auth on the OpenVPN server should have a value of 0, while on the VPN client, the value should be 1.
;tls-auth
tls-auth ta.key 1
5. Now, replace the cipher option with the auth SHA256 option below. This will be used for data channel encryption, and both the OpenVPN server and client should have the same algorithm.
;cipher
auth SHA256
When done, save and exit the file.
6. Lastly, move to the /usr/local/etc/openvpn directory and run the tar command below to compress the client directory to the john.tar.gz file. This will make clients easier to download OpenVPN configuration as a single file.
cd /usr/local/etc/openvpn
tar -czvf john.tar.gz client
Connecting to OpenVPN server from client computers
Now it’s time to verify your OpenVPN server installation by connecting from the client computer.
Here, you will learn how to connect to the OpenVPN server from both Windows and Linux client computers. But before that, you will download OpenVPN certificates and configuration to the local computer.
Downloading OpenVPN client configuration
Before connecting to the OpenVPN server, you must download the client configuration and certificates john.tar.gz file. In this case, I will download the VPN client configuration john.tar.gz with the scp command.
1. On your client computer, run the scp command below to download the file /usr/local/etc/openvpn/john.tar.gz from the OpenVPN server.
scp root@server-ip://usr/local/etc/openvpn/john.tar.gz .Once downloaded, extract the file john.tar.gz. Your VPN client configuration will be available in the client directory.

Connecting to OpenVPN from a Windows computer
If you’re using a Windows client, navigate through these actions to connect to OpenVPN via the OpenVPN GUI application:
1. Firstly, download the OpenVPN GUI application for Windows and install it. In Windows 10, the default installation folder should be located in the C:\Program Files\OpenVPN folder.
2. Then, copy VPN client certificates and configuration client.ovpn to the C:\Program Files\OpenVPN\config folder.
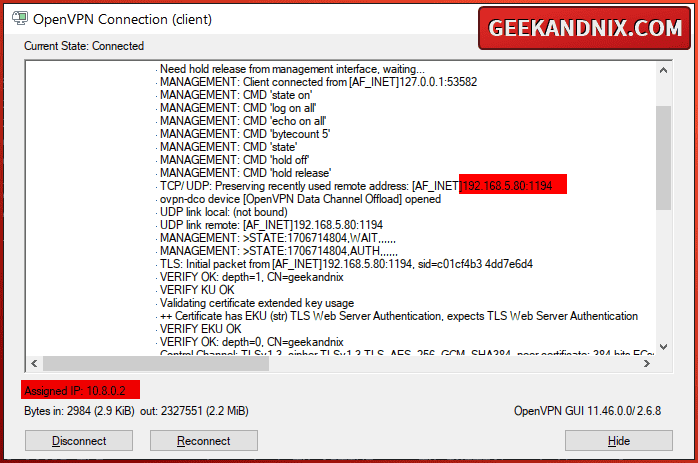
3. Lastly, open the OpenVPN GUI application and you should see the VPN icon on the taskbar. Right-click on the icon and select Connect.
Here, you can see the Windows client gets local IP address 10.8.0.2 from the OpenVPN server.
Connecting to the OpenVPN server from a Linux computer
For Linux desktop users, execute the following actions to connect to the OpenVPN server via NetworkManager:
1. Run the command below to install the openvpn and network-manager-openvpn-gnome packages.
sudo apt install -y openvpn network-manager-openvpn-gnome2. Once installation completes, open the NetworkManager and import the client configuration client.ovpn.
3. You can now connect to the OpenVPN server.
Connecting to OpenVPN via terminal
To connect to OpenVPN via the terminal, follow these actions below:
1. To connect to the OpenVPN server from the terminal, run the openvpn command below with sudo/root privileges.
sudo openvpn --config client.conf2. During the process, you should get the output like the following – Once connected, you should see a message at the bottom initialization complete.

How do I know if the VPN is working?
To verify if OpenVPN is working or not, you can utilize the tcpdump command to intercept the tun0 interface on your FreeBSD.
Navigate through these steps to ensure that your OpenVPN installation is working:
1. First, run the tcpdump command below on your OpenVPN server to intercept the tun0 interface.
tcpdump -i tun02. Next, move to the client computer and run the ping command below to verify your connection. If your OpenVPN installation is successful, you should get the ICMP reply from the target server.
ping 1.1.1.1
ping 10.8.0.1
3. Afterward, go back to the OpenVPN server terminal where tcpdump is running, and you should get the following:
In the following output, you can see the VPN client 10.8.0.2 successfully sent the ping or ICMP request to 1.1.1.1.

Also in the following, you can see the VPN client can connect to the VPN’s local IP address 10.8.0.1.

Conclusion
Fantastic work! If you have followed so far, you have installed OpenVPN on your FreeBSD 14 server. You’ve configured the OpenVPN server with pf (Packet Filter) firewall and learned how to connect to OpenVPN from a Windows client via OpenVPN GUI, and from a Linux desktop via NetworkManager and Terminal.
From here, you can try to implement client-based rules and policies for OpenVPN users or implement alternative authentication methods using username/password.


