How to Install and Use PostgreSQL on FreeBSD 14
In this article, I will teach you how to install and use PostgreSQL on FreeBSD 14 server. My purpose is not only to show you the PostgreSQL installation but also to teach you basic configuration and operations related to PostgreSQL.
So here you will also learn how to enable password authentication in PostgreSQL, set up a password for user postgres, then learn basic PostgreSQL queries for creating users, databases, tables, and basic CRUD (Create, Read, Update, and Delete) operations.
Without further ado, let’s get started!
Prerequisites
Before you continue, ensure you have access to:
- A FreeBSD 14 server.
Read more: FreeBSD 14: Step-by-Step Installation (With Screenshot) - A root user or non-root user with sudo privileges.
Installing PostgreSQL on FreeBSD
On FreeBSD, you can easily install PostgreSQL via package index or repository. As I write this, the FreeBSD 14 repository provides multiple versions of the PostgreSQL server, including PostgreSQL 16, 15, and 14.
Follow these steps to install PostgreSQL on your FreeBSD system:
1. To get started, update your FreeBSD package index using the following command:
pkg update2. Now run the pkg command below to install PostgreSQL and input y to proceed with the installation.
# Installing PostgreSQL 16
pkg install postgresql16-server postgresql16-client postgresql16-contrib

# Installing PostgreSQL 15
pkg install postgresql15-server postgresql15-client postgresql15-contrib

# Installing PostgreSQL 14
pkg install postgresql14-server postgresql14-client postgresql14-contrib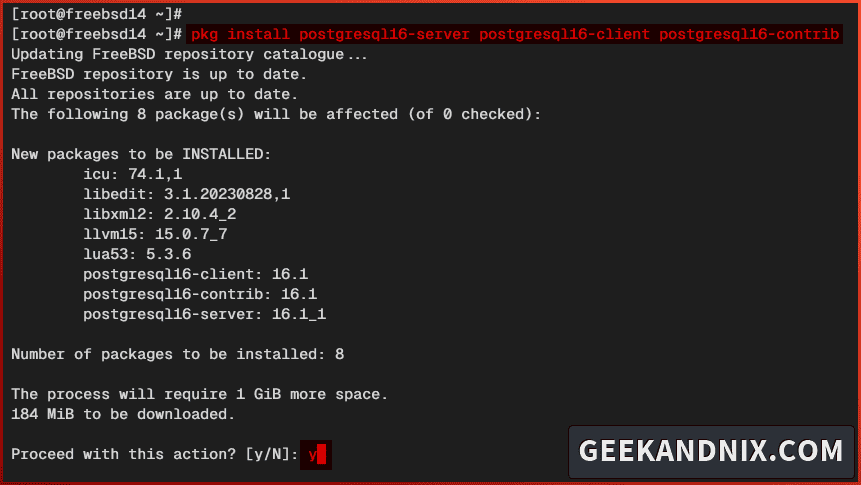
3. After you’ve installed PostgreSQL, open the /etc/login.conf using vim.
vim /etc/login.confAdd the following configuration to the bottom of the line to create a new login class for user postgres.
postgres:\
        :lang=en_US.UTF-8:\
        :setenv=LC_COLLATE=C:\
        :tc=default:
Save and exit the file when finished.
4. Now run the cap_mkdb command below to take effect by regenerating the login class database.
cap_mkdb /etc/login.conf5. Then, run the following command to enable the postgressql service and set up the default login class postgres for your PostgreSQL server.
sysrc postgresql_enable="YES"
sysrc postgresql_login_class="postgres"
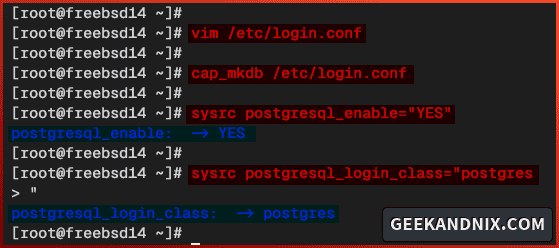
6. Next, run the command below to ensure that PostgreSQL is enabled and verify the default login class.
sysrc -a | grep postgresqlIf PostgreSQL is enabled, you will see the following output. Also, you can see postgres is the default PostgreSQL login class.
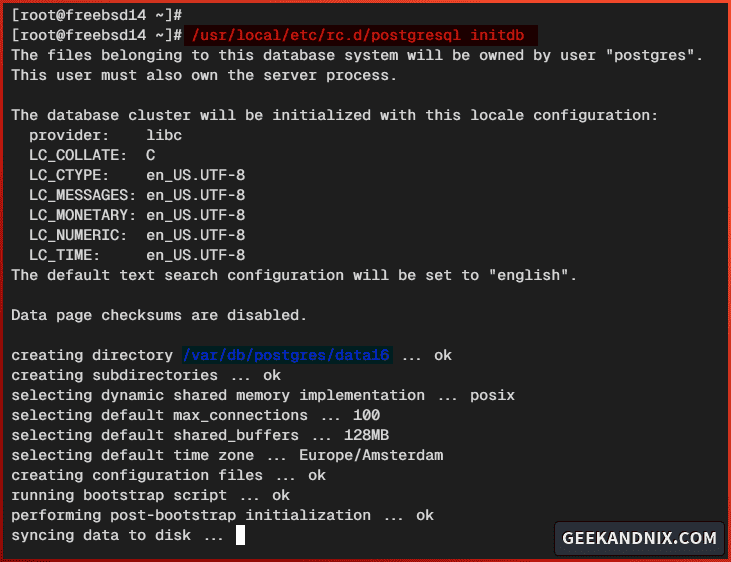
7. Lastly, run the command below to initialize the PostgreSQL database and configuration. The default data directory for PostgreSQL should be located in the /var/db/postgres/data16 directory.
/usr/local/etc/rc.d/postgresql initdbYou’ll encounter the following output:
Managing PostgreSQL Service on FreeBSD
After you’ve installed and initialized the PostgreSQL database and data directory, let’s start the postgresql service by performing the following tasks:
1. Run the command below to start the postgresql service.
service postgresql start2. Once postgresql starts, run the following command to verify it. This will show you the PID (Process ID) of the PostgreSQL service.
service postgresql status
3. When you need to stop the postgressql service, use the command below:
service postgresql stop4. To restart the postgresql, run the following command. Execute this command after making changes to the PostgreSQL server configuration.
service postgresql restart5. Lastly, run the sockstat command below to verify port 5432, which is the default PostgreSQL server port.
sockstat -4 | grep 5432Here’s the similar output that will be displayed:

PostgreSQL Configuration Files and Directory
Now that you’ve PostgreSQL running, take a look at some PostgreSQL configuration files and directories below:
- /var/db/postgres/data16: This is the default data directory for the PostgreSQL server on FreeBSD. The
data16directory name may be different from yours, depending on the PostgreSQL version. - /var/db/postgres/data16/postgresql.conf: The main configuration for the PostgreSQL server. This includes such as listen address, port, and max_connections.
- /var/db/postgres/data16/pg_hba.conf: The default authentication methods for PostgreSQL users. For local users, you can use the
peerortrustauthentication method. As for remote users, you can use password authenticationscram-sha-256.
Setting Up Password for PostgreSQL User
Setting up passwords for user postgres is important to prevent unauthorized access to your database. Complete the following actions to set up password for the postgres user:
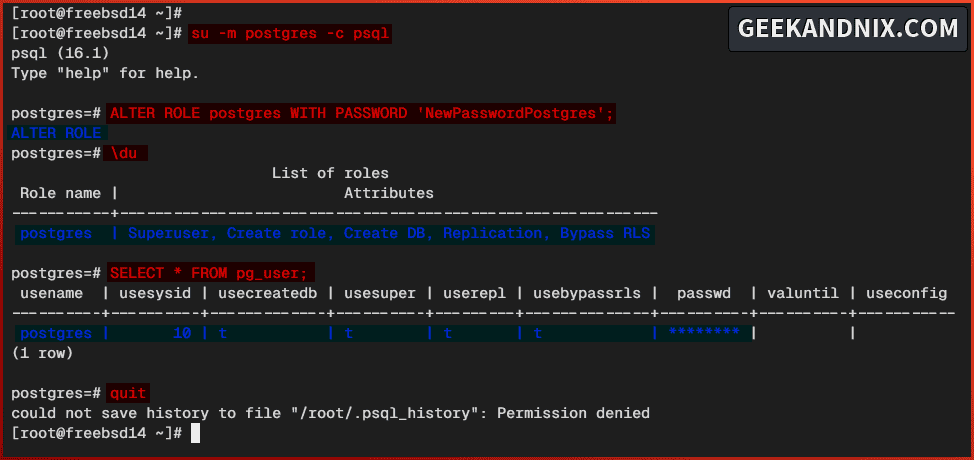
1. First, run the command below to access the psql or PostgreSQL interactive shell. The psql is a command line interface for the PostgreSQL server.
su -m postgres -c psqlOnce connected, your prompt will become such as postgres=>, which confirms that you’re connected to the database postgres.
2. Now run the ALTER ROLE query below to create a password for the default user postgres. Be sure to change the password NewPasswordPostgres in this query.
ALTER ROLE postgres WITH PASSWORD 'NewPasswordPostgres';3. Then run the following query to check available users in PostgreSQL. You’ll be presented with the default postgres user in your PostgreSQL server.
# display list users
\du

# display list users from pg_user
SELECT * FROM pg_user;
4. Type \q to exit from the PostgreSQL interactive shell.
Setting Up Password Authentication in PostgreSQL
After you’ve configured the password for postgres user, let’s enable and verify password authentication in your PostgreSQL server.
Here’s how to enable and verify password authentication in PostgreSQL:
1. Open the default PostgreSQL configuration /var/db/postgres/data16/postgresql.conf using vim.
vim /var/db/postgres/data16/postgresql.confUncomment the password_encryption = scram-sha-256 parameter to enable password authentication via scram-sha-256.
password_encryption = scram-sha-256Save and exit the file when finished.
2. Now open the /var/db/postgres/data16/pg_hba.conf configuration using `vim.
vim /var/db/postgres/data16/pg_hba.confChange the default authentication for localhost or 127.0.0.1 to scram-sha-256.
# IPv4 local connections:
host    all             all             127.0.0.1/32            scram-sha-256
# IPv6 local connections:
host    all             all             ::1/128                 scram-sha-256
Save the file and exit the editor when you’re done.
3. Next, run the following service command to restart the postgresql service and take effects.
service postgresql restart4. With the PostgreSQL authentication enabled, let’s verify your configuration.
Run the following command to log in to PostgreSQL via user postgres. Be sure to input your postgres password when prompted.
su -m postgres -c "psql -h localhost -U postgres"5. Once logged in, execute the \conninfo query below to verify your connection status to PostgreSQL.
\conninfoThe output shows that you’ve connected to PostgreSQL server localhost to the database postgres via user postgres with password authentication.

Creating a User in PostgreSQL
Before proceeding, ensure you’re still in the psql interactive shell. Because you will learn how to create a user in the PostgreSQL server.
Proceed with the following actions to PostgreSQL users for your applications:
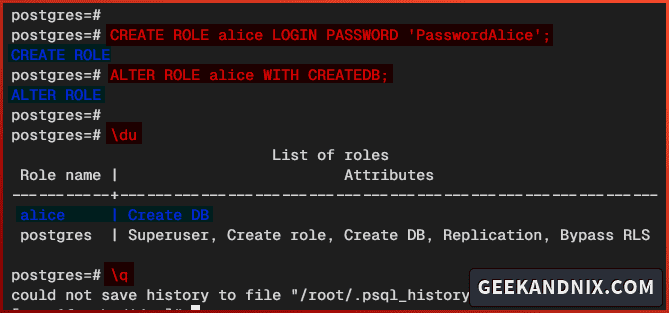
1. Run the CREATE ROLE query below to create a new user in PostgreSQL. In this case, you’ll create a new user alice with the password PasswordAlice.
CREATE ROLE alice LOGIN PASSWORD 'PasswordAlice';2. Now run the following query to permit user alice to create a database with the CREATEDB attribute.
ALTER ROLE alice WITH CREATEDB;3. Next, run the \du or display user query below to verify the list of users on PostgreSQL, the exit from the psql.
# display list users
\du

# exit from psql shell
\q
The output below confirms that you’ve created a user alice with the privilege CREATEDB.
4. Next, run the command below to connect to the PostgreSQL as the new user alice. Input your password when prompted.
su -m postgres -c "psql -h localhost -d postgres -U alice"5. Once logged in, verify your connection using the following query.
\conninfoThe output below reveals that you’ve connected to the database postgres as a user alice.

Creating Database in PostgreSQL
Now that you’ve created a PostgreSQL user, let’s create new databases in the PostgreSQL server.
Take these actions to create new databases in PostgreSQL and learn how to connect and navigate to your database:
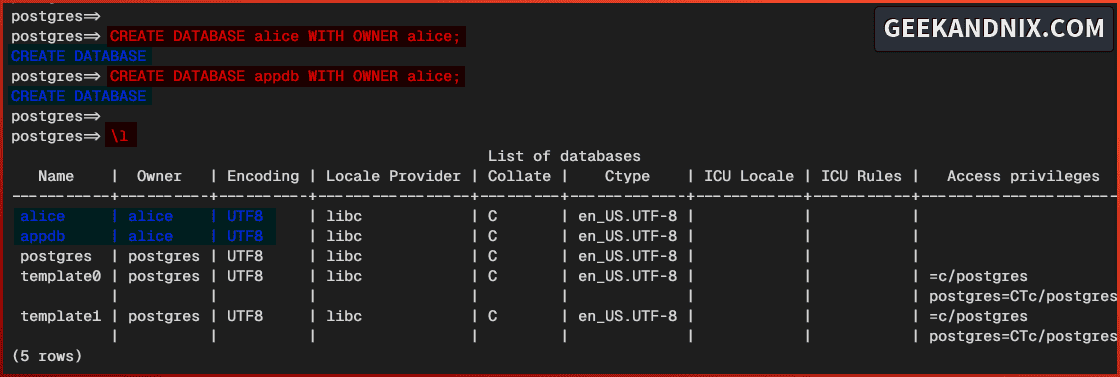
1. Run the CREATE DATABASE query below to create new databases alice and appdb in PostgreSQL. In this example, both databases will have the same owner user alice.
CREATE DATABASE alice WITH OWNER alice;
CREATE DATABASE appdb WITH OWNER alice;
2. Once you’ve created databases, run the \l or list query below to show the list of databases on PostgreSQL. You should see databases alice and appdb is available.
3. Now type \q to quit and exit from the psql.
4. Next, run the command below to connect to the PostgreSQL server as user alice to the specific database alice. Input the password for user alice when asked.
su -m postgres -c "psql -h localhost -d alice -U alice"5. Once connected, verify your connection using the following query.
\conninfoAs seen in the following, you’re connected to the database alice with the PostgreSQL user alice.

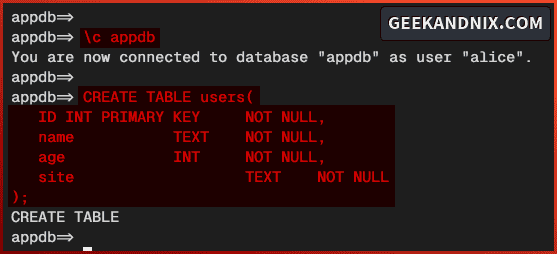
6. Lastly, you can use the \c DBNAME or \connect DBNAME query to switch between databases in PostgreSQL.
# connect to database appdb
\connect appdb

# or use this shorter query
\c appdb
In the psql prompt, you can see your current working databases – appdb=> means that you’re working in the appdb database, and alice=> means you’re working in the database alice.

Basic CRUD (Create, Read, Update, and Delete) Operations in PostgreSQL
Having the PostgreSQL user and database ready, let’s learn basic CRUD (Create, Read, Update, and Delete) operations in PostgreSQL through these tasks:
Before you start, be sure you’re connected to the appdb database. Or you can execute the query: \c appdb to connect to the appdb.
Creating Table in PostgreSQL
1. To create a table in PostgreSQL, run the CREATE TABLE query below. In this example, you will create a new table users with columns id, name, age, and site.
CREATE TABLE users(
   ID INT PRIMARY KEY     NOT NULL,
   name           TEXT    NOT NULL,
   age            INT     NOT NULL,
   site          TEXT    NOT NULL
);
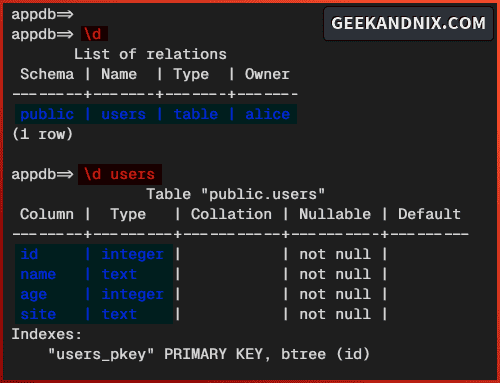
2. Now run the \d query below to show tables in your current database. Or \d TABLENAME query to show the list columns in your table.
# listing tables in database PostgreSQL
\d

# describe table users - listing columns
\d users
Here you can see the table users is available on the database appdb. And within table users, you can see columns id, name, age, and site.
Insert and Retrieve Data in PostgreSQL
1. Run the INSERT query below to add new data to the table users. In this example, you will add two different data separated with commas.
INSERT INTO users(id, name, age, site)
VALUES (1, 'david', 18, 'blog.david.io'), (2, 'joana', 20, 'blog.joana.com');
2. After adding new data, run the SELECT query below to retrieve your data from table users.
SELECT * FROM users;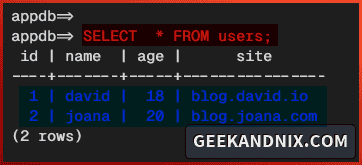
3. Additionally, you can also specify the column name within your SELECT query like his:
SELECT name, site FROM users;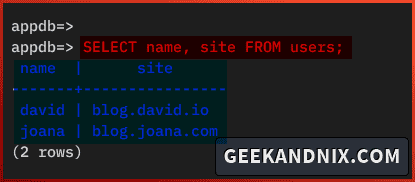
Update and Delete Data in PostgreSQL
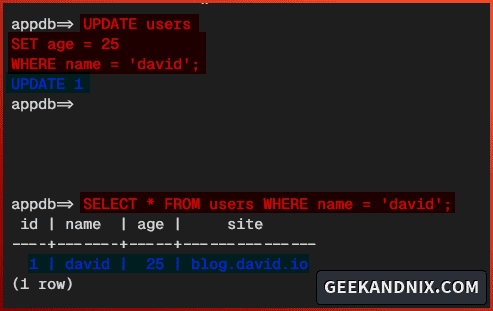
1. Run the UPDATE query below to update the current value in the column age for the name david to 25. The WHERE filter allows you to specify target data to a specific column.
UPDATE users
SET age = 25
WHERE name = 'david';
2. Now run the SELECT query below to verify data for the name david.
SELECT * FROM users WHERE name = 'david';As seen below, the age column has been updated to 25.
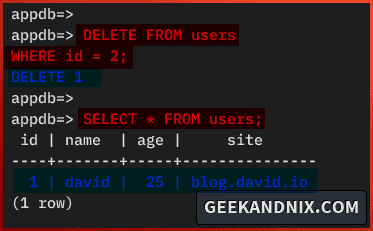
3. Lastly, run the DELETE FROM query below to remove/delete data for a specific row.
DELETE FROM users
WHERE id = 2;
If the process was successful, you should get an output DELETE 1. While unsuccessful operation will show you an output DELETE 0.
Uninstalling PostgreSQL from FreeBSD
If you want to remove/uninstall PostgreSQL, follow these actions:
1. Before removing PostgreSQL, run the command below to stop and disable the postgresql service.
service postgresql stop
sysrc -x postgresql_enable
2. Now remove/uninstall PostgreSQL using the following pkg command.
pkg delete postgresql16-server postgresql16-client postgresql16-contrib
pkg autoremove
Conclusion
In this guide, you installed a PostgreSQL database server on FreeBSD 14 and enabled password authentication for PostgreSQL. Moreover, you have configured a password for the default postgres user.
In addition to that, you also learned the basic operations in PostgreSQL for creating users, databases, and tables. Also some basic PostgreSQL queries for CRUD (Create, Read, Update, and Delete) operations.
With the PostgreSQL installed, you can now develop or deploy your applications. You can use PHP, Java, or Node.js to develop applications alongside the PostgreSQL server.
