How to Install and Use Samba on Ubuntu 24.04/22.04 Server
Samba is a solution for file-sharing over a network across different operating systems. With Samba, you can share files, printers, and resources between different operating systems such as Windows, Linux like Ubuntu, and macOS.
What you will learn here is:
- How to install and configure Samba on Ubuntu 24.04 server “Noble Numbat”.
- Setting up shared folders for multiple scenarios.
- Securing Samba with UFW (uncomplicated Firewall).
- How to connect to Samba share from Linux and Windows clients.
Prerequisites
Before proceeding, ensure you’re equipped with:
- An Ubuntu 24.04 server.
See more: How to Install Ubuntu 24.04 LTS Server - A non-root user with
sudoprivileges. - A client machine – Linux or Windows client.
Step 1 – Installing Samba on Ubuntu server
Samba is available on most Linux distributions, you can install it via package manager. To install Samba, follow these steps:
1. First, run the following command to update the Ubuntu repository and get the latest package index.
sudo apt update
2. Install the samba, acl, and smbclient packages via apt install command below. Type Y and press ENTER to proceed with the installation.
sudo apt install samba acl smbclient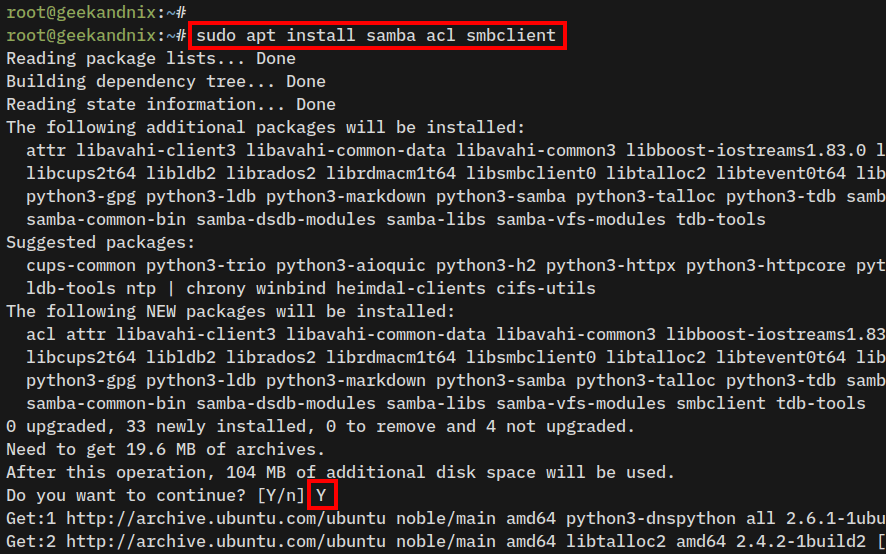
3. After you’ve installed Samba, the smbd service will start automatically on your Ubuntu machine. Verify it using the command below.
sudo systemctl status smbdIf the smbd service is running, the output should be active (running).

4. Lastly, you can also check the Samba version on your Ubuntu system using the following command.
samba -VIn the following output, you can see Samba v4.15 is installed.

Step 2 – Managing Samba service on Ubuntu
Now that you’ve installed Samba, the new service smbd will be available on your system. Manage Samba or smbd service via the systemctl utility by following these steps:
1. To start the smbd service, run the systemctl command below.
sudo systemctl start smbd2. If you need to stop samba, use the following command.
sudo systemctl stop smbd3. Now, restart Samba using the command below whenever you make changes to Samba configuration files.
sudo systemctl restart smbd4. Next, verify the samba service to ensure that the service is running.
You can see the output active (running), which confirms Samba is running. Also, you can see an output enabled, which means samba will start at system boot.
sudo systemctl status smbd5. Lastly, if Samba is not yet enabled on your Ubuntu system, enable it using the following command.
sudo systemctl enable smbdStep 3 – Configuring Samba shared folders on Ubuntu
In this section, you will configure the Samba server with the following:
- Basic configuration: Editing Samba configuration and setting up the default workgroup and bind interface to run Samba.
- Creating a shared folder for a specific group
- Creating a shared folder for specific user
- Creating a public shared folder for anonymous access
Let’s do this.
Samba Basic Configuration
First, you will configure Samba by modifying the file /etc/samba/smb.conf, then set up the default workgroup and bind interface for running Samba.
1. Open the default samba configuration /etc/samba/smb.conf using vim.
sudo vim /etc/samba/smb.conf2. Within the [global] directive, change the default workgroup with your workgroup name. On default Windows installation, the workgroup name is WORKGROUP.
[global]
workgroup = WORKGROUP
3. Now, uncomment the interfaces parameter and change the value with your network interface, for example here ens6. Then, uncomment the bind interfaces only parameter and change the value to yes. With this, you will run Samba on a specific target interface.
interfaces = ens6
bind interfaces only = yes
Save the file and exit the editor.
Creating shared folder for specific group
In this section, you will create a samba shared folder /srv/samba/shared/ that is only accessible for specific group samba, and anonymous access will be denied.
Follow these steps to create a Samba shared folder for a specific group:
1. First, create a new group using the following command. In this example, you will create a group samba.
sudo groupadd samba2. Now, run the command below to create a new shared folder /srv/samba/shared and allow read, write, and execute operations for group samba via ACLs (Access Control Lists).
sudo mkdir -p /srv/samba/shared
sudo setfacl -R -m "g:samba:rwx" /srv/samba/shared/
3. Next, open the Samba configuration /etc/samba/smb.conf using your preferred editor and copy the following configuration.
[Shared]
comment = Only users within the samba group can access
path = /srv/samba/shared/
browseable = yes
guest ok = no
writable = yes
valid users = @samba
Detailed parameters:
- path: The path of the target shared folder.
- browsable: Enable clients to browse the shared folder using the file manager.
- guest ok: When set to
no, means only authenticated users can access the shared folder. - writable: Enable write operation to the shared folder.
- valid users: Only users or groups listed in this parameter are allowed to access the shared folder.
4. Lastly, run the command below to add your user to the samba group. Then, add your user to the Samba password database file. Be sure to enter a new samba password when asked.
In this example, I will add user arvd to samba group and Samba password database.
# adding user arvd to samba group
sudo usermod -aG samba arvd

# adding user arvd to samba password database file
sudo smbpasswd -a arvd
Creating shared folder for specific user
Now you will create a Samba shared folder for a specific user. In this case, you will create a shared folder /srv/samba/david for the specific user david. Only user david will be allowed to access the shared folder.
Complete these tasks to create a Samba shared folder for a specific user:
1. First, create a new Linux user using the following command. Input your password and repeat when prompted, then input your information details and type Y to confirm.
In this case, you’ll create a new user david for Samba.
sudo adduser david2. Then, run the smbpasswd command below to add user david to the local smbpasswd file. Input a new password for Samba and repeat.
sudo smbpasswd -a david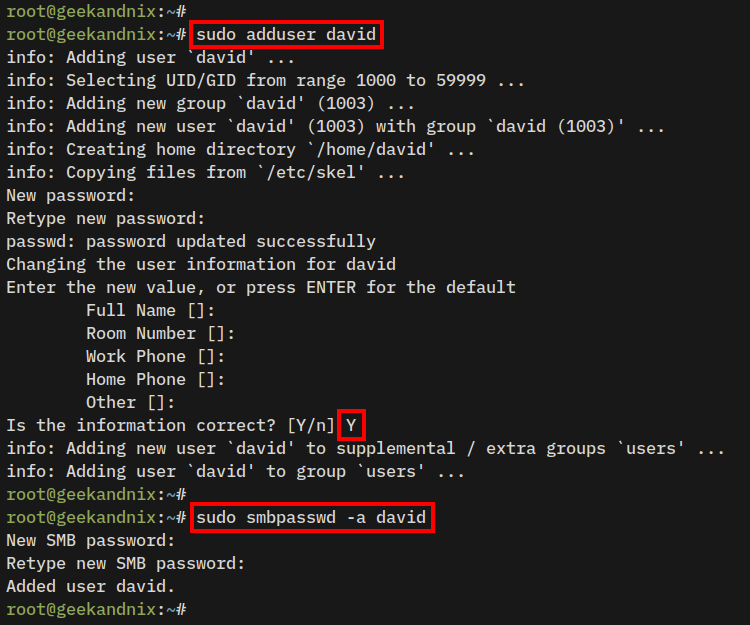
3. Now that you’ve created and added Linux user david to the smbpasswd file.
Run the command below to create a shared folder /srv/samba/david and allow user david to read, write, and execute via Access Control Lists (ACLs).
sudo mkdir -p /srv/samba/david
sudo setfacl -R -m "u:david:rwx" /srv/samba/david/
4. Lastly, add the following configuration to the samba configuration file /etc/samba/smb.conf. With this, you will create a new shared folder David for a specific user david.
[David]
comment = Only user david can access - read write and exec
path = /srv/samba/david/
browseable = yes
writable = yes
read only = no
guest ok = no
valid users = david
Here you use an additional parameter read only that determines write permission to the shared folder:
- The value
noallows write permission for users. - The value
yesdisable write permission for users.
Creating a Public shared folder for anonymous access
In the following section, you will the Public shared folder that allows anonymous access into it with write access also enabled.
NOTE: be cautious about this, you may limit the write access for anonymous users for security.
Proceed with the following to create a Samba shared folder for anonymous access:
1. Create a new shared folder /srv/samba/public/ and change the ownership to nobody and nogroup.
sudo mkdir -p /srv/samba/public/
sudo chown -R nobody:nogroup /srv/samba/public/
2. Now, run the command below to allow read, write, and execute permission for user nobody to the /srv/samba/public/ directory.
sudo setfacl -R -m "u:nobody:rwx" /srv/samba/public/3. Lastly, add the following configuration to the xxx file to create a Public shared folder.
[Public]
comment = Public users can access and write
path = /srv/samba/public/
browseable = yes
guest ok = yes
writable = yes
Detailed parameters:
guest ok = yes: Allows anonymous access without authentication.writable = yes: Gives anonymous write permission to thePublicshared folder.
Checking Samba server configuration
Now that you’ve created multiple shared folders for different scenarios, it’s time to apply your changes to Samba. But before that, ensure that you’ve proper Samba configuration to avoid any errors.
Execute the following process to check and verify the Samba Server configuration, then restart the smbd service:
1. Before restarting the smbd service, run the command below to verify your samba configuration.
sudo testparmIf you have proper samba configuration, the output you should receive is Loaded services file OK.
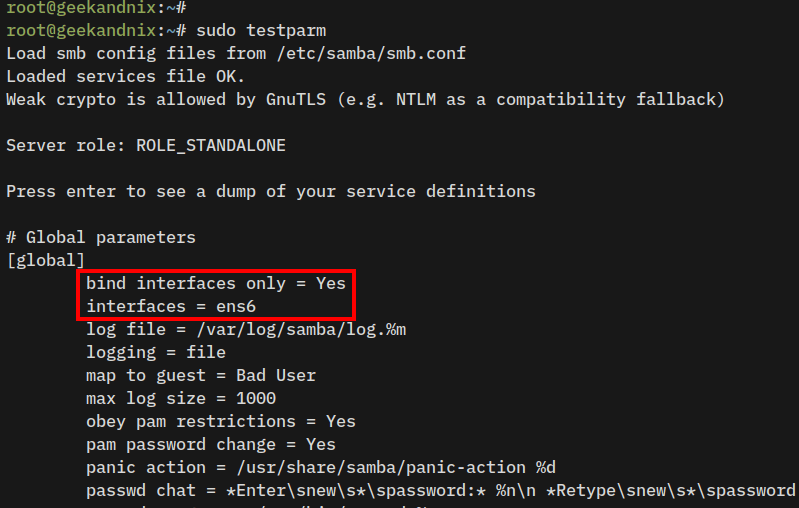
Then, hit ENTER to ensure that your changes are loaded.
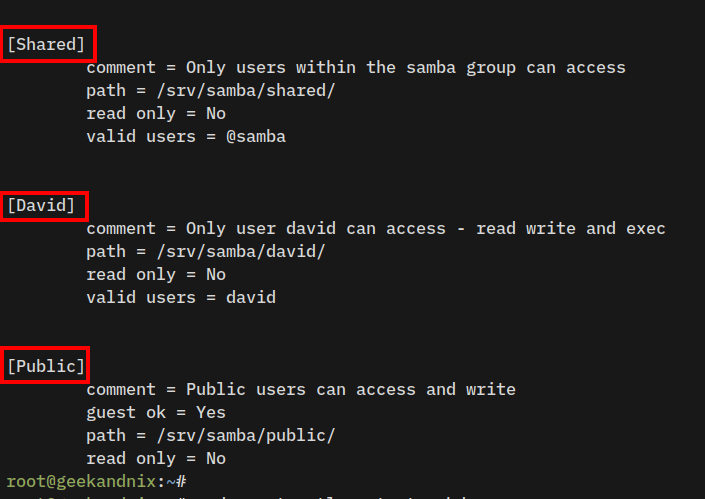
2. Now that you’ve confirmed your proper samba configuration, restart the smbd service and apply your changes using the command below.
sudo systemctl restart smbdStep 4 – Adding Samba user and group on Ubuntu
At this point, your Samba server is running. Before going further, you will learn how to add Samba users and groups.
Follow these steps to add Samba user and group:
1. First of all, you must add Linux users to your Samba server using the command below. Input your password and detailed information about your new user, then click Y to proceed.
sudo adduser newuser2. Secondly, you must add your Linux user to the sambapasswd file via the smbpasswd command below. Input your password for Samba authentication and repeat.
sudo smbpasswd -a newuser3. Additionally, if you need a group for samba users, create it using the command below.
sudo groupadd newgroup4. Lastly, add your user to the target group via the usermod command below.
sudo usermod -aG newgroup newuserStep 5 – Securing Samba with UFW
In the following section, you will secure Samba by enabling the samba application profile on UFW (Uncomplicated Firewall).
See more: Master the UFW Firewall on Ubuntu: 17 Practical Examples
1. Run the ufw command below to enable the Samba application profile and allow traffic to the Samba server.
sudo ufw allow Samba2. Now, verify the list-enabled profiles and rules using the following command. Ensure the Samba profile is available on UFW.
sudo ufw status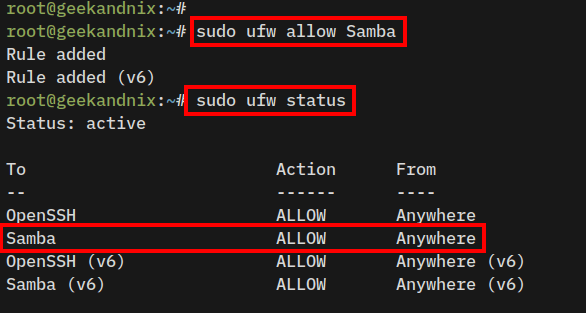
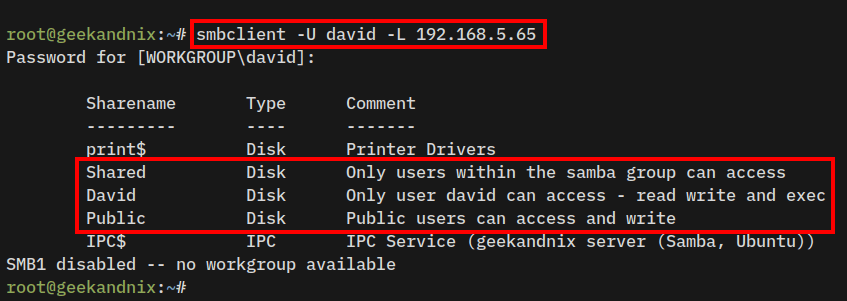
3. Lastly, run the smbclient command below to ensure the connection to the Samba server is allowed. Input the password for your Samba user.
smbclient -U david -L 192.168.5.65When successful, you should see the list of available shared directories on Samba.
Step 6 – Connecting to Samba shared folder
Now that you’ve allowed Samba traffic, you will be connecting to the Samba shared folder from the Windows and Linux client.
Connecting to Samba from Windows client
To connect to the Samba server from a Windows machine, complete the following steps:
1. Open the Windows Explorer, click Network, then click the information on top to enable Network discovery and file sharing.

2. Enter the samba server IP address \\192.168.5.65 on the address bar within Windows Explorer.
If the operation is successful, you should see the list of shared directories on your Samba server.

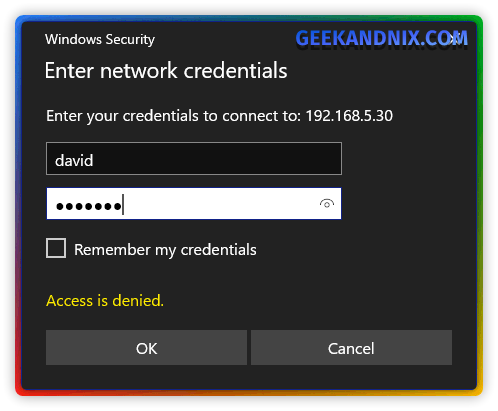
3. Click on the shared folder that you want to access, and you will be prompted for Samba authentication.
Input your Samba username and password, then click OK to confirm.
4. You can now try uploading files to the Samba server by copy-paste normally from Windows Explorer.

5. Additionally, you can access Samba and map the shared folder by running the command below via CMD or Powershell.
In this case, you will map the shared folder David to the drive S:.
net use S: \\192.168.5.30\David /user:david passwordIf successful, you should get the output The command completed successfully..

Tips: If you’re running a VPN on your Windows machine, disconnect first to ensure the connection to the Samba server is successful. In my test, I’m unable to connect to Samba via the local network when my VPN is active.
Connecting to Samba from Linux using Thunar
For XFCE users, you can connect to Samba through Thunar. Make sure that you have installed samba on your machine. Follow these steps to connect to Samba using Thunar:
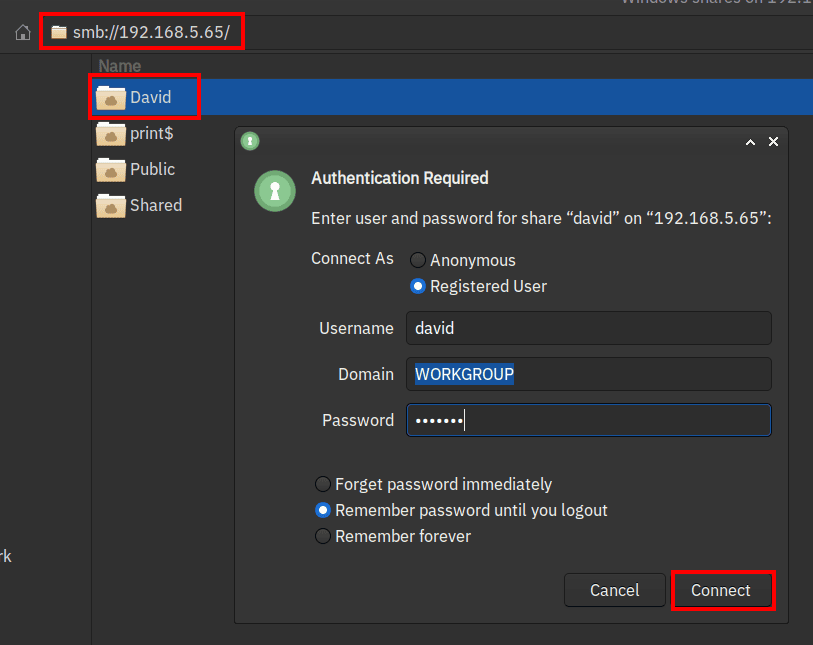
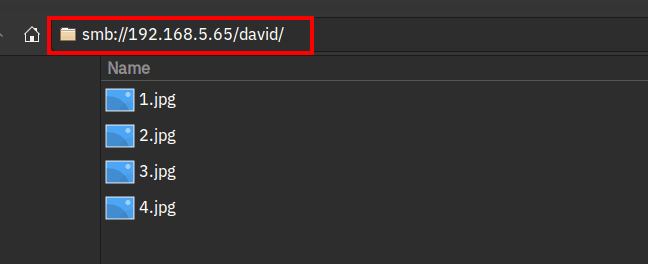
1. Open Thunar, click the Browse Network, type the Samba server address such as smb://192.168.5.65, and then press ENTER. You will see Samba shared directories on your Thunar window.
2. Now click on your shared folder and you will be prompted for Samba authentication. Select the option Registered User, input your samba user and password, then click Connect.
3. Once connected, you can upload files to your Samba shared directory.
Connecting to Samba from Linux client via Nautilus
For Linux clients, it will depend on your current desktop environment. The following example will be using the Nautilus file manager.
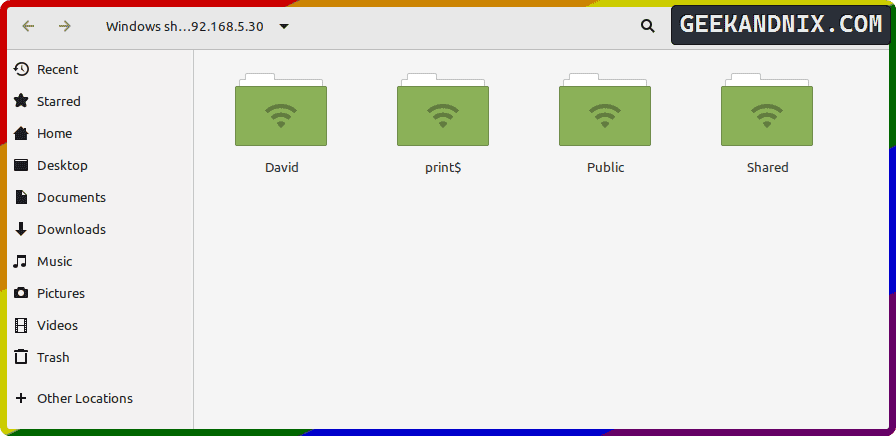
1. Open the Nautilus file manager, click the Other Locations menu, then input your samba address smb://192.168.5.30 and click Connect.

2. Once connected, you should see the list of shared directories available on Samba.
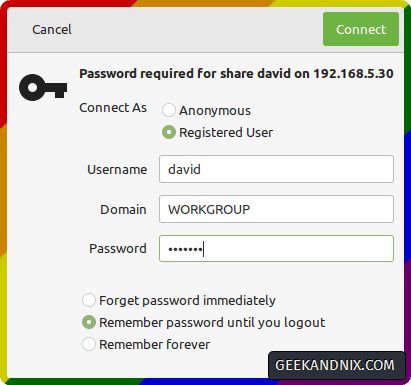
3. Click on the target shared folder and you’ll be prompted with Samba authentication.
Input your Samba username, and password, and click Connect to confirm.
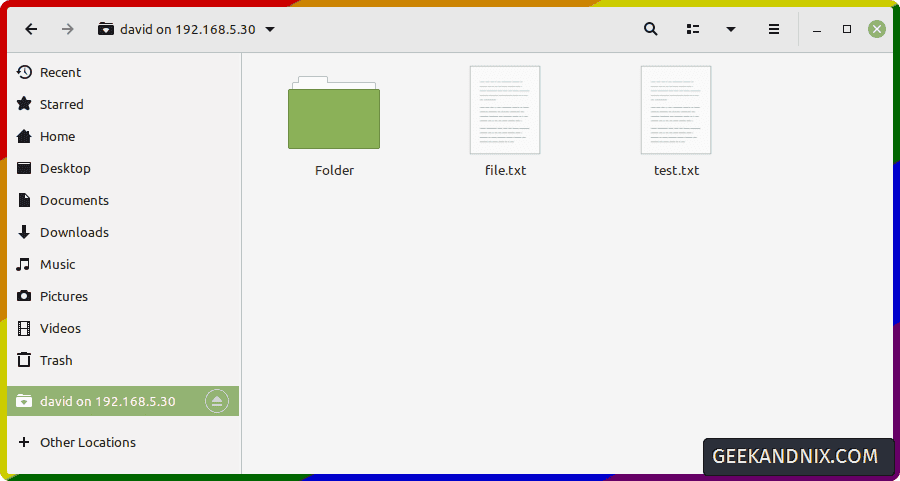
4. If your connection is successful, you will be presented with a Samba shared folder. You can now copy/paste files easily to the Samba server using File Manager.
Step 7 – monitoring Samba via command line
To monitor Samba activity, run the following command on your Samba server.
smbstatus
In this example, you can see information about samba activities:
- The user david from the host
192.168.5.1is connected throughSMB3_11. - You can see the date when connected (censored).
Conclusion
To conclude, you’ve completed the installation of Samba on the Ubuntu 24.04 server. You’ve also created multip Samba shared folders for different scenarios and secured Samba with UFW (Uncomplicated Firewall). Furthermore, you’ve learned how to connect to Samba shared directory from Windows and Linux clients, and also monitor Samba server activity via smbstatus.
Moving forward, installing Samba as a Printer Server would be a valuable addition to facilitate clients on your internal network department.


