How to Install Redis on Ubuntu 24.04/22.04 Server
Looking for lightweight and scalable caching solution? Use Redis. It is an open-source in-memory data store that can be used as database, cache, streaming engine, and message broker. Follow this guide to install Redis 7 on your Ubuntu 24.04 server in just a few steps.
Using FreeBSD? Check our new guide How to Install and Secure Redis 7 on FreeBSD 14 (with ACL).
Prerequisites
To follow along with this demonstration, ensure that you have the following:
- A Linux server running Ubuntu 24.04.
See also: How to install Ubuntu 24.04 server (step-by-step) - A non-root user with root privileges.
Installing Redis on Ubuntu
The new Ubuntu 24.04 “Noble Numbat” shipped with the Redis 7. This allows you to install Redis easily using the APT package manager.
Now, follow these steps to install Redis 7 on your Ubuntu system:
1. First, update and refresh your package index using the following command.
sudo apt update
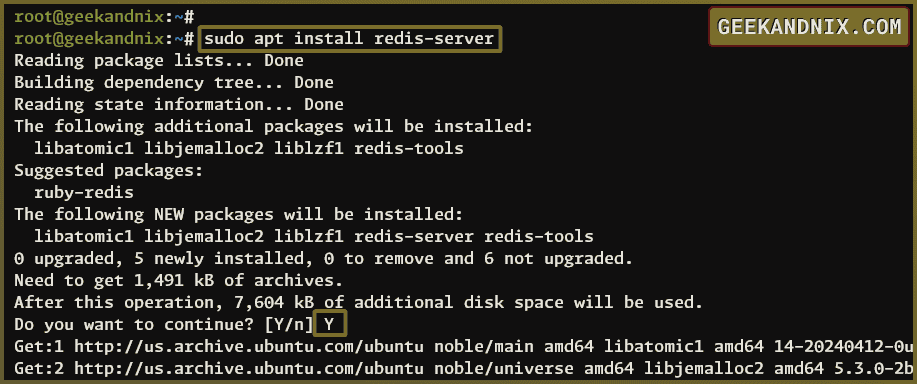
2. After that, install Redis using the apt install command below. Type y to proceed with the confirmation and press ENTER.
sudo apt install redis-server
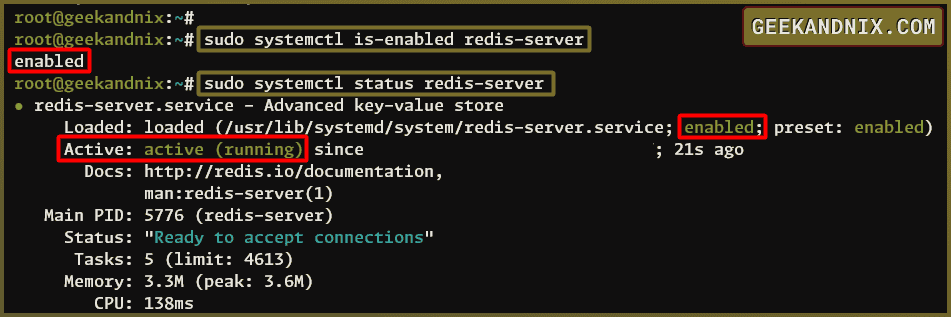
3. When Redis is installed, enter the following command to check the redis-server status. This will ensure that redis-server is running and enabled on your system.
# Checking if redis-server is enabled
sudo systemctl is-enabled redis-server

# Checking redis-server status
sudo systemctl status redis-server
If redis-server is running, you should expect an output active (running). And if enabled, you should see an output like enabled.

4. Lastly, type the following command to check the Redis version that you’ve installed.
redis-server --versionThe output below shows that the Redis 7.0 is installed.

At this time, the official Redis repository does not yet support the new Ubuntu 24.04 version. When available, you can install Redis through official Redis repository with the following:
# adding GPG key
curl -fsSL https://packages.redis.io/gpg | sudo gpg --dearmor -o /usr/share/keyrings/redis-archive-keyring.gpg
# adding Redis repository
echo "deb [signed-by=/usr/share/keyrings/redis-archive-keyring.gpg] https://packages.redis.io/deb $(lsb_release -cs) main" \
| sudo tee /etc/apt/sources.list.d/redis.list
Configuring Redis Server on Ubuntu
After installing Redis, the next step is to configure your Redis installation by editing the default configuration /etc/redis/redis.conf, then set up the bind IP address of your Redis server and integrate it with the systemd.
1. To start, open the Redis configuration /etc/redis/redis.conf using the vim editor.
sudo vim /etc/redis/redis.confNow, change the default bind parameter to your internal server IP address. The bind parameter is used to specify the IP address for Redis to run on.
bind 192.168.5.65Then, uncomment the supervised parameter and change the value to systemd to integrate Redis with the systemd manager.
supervised systemdAdditionally, if you’ve multi-server architecture and use Redis as the remote cache management, then change the value of the protected-mode parameter to no. This will ensure that Redis is accessible from the client or remote host.
protected-mode noSave the file and close the editor.
2. Next, run the following command to restart Redis and apply the changes.
sudo systemctl restart redis-server3. Lastly, run the following ss command to ensure that Redis is running.
ss -tlpn | grep redisAt this point, you should see that Redis is running on port 6378 with the internal IP address 192.168.5.65.

Connecting to Redis Server via redis-cli
In this section, you will learn how to connect to the Redis server in Linux via the redis-cli client. The redis-cli is installed by default, and it is used to interact with the Redis server.
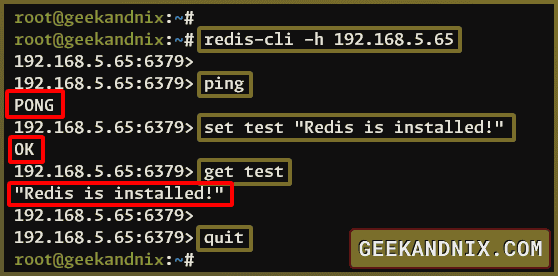
1. First, run the redis-cli command below to connect to the Redis server. The parameter -h allows you to specify the IP address of the Redis server.
redis-cli -h 192.168.5.652. Once connected, run the following query to ping the Redis server. You should get the response PONG from the Redis server.
ping3. Next, run the set query below to create a test database with value Redis is installed. Then, run the get query to retrieve the data from Redis.
# setup key:value
set test "Redis is installed!"

# retrieve Redis key
get test
4. Lastly, type quit to exit from the Redis server.

Securing Redis with Access Control List (ACL)
At this point, you’ve installed Redis on the Ubuntu system. To take your installation to the next step, you will secure Redis by using Access Control List (ACL). The Redis ACL have been introduced since Redis v6, and it’s the recommended way to secure Redis.
In the following example, you will secure Redis using ACL and creating two users:
- A user
alice: This user can run all commands except DEBUG. - A user
bob: This user can run all commands except command categories such as@dangerous@admin.
1. To start, run the command below twice to generate a new random 32-character password.
head -c 32 /dev/urandom | base64
2. Then, open the Redis config file /etc/redis/redis.conf using vim editor.
sudo vim /etc/redis/redis.confInsert the following line to enable the Access Control List on Redis via the aclfile parameter. In this demo, the Redis ACL file will be stored at /etc/redis/users.acl.
aclfile /etc/redis/users.aclSave and exit the file.
3. Now, run the following command to create a new ACL file /etc/redis/users.acl and change the ownership of that file to the user redis.
# Create an ACL file /etc/redis/users.acl
touch /etc/redis/users.acl

# Change the ownership of /etc/redis/users.acl to redis
sudo chown redis:redis /etc/redis/users.acl
4. Next, open the Redis ACL file /etc/redis/users.acl using vim editor.
sudo vim /etc/redis/users.aclInsert the following configuration to create new users alice and bob, then disable the user default on Redis. IMPORTANT, the password is after the > character.
user alice on +@all ~* >0QvsZQQbcH9O4zP50cWs4o98bRW2tWBjIzZJqPSxlGs=

user bob on +@connection +get -@admin -@dangerous ~myapp:* >G913/RFp/i9/5wgmB37+t+msKg3IqDwQ3BNq00JyUJ8=

user default off nopass ~* &* +@all
Save and exit the file when finished.
Points from the ACL:
- Create user
aliceasadminthat can execute all queries. - Create user
bobthat with disabled all@adminand@dangerousqueries. Also userbobcan only access keys beginning withmyapp. - Disable user
defaulton Redis.
5. Lastly, execute the systemctl command below to restart the redis service and apply the changes.
sudo systemctl restart redisAuthenticating to Redis Server
After securing Redis, you will verify your configuration by authenticating to Redis and creating Redis key-value databases.
1. Firstly, connect to the Redis server via the redis-cli command below. The -h option is used to specify the target server.
redis-cli -h 192.168.5.652. Once connected, execute the following query to authenticate as user alice. If you have a different password, be sure to change it.
AUTH alice 0QvsZQQbcH9O4zP50cWs4o98bRW2tWBjIzZJqPSxlGs=3. Now, run the queries below to verify your connection. If successful, you should get the response PONG and your current user alice.
ping
ACL WHOAMI
4. After that, check the list of available users on the Redis server via the following query. At this point, you should have three different users, including alice, bob, and default (off).
ACL LISTIn this case, the default user is disabled or off, and the user alice can access all available databases. Meanwhile user bob only allowed accessing databases with the name myapp. Check the file /etc/redis/users.acl.

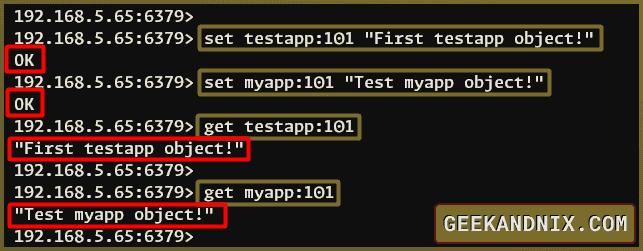
5. Furthermore, run the below queries to create new databases testapp and myapp.
# Create a new database key:value testapp:101
set testapp:101 "First testapp object!"

# Create a new database key:value myapp:101
set myapp:101 "Test myapp object!"
6. Then, verify databases testapp and myapp using the get query below. For the user alice, you should get data from both databases.
# Retrieve data from testapp:101
get testapp:101

# Retrieve data from myapp:101
get myapp:101
7. After that, run the AUTH query below to authenticate as user bob and check your connection using ping command.
# Authenticate to Redis as user bob
AUTH bob G913/RFp/i9/5wgmB37+t+msKg3IqDwQ3BNq00JyUJ8=

# Ping to Redis
ping
8. Lastly, check the connection and verify the object testapp and mydb.
# Retrive key-value form database testapp:101
get testapp:101

# Retrive key-value form database myapp:101
get myapp:101
When the connection is successful, you should get the message PONG. And the user bob can only access the object myapp, while another database like testapp will be an error with NOPERM or No Permission.

Managing Redis Service on Ubuntu
In the following step, you will learn how to manage Redis on your Ubuntu machine via the systemctl utility. This you must know, especially when you need to restart Redis after making some changes, or checking Redis service status when a problem occurs.
1. To start the redis-server service, use the following command.
sudo systemctl start redis-server2. Now, if you want to stop redis-server, use the systemctl command.
sudo systemctl stop redis-server3. Next, if you make changes on Redis, you must restart it. Execute the following command to restart the redis-server service.
sudo systemctl restart redis-server4. Lastly, to check the redis service status, execute the systemctl status command below. If redis-server is running, you should see the output active (running).
sudo systemctl status redis-serverUninstalling Redis from Ubuntu
In the last, do this when you want to remove Redis from your Ubuntu machine.
1. To remove Redis-server from your Ubuntu system, use the apt remove command below. Type y for the confirmation.
sudo apt remove redis2. Now execute the following command to remove the Redis repository, and Redis data directory, then update and refresh your Ubuntu package index.
sudo rm -rf /etc/apt/sources.list.d/redis.list /etc/redis /var/lib/redis && sudo apt updateConclusion
To wrap up, you’ve now completed the installation of Redis on the Ubuntu 24.04 server and secured Redis with Access Control List (ACL). You can now use Redis as the in-memory database cache for your applications.
Perhaps, you may take the next step of Redis by building a high-availability Redis Cluster.


