How to Install and Secure Redis 7 on FreeBSD 14 (with ACL)
Redis is an open-source in-memory caching solutions to speed up your applications. It can be installed on Unix such as FreeBSD, and Unix-like operating systems.
In this guide, I will show you how to install Redis on a FreeBSD 14 server. Moreover, I will also show you how to secure Redis with ACL (Access Control List) and the basic usage of redis-cli for managing Redis from the terminal.
Without further ado, let’s dive in.
Prerequisites
Before you proceed, make sure you have the necessary items below:
- A FreeBSD 14 server.
Read more: FreeBSD 14: Step-by-Step Installation (With Screenshot) - A root user or non-root user with sudo administrator privileges.
Installing Redis on FreeBSD
Redis is an open-source in-memory data store for caching and stream data processing. It offers low-latency read/write operation and scalable deployment.
To install Redis on FreeBSD, follow these steps:
1. To begin with, update and refresh your FreeBSD package index using the pkg command below.
pkg update
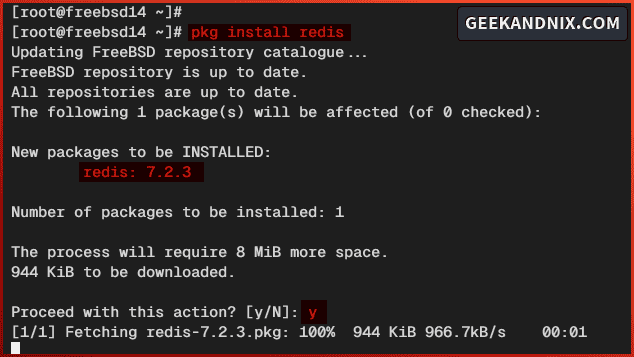
2. Once the package index is updated, execute the command below to install Redis on your FreeBSD system. As I write this, the default FreeBSD repository provides Redis v7 and v6.
# installing Redis
pkg install redis

# installing Redis specific version
pkg install redis62
pkg install redis70
Confirm the installation by typing y and press ENTER.
3. After that, run the command below to enable and verify the redis service.
sysrc redis_enable="YES"
sysrc -a | grep redis
4. Lastly, verify the Redis version using the following command.
redis-server --versionThe output should display your current Redis version. In this example, I’ve installed Redis v7.2.3.

Managing Redis Service on FreeBSD
It’s important to know how to manage Redis service before configuring it. On FreeBSD, you can easily start, stop, restart, and check Redis using the service command.
Here’s how you can manage Redis service on the FreeBSD server:
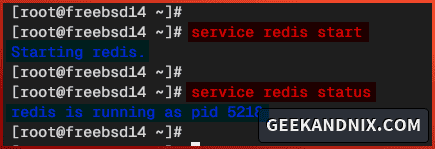
1. To start the redis service, run the command below.
service redis start2. Now, verify the redis service status using the following command.
service redis statusAfter executing the command, you should get the PID (Process ID) of the redis service.
3. Next, if you need to stop or terminate Redis, execute the command below.
service redis stop4. Lastly, run the command below to restart the redis service when needed, especially after making changes to Redis configurations.
service redis restartConfiguring Redis on FreeBSD
Now that Redis is running, let’s explore the Redis basic configuration on FreeBSD by editing the default configuration file /usr/local/etc/redis.conf. In this example, you will set up bind IP address and disable the default protected-mode for the Redis.
Complete these actionable steps to configure Redis:
1. Firstly, run the vim editor below to open the Redis configuration /usr/local/etc/redis.conf.
vim /usr/local/etc/redis.confUncomment the bind parameter below and change the IP address with your local or internal IP address. If you’re using Redis on localhost only, change it to localhost or 127.0.0.1.
bind 192.168.5.80Then, uncomment the protected-mode parameter and change the value to no. In the next step, I will show you how to properly secure Redis via ACL (Access Control List).
protected-mode noWhen finished, save and exit the file.
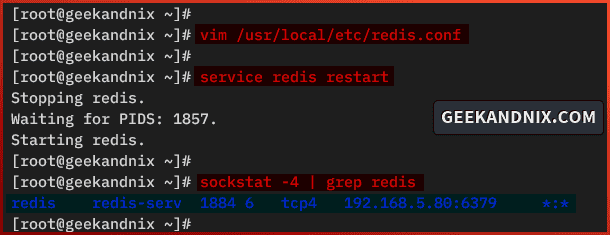
2. Next, run the command below to restart the redis service and take effect.
service redis restart3. Lastly, run the following command to verify Redis internal IP address.
sockstat -4 | grep redisIn this case, I run Redis on local IP address 192.168.5.80 and the default TCP port 6379.
Connecting to Redis Server via redis-cli
Now that you’ve configured Redis, it’s time to connect to the Redis server via the redis-cli. The redis-cli is a command-line utility for interacting with Redis server via the terminal. It’s installed by default on every Redis instance.
Complete the following actions to connect to the Redis server via redis-cli:
1. To connect to the Redis server, run the redis-cli command below. Once logged in, your prompt should become like SERVERIP:6379>.
redis-cli -h 192.168.5.802. Now run the ping command below to verify your Redis connection.
pingIf successful, you should get the response PONG like the following:

3. Next, let’s try creating a new key-value database on Redis using the set query below. In this example, you will create a key test with the value Redis 7 on FreeBSD!.
# setup key:value
set test "Redis 7 on FreeBSD!"
4. Now run the get query below to retrieve data from the Redis key test. The output should display the message Redis 7 on FreeBSD!.
# retrieve Redis key
get test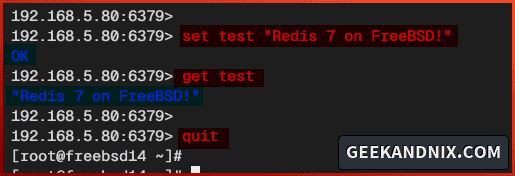
5. Lastly, enter quit to exit from the Redis server.
Securing Redis Server with Access Control List (ACL)
In this section, you will take Redis installation to the next level by securing Redis via ACL (Access Control List). Redis ACL can be implemented via the ACL command and aclfile.
Complete the following actions to secure your Redis installation with ACL (Access Control List):
1. Before setting up Redis ACL, execute the following command to generate a random password that will be used for Redis users. In this example, I will create two Redis users, so I run the command twice.
head -c 32 /dev/urandom | base64
2. Now, run the command below to create a new ACL file /usr/local/etc/redis-users.acl and change the ownership to the redis user.
touch /usr/local/etc/redis-users.acl
chown redis:redis /usr/local/etc/redis-users.acl
3. Then, open the ACL file /usr/local/etc/redis-users.acl using vim.
vim /usr/local/etc/redis-users.aclAdd the following configuration to create two users in your Redis server. Be sure to change the username david and john, and the generated passwords.
# create user david
user david on +@all ~* >FUbaXDMFL85dUsyX2JDn9Xvo2QWjBuSfsh5gimBeLtw=

# create user john
user john on +@connection +get -@admin -@dangerous ~myapp:* >k+W8PD7mKHYMHZ7sk6uIg3jeMr18oRWxpFYVEMJff9M=

# disable user default with status off on Redis.
user default off nopass ~* &* +@all
Save and close the file when finished.
Here’s I explain options for each user:
Detail option for user david:
- The new user named david with on or status enabled.
- +@all = allow the user to execute every command in the Redis server.
- ~* = allow user to access all key-value databases on Redis.
- >Password = the password is behind > character.
Below for the user john:
- The new user john with status on, which means the user will be enabled.
- +@connection and +get = allow user to execute group command
+@connectionand+get. - -@admin and -@dangerous = disallow user to execute commands within group
-@adminand-@dangerous. - ~myapp:* = Only database starting with
myappwill be allowed for the target user.
The Redis default user details:
- This user is automatically created on every Redis installation.
- With the off parameter, you will disable the Redis default user.
Note: To make you easier for managing permissions for users, check the official documentation of Redis ACL Rules.

4. Next, run the vim command below to edit the file /usr/local/etc/redis.conf and enable Redis ACL (Access Control List).
vim /usr/local/etc/redis.confUncomment or add the aclfile parameter and insert your ACL file /usr/local/etc/redis-users.acl that you’ve just created.
aclfile /usr/local/etc/redis-users.aclWhen you’re done, save the file and exit the editor.
5. Lastly, run the command below to restart Redis and apply your modifications.
service redis restartTesting Redis ACL: Authenticate as Redis Admin
Now that you’ve secured Redis with ACL, it’s time to verify your ACL configuration into an action. For example, trying to authenticate to Redis via redis-cli.
To test Redis ACL configuration, perform the following tasks:
1. First, run the command below to connect to the Redis server and execute the ping command.
# connect to Redis server 192.168.5.80
redis-cli -h 192.168.5.80

# run ping query on redis to verify connection
ping
Without user authentication, the message (error) NOAUTH Authentication required should be expected like the following:

2. Run the AUTH query below to authenticate to your Redis server. In detail, use the AUTH query followed by the Redis user, then the password. If the authentication is successful, the expected output is OK.
AUTH david FUbaXDMFL85dUsyX2JDn9Xvo2QWjBuSfsh5gimBeLtw=3. Next, run the following queries to verify your connection and the current user.
# check connection status
ping

# check Redis current user
ACL WHOAMI
You should expect to see an output PONG and your current Redis user. In this example, I’ve authenticated as user david.

4. Lastly, run the query below to verify the list of users on your Redis server. This query is only available for Redis admin users.
ACL LISTYou can see the list of available users and their status on the Redis server.

Getting Started with Redis Key-Value Database
After you’ve authenticated to Redis, you can now proceed to get started with the Redis Key-Value database and demonstrate the user permission that you’ve configured within the ACL.
Follow these actions to familiarize yourself with Redis SET and GET queries and verify permissions within the Redis ACL rules.
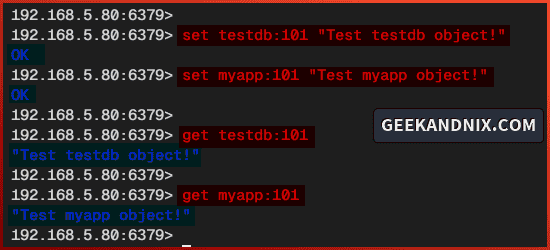
1. Run the set query below to create a new key-value database testdb:101 and myapp:101.
# Create a new database key:value testdb:101
set testdb:101 "Test testdb object!"

# Create a new database key:value myapp:101
set myapp:101 "Test myapp object!"
2. Now run the get query below to retrieve data from the testdb:101 and myapp:101.
# Retrieve data from testdb:101
get testdb:101

# Retrieve data from myapp:101
get myapp:101
Because the user david as admin is allowed to access any databases in Redis, you should expect to see the value from both databases testdb:101 and myapp:101.
3. Next, run the queries below to authenticate as user john and verify your connection. Be sure you get the output OK and PONG as the authentication is successful.
# Authenticate to Redis as user john
AUTH john k+W8PD7mKHYMHZ7sk6uIg3jeMr18oRWxpFYVEMJff9M=

# Ping to verify the connection
ping
4. Run the get query below to retrieve data from databases testdb:101 and myapp:101. In this example, the user john is only allowed to access databases starting with myapp:*. So you will get an error when accessing the database testdb*.
# Retrive key-value from database myapp:101
get myapp:101

# Retrive key-value from database testdb:101
get testdb:101
When retrieving data from the database myapp:101, you should get the correct output value. But, when retrieving the testdb:101 database, you should get a message (error) NOPERM No permissions to access a key.

Uninstalling Redis from FreeBSD
If you need to remove or uninstall Redis from your FreeBSD server, use the following steps:
1. Before uninstalling Redis, run the command below to stop and disable Redis service.
service redis stop
sysrc -x redis_enable="YES"
2. Now run the command below to remove or uninstall Redis from your FreeBSD system.
pkg delete redis
pkg autoremove
Conclusion
To conclude, you have installed Redis on the FreeBSD 14 server via the PKG package manager. You have also learned how to secure Redis with ACL (Access Control List) via the aclfile.
Moreover, you have also learned the basic usage of redis-cli for connecting to the Redis server, authenticating against Redis, and basic SET and GET queries for creating and retrieving key-value databases in Redis.
