How to Install PostgreSQL 16 on Ubuntu 24.04
Are you looking for database server that supports both relational and non-relational data types? PostgreSQL is what you’re looking for. The PostgreSQL has proven as a powerful object-relational database server that can be installed on multiple operating systems, including Ubuntu and Debian.
Don’t miss out! Our latest guide for FreeBSD users: How to Install and Use PostgreSQL on FreeBSD 14.
This guide will take you through the process of how to install PostgreSQL on Ubuntu 24.04. Besides that, you’ll also go through the basic usage of psql command for connecting to the PostgreSQL server, and also some basic PostgreSQL queries for creating user and database.
Prerequisites
Before you begin this guide, you must have the following:
- A Linux server running Ubuntu 24.04.
See also: How to install Ubuntu 24.04 server (step-by-stepLTS - An administrative user or non-root user with sudo/root privileges.
Step 1 – Installing PostgreSQL on Ubuntu
PostgreSQL is a high-performance and enterprise-grade database system that supports multiple platforms.
On Ubuntu, you can install PostgreSQL from two different sources:
- Installing PostgreSQL via Ubuntu Repository
- Installing PostgreSQL via the Official PostgreSQL Repository
Installing PostgreSQL via Ubuntu Repository
The default Ubuntu repository provides multiple versions of PostgreSQL. At this time, the PostgreSQL 16 will be installed when using the exact package name as postgresql.
Follow these steps to install PostgreSQL via the Ubuntu repository.
1. First, run the command below to update the Ubuntu repository and get the latest version of package information.
sudo apt update
2. Now, run the apt install command below to install PostgreSQL. Input y when prompted, then press ENTER to proceed.
sudo apt install postgresql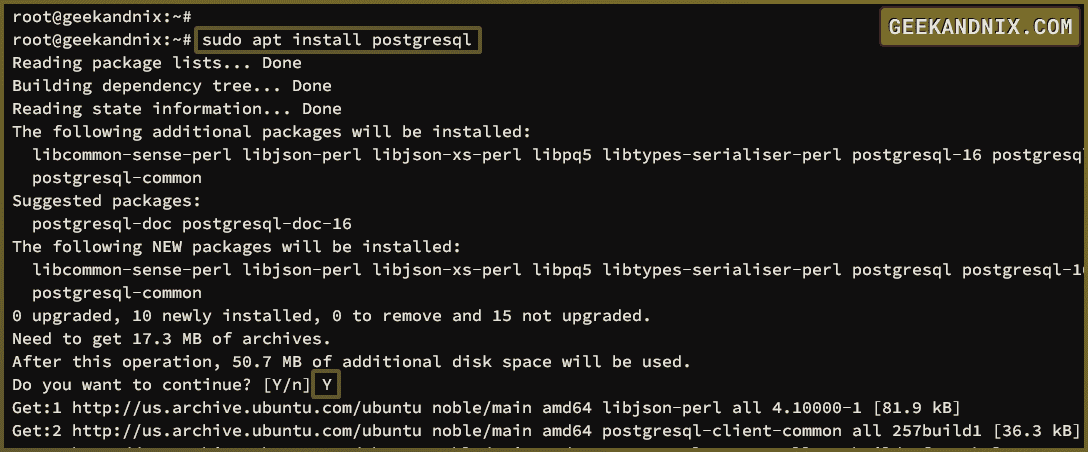
3. After installing the PostgreSQL server, run the systemctl command below to start the PostgreSQL service.
sudo systemctl start postgresql4. Then, verify the PostgreSQL service to ensure that the service is running and enabled.
# checking postgresql if enabled
sudo systemctl is-enabled postgresql

# checking postgresql statsu - running or not
sudo systemctl status postgresql
When successful, you can expect to get an output like enabled and active (running/exited).

5. In addition, you can also verify the default PostgreSQL port 5432 using the ss command below.
ss -tulpn | grep 5432The following output confirms that the port 5432 with the LISTEN state and used by the user postgres and the service PostgreSQL.

Installing PostgreSQL on Ubuntu via PostgreSQL Repository
The second method to install PostgreSQL on Ubuntu 24.04 is by using the official PostgreSQL repository, which provides multiple versions of PostgreSQL, including the latest version PostgreSQL v15.
Follow these steps to install the latest version of PostgreSQL.
1. Run the following command to add the GPG key of the PostgreSQL repository. The PostgreSQL GPG key will be saved at /usr/share/keyrings/pgdg.gpg.
curl -fsSL https://www.postgresql.org/media/keys/ACCC4CF8.asc | sudo gpg --dearmor -o /usr/share/keyrings/pgdg.gpg2. Then, run the below command to add the official PostgreSQL repository to your Ubuntu system.
sudo sh -c 'echo "deb [arch=amd64 signed-by=/usr/share/keyrings/pgdg.gpg] http://apt.postgresql.org/pub/repos/apt $(lsb_release -cs)-pgdg main" > /etc/apt/sources.list.d/pgdg.list'3. Once the PostgreSQL repository and GPG key are added, run the apt command below to refresh the package index and apply the new repository.
sudo apt update
4. Now, install PostgreSQL via the official PostgreSQL repository using the apt install command below.
sudo apt install postgresqlWhen prompted, input y, then press ENTER.

5. Once PostgreSQL is installed, run the following command to start, enable, and verify the PostgreSQL service.
# start and enable postgresql service
sudo systemctl enable --now postgresql

# verify postgresql service status
sudo systemctl status postgresql
If PostgreSQL running, an output active (running) will be shown. Also, the output enabled confirms that the PostgreSQL service is enabled.

Step 2 – Guide to PostgreSQL Authentication
On Ubuntu, the default PostgreSQL configuration is stored in the /etc/postgresql/VERSION/main directory. There are multiple configuration files, but you must always keep an eye on the following two files:
- postgresql.conf: The main configuratiion file for PostgreSQL. You can set up the listen address to allow remote connections, set up default password encryption, enable SSL, set up replication, and many more.
- pg_hba.conf: Handle the authentication method for the PostgreSQL server. You can set up a peer for local authentication, trust for trusted hosts, and scram-sha-256 password authentication.
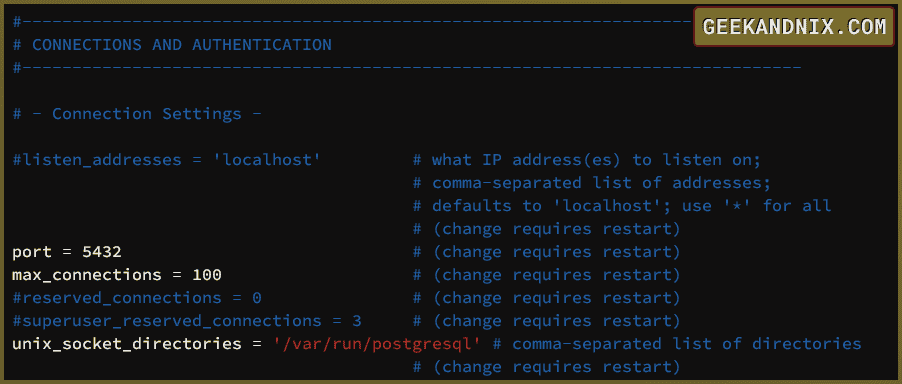
Below default postgresql.conf with listen_address to localhost (default), port 5432, and max_connections is 100.
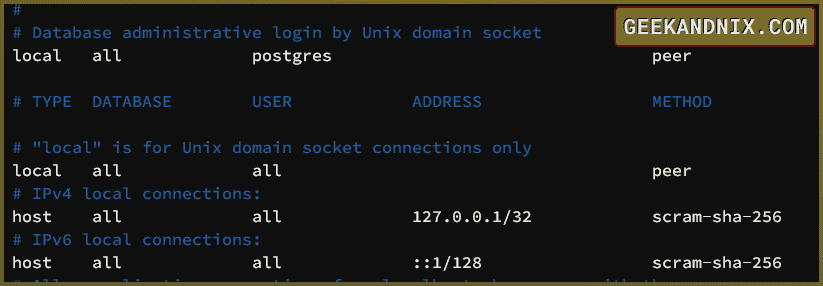
The default local authentication method is peer via socket. As for localhost connections, PostgreSQL used password authentication via scram-sha-256.
Step 3 – Changing Password for Default postgres User
Moving forward, you’ll be setting up a password for the user postgres. This allows you to log in to the PostgreSQL server using the scram-sha-256 password authentication, which is used by most applications.
1. Log in to the PostgreSQL server via peer authentication using the following psql command.
sudo -u postgres psql2. Now, run the following query to change the password for the user postgres. Change the password PostgresPassw0rd with your password.
ALTER ROLE postgres WITH PASSWORD 'PostgresPassw0rd';
3. Type quit or \q to exit from the PostgreSQL server.
\q4. Next, run the following command to log in to PostgreSQL as the user postgres using password authentication. When prompted, input the password you configured for the postgres user.
sudo -u postgres psql -h localhost -U postgres5. Lastly, run the following query to verify your current connection details.
\conninfoIf successful, you should have connected to the PostgreSQL server on localhost via user postgres using the scram-sha-256 password authentication to the default database postgres.

Step 4 – Creating a New User on PostgreSQL
Now that you’ve configured the PostgreSQL password, you can proceed to create a new user on PostgreSQL. This new user can be used for your applications.
1. First, ensure that you’ve logged in to the PostgreSQL server via psql. If not, run the following command to log in to PostgreSQL.
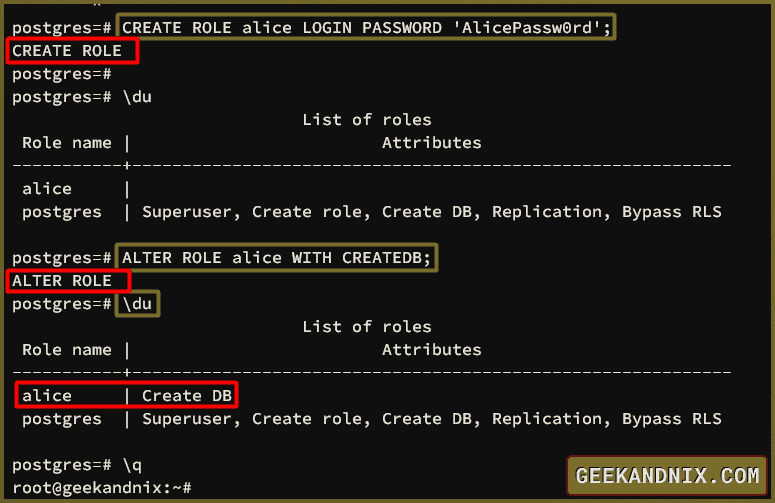
sudo -u postgres psql -h localhost -U postgres2. Run the CREATE ROLE query below to create a new PostgreSQL user called alice with the password AlicePassw0rd. The option LOGIN allows the new user to log in to PostgreSQL. Check available role options on PostgreSQL that you can use.
CREATE ROLE alice LOGIN PASSWORD 'AlicePassw0rd';3. Next, run the following query to allow the new user alice to create a database with the role CREATEDB. Then, verify again the detailed available users on PostgreSQL.
# adding CREATEDB role to user alice
ALTER ROLE alice WITH CREATEDB;

# checking list user and roles
\du
You should see the new role attribute CREATEDB assigned to the user alice.
Step 5 – Creating a New Database on PostgreSQL
With the PostgreSQL user created, it’s time to move on to create new databases on PostgreSQL. But, before that, you’ll verify and ensure that you can log in to PostgreSQL using the new user alice.
1. First, log in to PostgreSQL as the user alice with the following command. When prompted, input the password for user alice.
sudo -u postgres psql -h localhost -d postgres -U alice2. Now, run the following query to verify the current connection.
\conninfoIf successful, you should expect an output that confirms you’ve connected to PostgreSQL as user alice to the default database postgres.

NOTE: If you get an error like psql: error: connection to the server at "localhost" (127.0.0.1), port 5432 failed: FATAL: database "alice" does not exist, this means that the target database doesn’t exist and you must specify the target database such as -d dbname.
3. Next, run the query CREATE DATABASE to create new databases called alice and appdb with the owner as user alice.
# creating database alice
CREATE DATABASE alice WITH OWNER alice;

# creating database appdb
CREATE DATABASE appdb WITH OWNER alice;
4. Once the database is created, run the following query to get a list of available databases on PostgreSQL. And you should expect to see new databases alice and appdb.
\l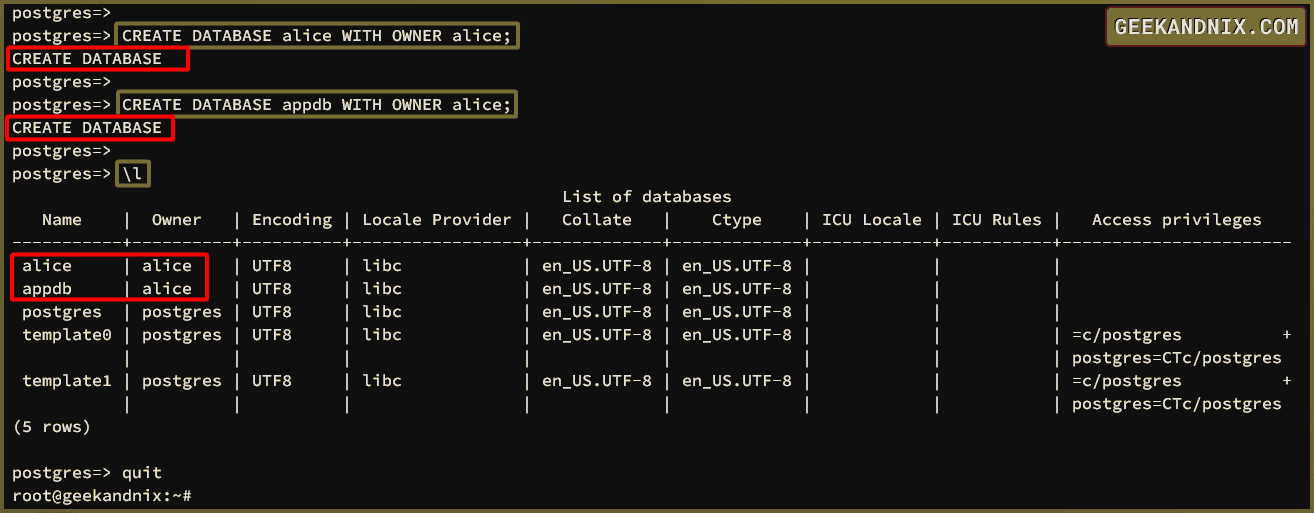
5. Now, type quit to exit from the PostgreSQL shell.
quit6. Next, run the following command to log in to PostgreSQL via user alice to the new database appdb. Input the password for the user alice when prompted.
sudo -u postgres psql -h localhost -d appdb -U alice
7. Lastly, you can also switch to the database alice using the \connect or \c query as below.
# connecting to database alice
\connect alice

# connecting to database appdb
\c appdb
If successful, you should expect to get an output such as You are now connected to database '[dbname]' as a user 'userdb'.

Step 6 – Uninstall PostgreSQL from Ubuntu
If you decide to uninstall and remove PostgreSQL, follow these steps:
1. First, stop the PostgreSQL service using the following command.
sudo systemctl disable --now postgresql2. Now, run the following command to uninstall PostgreSQL packages. Input y when prompted to confirm.
# removing/uninstalling postgresql server
sudo apt remove postgresql postgresql-client

# remove orphaned/unused packages
sudo apt autoremove
3. Lastly, remove orphaned directories using the following command.
sudo rm -rf /etc/postgresql /var/lib/postgresqlConclusion
Now that you’ve completed this guide, you should have the PostgreSQL up and running on Ubuntu 24.04. In addition to that, you’ve also learned the authentication method on PostgreSQL, and also configured the password for PostgreSQL user postgres. Not only that, but also you’ve learned the basic usage of PostgreSQL queries for creating databases and users.
Further reading, you may interest to install pgAdmin 4 as the PostgreSQL administration tool that can be run on any operating systems.


