How to Install and Configure NFS on Ubuntu 24.04/22.04
NFS or Network File System is the go-to solution for file-sharing over the internal network. It is available on most Linux distributions such as Ubuntu, easy to install and use.
In this tutorial, you’re going to learn how to install and configure NFS on Ubuntu 24.04 “Noble Numbat”.
In addition to that, you’ll also:
- Secure the NFS Server using UFW (Uncomplicated Firewall).
- Configure on-demand auto-mount via AutoFS.
- Tune up your Ubuntu server for better NFS Server performance.
- Basic monitoring of NFS Server.
Prerequisites
To begin the process, confirm you’ve got:
- An Ubuntu Server 24.04.
See more: How to Install Ubuntu 24.04 LTS Server - A non-root user with
rootprivileges. - A client machine – You can use the Ubuntu or Debian machine.
Step 1 – Installing NFS Server on Ubuntu
NFS or Network File System is a standard file-sharing protocol for Unix and Unix-like operating systems. NFS is available on most Linux distributions, including Ubuntu.
To install NFS on your Ubuntu server, proceed as follows:
1. Before installing packages, update and refresh the Ubuntu repository using the command below.
sudo apt update
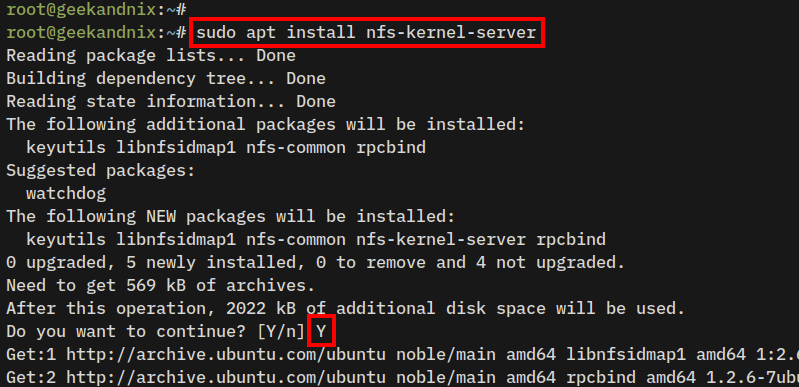
2. Once you’ve updated the repository, execute the apt command below to install the nfs-kernel-server package.
sudo apt install nfs-kernel-serverType Y to proceed with the installation, once finished, move on.
Step 2 – Configuring NFS Server on Ubuntu
After installing NFS, you will configure the NFS server by editing the NFS configuration /etc/nfs.conf. From there, you will also disable old nfsv2 and nfsv3 protocols.
To configure the NFS server, perform these tasks:
1. Open the default NFS server configuration /etc/nfs.conf using vim.
sudo vim /etc/nfs.conf2. within the [mountd] section, specify the nfs.mountd port using option port=13025. With this, you can limit the requests to the nfs.mountd via UFW (in the next section).
[mountd]
…
port=13025
3. Additionally, you can also control how to run NFS using the [nfsd] section. For example, you can disable nfsv2 and nfsv3, and enable only nfsv4 like this:
[nfsd]
vers2=n
vers3=n
vers4=y
vers4.0=y
vers4.1=y
vers4.2=y
Save the file and exit the editor.
Step 3 – Setting Up NFS Shared Directory
Now that you’ve configured the NFS server, the next step is to create and configure the NFS shared directory for clients. This can be done by utilizing the /etc/exports file.
Complete these tasks to create and set up the NFS shared directory:
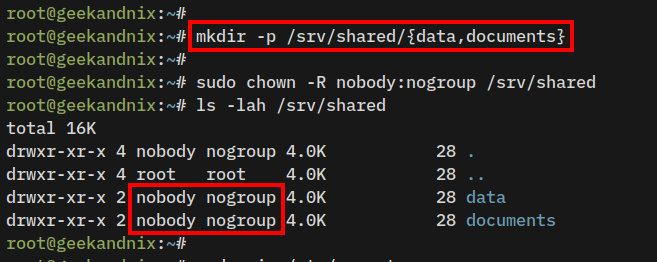
1. First, run the command below to create shared directories for the NFS server. For this case, you will create two shared directories, /srv/shared/data and /srv/shared/documents.
mkdir -p /srv/shared/{data,documents}2. Change the ownership of directory /srv/shared to nobody and nogroup, then verify it using the ls command below.
sudo chown -R nobody:nogroup /srv/shared
ls -lah /srv/shared
Ensure the ownership of data and documents directories is nobody and nogroup.
3. Now, run the vim command below to open the /etc/exports file and configure the NFS shared directory.
sudo vim /etc/exportsInsert the following configuration to set up your shared directories. Be sure to change the target directory, IP address, and subnet with your information.
/srv/shared/data    192.168.5.0/24(rw,sync,no_subtree_check)
/srv/shared/documents    192.168.5.15(rw,sync,no_subtree_check)
Save and close the file when finished.
Details NFS sharing options:
- rw: Enable read and write access to the shared directory.
- sync: Allow any changes to files to be applied immediately. This will prevent data loss but has an impact on performance.
- no_subtree_check: Disable subtree checking to prevent errors when changing or renaming files between NFS server and client.
4. After configuring the NFS exports file, restart the nfs-server service to apply your changes.
sudo systemctl restart nfs-serverStep 4 – Managing NFS Server Service on Ubuntu
In the following section, you will learn how to manage the NFS server via systemctl. This includes how to start NFS, how to check if NFS is running, and then how to stop and restart NFS after making changes.
1. To start the NFS Server, run the command below.
sudo systemctl start nfs-server2. After making changes on the NFS server, restart it to take effect.
sudo systemctl restart nfs-server3. In case, you want to stop the NFS server, use the following command.
sudo systemctl stop nfs-server4. Next, check and verify the NFS server status using the command below.
sudo systemctl status nfs-serverThe output active (exited) means the NFS server is running, but the systemd manager can’t find any process to monitor. So, the systemd shows you an output exited.

5. Now, add the NFS server to run automatically at system startup using the following command.
sudo systemctl enable nfs-server6. Lastly, ensure that the NFS server is enabled by executing the command below. The output enabled should confirm the NFS server is enabled and will start at system startup.
sudo systemctl is-enabled nfs-serverStep 5 – Securing NFS with UFW (Uncomplicated Firewall)
At this point, your NFS Server is running. Now, you will secure NFS via UFW (Uncomplicated Firewall) by limiting specific IP addresses or subnets that allow to access the shared directory.
See more: Master the UFW Firewall on Ubuntu: 17 Practical Examples
To secure your NFS Server via UFW, proceed as follows:
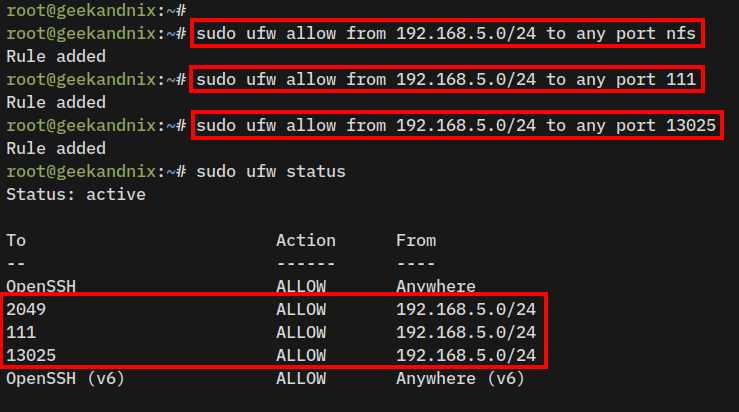
1. Run the ufw command below to open NFS service ports nfs (port 2409), 111 for RPC (Remote Procedure Call), and 13025 for the nfs.mountd.
Be sure to change the network subnet with your local network.
# allow traffic from 192.168.5.0/24 to NFS port 2409
sudo ufw allow from 192.168.5.0/24 to any port nfs

# allow traffic from 192.168.5.0/24 to RPC
sudo ufw allow from 192.168.5.0/24 to any port 111

# allow traffic from 192.168.5.0/24 to mountd port 13025
sudo ufw allow from 192.168.5.0/24 to any port 13025
2. Now, verify the UFW firewall rule using the following command.
sudo ufw statusEnsure your network subnet is allowed to access NFS ports 2049, 111, and 13025.
Step 6 – Setting Up NFS Client on Ubuntu/Debian
Now that you’ve completed the NFS Server installation, the next step is to mount the NFS shared directory from the client machine. The following example will be using an Ubuntu/Debian as a client.
Perform these steps to set up the NFS client and mount the NFS shared directory.
1. Log in to your Ubuntu/Debian client machine, and install the nfs-common via APT.
sudo apt install nfs-common -y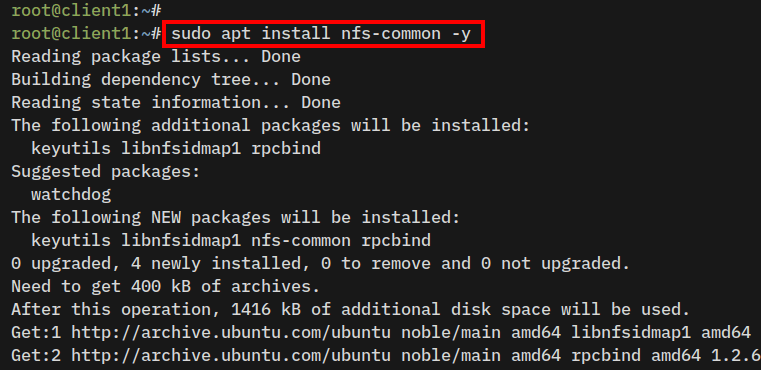
2. Now, create target mount directories /mnt/data and /mnt/documents.
sudo mkdir -p /mnt/{data,documents}3. Then, mount the NFS shared directory /srv/shared/data to /mnt/data, and /srv/shared/documents to /mnt/documents.
sudo mount -o nfsvers=4.2 192.168.5.65:/srv/shared/data /mnt/data
sudo mount -o nfsvers=4.2 192.168.5.65:/srv/shared/documents /mnt/documents
The -o parameter: Add specific options to mount. In this case, you will specify the NFS protocol to nfsv4.2 via the nfsservers option.

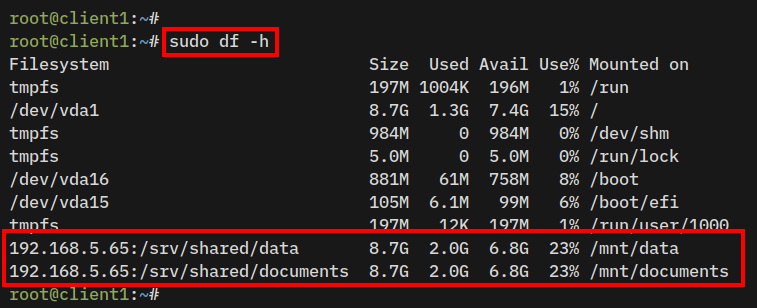
4. Next, verify the list of mounted file systems using the command below.
sudo df -hNow you’ve mounted NFS shared directory /srv/shared/data to /mnt/data, and /srv/shared/documents to /mnt/documents.
5. Lastly, to unmount NFS shared directories, run the umount command below.
sudo umount /mnt/data /mnt/documentsStep 7 – Auto-Mounting NFS Server with AutoFS
Now that you’ve learned the basics of how to mount the NFS shared directory, let’s take a step further by implementing AutoFS. AutoFS is an on-demand automount program for mounting filesystems such as NFS.
AutoFS will automatically mount NFS when you need it, then detach the NFS automatically when you don’t need it or idle. This increases NFS server performance by allocating most resources to the client when needed.
To mount NFS with AutoFS, complete these tasks:
Installing AutoFS on Ubuntu/Debian Client
Install the autofs package using the command below.
sudo apt install autofs -y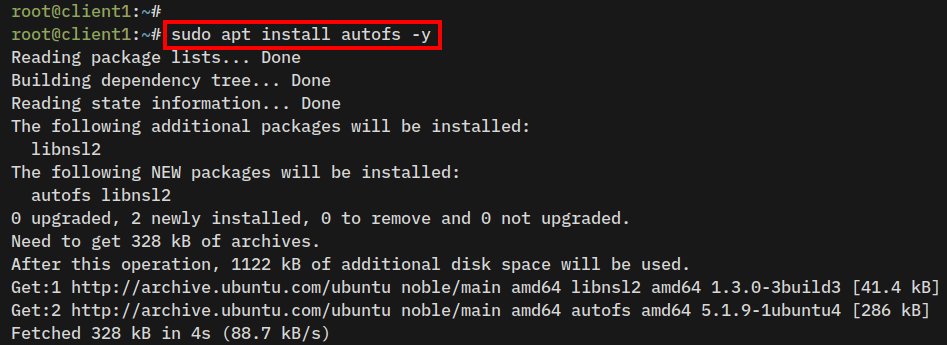
Consider NFS Mount Scenario
Now that you’ve installed autofs, let’s create an IMPORTANT scenario:
- In this case, you will mount the shared directory
/srv/shared/datato/mnt/data. - You will add
mountoptions-rw,soft,intr,rsize=8192,wsize=8192to the process.
Setting Up Auto-Mount NFS Server via AutoFS
1. Open the autofs main configuration /etc/auto.master using vim.
sudo vim /etc/auto.masterInsert the following configuration to the bottom of the line.
/mnt /etc/auto.misc --timeout 30Save and close the file
Detailed options:
/mnt: The root directory of targetmount. Taken from/mnt/data./etc/auto/misc: The map file for mounting the NFS server.--timeout 30: set up timeout to 30 seconds before NFS is unmounted automatically when idle (not used).
2. Next, open the /etc/auto.misc file using vim.
sudo vim /etc/auto.miscInsert the following configuration to the bottom of the line.
data -rw,soft,intr,rsize=8192,wsize=8192 192.168.5.65:/srv/shared/dataSave the file and exit the editor.
Detailed options:
data: The targetmountdirectory, which is part of the/mntdirectory on theauto.masterfile.-rw,soft,intr,rsize=8192,wsize=8192: Additionalmountoptions. Change this as you need.192.168.5.65:/srv/shared/data: The NFS server and the shared directory.
3. Now run the following command to restart autofs and apply your changes. Then, verify autofs to ensure it is running.
sudo systemctl restart autofs
sudo systemctl status autofs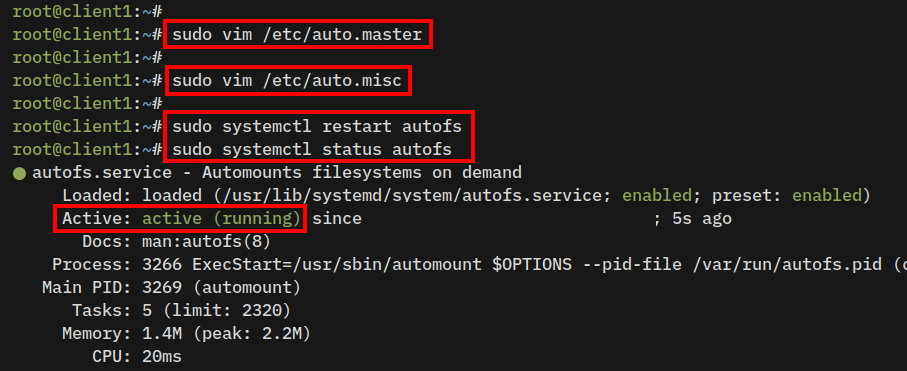
Checking AutoFS In Action
At this point, you’ve configured AutoFS, let’s verify it with the following:
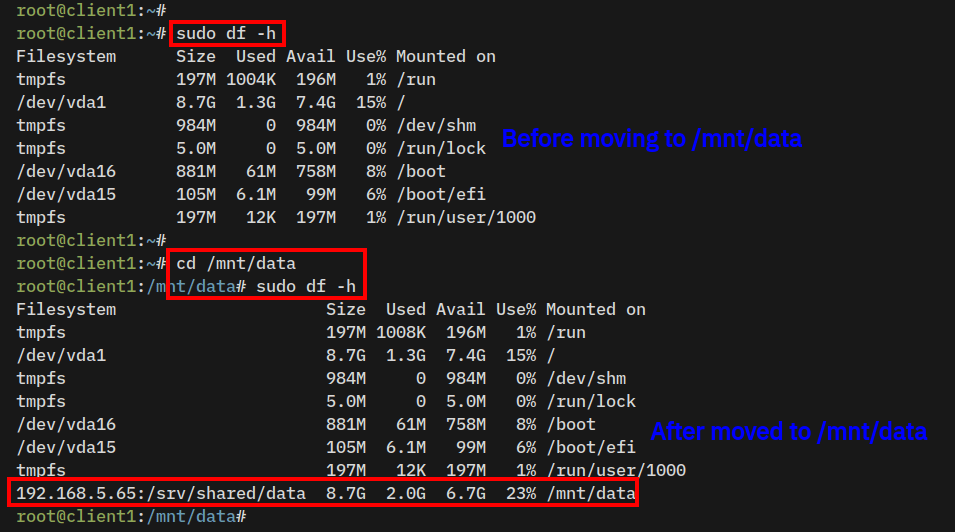
1. Check the list of mounted file systems using the following command. At this stage, your NFS server should not be mounted because there was no activity.
sudo df -h2. But, if you go to the /mnt/data directory, the NFS shared directory will be mounted automatically via AutoFS.
cd /mnt/data
sudo df -h
Check the following before and after the user accesses the directory /mnt/data:
Step 8 – Tips: Improving NFS Server Performance
Implement these 2 tips to improve NFS Server performance:
- Changing TCP Congestion Control to BBR
- Specifying NFS Protocol, rsize and wsize
Changing TCP Congestion Control to BBR
BBR (“Bottleneck Bandwidth and Round-trip propagation time“) is a modern congestion algorithm by Google for improving network speed with higher throughput and lower latency.
BBR added to Linux since kernel 4.9, you can enable BBR by modifying the kernel parameter. Proceed as follows to enable BBR on your NFS Server host:
1. First, open the /etc/sysctl.conf file using vim.
sudo vim /etc/sysctl.conf2. Insert the following configuration to the bottom of the line.
With this, you improve network performance by changing the default congestion control to bbr or Bottleneck Bandwidth and RTT.
net.core.default_qdisc=fq
net.ipv4.tcp_congestion_control=bbr
net.ipv4.tcp_window_scaling = 1
Save the file and exit the editor.
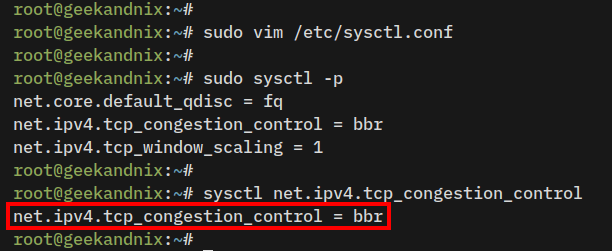
3. Now, run the command below to apply kernel parameter modification.
sudo sysctl -p4. Verify the current network congestion control using the command below.
sysctl net.ipv4.tcp_congestion_controlIf successful, you should see bbr on the output.
Specifying NFS Protocol and rsize/wsize
Below 2 key points you must know related to NFS performance:
- Ensure to use nfsv4 protocol in the
mountoption. The nfsv4 is faster and safer than nfsv3 or nfsv2. - Specify the
rsize(read size) andwsize(write size) options. The format is in bytes. - The
rsizeor read size should depend on your data operations. For example, you should use differentrsizebetween media streaming operations and casual documents like text and photos. - The
wsizeor write size should depend on the disk I/O of your server hardware. Also, consider the network speed (Gigabit) too.
1. To mount the NFS server via the command line, use the mount command below:
sudo mount -o nfsvers=4,rsize=8192,wsize=8192 server:/srv/shared/data /mnt/data2. For AutoFS, use the following configuration in auto.misc:
data -nfsvers=4,rw,soft,intr,rsize=8192,wsize=8192 192.168.5.65:/srv/shared/data3. Furthermore, you can check the mount options that are used on the NFS client using the following command.
mount | grep nfs
nfsstat -4 -m
Step 9 – Monitoring NFS Performance
For the final step, you will explore the nfsstat and nfsiostat commands for monitoring NFS Server and Client performance.
To monitor NFS Server performance, proceed as follows:
1. To monitor NFS statistics for both server and client, use the nfsstat command below.
# on NFS Server with nfs4
nfsstat -4 -s

# on NFS client with nfs4
nfsstat -4 -c
2. To monitor the i/o stats of the NFS shared directory, run the nfsiostat on the client machine.
nfsiostat
nfsiostat -d /mnt/data
Conclusion
Well done! You’ve completed the installation of NFS Server and Client on Ubuntu servers. You’ve also secured NFS with UFW (Uncomplicated Firewall) and configured auto-mount NFS Server on-demand via auto-fs on the client machine.
Furthermore, you also have increased NFS Server performance via BBR congestion control and specifying NFS protocol. And lastly, you’ve learned 2 commands nfsstat and nfsiostat for monitoring NFS activity.
At this stage, why not leverage NFS security by integrating with Kerberos authentication?
