How to Install Memcached on Ubuntu 24.04/22.04
Implementing a caching solution for your application is crucial to improve application speed and performance. Memcached is a distributed memory-caching solution that you can implement on your Ubuntu server stack.
This tutorial will guide you through the installation of Memcached memory-caching solutions on the Ubuntu 24.04 server “Noble Numbat“.
Prerequisites
Before you proceed, ensure you have the following:
- An Ubuntu 24.04 server.
See more: How to Install Ubuntu 24.04 Server - A non-root user with
sudoorrootprivileges.
Installing Memcached on Ubuntu
Memcached is a distributed memory-caching system for Linux and BSD operating systems. For Ubuntu distribution, Memcached is available by default on the official Ubuntu repository.
To install memcached on your Ubuntu system, proceed as follows:
1. First, run the following apt command to update your Ubuntu repository and retrieve the latest package index.
sudo apt update
2. Now, install memcached and libmemcached-tools by running the following command. Type Y and press ENTER to proceed with the installation.
sudo apt install memcached libmemcached-tools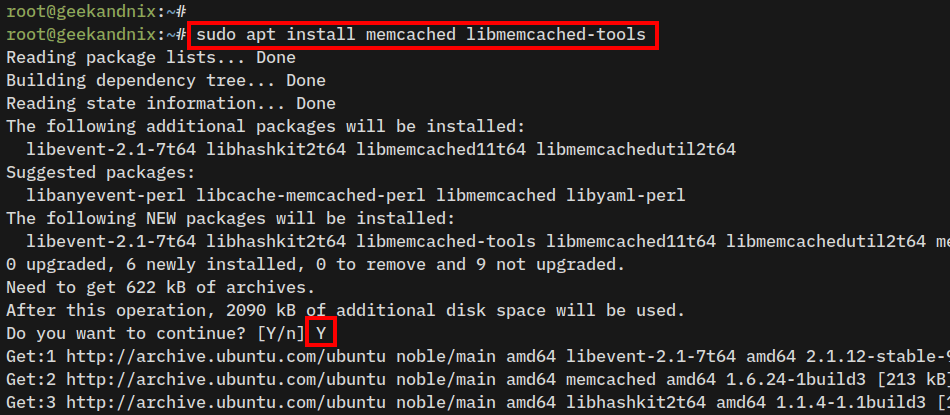
3. After you’ve finished the installation, the memcached service should be running and enabled on your Ubuntu server.
Memcached is running on default port 11211, check it using the ss command below.
ss -tulpn | grep 11211
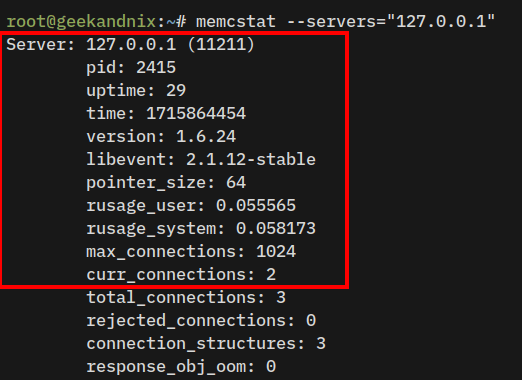
4. Lastly, run the memcstat command below to verify the Memcached status. The memcstat is part of the libmemcached-tools which shows you the current state of the Memcached server.
memcstat --servers="127.0.0.1"From the output, you can highlight the following:
- pid: Process ID of Memcached server.
- uptime: The uptime in format seconds.
- version: The Memcached version that you’ve installed.
- max_connections: The allowed incoming connections simultaneously.
- curr_connections: The current connections Memcached handled.
5. Furthermore, you can also check the Memcached server status by utilizing the nc or netcat command below.
echo stats | nc 127.0.0.1 11211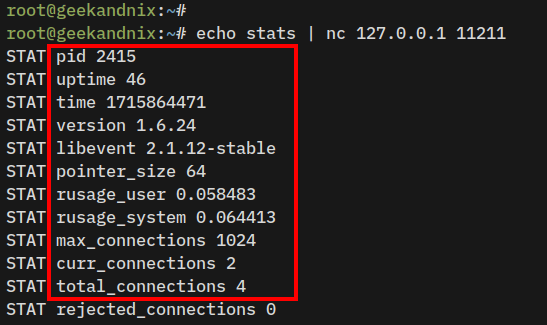
Managing Memcached Service on Ubuntu
After you’ve installed memcached, learn how to manage memcached service via systemctl using the following steps:
1. Run the following command to start the memcached service.
sudo systemctl start memcached2. In case you want to stop the service, execute the following command.
sudo systemctl stop memcached3. Now, after making changes to Memcached, restart it using the command below.
sudo systemctl restart memcached4. Then, verify the memcached service status using the below command. If running, you should get an output active (running).
sudo systemctl status memcached5. Next, to run the memcached service automatically at system boot, you must enable it using the command below.
sudo systemctl enable memcached6. Lastly, to ensure that memcached is enabled, run the following command.
sudo systemctl is-enabled memcachedThe output enabled confirms that the memcached service will start automatically at system boot. Otherwise, the output is disabled.

Configuring Memcached on Ubuntu
In this section, you will configure the memcached server by editing the default configuration /etc/memcached.conf.
From there, you will set up the bind address, change the memory allocation and allowed connections, and run Memcached as a non-privileged user. Now let’s start configuring memcached.
1. To configure Memcached, open the default configuration file /etc/memcached.conf using vim.
sudo vim /etc/memcached.conf2. Find the -l option to set up a bind IP address for Memcached.
By default, Memcached is running on localhost or 127.0.0.1. But, you can change it with your internal IP address too, such as 192.168.5.65. Also, NEVER run Memcached on a public IP address.
-l 192.168.5.653. Now, insert the new line with -U 0 to disable UDP on Memcached. The UDP protocol can handle small of data, so you can disable it.
-U 04. Find the -m option to increase the default memory allocation.
The default memory allocation for Memcached is 64MB. In this case, you will increase it to 512MB.
-m 5125. After that, find the -c option to change the default allowed connections. The default value is 1024, you can increase it to 2048.
-c 20486. Next, find the -u option to run Memcached as a specific user. The Memcached server should be running as a memcache user like this:
-u memcacheWhen finished, save and exit the file.
7. Now that you’ve changed Memcached configurations, restart the memcached service to apply your changes.
sudo systemctl restart memcached8. Lastly, verify the Memcached using the command below. Be sure to change 192.168.5.65 with the server IP address on the -l option.
# checking memcached via memcstat
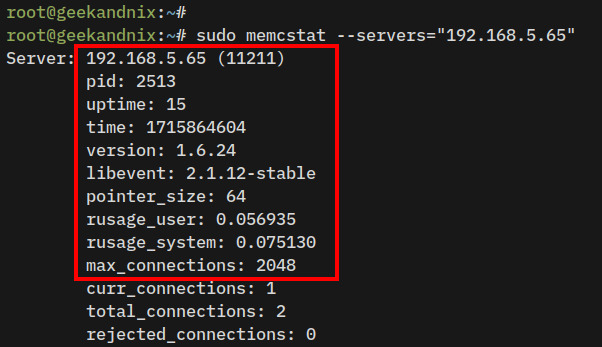
sudo memcstat --servers="192.168.5.65"

# checking memcached via netcat or nc
echo "stats settings" | nc 192.168.5.65 11211
Look at the value of inter, udpport, maxconns, and maxbytes to verify your changes to Memcached.
Optional: Securing Memcached with Authentication
I’m unable to setup Memcached authentication on the new Ubuntu 24.04 version. Below is the error I got:
Failed to ‘STAT ‘: (0x7ffcd9261ca0) INVALID ARGUMENTS, host: 192.168.5.65:11211 -> ./src/libmemcached/version.cc:40.
By default, the memcached server running without authentication. To secure it, you need to enable authentication via SASL2 (Simple Authentication and Security Layer v2).
To secure Memcached with SASL2 authentication, complete the following tasks:
Installing and Configuring SASL2
First, you must install the sasl2-bin to your Ubuntu server and set up the sasl2 database password for memcached.
1. Execute the apt command below to install the sasl2-bin package to your Ubuntu server.
sudo apt install sasl2-bin -y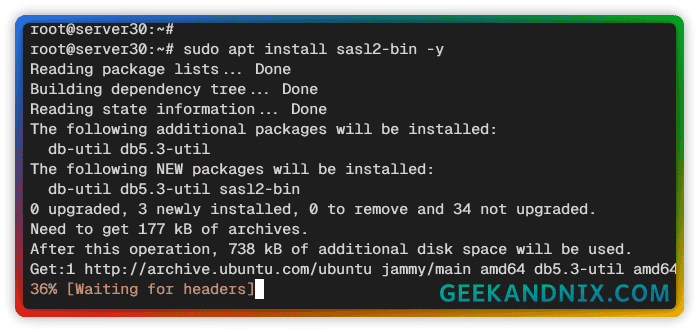
2. Create a new directory /etc/sasl2 and a new configuration file /etc/sasl2/memcached.conf using the following command.
By default, SASL looks for the configuration file /etc/sasl2/appname.conf. In this case, the application is Memcached, so the configuration should be memcached.conf
mkdir -p /etc/sasl2
sudo vim /etc/sasl2/memcached.conf
Insert the following configuration to create a SASL-based authentication for Memcached.
log_level: 5
mech_list: plain
sasldb_path: /etc/sasl2/memcached-sasldb2
Save and exit the file when finished.
SASL2 options that are used:
- log_level: Setting up log level to
5– Log to syslog. - mech_list: Specify the mechanism plugin for SASL. In this case, using
plainwith password file viasasldb_path. - sasldb_path: Specify the sasldb password file.
3. Now, run the saslpasswd2 command below to initialize the sasl database file.
In this example, you will create sasl database file /etc/sasl2/memcached-sasldb2 with the user wpapp. Be sure to input your password when prompted.
sudo saslpasswd2 -a memcached -c -f /etc/sasl2/memcached-sasldb2 wpapp
Detailed options for the saslpasswd2 command:
- -a: The application name.
- -c: Create a new entry for the SASL user.
- -f: Specify the user sasldb file.
- wpapp: The target user that you want to create.
4. Lastly, run the command below to set up permission of the /etc/sasl2 directory to user memcached. This will ensure the Memcached server can access the database file /etc/sasl2/memcached-sasldb2.
sudo chown -R memcache:memcache /etc/sasl2Enable SASL2 Authentication on Memcached
Now that you’ve configured the SASL2 installation, complete these steps to add SASL2 authentication to the Memcached server:
1. Open Memcached configuration file /etc/memcached.conf using vim.
sudo vim /etc/memcached.confInsert the new option -S to enable SASL-based authentication for Memcached.
-SSave the file and exit the editor.
2. Now, run the systemctl command below to restart the memcached service and apply your changes.
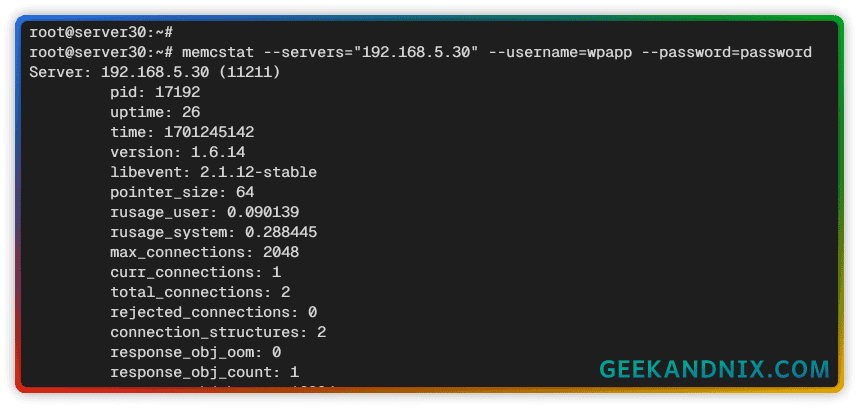
sudo systemctl restart memcached3. Lastly, run the memcstat command below to verify Memcached authentication.
memcstat --servers="127.0.0.1" --username=wpapp --password=passwordIf the authentication is successful, you should get the detailed stats of the Memcached server.
Securing Memcached Access with UFW
Additional to secure the Memcached server is by limiting hosts or IP addresses that are allowed to access port 11211 via UFW (Uncomplicated Firewall).
See more: Master the UFW Firewall on Ubuntu: 17 Practical Examples
Do the following to secure memcached with UFW:
1. Execute the ufw command below to specify the network subnet or IP address that is allowed to access Memcached.
# allow subnet 192.168.5.0/24 to access memcache port 11211
sudo ufw allow from 192.168.5.0/24 to any port 11211

# allow only IP address 192.168.5.20 to access memcache port 11211
sudo ufw allow from 192.168.5.20 to any port 11211
2. Then, reload UFW and verify enabled rules using the following command.
# reload ufw to apply changes
sudo ufw reload

# verify ufw status
sudo ufw status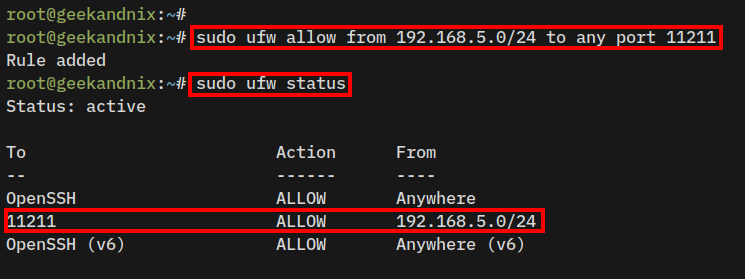
Installing Memcached Client Drivers
At this point, you’ve completed the Memcached installation. How do I connect my application to memcached? You must install the memcached client driver to your system.
Below is an example of how to install a memcached client driver for PHP, Python, and Node.js.
How do I Install the memcached PHP Extension on Ubuntu?
If you have PHP-based applications that require a Memcached driver, install the extension php-memcached via APT.
sudo apt install -y php-memcachedOnce the installation is complete, verify the PHP modules using the command below.
php -m | grep memcached
php -i | grep memcached
How do I Install memcached for Python?
For Python-based applications, you can install python3-memcached from the Ubuntu APT repository, or install the pymemcached package via pip3.
sudo apt install python3-memcached
sudo pip3 install pymemcached
How do I Install memcached for Node.js?
If you’re running Node.js applications, install the memcached or memjs package via NPM.
sudo npm install -g memcached
sudo npm install -g memjs
Conclusion
Congratulations and well done! You’ve installed memcached on the Ubuntu 24.04 server. You’ve also secured memcached with SASL2 (Simple Authentication and Security Layer v2) authentication and UFW (Uncomplicated Firewall).
In addition to that, you’ve also learned how to install memcached client drivers for different types of programming languages such as PHP, Python, and Node.js.
At this stage, you may consider installing a Memcached cluster via mcrouter to scale your memcached deployments.


