How to Install Chrony on Ubuntu 24.04/22.04 Server
This guide has been updated with the Ubuntu 24.04 server without any significant changes. So this guide is working for both Ubuntu 24.04 and 22.04.
Chrony is a modern NTP implementation for both NTP Server and Client. Follow this guide to install Chrony as an NTP Server and Client on Ubuntu 24.04 servers.
By installing chrony, you can have correct and synchronized time on computer networks. And it is critical to track accurate events that occurred within your networks.
Prerequisites
Before proceeding, make sure you have:
- Two Ubuntu 24.04 servers – one for the NTP Server, and one for NTP Client.
See more: How to install Ubuntu 24.04 server (step-by-step) - A non-root user with
sudoorrootprivileges.
Difference Between Chrony and ntpd
Chrony is the newer implementation of NTP (Network Time Protocol) with more features, such as frequency tracking, NTS (Network Time Security), and RTC (Real Time Clock) integration.
As for performance, chrony is faster with better accuracy than ntpd. Also, chrony uses less system resources (memory and CPU).
By that means, for newer systems and devices, you should always use Chrony. But, if you have old hardware or a system that doesn’t support chrony, use ntpd.
Below from RedHat Documentation:
Chrony should be preferred for all systems except for the systems that are managed or monitored by tools that do not support chrony, or the systems that have a hardware reference clock which cannot be used with chrony.
Installing Chrony as an NTP Server
Chrony is a flexible implementation of an NTP server that can be used as an NTP Server and NTP Client. It is available on most Linux distributions, for Ubuntu, install it via APT.
In this section, you will learn how to install and use Chrony as an NTP Server on the Ubuntu system.
Installing Chrony on Ubuntu
To install Chrony to your Ubuntu server, follow these steps:
1. First, run the apt command below to update the Ubuntu repository to receive the latest version of package information.
sudo apt update
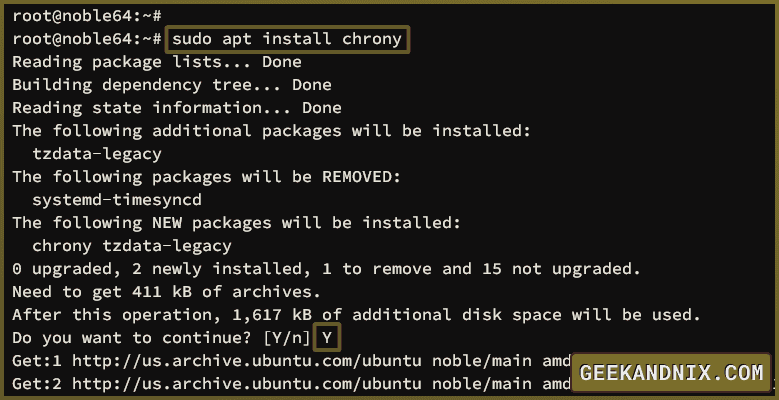
2. Install chrony using the following apt install command.
sudo apt install chronyInput Y to confirm the installation.
Configuring Chrony as NTP Server
Once you’ve installed chrony, you’re ready to create an NTP Server for your local network.
Carry out these steps to configure Chrony as an NTP Server:
1. Open the default chrony configuration /etc/chrony/chrony.conf using vim.
sudo vim /etc/chrony/chrony.conf2. Go to https://www.ntppool.org/en/, select the nearest location by country, and then copy the NTP source.

3. Change the default NTP server sources with a new pool. In this case, we will be using NTP pool 0.nl.pool.ntp.org.
pool 0.nl.pool.ntp.org iburstDetailed chrony configurations:
- pool: The functionality is similar to the
serveroption, but rather than using a single NTP server, it uses NTP pool servers. - iburst: Speed up initial synchronization to NTP sources.
4. Add the allow parameter to set up chrony as an NTP server, then input the allowed network subnet like this:
allow 192.168.5.0/24Save and close the file when you’re done.
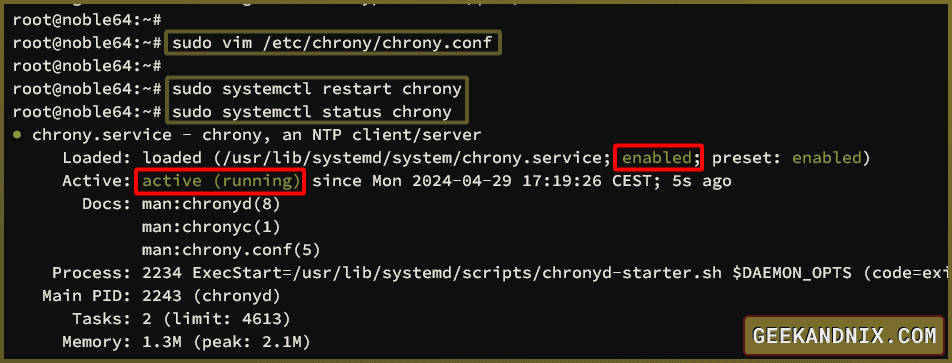
5. Next, run the following systemctl command to restart and apply your changes to the chrony service. Then, verify it to ensure chrony is running.
sudo systemctl restart chrony
sudo systemctl status chrony
If chrony is running, you will be presented with the output active (running).
Verifying Chrony as an NTP Server
At this point, you’ve configured chrony as an NTP Server. How to check and verify that chrony is running? You can check and verify chrony via the chronyc command line.
Carry out the following steps to verify chrony with the chronyc command line:
1. Run the chronyc command below to verify the activity of the chrony NTP server.
sudo chronyc activityYou should expect a similar output below.
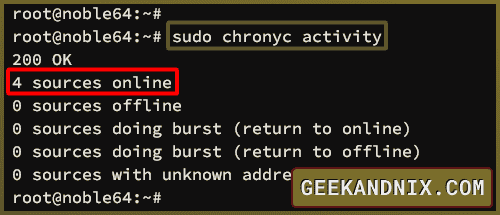
- 200 OK: The authentication to the chrony NTP server is successful. By default, the authentication in chrony is disabled.
- 4 sources online: There are 4 NTP server sources online.
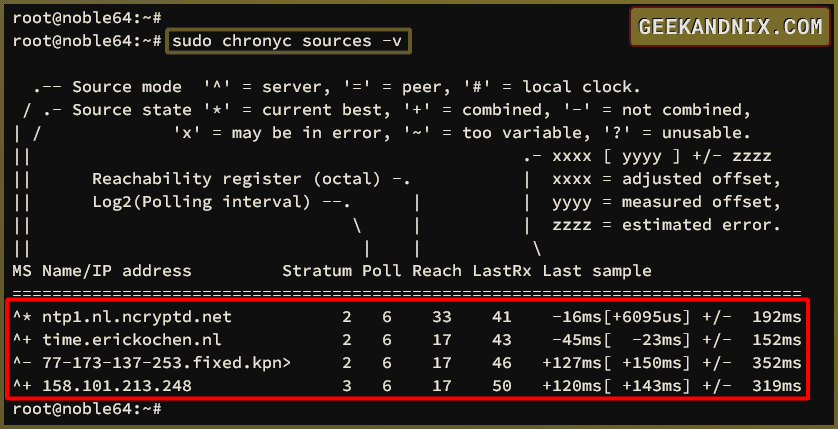
2. Then, verify the list of available NTP sources by executing the following command. The -v option means verbose that shows additional information about NTP sources.
sudo chronyc sources -vYou should take a look at the NTP source mode and state. In this example, our server is connected to ntp1.nl.ncryptd.net.
3. Lastly, run the following command to check the system clock performance with the current connected NTP server.
sudo chronyc tracking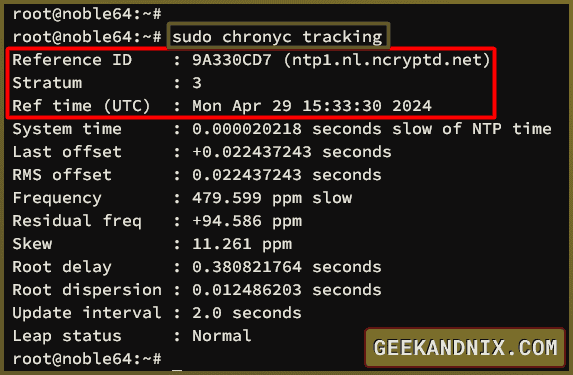
Allowing NTP Traffic via UFW
The final step of configuring chrony as an NTP Server is by allowing NTP traffic via UFW (Uncomplicated Firewall).
See more: Master the UFW Firewall on Ubuntu: 17 Practical Examples
Complete these tasks to allow NTP traffic via UFW:
1. If UFW (Uncomplicated Firewall) is enabled on your NTP server, add the ntp profile using the command below. The ntp application profile will open UDP port 123 for incoming NTP traffic.
sudo ufw allow ntp2. Now verify UFW using the ufw command below. Be sure the ntp application profile is enabled.
sudo ufw status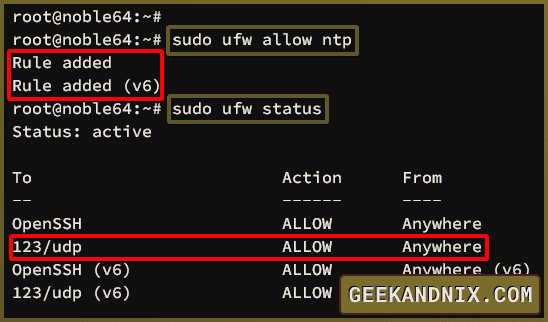
Installing Chrony as NTP Client
Now that you’ve installed and configured chrony as NTP Server, the next step is to install and configure chrony as an NTP client.
Follow these steps to install and configure chrony as an NTP client:
1. Be sure that you’ve installed chrony on your client machine. If not, use the following command to install it.
sudo apt install chrony -y2. Open the chrony configuration /etc/chrony/chrony.conf using the vim.
sudo nano /etc/chrony/chrony.conf3. Change the server parameter with the IP address of your NTP server.
server 192.168.5.30 minpoll 2 maxpoll 4 polltarget 304. Change some other configuration with the following:
driftfile /var/lib/chrony/chrony.drift
makestep 1 3
rtcsync
When you’re done, save and close the file.
Detailed parameters:
- driftfile: The file where the
chronyddaemon store rate information - makestep: Chrony making changes to system time gradually. To force a synchronization to the NTP source, lower the
makestepparameter (We’ll explain this later). - rtsync: Enable the RTC (Real Time Clock) integration for the hardware clock.
5. Now execute the following command restart the chrony and take effects. Then, verify the chrony service to ensure it is running.
sudo systemctl restart chrony
sudo systemctl status chrony
You should expect to get the following output when chrony is running.
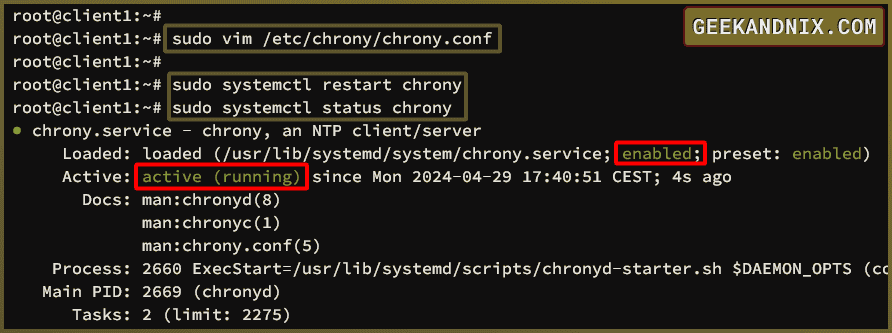
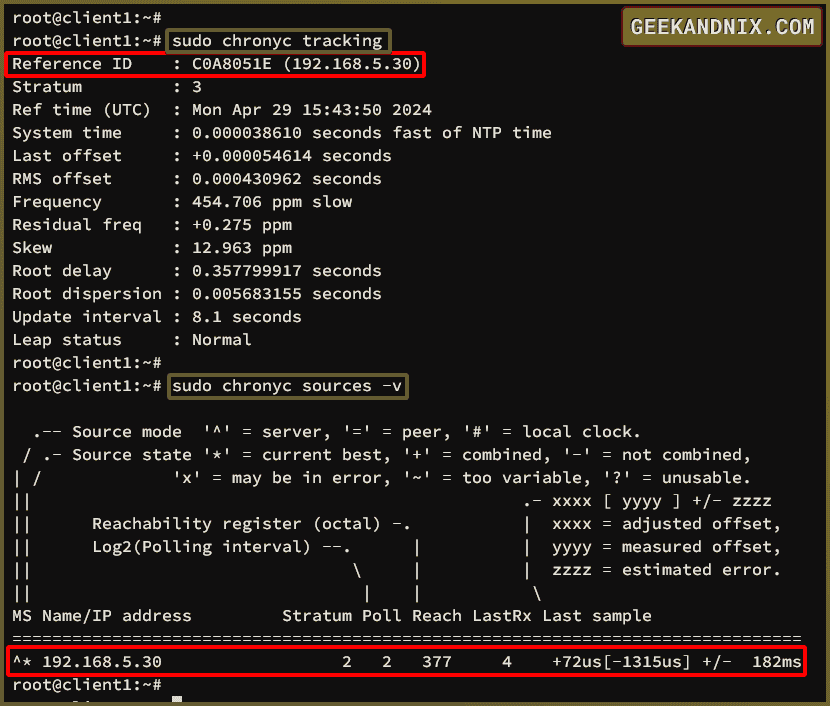
6. Lastly, verify the NTP client status using the command below.
sudo chronyc tracking
sudo chronyc sources -v
If successful, you will your local NTP server as the source.
Chronyc Commands You Must Know
In this section, you will learn how to use chronyc for checking and monitoring chrony operation on both NTP Server and the Client.
Below are some chronyc commands you must know:
1. First, run the command below to check the chronyd daemon activity.
sudo chronyc activity2. Now, use the chronyc tracking command to track the time difference between the current system and with NTP source. This also gives you information about the connected NTP server source.
sudo chronyc tracking
sudo watch chronyc tracking
3. If you need to check the list of NTP server sources, run the command below. Take a look at the server mode and state, you may see the NTP sources in error or unusable.
sudo chronyc sources
sudo chronyc sources -v
4. Next, run the command below on the NTP server to verify if the subnet or IP address is allowed to access local NTP.
sudo chronyc accheck 192.168.10.8
sudo chronyc accheck 192.168.5.20
If the host is allowed, you should get the output 208 Access Allowed. If denied, the expected output should be 209 Access Denied.

5. Lastly, execute the following command to list connected clients to your local NTP server.
sudo chronyc clients
makestep: Force Time Synchronization with Chrony
By default, the chronyd daemon gradually syncs the system time to the NTP source via the makestep ... parameter on the /etc/chrony/chrony.conf file.
Instead of gradually changing, you can force sync with chrony if you really need it, or if the time difference to the NTP source is too high.
Here is the rule: if the makestep value is high, such as 1000 10, the sync to the NTP server will be slow. To force sync or take an immediate update, lower the makestep parameter.
1. Open the chrony configuration /etc/chrony/chrony.conf using vim.
sudo vim /etc/chrony/chrony.conf2. Lower the makestep parameter like this – In this example, chrony will force synchronization when the time difference is 0.5 seconds.
makestep 0.5 -1Save and close the file when finished.
3. Now, run the systemctl command below to restart chrony and apply immediate changes to your system.
sudo systemctl restart chrony4. In addition to that, you can also force synchronization via the chronyc command below.
sudo chronyc -m 'burst 3/3' 'makestep 0.1 3'Managing Chrony Service
In the following section, you will learn how to manage the chrony service via the systemd systemctl tool.
1. To start the chrony service, run the following command.
sudo systemctl start chrony2. If you want to stop chrony, use the command below.
sudo systemctl stop chrony3. If you make changes to chrony, apply your changes by restarting chrony via the command below.
sudo systemctl restart chrony4. To check if chrony is running, use the following command. If running, you will see the out active (running).
sudo systemctl status chrony5. Lastly, to check if chrony is enabled on your system, use the command below. You should expect to see the output enabled.
sudo systemctl enable chronyUninstalling Chrony
1. If you want to remove chrony from your Ubuntu machine, execute the apt command below.
sudo apt remove chrony2. Optional, you can also remove chrony configuration directory to remove it completely
sudo rm -rf /etc/chronyConclusion
To conclude, you’ve installed Chrony as NTP Server and Client on Ubuntu servers. You’ve also learned about the chronyc command for monitoring chrony activity, checking NTP server sources, tracking time difference between NTP sources, listing allowed network and IP addresses, and also checking connected clients on the NTP server.
Furthermore, you’ve also learned how to use makestep to force time synchronization via chrony, which will be valuable if you need immediate changes in time.
From here, why not implement NTS (Network Time Security) on Chrony for securing connections between NTP Server and Clients? You can now implement Chrony as both NTP Server and Clients for your local networks.


