How to Install Squid Proxy on FreeBSD 14
Are you looking to reduce your bandwidth usage and speed up your internet connection on your local network? If so, consider installing Squid as an HTTP/S cache proxy on your FreeBSD server.
Squid will cache the most requested page by the client. The second time the client accesses the page, Squid will take the page from its cache. This improves your internet speed and reduces bandwidth because you access the page locally from Squid cache.
In this guide, I will show you how to install Squid proxy on a FreeBSD 14 server. I also cover how to create an HTTPS proxy, set up ACL (Access Control List) for your local network, and then enable Squid authentication.
Prerequisites
Before moving forward, make sure you’re equipped with the following:
- A FreeBSD 14 server initialized with root/administrator privileges.
- A pf (Packet Filter) firewall is configured and running.
- A client machine and web browser.
Installing Squid proxy on FreeBSD
Squid is an HTTP/S cache proxy for speeding up and reducing bandwidth in your local network. On FreeBSD, you can install Squid via the pkg package manager for easier installation, and via Ports for customizing Squid installation. Here, you will install Squid via pkg.
To install Squid proxy on FreeBSD, complete the following actions:
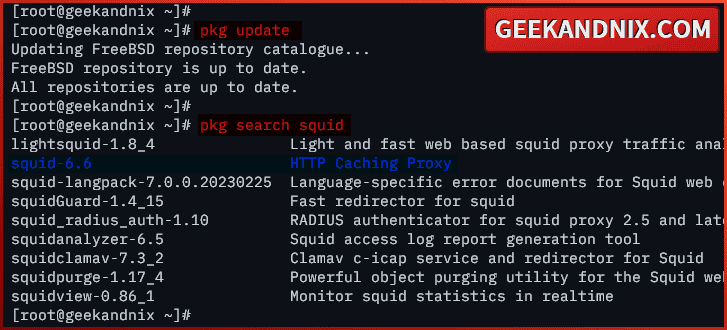
1. First, run the command below to update the FreeBSD package index and find the available squid packages.
pkg update
pkg search squid
As highlighted below, squid 6.6 is available on the FreeBSD repository.
2. Run the command below to install squid on your FreeBSD server. Type y to confirm with the installation.
pkg install squid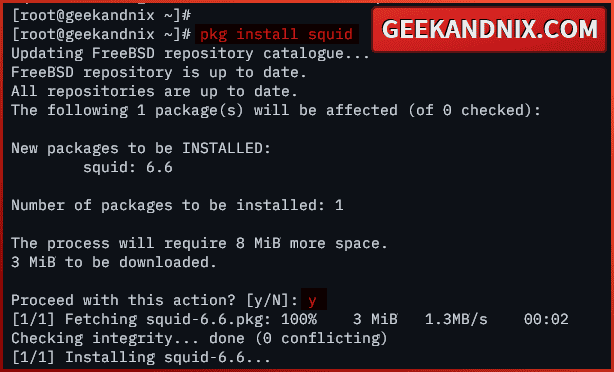
3. Now, run the command below to enable and verify the squid service.
sysrc squid_enable=yes
sysrc -a | grep squid
4. Lastly, run the squid command below to verify your squid version. Through this command, you will see the detailed compile parameters for your squid package.
squid --versionMake sure you have to compile parameters --enable-ssl, --with-openssl, and --enable-ssl-crtd on your squid package. Those parameters will be used to create and set up squid HTTPS proxy.

Generating TLS certificates for Squid proxy
After you’ve installed Squid, move on to generate TLS certificates for setting Squid HTTPS proxy. Here, you will generate TLS certificates via OpenSSL.
Navigate through the following tasks to generate TLS certificates for Squid proxy via OpenSSL:
1. First, run the command below to create a new directory /usr/local/etc/squid/certs, and move into it. Here, you will store TLS certificates for squid.
mkdir -p /usr/local/etc/squid/certs; cd /usr/local/etc/squid/certs2. Run the openssl command below to generate TLS certificates for squid. After the process is complete, you will see the private key squid-ca.key and public certificate squid-ca.crt.
openssl req -new -newkey rsa:2048 -days 365 -nodes -x509 -extensions v3_ca -keyout squid-ca.key -out squid-ca.crtInput detailed information about your certificate. In this case, I’m using the server fqdn as a Common Name for the certificate.
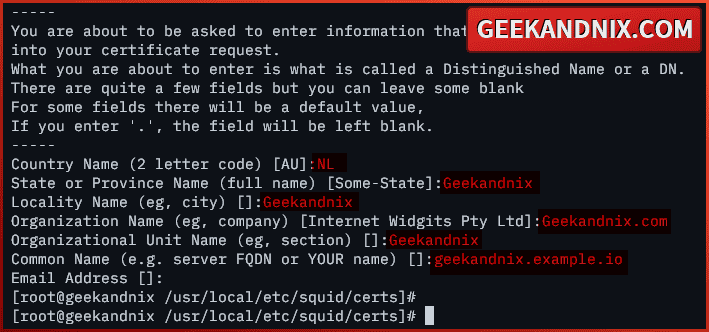
3. Now, run the command below to convert the public certificate.CRT to .PEM – squid-ca.crt to squid-ca.pem. The squid-ca.pem certificate will be distributed to clients.
openssl x509 -in squid-ca.crt -outform PEM -out squid-ca.pem4. Next, run the following command to generate the DHPARAM certificate squid-ca-dhparam.pem for squid.
openssl dhparam -outform PEM -out squid-ca-dhparam.pem 20485. Once the process is complete, run the command below to change the ownership of the /usr/local/etc/squid/certs directory to user squid. Through this, you will allow squid to read your certificates.
sudo chown -R squid /usr/local/etc/squid/certs6. Lastly, run the command below to generate the SSL database file /var/squid/ssl_db with a size of 32 MB. The SSL database file /var/squid/ssl_db will be used by Squid for storing SSL certificates.
sudo -u squid /usr/local/libexec/squid/security_file_certgen -c -s /var/squid/ssl_db -M 32MB
Configuring Squid and creating HTTPS proxy on FreeBSD
Having TLS certificates generated, it’s time to configure Squid and create an HTTPS proxy via ssl_bump. Here, you will create an HTTPS proxy, increase the size of the Squid cache directory, and then create a custom ACL (Access Control List) for your local network.
To configure Squid proxy on your FreeBSD server, and create HTTPS proxy via ssl_bump, execute the following actions:
1. To start, open the default squid configuration /usr/local/etc/squid/squid.conf using vim.
vim /usr/local/etc/squid/squid.conf2. Change the default http_port option with configuration below. with this, you will create a squid HTTPS proxy via ssl_bump that runs on 192.168.5.80:3128. Also, make sure to use the correct path of your TLS and DHPARAM certificates.
# Squid normally listens to port 3128
http_port 192.168.5.80:3128 ssl-bump generate-host-certificates=on tls-cert=/usr/local/etc/squid/certs/squid-ca.crt tls-key=/usr/local/etc/squid/certs/squid-ca.key tls-dh=/usr/local/etc/squid/certs/squid-ca-dhparam.pem
3. Now, add the following configuration to enable bumping for all requests.
acl step1 at_step SslBump1
ssl_bump peek step1
ssl_bump bump all

sslcrtd_program /usr/local/libexec/squid/security_file_certgen -s /var/squid/ssl_db -M 32MB
sslcrtd_children 5

ssl_bump server-first all
sslproxy_cert_error allow all
Or use this one:
# setup sslcrtd_program
sslcrtd_program /usr/local/libexec/squid/security_file_certgen -s /var/squid/ssl_db -M 32MB
sslcrtd_children 5

# enable ssl_bump
ssl_bump server-first all
ssl_bump stare all
4. Uncomment the cache_dir option and change the configuration with this. Here, you will be using ufs as the default storage format, setting up the max total cache size to 3000MB or 3GB, setting up the first-level directories
cache_dir ufs /var/squid/cache 3000 16 256 max-size=200000000Detailed cache options:
- ufs: the default storage format for squid cache.
- /var/squid/cache: target directory where cache will be stored.
- 3000: set up max total cache size to 3000MB or 3GB.
- 16 256: set up the first level for squid cache to 16 directories, then the second level with 256 directories.
- max-size=200000000: set up max cached file size up to 200000000 bytes or 20GB.
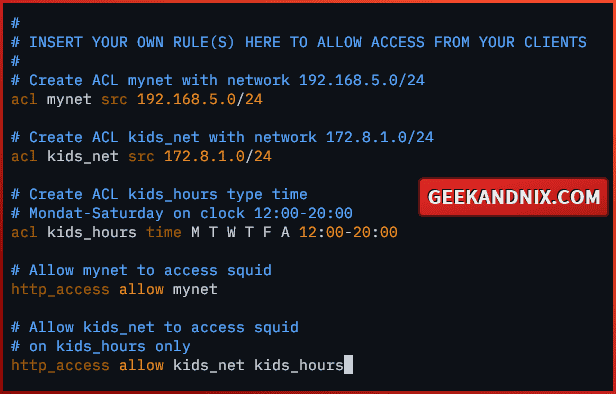
5. Lastly, add the following configuration to create a new ACL (Access Control List) to allow networks to use Squid as a proxy.
Here, I will allow networks 192.168.5.0/24 and 172.8.1.0/24 to use squid. However, the network 172.8.1.0/24 will be allowed only on specific days and hours.
# Create ACL mynet with network 192.168.5.0/24
acl mynet src 192.168.5.0/24

# Create ACL kids_net with network 172.8.1.0/24
acl kids_net src 172.8.1.0/24

# Create ACL kids_hours type time
# Mondat-Saturday on clock 12:00-20:00
acl kids_hours time M T W T F A 12:00-20:00

# Allow mynet to access squid
http_access allow mynet

# Allow kids_net to access squid
# on kids_hours only
http_access allow kids_net kids_hours
When finished, save the file and exit the editor.
6. Lastly, run the command below to generate a squid cache swap directory. This is needed when the first time you install squid on your FreeBSD.
Press ENTER to confirm.
squid -z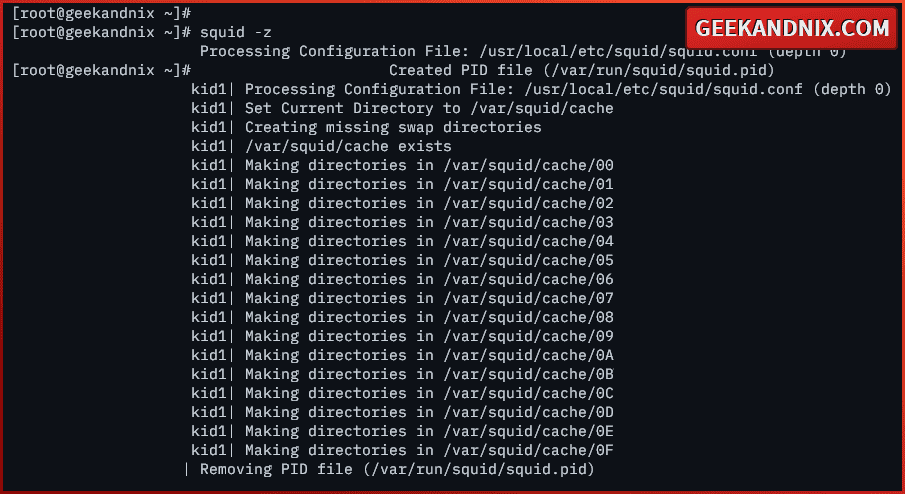
Managing Squid service on FreeBSD
After configuring Squid, move on to start Squid service on your FreeBSD server. Navigate through the following tasks to start and manage Squid service:
1. Run the command below to start squid on your FreeBSD server.
service squid start2. Once starts, run the command below to verify squid and ensure that the service is running.
service squid statusIf squid is running, you should get the pid (process id) of the squid service.

3. If you need to stop squid, use the following command.
service squid stop4. Lastly, run the command below to restart the squid service when needed. Especially after making changes to the squid.conf file.
service squid restartSetting up Squid authentication on FreeBSD
As the Squid service running, let’s take your Squid installation to the next level by implementing user authentication. In this example, you will enable Squid authentication via the basic_ncsa_auth module, which is similar to Apache’s basic_auth module.
Carry out the following actions to configure Squid authentication via the basic_ncsa_auth module:
1. First, run the command below to generate the password file /usr/local/etc/squid/htpasswd for squid authentication. In this example, I will create the first squid user geekandnix with the password mysecretpass.
printf "geekandnix:$(openssl passwd -apr1 mysecretpass)n" | sudo tee -a /usr/local/etc/squid/htpasswd
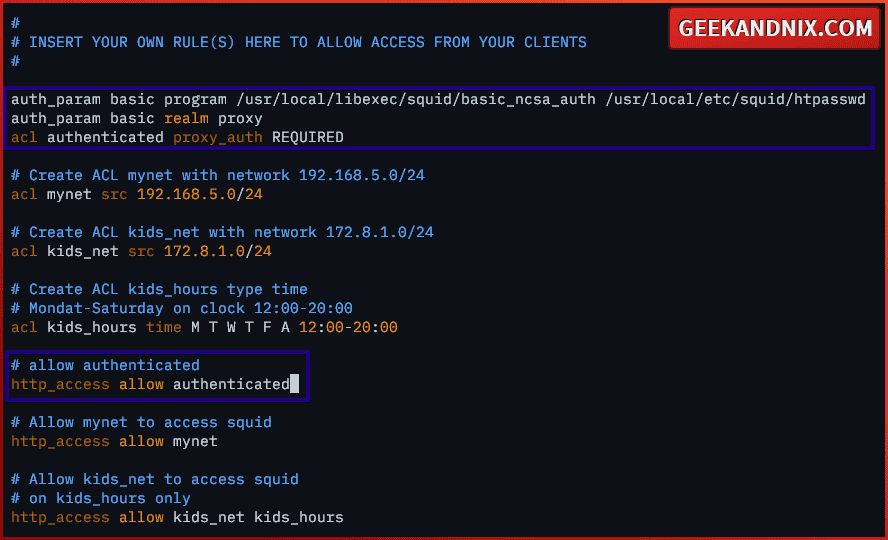
2. Now, open the squid configuration /usr/local/etc/squid/squid.conf and add the configuration below to enable squid authentication via the basic_ncsa_auth module.
Be sure to place the configuration in the exact place like this:
auth_param basic program /usr/local/libexec/squid/basic_ncsa_auth /usr/local/etc/squid/htpasswd
auth_param basic realm proxy
acl authenticated proxy_auth REQUIRED

# Create ACL mynet with network 192.168.5.0/24
acl mynet src 192.168.5.0/24

...
# allow authenticated
http_access allow authenticated

# Allow mynet to access squid
http_access allow mynet
When finish editing, save and exit.
3. After editing the squid.conf file, run the command below to verify and print the squid configuration to your terminal.
squid -k check && squid -k parseYou should have the squid configuration like the following:

4. Lastly, run the command below to restart the squid service and apply authentication to your squid HTTPS proxy.
service squid restart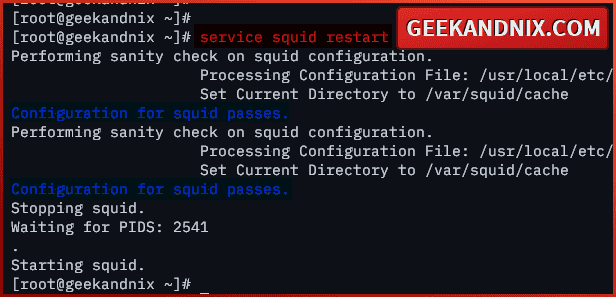
Opening Squid port via pg (Packet Filter)
So far, you have created an HTTPS proxy and enabled Squid authentication. Moving on, you will open Squid port 3128 via the firewall and allow clients to access your Squid HTTPS proxy.
To open Squid ports via pf (Packet Filter), execute the following tasks:
1. Open the default pf configuration /etc/pf.conf using vim.
vim /etc/pf.confAdd the squid port 3128 to both tcp_custom and udp_custom ports.
tcp_custom = "{ 3896, 8080, 3128 }"
udp_custom = "{ 5353, 3128 }"
Save and exit the file when done editing.
2. Now, run the command below to reload the pf service and open port 3128 for squid.
service pf reload3. Lastly, run the following command to verify the list of enabled rules on pf. Make sure traffic to the squid port 3128 is allowed on pf.
pfctl -sr | grep 3128
Connecting to Squid HTTPS proxy from client
Now that you’ve opened Squid ports, you can try to connect to Squid HTTPS proxy from your client. In this example, I will connect to Squid HTTPS proxy via Mozilla Firefox with the add-on FoxyProxy.
Perform these steps to connect to Squid proxy from your client machine:
1. First, download the squid-ca.pem certificate from your FreeBSD server to the client computer. In this case, I will use scp to download the squid-ca.pem certificate via user root.
scp [email protected]:/usr/local/etc/squid/certs/squid-ca.pem .
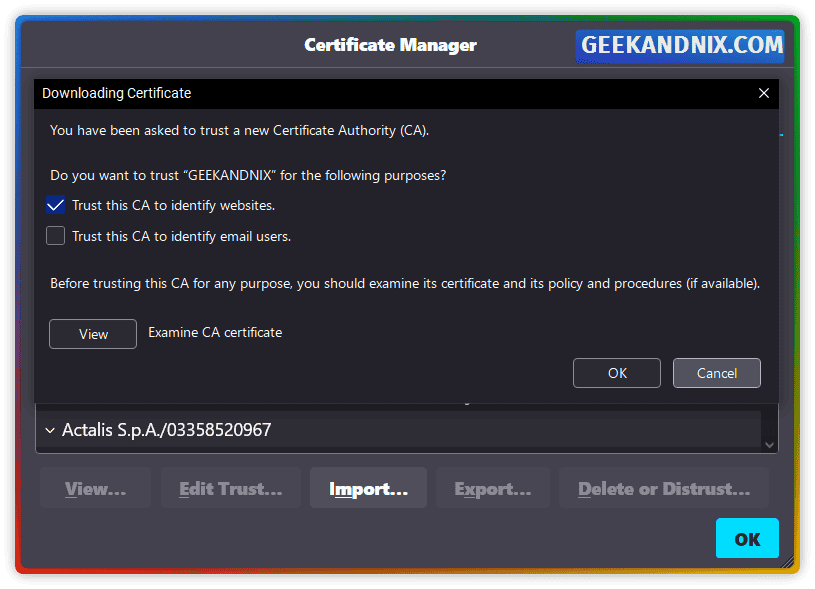
2. Once the certificate is downloaded, open your web browser and import the certificate to the browser. In this case, I’m using Mozilla Firefox, and here is how I do it:
- Click on the Settings menu, then go to Privacy & Security.
- Scroll to the Security section and click View Certificates.
- Select the tab Authorities and click Import. Then, browse the
squid-ca.pemcertificate file. - Check the option Trust this CA to identify websites and click OK to confirm.
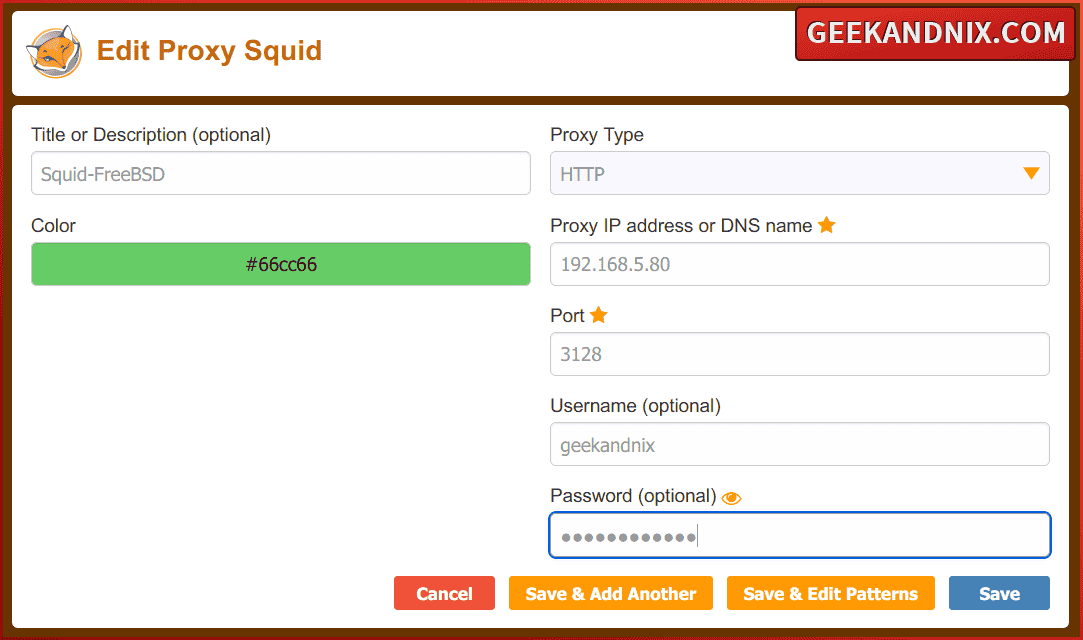
3. Next, install the FoxyProxy add-ons to your browser and create a new proxy with the following:
- Click the FoxyProxy icon and select Settings.
- Click Add to create a new proxy.
- Input details of squid proxy like the following – then click Save.
4. Lastly, visit https://geekandnix.com/ to verify your squid proxy installation. Once you’ve presented with the site homepage, do this:
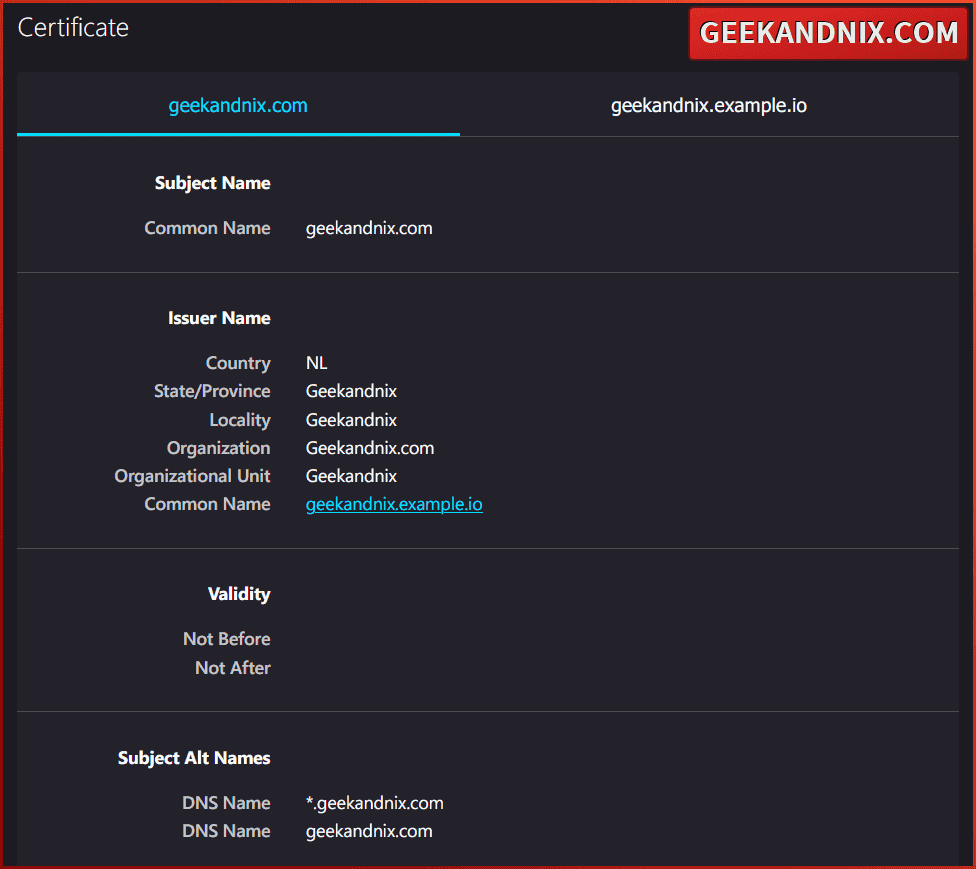
- Click on the HTTPS lock icon > Connection Secure > More information.
- Now click View Certificate.
If your squid installation was successful, you will be presented with the certificate of the squid server like the following – You can see the Issuer Name section:
How do I know that Squid proxy is working?
To check if the Squid cache proxy is working, check Squid access log /var/log/squid/access.log and find HTTP headers containing HIT. For this, you can utilize the tail and grep commands, or use an additional application such as calamaris for summarizing Squid log files.
To check and verify if Squid is working or not, navigate through these two methods:
1. First, run the following command to check the access.log file of the squid proxy. Find the word HIT, which means the squid as HTTP/HTTPS proxy cache is working.
tail -f /var/log/squid/access.log
grep HIT /var/log/squid/access.log
As pointed out below, the HTTP status TCP_INM_HIT/304, confirms that the requested page is cached by squid. But, because the page is changed, squid gives the client a page from outside of its local cache.

2. Secondly, you can use calamaris to generate reports of your squid proxy logs. This gives you a summary of squid activity on your FreeBSD server.
Run the command below to install calamaris on your system.
pkg install -y calamaris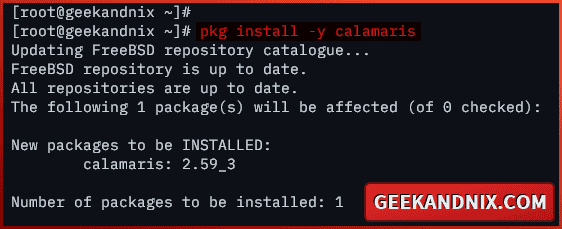
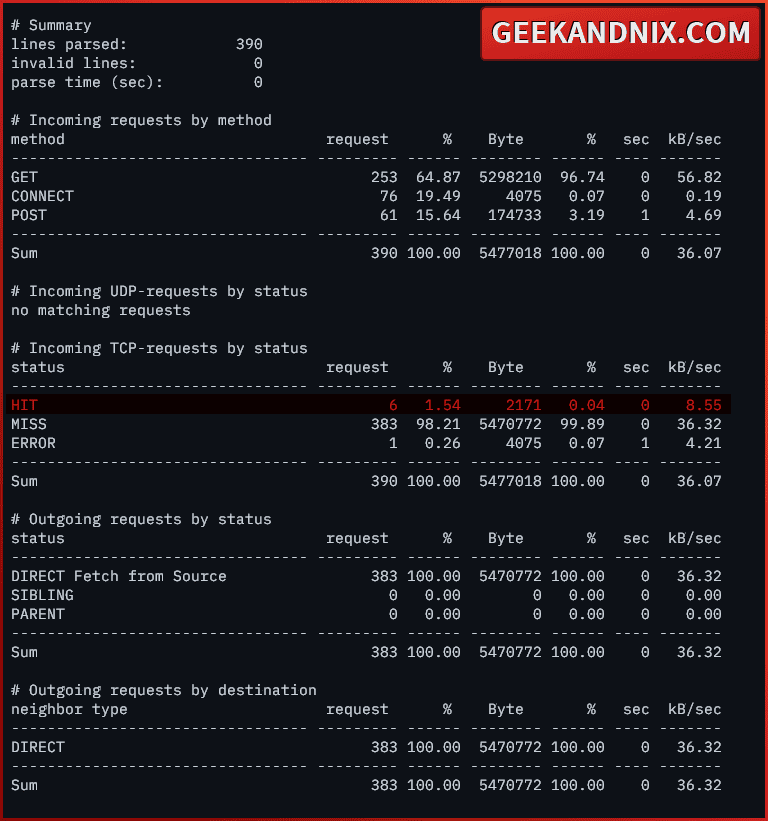
3. Once installed, run the command below to generate the reports of squid access.log using calamaris.
cat /var/log/squid/access.log | calamarisHere, you can see in the Incoming TCP-requests by status section the detailed status of squid cache HIT, MISS, and ERROR.
Debugging Squid proxy on FreeBSD
When you have errors during the Squid installation, you can trace and debug your errors with the following steps:
1. First, run the command below to check the squid service status. If squid running, you should see the pid of the squid service.
service status squid2. Secondly, run the command below to check the squid log files, both access.log and error.log. Here, you can find an error message related to your squid configuration.
tail -f /var/log/squid/error.log
tail -f /var/log/squid/access.log
3. Lastly, run the command below from outside of your squid proxy. Through this, you will ensure that the squid proxy is reachable from outside networks.
nc -zv 192.168.5.80 3128If your connection to Squid successful, you should get an output like this:

Uninstalling Squid proxy from FreeBSD
If you need to remove and uninstall Squid from your FreeBSD server, perform these tasks below:
1. First, disable and stop the squid service with the command below.
sysrc -x squid_enable=YES
service squid stop
2. Now, run the following command to remove the squid cache directory /var/squid.
rm -rf /var/squid3. Lastly, run the command below to uninstall/remove squid from your FreeBSD machine.
pkg remove squidConclusion
Fantastic work! You have installed Squid proxy on the FreeBSD 14 server. You also created Squid HTTPS proxy, configured different ACL (Access Control List) for your clients, and managed to connect to Squid HTTPS proxy via Mozilla Firefox.
Moreover, you also learned how to check and verify if the Squid cache is working or not. By utilizing the tail and grep commands, or using a third-party program such as calamaris.
If you’re interested in Squid, I recommend you check out how to set up a Transparent Proxy with Squid.
