How to Install and Use Samba on FreeBSD 14
Looking for a file server that works out of the box with Windows and Linux clients? Samba should be your top choice that you can install on FreeBSD server.
Samba is one of the solutions when you’re working on computer networks that mix between Windows and Linux clients. It provides file and printer services via SMB/CIFS protocol.
In this guide, I will teach you how to install Samba on the FreeBSD 14 server, step-by-step. I will show you how to create shared folders for multiple scenarios, as well as accessing Samba shared folders from Windows and Linux clients.
Prerequisites
To proceed with this guide, make sure you have the following:
- A FreeBSD 14 server initialized with sudo/root privileges.
- A pf (Packet Filter) firewall up and running.
- A client computer, can be a Windows or Linux client.
Installing Samba on FreeBSD
Samba is an open-source software providing file server printer service via SMB/CIFS protocol. Moreover, you can also use Samba as an AD/DC and Domain member. Whether you use Samba as a standalone file server or AD/DC, you need to install Samba packages to your system.
To install Samba on the FreeBSD server, follow these steps:
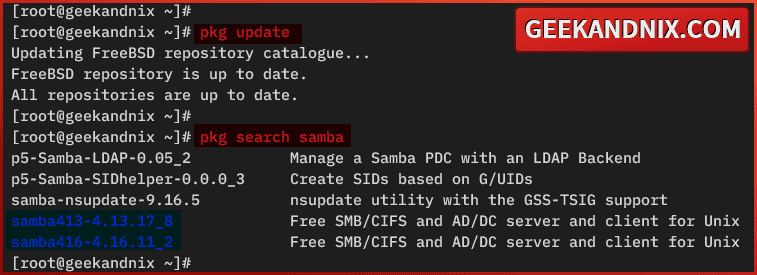
1. To start, run the command below to update the FreeBSD package index and search for any package with the name samba.
pkg update
pkg search samba
As pointed out below, there are two versions of Samba on the FreeBSD repository, v4.16 and v4.13.
2. Now, install the samba416 package by executing the following command. Enter y to confirm and proceed with the installation.
pkg install samba416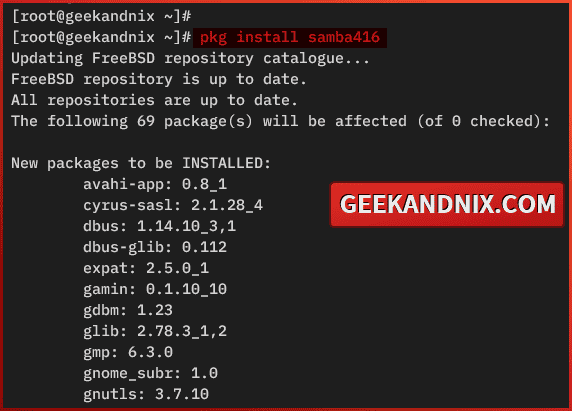
3. Lastly, run the command below to enable and verify the samba_server service on your FreeBSD server.
sysrc samba_server_enable=YES
sysrc -a | grep samba
Configuring Samba on FreeBSD
After you have installed Samba, you must create the Samba config file xxx and add global configuration to it. For the file server, you also need to create a new directory that will be shared with clients.
Navigate through these actions to configure Samba on FreeBSD:
1. First, run the command below to create a shared folder /smbshare and change the ownership to user nobody.
mkdir -p /smbshare
chown -R nobody:nobody /smbshare
2. Create a new Samba configuration /usr/local/etc/smb4.conf using vim.
vim /usr/local/etc/smb4.conf3. Insert the configuration, and be sure to change the interface em1 with your local network interface.
[global]
    # default workgroup to WORKGROUP
    workgroup = WORKGROUP

    # running Samba on localhost and em1
    interfaces = lo em1

    # Only bind Samba on the interface
    bind interfaces only = yes
When finished editing, save and exit the file.
Here, you will configure Samba with the following:
- workgroup: setup default workgroup to WORKGROUP, which is the default workgroup for Windows clients.
- interface: You will run Samba on the interface
lofor localhost andem1for the local network. - bind interfaces only: with
yes, you will enable Samba to bind on network interfaces.
Creating Samba shared folders on FreeBSD
So now you’ve created a basic Samba configuration, let’s move on to create and configure Samba shared folders on FreeBSD. In this example, I will show three specific cases of creating Samba shared folders, that most people need:
- Creating a Samba shared folder for a specific user.
- Creating a Samba shared folder for a group.
- Creating a Samba for anonymous access (without password authentication).
Creating a Samba shared folder for specific user
This case is straight to the point, you will create a Samba shared folder that is only accessible by a specific user.
To create a Samba shared folder for a specific user, follow these steps:
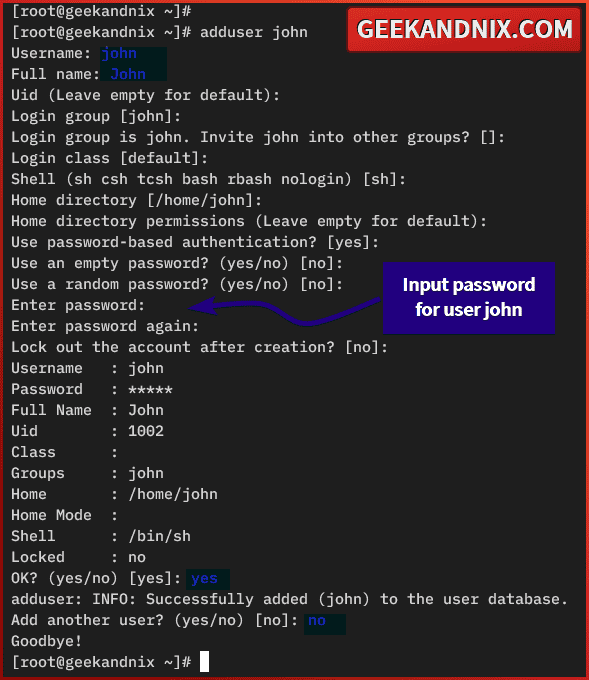
1. To begin, run the command below to add a new user to your FreeBSD server. In this case, I will create a new user john for Samba.
adduser johnEnter your username, full name, and password. You can leave the rest as default.
2. Now, run the pdbedit command below to add user john as a Samba user. Type a new Samba password and repeat for your account.
pdbedit -a -u john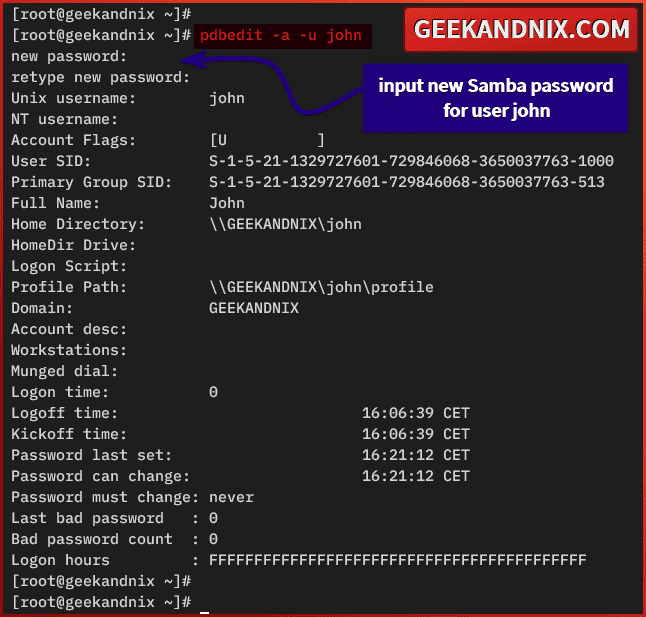
3. Lastly, open the Samba configuration /usr/local/etc/smb4.conf. Then, add the following settings to create a new SMB share John for specific user john.
[John]
    comment = SMB share for user john
    path = /home/john
    public = no
    writable = yes
    printable = no
    guest ok = no
    valid users = john
Creating a Samba shared folder for the group
Samba shared folder for a group is needed when multiple users need to access the same files. From there, you can create a new group and add users to that group.
Carry out the following actions to create a Samba shared folder for a specific group:
1. First, run the command below to create a new group on your FreeBSD server. Here, I will create a new group developers.
pw groupadd developers2. Run the command below to create the Samba shared directory /smbshare/developers and change the ownership to group developers.
mkdir -p /smbshare/developers
chown -R nobody:developers /smbshare/developers
3. Now, run the command below to allow read and write operations for group developers to the Samba shared directory /smbshare/developers.
chmod -R g+rw /smbshare/developers3. Then, open the Samba and add configuration /usr/local/etc/smb4.conf with your preferred text editor. Then insert the following configuration.
Through these settings, you will create a new shared folder Developers only for the group developers.
[Developers]
    comment = SMB share only for group developers can access
    path = /smbshare/developers
    browseable = yes
    guest ok = no
    writable = yes
    valid users = @developers
4. Next, run the pw usermod command below to add the user to the developers group. Here, I will add user alice to the group developers.
pw usermod alice -G developers5. Lastly, run the pdbedit command below to add user alice to the Samba password database file. Enter a new Samba password and repeat when prompted. With this, you will allow user alice to access Samba shared folder Developers.
pdbedit -a -u aliceCreating a Samba shared folder for anonymous (without password)
Do this only when you need, to because you will allow anyone to access your shared folder. For anonymous shared folder, read permission can always be granted, write only when needed, and always disable execute.
Execute these steps to create a Samba shared folder for anonymous:
1. First, run the command below to add a new shared directory /smbshare/public, and change the ownership to nobody.
mkdir -p /smbshare/public
chown -R nobody:nobody /smbshare/public
2. Run the chmod command below to allow read and write operations for anyone (user, group, and others). You can customize the permission as you need.
chmod -R ugo+rw /smbshare/public
chmod -R ugo+r /smbshare/public
3. Now, run the command below to add the user nobody to the Samba user database. Leave the password blank and press ENTER when asked.
pdbedit -a -u nobody4. Next, open the file /usr/local/etc/smb4.conf using using vim.
vim /usr/local/etc/smb4.conf5. Add these lines to the [global] section to enable anonymous access in Samba.
[global]
...
    security = user
    guest account = nobody
    map to guest = Bad User
Detailed options:
- security: control user authentication in Samba. The value
user, means the user needs to authenticate before accessing the shared folder. - guest account: a Samba user that will be used for guest or anonymous access. The default value is user
nobody. - map to guest: with the value
Bad User, you will treat the user login with an invalid password as a guest and will be mapped to theguest account.
6. Then, insert the configuration below at the bottom of the line. With this, you will create a shared folder Public for anonymous access without a password.
[Public]
    comment = SMB share for Public - any users can access and write
    path = /smbshare/public
    public = yes
    browseable = yes
    guest ok = yes
    guest only = yes
    writable = yes
    force user = nobody
    force group = nobody
When done editing, save and exit the file.
Managing Samba service on FreeBSD
So far, you have created multiple Samba shared folders. It’s time to start and manage the Samba service on your FreeBSD server.
Follow through these actions to start and manage the Samba service on FreeBSD:
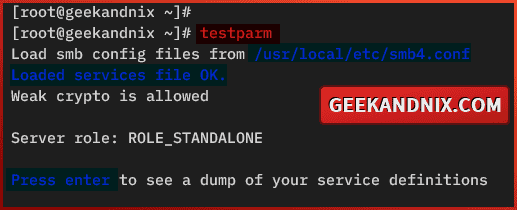
1. First, run the command below to verify the Samba configuration. Press ENTER when asked to show or dump your configuration.
testparmIf you have the correct Samba configuration, you should get an output Loaded services file OK. You should also see details of your Samba configuration.
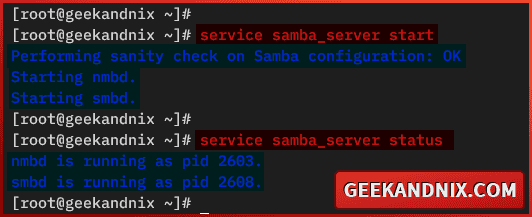
2. Now, run the command below to start samba_server on your FreeBSD. When starting Samba, the service will check your Samba configuration. If OK, the nmbd and smbd services will start.
service samba_server start3. Run the command below to verify the Samba service status. Through this, you will get the pid (process id) for both nmbd and smbd services.
service samba_server statusAs shown below, the nmbd service running on pid 2603, while smbd running on 2608.
4. Now, if you need to stop the Samba server, run the following command.
service samba_server stop5. Lastly, run the command below to restart Samba when needed. Especially after editing the smb4.conf file.
service samba_server restartOpening Samba ports with pf (Packet Filter) firewall
Now that the Samba file server is running, proceed further to open Samba ports via pf and allow clients to access shared folders.
Open ports for Samba services via pf (Packet Filter) firewall with these actions:
1. Edit the default pf configuration /etc/pf.conf using vim.
vim /etc/pf.conf2. Add Samba services netbios-ns, netbios-dgm, netbios-ssn, and microsoft-ds to the tcp_services and udp_services like this:
tcp_services = "{ ssh, http, https, domain, netbios-ns, netbios-dgm, netbios-ssn, microsoft-ds }"
udp_services = "{ domain, ntp, netbios-ns, netbios-dgm, netbios-ssn, microsoft-ds }"
Save and exit the file when finished.
3. Now, run the command below to reload the pf service and implement your changes.
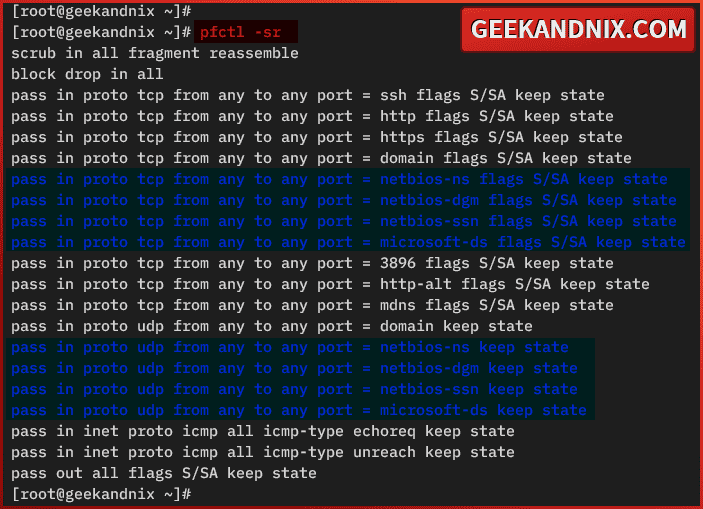
service pf reload4. Next, run the following command to verify the list of enabled rules on pf.
pfctl -srAs highlighted in the image below, ports for Samba services netbios-ns, netbios-dgm, netbios-ssn, and microsoft-ds is available on pf.
5. Lastly, run the smbclient command below to verify the list of Samba shared folders on your FreeBSD server. Be sure to change the Samba user john and the IP address with your information.
smbclient -U john -L 192.168.5.80If your configuration is successful, you should get the list of Samba shared folders. Here, I’ve created three shared folders, including John, Developers, and Public.

Accessing Samba shared folder from Windows client
Having the Samba file server running and the pf firewall configured, you’re ready to access Samba shared folders from client machines, Here, I will show you how to access Samba shared folders from Windows clients using two methods: via Windows Explorer and CMD/PowerShell.
Accessing Samba shared folder via Windows Explorer
To mount and access the Samba shared folder via Windows Explorer, go through these steps:
1. Open the File Explorer and navigate to Network. If you get a message such as Network discovery anmd file sharing are turned off, that means the Network Discovery feature is disabled.
Click the error message to enable Network Discovery on your Windows client.

2. Enter the Samba server address and shared folder such as \\192.168.5.80\John, then Press ENTER to connect.
When prompted for authentication, input your Samba username and password, then click OK.
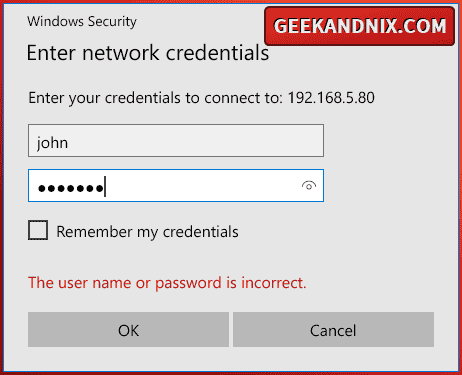
3. Once connected, you should see three Samba shared folders. You can access both shared folders John and Public, but you can’t access the field Developers.

Accessing Samba shared folder via CMD or PowerShell
If you need to mount a Samba shared folder via CMS or PowerShell, complete these actions below:
1. Open CMD or Powershell from the start menu.
2. Run the net use command below to mount shared folder John to the drive Z. Enter your Samba username and password when asked.
net use Z: \\192.168.5.80\John /user:john passwordIf the operation was successful, you should get the output The command completed successfully..

3. Now, open File Explorer and you should get the drive Z, which is the Samba shared folder John.

4. Moreover, run the command below to verify the list of mounted Samba folders via CMD.
net use5. If you want to remove the Samba shared folder from File Explorer, right-click on the target drive Z, then select Disconnect.
Common error when accessing Samba from Windows client
When mounting Samba to a Windows client, I got two different errors. If you have the same error, follow through these to solve the error:
1. First, I got the following error when mounted the Public shared folder without authentication:
You can’t access this shared folder because your organization’s security policies block unauthenticated guest access. These policies help protect your PC from unsafe or malicious devices on the network.
To solve this error, do this:
- Press Windows+R and type
gpedit.msc. - Click on the Computer Configuration > Administrative Templates > Network > Lanman Workstation.
- Click and enable the policy Enable insecure guest logons.
2. Secondly, I also got an error the following when mounting the shared folder John (after I already mounted the Public folder):
Multiple connections to a server or shared resource by the same user, using more than one user name, are not allowed. Disconnect all previous connections to the server or shared resource and try again.
To solve this, you must disconnect from the Public folder. Then, mount the folder John again. From here, you can access both Folder John and Public.
So the order of mounting shared folder matters:
- You can mount folder John, then access the Public folder.
- You cannot mount Public folder, then mount folder John. This is because only one user is allowed to connect to the Samba server.
Accessing Samba shared folder from Linux clients
If you’re using Linux clients, you can easily access and mount the Samba shared folder via your File Manager. You can use nautilus if you’re using GNOME, Dolphin for KDE users, or Thunar for XFCE users.
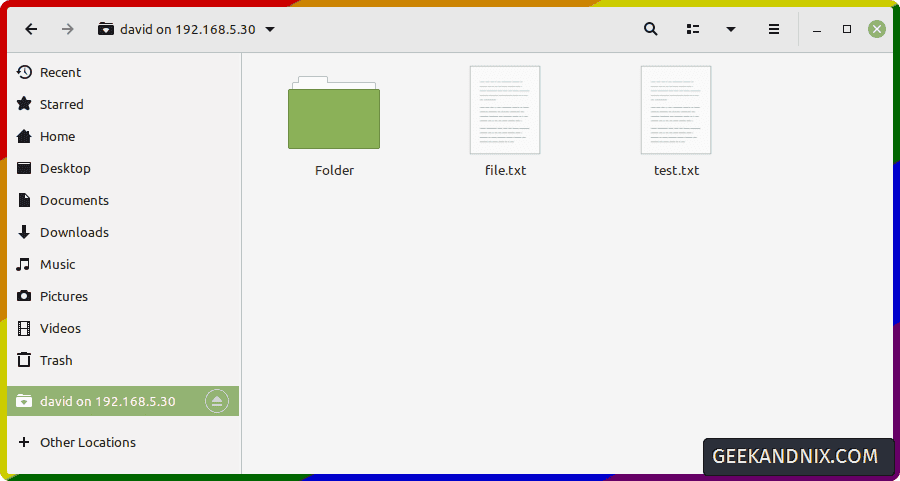
I used different screenshot, but the idea is the same: Accessing Samba shared folder via Nautilus.
In this example, I will use Nautilus for the GNOME desktop. So follow these actions to mount the Samba shared folder from the Linux client:
1. Open Nautilus on your Linux client and navigate to Other Locations. Enter the Samba server address smb://192.168.5.80 and click Connect.

2. Once connected, you should see multiple shared folders on the Nautilus window.
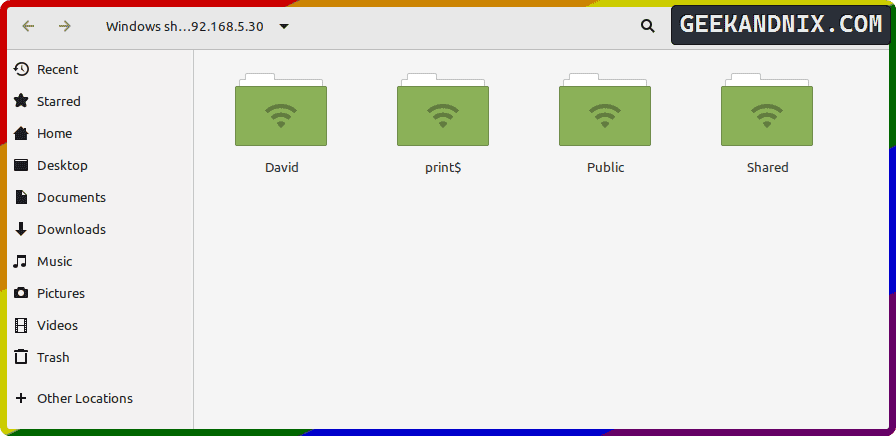
3. Click on the folder John to access and you will be asked for authentication. Enter Samba username and password, then click Connect.
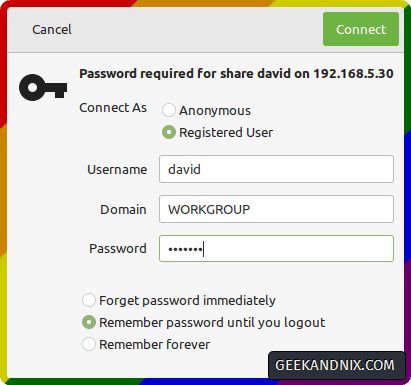
4. After connecting, the folder John should be mounted on your Nautilus menu.
Monitoring Samba activity on FreeBSD
Samba provides a command line tool smbstatus for monitoring activity. Here is how you can use it:
1. To monitor Samba server activity, run the smbstatus command below on your FreeBSD server. Through this, you will see the detailed client connections and data transfer activity.
smbstatus2. As pointed out below, user john connected to the Samba server via IP address 192.168.5.1 with SMB3 protocol.

Conclusion
Awesome work! You have installed Samba on the FreeBSD 14 server. You have created Samba shared folders for multiple real-world cases and allowed clients to access Samba via the firewall.
Moreover, you also learned how to use Windows Explorer and CMD/PowerShell to access the Samba shared folder from a Windows client. As for the Linux client, you have learned how to use Nautilus to access the Samba shared folder.
