How to Install NFS Server and Client on FreeBSD 14 (+AutoFS)
If you’re looking for a network file-sharing solution that you can access like a local disk/drive, you’re in the right place. In this guide, I will teach you how to install the NFS server and client on the FreeBSD 14 server, step-by-step.
I also cover how to create an NFS shared directory using NFSv4 and NFSv3/v2 protocols. And how to set up auto-mount on-demand by utilizing AutoFS (Automounter Filesystems).
No more waiting, let’s jump in.
Prerequisites
To complete this guide, make sure you have:
- A FreeBSD 14 server initialized with sudo/administrator privileges.
- A PF (Packet Filter) firewall up and running.
- A FreeBSD client computer.
Setting up NFS server on FreeBSD
On FreeBSD, you can easily enable NFS protocol via the /etc/rc.conf file, and you don’t need to install additional packages. To run NFS run smoothly, you must also enable some other services, such as:
- nfs_server and nfsv4_server: this will add supports to NFSv4 protocol for your NFS server.
- mountd: this service handles remote NFS mount process from clients.
- rpcbind: The
rpcbindcontrols RPC services, which are used by NFSv2 and NFSv3 protocols and handle port-mapping for clients.
To set up NFS Server on your FreeBSD server, follow these actions:
1. First, run the command below to enable the nfs server and set up additional flags/options on your FreeBSD server.
In this case, you will run the nfsd with additional flags -u -t -n 4. This means that you will serve NFS in both TCP and UDP using four daemons. If you have large clients, increase the daemon number to -n 16.
sysrc nfs_server_enable="YES"
sysrc nfs_server_flags="-u -t -n 4"
2. Run the command below to enable nfsv4 protocol on your FreeBSD server. This allows your NFS server to serve clients via the nfsv4 protocol.
sysrc nfsv4_server_enable="YES"
sysrc nfsuserd_enable="YES"
3. Now, run the following command to enable and allocate port 4046 for the mountd service.
sysrc mountd_enable="YES"
sysrc mountd_flags="-r -p 4046"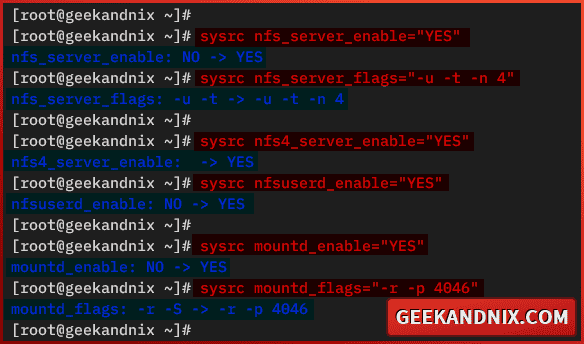
4. Next, run the following command to enable the rpcbind service. The rpcbind handles port-mapping requests from clients on the NFS server.
sysrc rpcbind_enable="YES"5. Once you’ve enabled rpcbind, run the command below to enable the rpc_lockd service and allocate port 4045 for it.
sysrc rpc_lockd_enable="YES"
sysrc rpc_lockd_flags="-p 4045"
6. Lastly, run the command below to enable and allocate port 4047 for the rpc_statd service.
sysrc rpc_statd_enable="YES"
sysrc rpc_statd_flags="-p 4047"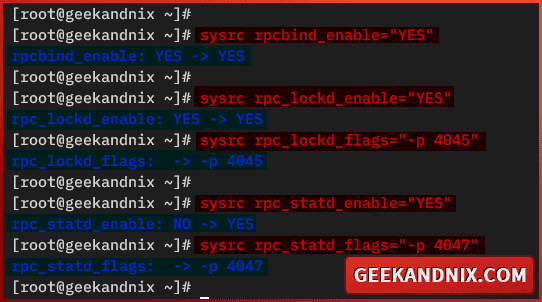
Creating NFS shared directory on FreeBSD
Now that you have enabled the NFS server, it’s time to create and configure NFS-shared directories for your clients. Here, you will create two shared directories via the /etc/exports file. You will set up an NFS shared directory with both NFSv2/v3 and NFSv4 protocols.
My recommendation: If you’re building an NFS server for production, ensure to use an external disk/drive. This will save you from data failure or system error.
Complete the following tasks to create NFS-shared directories on your FreeBSD server:
1. To get started, run the following command to create new shared directories /data/Docs and /shared.
mkdir -p /data/Docs
mkdir -p /shared
2. Now, run the command below to change the ownership of shared directories to nobody.
chown -R nobody:nobody /data/Docs /shared3. Next, create a new file /etc/exports using the vim editor.
vim /etc/exports4. Add the following configuration to create a new shared directory with nfsv4 enabled. The nfsv4 works as a pseudo root, so here, you will set up a shared directory /Docs for networks 192.168.5.0/24.
# Configuration for NFSv4 - comes pseudo root
# So here client's correct mount host:/Docs
# WRONG = host:/data/Docs
V4: /data -network 192.168.5.0 -mask 255.255.255.0
/data/Docs -maproot=root -network 192.168.5.0 -mask 255.255.255.0
5. Lastly, add the configuration below to to exports directory /shared for specific client 192.168.5.86.
/shared -alldirs 192.168.5.86Managing NFS services on FreeBSD
After you have created the NFS shared directory, let’s start and manage the NFS service on your FreeBSD server.
Important: The order of services for the NFS server on FreeBSD is matter.
This is the correct order when start nfsd: restart rpcbind, start nfsd, then restart mountd. When you need to restart nfsd: restart nfsd, then restart mountd, leave rpcbind.
Navigate through these steps to start and manage NFS services on FreeBSD:
1. First, run the command below to restart the rpcbind, start the nfsd service, then restart the mountd service.
service rpcbind restart
service nfsd start
service mountd restart
2. Run the following command to verify the rpcbind, nfsd, and mountd services. Make sure that each of those services is running.
service rpcbind status
service nfsd status
service mountd status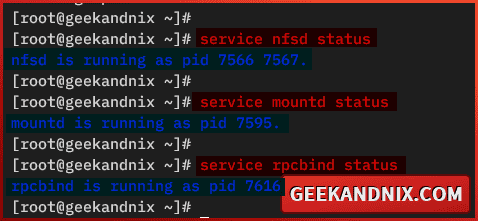
3. Now, if you need to stop NFS, run the command below – stop the nfsd and mountd, but never rpcbind.
service nfsd stop
service mountd stop
4. Next, run the command below to if you need to restart the NFS server. Remember, the service order should be rpcbind, nfsd, then mountd.
service rpcbind restart
service nfsd restart
service mountd restart
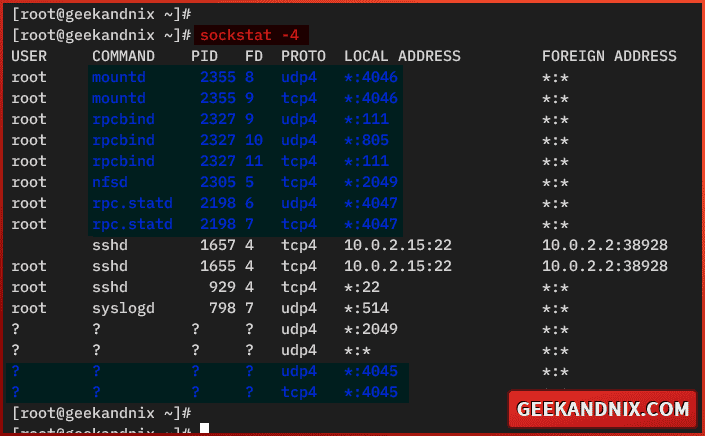
5. Lastly, run the sockstat command below to verify open ports in your FreeBSD server.
sockstat -4In this case, you should have the following ports for your NFS server:
- 111/tcp and 111/udp for the
rpcbindservice. - 2049/tcp for the
nfsdservice. - 4046/tcp and 4046/udp for the
mountdservice - 4045/tcp and 4046/udp for the
rpc_lockdservice. - 4047/tcp and 4047/udp for the
rpc_statdservice.
Opening NFS ports via pf (Packet Filter) firewall
By now, your NFS server is running. Following this, you need to open ports for your NFS server and allow traffic from clients. In this case, you will be using a pf (Packet Filter) firewall.
Execute these actions to open NFS ports via the pf (Packet Filter) firewall:
1. Open the default pf configuration /etc/pf.conf using vim.
vim /etc/pf.confAdd services for nfsd and sunrpc to the tcp_services and udp_services.
tcp_services = "{ ssh, http, https, domain, nfsd, sunrpc }"
udp_services = "{ domain, ntp, nfsd, sunrpc }"
Then, add ports 4045, 4046, and 4047 to both tcp_custom and udp_custom ports.
tcp_custom = "{ 3896, 8080, 4045, 4046, 4047 }"
udp_custom = "{ 5353, 4045, 4046, 4047 }"
Save and exit the file when finished.
2. Now, run the service command below to reload pf and take the effects of your changes.
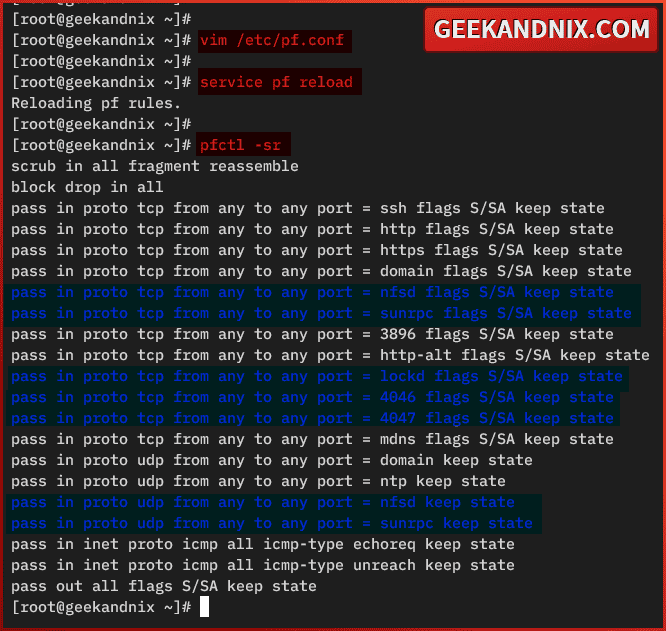
service pf reload3. Lastly, run the pfctl command below to get the list of enabled rules in pf.
pfctl -srAs can be seen below, the nfsd and sunrpc services are available on pf. Then, ports 4045 or lockd, 4046, and 4047 also added to pf.
Setting up NFS client on FreeBSD
Having successfully configured the NFS server, let’s move on to configure the NFS client on the FreeBSD. You just need to add the nfs_client_enable parameter to the /etc/rc.conf file on your client. Then enable the rpc_lockd and rpc_statd services. And you’re ready to mount the NFS shared directory.
To set up the NFS client on FreeBSD, carry out the following tasks:
1. Log in to your FreeBSD client machine via SSH or Desktop, then open a terminal and execute the sudo su command to get root privileges.
2. Run the command below to make your current machine an NFS client, then enable rpc_lockd and rpc_statd services.
sysrc nfs_client_enable="YES"
sysrc rpc_lockd_enable="YES"
sysrc rpc_statd_enable="YES"
3. Now, run the following command to start the lockd and statd services.
service lockd start
service statd start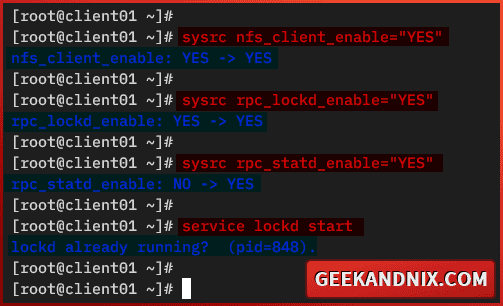
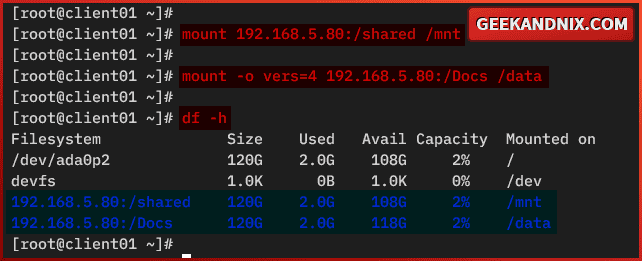
4. Once lockd and statd is running, run the command below to mount NFS shared directory /shared to /mnt via nfsv3. Be sure to change the server IP address with your NFS server.
mount 192.168.5.80:/shared /mnt5. Next, run the following command mount the /Docs shared directory to /data via nfsv4. Remember, the nfsv4 uses pseudo root, so it’s /Docs and not /data/Docs.
mount -o vers=4 192.168.5.80:/Docs /data6. Then, run the df command below to verify the list of mounted filesystems on your client.
df -hIf the mount is successful, you should get an output like the following:
7. Now, run the following command to check the read and write access to the NFS server. Then verify the file.
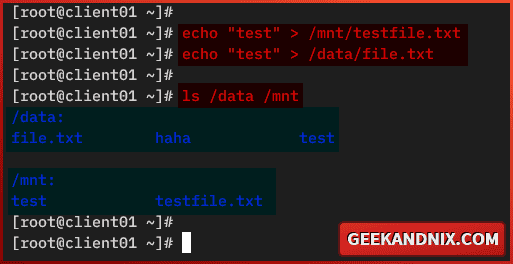
echo "test" > /mnt/testfile.txt
echo "test" > /data/file.txt

ls /data /mnt
cat test.txt
If you have read and write access to the NFS server, you should see the file testfile.txt in the /mnt directory, and file file.txt in the data directory.
8. Lastly, run the nfsstat command below to monitor NFS activity on your FreeBSD client.
nfsstatHere you can see the /Docs mounted to the /data directory via nfsv4, while /shared to /mnt via nfsv3.

Auto-mouting NFS server via AutoFS on FreeBSD client
As you have now mounted the NFS server via the mount utility, let’s take it to the next level by setting up auto-mount on-demand of NFS shared directories using AutoFS or automounter filesystems.
Carry out these steps to set up an auto-mount on-demand NFS server via AutoFS on your FreeBSD client:
1. Before you start, run the command below to unmount the NFS server.
umount /data
umount /mnt
2. Now, run the command below to enable the autofs service on your FreeBSD client.
sysrc autofs_enable=YES3. Open the autfs master configuration /etc/auto_master using vim.
vim /etc/auto_masterAdd the following configuration to the bottom of the line. Using this, you will automatically mount the NFS server to the /mnt directory.
#NFS
/mnt        /etc/auto.nfs   -nosuid,-intr
When finish editing, save the file and exit.
4. Next, create a new file /etc/auto.nfs using vim editor.
vim /etc/auto.nfsInsert the configuration below to mount the shared directory /Docs to /mnt/Docs, and /shared to the /mnt/shared directory. The ./mnt here is taken from the autofs master config file, and should not be included in the auto.nfs.
Docs -intr,nfsv4 192.168.5.80:/Docs
shared -intr,nfsv3 192.168.5.80:/shared
Save the file and exit after finished.
5. Then, run the command below to start services for automount, automountd, and autounmount.
service automount start
service automountd start
service autounmount start
Those services will monitor activity within the /mnt directory and the following conditions:
- When there is activity in the
/mnt/Docsor/mnt/shareddirectory, the NFS shared directory will automatically be mounted. - When there is no activity, the
autounmountservice will kick and automatically unmount NFS.
6. Lastly, do this to verify the autofs configuration for automatically mounting the NFS server:
- Run
df -hto get the list of mounted filesystems. Be sure there is no NFS mounted. - Now run
cd /mnt/Docsto go to the/mnt/Docs. This will kick theautomountdservice and mount the NFS server. - Run
touch test.txtto test and create a new file on it. - Run again the
df -hcommand and you will see the NFS shared directory/Docsis mounted automatically via autofs.

Conclusion
Good job and well done! You have installed the NFS Server on FreeBSD 14. You’ve also created NFS shared directories with NFSv4 and NFSv3/2 protocol and secured NFS with pf (Packet Filter) firewall.
On the other hand, you also configured FreeBSD as an NFS client and utilized the mount command to mount the NFS server with NFSv4 and NFSv3. Lastly, you also learned how to configure AutoFS (Automounter Filesystems) for auto-mount on-demand NFS shared directories.
