How to Install and Secure Memcached on FreeBSD 14
Looking for an in-memory data store for your database, API, and rendering page? Memcached are the solutions for Unix such as FreeBSD and Unix-like operating systems.
Memcached is a distributed in-memory data store to boost the performance of your application. It allows you to cache chunks of arbitrary data, which makes data retrieval faster.
In this guide, I will show you how to install and secure memcached on the FreeBSD 14 server.
Prerequisites
Before you begin, make sure you have:
- A FreeBSD 14 server initialized with sudo root/administrator privileges.
- (Optional) A pf (Packet Filter) firewall up and running.
Installing Memcached on FreeBSD
Memcached is an open-source in-memory key-value data store for BSD and Linux operating systems. In this case, you will install memcached to FreeBSD via PKG package manager. Alternatively to that, you can also install it via Ports.
To install memcached on FreeBSD, follow these steps:
1. First, run the command below to update the FreeBSD package index on your system.
pkg update2. Run the pkg command below and install the memcached package. Enter y to accept and proceed with the installation.
pkg install memcached libmemcached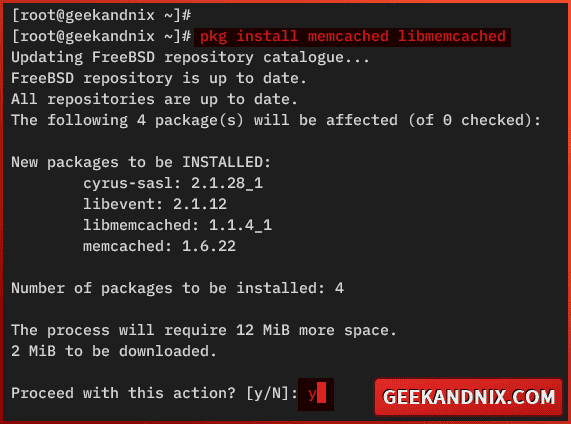
3. Once installation is complete, run the command below to enable the memcached service.
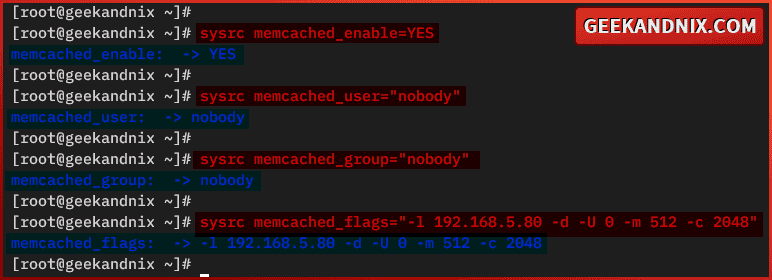
sysrc memcached_enable=YES4. Then, run the following command to configure memcached to run with user nobody and some additional start options/flags.
# running memcached as user nobody
sysrc memcached_user="nobody"
sysrc memcached_group="nobody"

# memcached start options/flags
sysrc memcached_flags="-l 192.168.5.80 -d -U 0 -m 512 -c 2048"
Memcached options used:
- -l 192.168.5.80: Run memcached service on IP address 192.168.5.80.
- -d: Start memcached in the background.
- -U 0: Disable memcached on UDP port.
- -m: Set up max memory to 512 MB.
- -c 2048: Set up max connections to 2048.
5. Lastly, run the command below to verify the memcached service.
sysrc -a | grep memcached
Managing Memcached service on FreeBSD
After you have installed memcached, let’s gear up to start and manage the memcached service. Here, you will be utilizing the service command to manage the memcached service, and the sockstat command to verify the default memcached port 11211.
To start and manage the memcached service, carry out the following actions:
1. To start the memcached service, run the command below.
service memcached start2. Once memcached starts, verify it with the following command. This will show you the PID (Process ID) of the memcached service.
service memcached statusAs pointed out below, memcached is running with pid 2168.

3. Now, run the command below to stop memcached when needed.
service memcached stop4. Next, when needed to restart memcached, use the command below.
service memcached restart5. Lastly, you can also verify memcached port 1121 by running the sockstat command below. If memcached is running, you will see port 11211 is used by the memcached service.
sockstat -4 | grep 11211
Optional: Open Memcached port with pf (Packet Filter)
If you’re running memcached on a local IP address, be sure to open memcached port 11211 to allow traffic from your application. Execute the following steps to open port 11211 with pf on FreeBSD:
1. Run the vim editor to open pf configuration /etc/pf.conf.
vim /etc/pf.confAdd port 11211 to the tcp_custom port like this:
tcp_custom = "{ 3896, 8080, 11211 }"Save and exit the file when done.
2. Now, run the command below to reload pf service and take effect of your changes.
service pf reload3. Lastly, run the following command to ensure traffic to memcached port 11211 is allowed. If allowed, you should see an output pass in proto tcp ..., on port 11211.
pfctl -sr | grep 11211Testing Memcached connection via memcached-tool on FreeBSD
Now that you have started memcached, the next task is to verify memcached via memcached-tool and netcat utility. The memcached-tool is a Perl-based application for checking stats and managing memcached, and it is included in the memcached package.
Go through the following steps to test and verify memcached using memcached-tool:
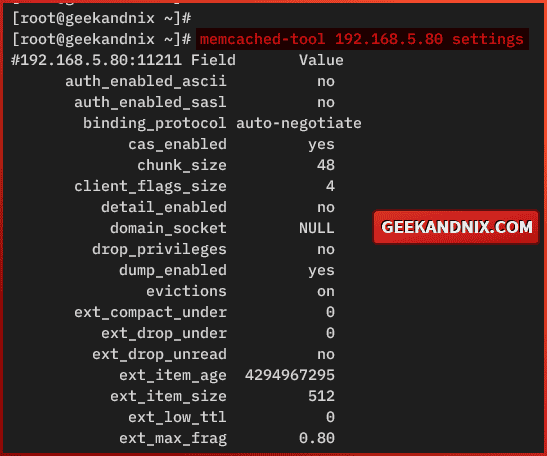
1. First, run the memcached-tool command below to check your memcached configuration.
memcached-tool 192.168.5.80 settingsAfter the command is executed, you will see a memcached configuration like the following:
2. Now, run the command below to check the memcached stats. Using this, you can check the current read and write stats, connections stats, and also authentication stats.
memcached-tool 192.168.5.80 stats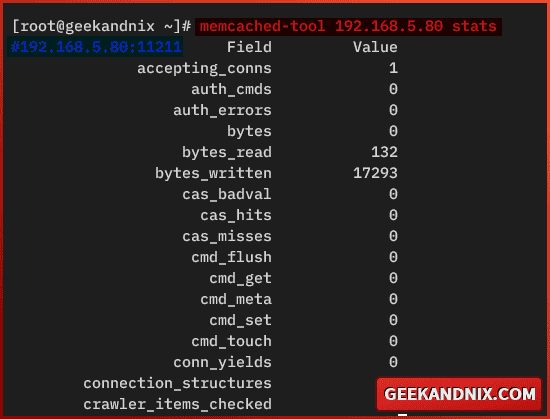
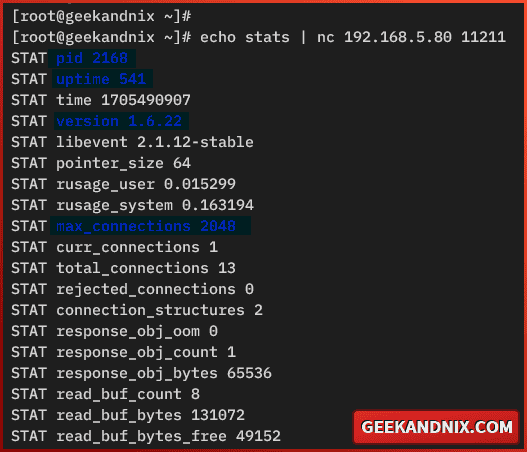
3. Additionally, you could verify the memcached stats via netcat or nc command below. The netcat command is available in Unix and Unix-like operating systems, which gives you flexibility to check memcached stats from anywhere.
echo stats | nc 192.168.5.80 11211Press Ctrl+c to terminate the netcat process.
Here, you can see memcached stats and basic configurations, such as the memcached version, pid, uptime, max_connections settings, and total connections.
Securing Memcached with SASL authentication on FreeBSD
So far, the memcached service is up and running. Moving from here, you will secure memcached installation via SASL (Simple Authentication and Security Layer) authentication. By enabling SASL authentication, you can prevent unauthorized access to your memcache data store.
Carry out the following steps to secure memcached with SASL authentication:
1. First, run the command below to add the memcached options/flags -S to enable SASL authentication in memcached. Then, add an additional environment variable for memcached service SASL_CONF_PATH, which pointed to the configuration /usr/local/etc/memcached.conf.
# addning start option/flag -S to enable SASL authentication
sysrc memcached_flags+=" -S"

# create env SASL_CONF_PATH for memcached service
sysrc memcached_env="SASL_CONF_PATH=/usr/local/etc/memcached.conf"
2. Run the following command to verify memcached parameters in the rc.conf file. Ensure you have the option -S in the memcached_flags parameter.
sysrc -a | grep memcached
3. Now, run the vim editor to create a new configuration /usr/local/etc/memcached.conf.
vim /usr/local/etc/memcached.confAdd the following setup to the file.
log_level: 5
mech_list: plain
sasldb_path: /usr/local/etc/sasldb2
Save and close the file.
4. Next, run the salspasswd2 command below to generate the SASL password authentication for application memcached and create a user user appuser. Enter your password when asked and repeat.
saslpasswd2 -a memcached -c appuser5. Now, run the command below to change the ownership for the SASL password database file /usr/local/etc/sasldb2.db to nobody.
chown -R nobody:nobody /usr/local/etc/sasldb2.db6. Lastly, run the service command below to restart memcached and implement your changes.
service memcached restart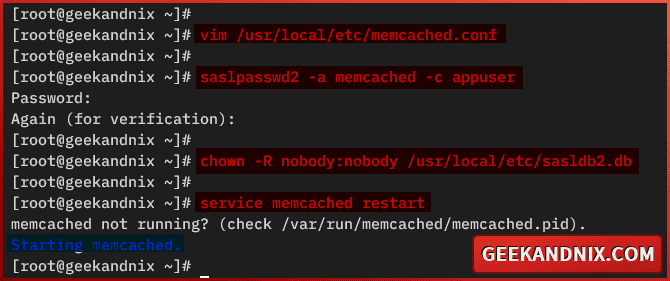
Testing Memcached authentication with Python memcached
Now that you’ve enabled SASL authentication, let’s navigate to the final step to verify memcached authentication. In this example, you will be utilizing the Python memcached driver to connect to memcached, and then create a key-value data store.
Execute the following steps to verify memcached authentication via the Python memcached driver:
1. First, run the pkg command below to install the Python memcached driver py39-python-binary-memcached package on your FreeBSD.
pkg install -y py39-python-binary-memcached
2. Now, run the command below to activate your Python interactive shell.
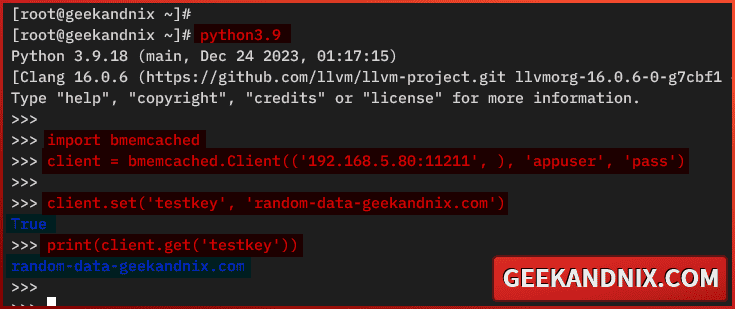
python3.93. Within the Python interactive shell, import the Python memcached driver bmemcached.
import bmemcached4. Next, create a new client connection to the memcached server 192.168.5.80:11211 with the user appuser and password pass. Be sure to change the details of the memcached host, user, and password with your information.
client = bmemcached.Client(('192.168.5.80:11211', ), 'appuser', 'pass')5. Lastly, run the following to create a new key testkey on memcached, and retrieve it.
client.set('testkey', 'random-data-geekandnix.com')
print(client.get('testkey'))
If your memcached authentication was successful, you should be able to create and retrieve the testkey from the memcached server like the following:
Conclusion
Mission accomplished! You have completed the steps and installed memcached on the FreeBSD 14 server. Also, you have secured memcached by enabling SASL (Simple Authentication and Security Layer) authentication and learned the basic memcached-tool for checking cache status.
Moreover, you have also learned the basic usage of Python memcached driver for connecting to memcached, creating and retrieving key-value data store.
