How to Install Fail2ban with PF on FreeBSD 14
Fail2ban is Python-based intrusion prevention software for securing against brute-force attacks. It’s available on most Unix and Unix-like OS, including FreeBSD. Fail2ban works by scanning the log file of a specific service via filters, then blocks any IP addresses with excessive failed login attempts via the backend firewall.
In this guide, you will learn the following about fail2ban:
- How to install fail2ban on FreeBSD.
- How to integrate fail2ban with pf (Packet Filter).
- How to verify that fail2ban and pf are working?
- How to manage fail2ban using fail2ban-client utility.
Prerequisites
Make sure you have the following to complete this guide:
- A FreeBSD 14 server.
Read more: FreeBSD 14: Step-by-Step Installation (With Screenshot) - A root user or non-root user with sudo/root privileges.
- PF (Packet Filter) is configured on your FreeBSD machine.
Read more: How to Set Up and Manage PF Firewall on FreeBSD 14
Installing Fail2ban on FreeBSD
Fail2ban is available on most major Unix and Linux operating systems. It can be installed via the package manager. To install fail2ban on FreeBSD, complete the following steps:
1. To start, run the pkg command below to update the FreeBSD package index and find the fail2ban package.
pkg update
pkg search fail2ban
As you can see in the following, the fail2ban package on FreeBSD comes with the name py39-fail2ban.

2. Run the following command to install the py39-fail2ban to your FreeBSD server.
pkg install py39-fail2banInput y when prompted to proceed.
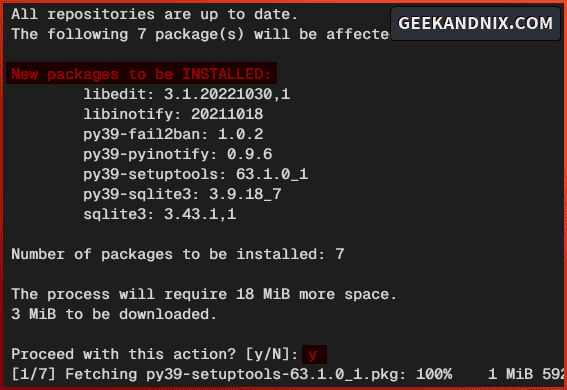
3. After you’ve installed fail2ban, execute the following sysrc command to enable the fail2ban service and verify it.
# enable fail2ban service
sysrc fail2ban_enable="YES"

# check if fail2ban is enabled
sysrc -a | grep fail2ban
If fail2ban is enabled, you should get an output fail2ban_enable: YES.

Integrating Fail2ban with PF (Packet Filter) on FreeBSD
To integrate fail2ban with pf (Packet Filter) on FreeBSD, you must create a new anchor f2b/* in the pf configuration /etc/pf.conf. The anchor f2b/* will be used by fail2ban for storing jail rulesets.
In this example, you will be using pf (Packet Filter) as the backend firewall for fail2ban. Follow these steps to configure pf with fail2ban:
1. First, open the pf configuration /etc/pf.conf using vim.
vim /etc/pf.confAdd the following line to create a new anchor f2b/*. The f2b/* anchor will be used for storing fail2ban jail rulesets in the nested format. So, for example, if you have fail2ban jail with the name ssh-pf, the ruleset f2b/ssh-pf will be created.
# Anchor for fail2ban
anchor "f2b/*"
Save the file and exit the editor.
2. Now run the service command below to reload the pf service and apply your modifications.
service pf reload3. Lastly, run the command below to verify the list of available anchors on your pf.
pfctl -a '*' -srEnsure the f2b/* anchor is available on your pf rules.

Configuring Fail2ban on FreeBSD
After integrating pf with fail2ban, let’s configure fail2ban with the following:
- Configuring Default banaction with PF (Packet Filter).
- Adding Fail2ban Jail for securing SSH.
Let’s begin.
Configuring Default banaction with PF (Packet Filter)
To configure fail2ban bannaction with pf, follow these steps:
1. Create a new jail /usr/local/etc/fail2ban/jail.local using the vim.Execute the vim.
vim /usr/local/etc/fail2ban/jail.local2. Insert the following configuration to set up the default banaction and bannaction_allports via pf (Packet Filter). With this, detected malicious IPs will be blocked by pf.
In addition to that, you may customize the findtime and maxretry options. In this example, you will set global findtime to 30 minutes with the maxretry 10 times. This means any IP address that has failed login 10 times in 30 minutes of duration will be blocked.
[DEFAULT]
banaction = pf[actiontype=<allports>]
banaction_allports = pf[actiontype=<allports>]

findtime = 30m
maxretry = 10
Save and exit the file when you’re done.
Note: The configuration within the jail.local file will override the default fail2ban configuration on the jail.conf file.
Adding Fail2ban Jail for Securing SSH
Now that you have configured fail2ban bannaction with pf, let’s take a look step-by-step to create fail2ban jail:
- A fail2ban jail must be located at the
/usr/local/etc/fail2ban/jail.d/directory with the format file.local. - Be sure to add the option
enabled = trueto enable custom jail. - Find the filter for your services within the
/usr/local/etc/fail2ban/filters.ddirectory. - Find the path of log files for your services.
- Adjust the
findtime,maxretry, and thebantime.
Let’s apply these steps to create fail2ban jail ssh-pf for securing OpenSSH on your FreeBSD system.
1. Run the following vim command to create a new jail configuration /usr/local/etc/fail2ban/jail.d/ssh-pf.local.
vim /usr/local/etc/fail2ban/jail.d/ssh-pf.local2. Insert the following configuration to create a new jail ssh-pf for preventing brute-force against SSH service.
[ssh-pf]

enabled = true

filter = sshd
logpath = /var/log/auth.log

findtime = 10m
maxretry = 3
bantime = 1h
In this example. you will create a fail2ban jail with the following details:
- ssh-pf: The fail2ban jail name.
- filter: The
ssh-pfjail will be utilizing filtersshdto detect malicious login. Check the/usr/local/etc/fail2ban.filters.ddirectory to see the list of available filters. - logpath: The ssh log file where fail2ban will check failed login attempts. On FreeBSD, the ssh log file is located in the
/var/log/auth.logfile. - findtime: This refers to the amount of time during which failed login attempts are counted. In this case, you will set up findtime to 10 minutes.
- maxretry: How many times max login attempt fail that resulted in being banned? In this case, you will set up maxretry to 3 times for ssh-pf jail.
- bantime: In this case, the detected IP address will be banned for 1 hour.
Managing Fail2ban Service
At this point, you’ve configured the fail2ban banaction and created a jail for securing SSH. Now, let’s start the fail2ban service and learn how to manage it using the following steps:
1. To start the fail2ban service, run the command below.
service fail2ban start2. Once fail2ban starts, run the following command to verify the service status.
service fail2ban statusIn the following screenshot, you can see that fail2ban is running on PID 1818.

3. Next, to stop fail2ban, use the command below.
service fail2ban stop4. Lastly, if you need to restart fail2ban, run the following command.
service fail2ban restartHow to Check if Fail2ban is Working with PF?
Now that fail2ban is running with pf as the default backend firewall. How do I know that fail2ban and pf are working? You can utilize the pfctl to ensure fail2ban and pf are working.
1. First, run the pfctl command below to check the anchor f2b/ssh-pf.
As said before, the anchor for fail2ban f2b will be nested based on the jail name, which becomes the ruleset name. So, for the ssh-pf jail, the anchor will be nested to f2b/ssh-pf.
pfctl -a "f2b/ssh-pf" -sr2. Next, you can also check blocked IP addresses by pf and fail2ban using the pfctl command below. You will see the list of banned IP addresses
pfctl -a "f2b/ssh-pf" -t f2b-ssh-pf -TsManaging Fail2ban with fail2ban-client
In the following section, you will learn how to manage fail2ban using the fail2ban-client utility. This includes:
- How to check if fail2ban is working?
- How to check the status of the fail2ban jail?
- How to check the list of banned IP addresses on fail2ban?
- How to unban IP addresses on fail2ban?
Let’s get into it.
1. To verify if fail2ban is running, run the fail2ban-client command below. If the fail2ban is running, you should get an output PONG.
# check if fail2banis running
fail2ban-client ping

# checking enabled jails on fail2ban
fail2ban-client status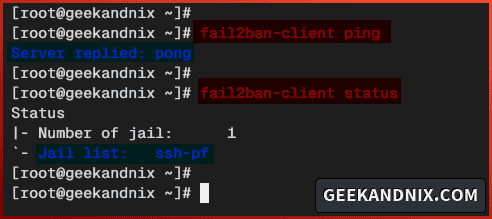
2. To check jail status on fail2ban, run the fail2ban-client status jailname command like the following. This will show you the list of banned IP addresses, how many failed authentication attempts, and the path of the log file.
fail2ban-client status ssh-pf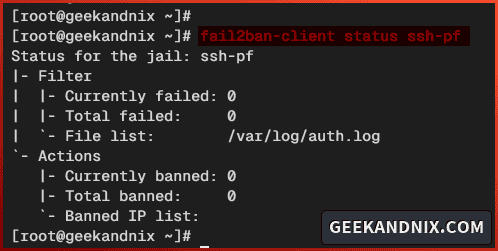
3. To check the list of banned IP addresses by fail2ban, run the fail2ban-client banned command below. This will show you the list of banned IP addresses from all enabled jails.
fail2ban-client bannedAs for FreeBSD, you can also check the list of banned IP addresses via the pfctl command below.
pfctl -a "f2b/ssh-pf" -t f2b-ssh-pf -Ts
4. To unban IP address from fail2ban, run the fail2ban-client unban IP command below.
fail2ban-client unban 192.168.5.15. After unbaning the IP address, run the command below to ensure the IP address is removed from fail2ban.
# check jail status - all jails
fail2ban-client status

# check blocked IP address on ssh-pf jail
pfctl -a "f2b/ssh-pf" -t f2b-ssh-pf -Ts
Conclusion
In summary, you’ve successfully installed fail2ban on FreeBSD. You’ve also configured fail2ban with pf (Packet Filter) on FreeBSD. Furthermore, you’ve also learned how to check fail2ban with the pfctl and fail2ban-client utilities.
Ready to dive deeper? Learn more about fail2ban to secure services such as vsftpd or web applications such as phpMyAdmin and WordPress.
